Is there anything more disappointing than anticipating a slice of decadent chocolate cake, only to find it’s dry? Fear no more! This Chocolate Peanut Butter Layer Cake recipe guarantees incredibly moist, tender layers every single time. The secret? A simple technique that unlocks a richer chocolate flavor and creates the perfect crumb. Get ready for an irresistible combination of chocolate and peanut butter in every single bite!
Why You’ll Love This Chocolate Peanut Butter Layer Cake
This cake isn’t just another dessert; it’s a guaranteed crowd-pleaser for several reasons:
- Unbelievably Moist Layers: Say goodbye to dry cake forever! The simple trick we use ensures a tender, moist crumb that practically melts in your mouth.
- Perfect Chocolate Peanut Butter Balance: The rich chocolate cake is perfectly complemented by the creamy, dreamy peanut butter frosting. It’s a match made in dessert heaven.
- Impressive Presentation: With its towering layers and beautiful decoration, this cake is sure to wow your family and friends. It’s perfect for birthdays, celebrations, or any special occasion.
- Surprisingly Easy to Make: While it looks impressive, this cake is actually quite simple to put together. The steps are straightforward, and the results are truly rewarding.
Gathering Your Ingredients for Chocolate Peanut Butter Layer Cake
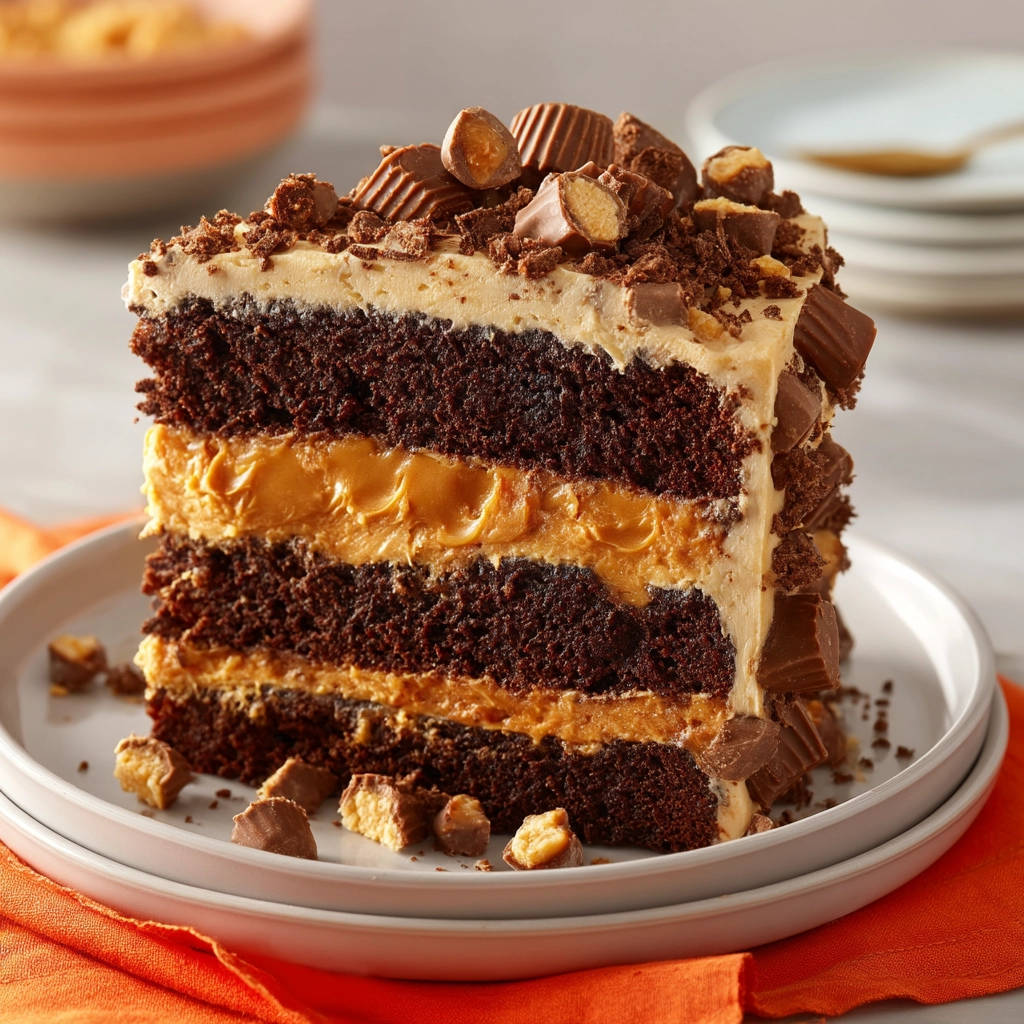
Before we dive into baking, let’s talk ingredients. The key to this amazing Chocolate Peanut Butter Layer Cake is using quality components and understanding how they work together. This cake is a symphony of flavors, where the deep chocolate notes dance perfectly with the salty-sweet peanut butter. The cake ingredients work together to create a tender crumb, while the frosting offers a luscious, creamy counterpoint. Chopped peanut butter cups add the perfect finishing touch.
For the Decadent Chocolate Cake Layers, you’ll need:
- All-Purpose Flour: Provides the structure for the cake. Make sure to measure accurately!
- Granulated Sugar: Adds sweetness and helps to create a tender crumb.
- Unsweetened Cocoa Powder: This is where the chocolate flavor comes from! Use a good quality cocoa powder for the best results.
- Baking Soda & Baking Powder: These are the leavening agents that help the cake rise. Make sure they are fresh for optimal results.
- Salt: Enhances the flavors of the other ingredients and balances the sweetness.
- Large Eggs: Add richness and moisture to the cake.
- Buttermilk: Contributes to the cake’s tenderness and adds a subtle tang. If you don’t have buttermilk, you can make a substitute by adding 1 tablespoon of lemon juice or vinegar to a cup of milk and letting it sit for 5 minutes.
- Vegetable Oil: Keeps the cake moist and tender.
- Vanilla Extract: Enhances the flavors of the other ingredients. Use pure vanilla extract for the best taste.
- Hot Water: This is the secret ingredient! The hot water blooms the cocoa powder, intensifying the chocolate flavor and creating an incredibly moist crumb.
For the Creamy Peanut Butter Frosting, you’ll need:
- Unsalted Butter: Softened to room temperature. This is crucial for a smooth and creamy frosting.
- Creamy Peanut Butter: Use your favorite brand of creamy peanut butter. Avoid natural peanut butters that separate, as they can make the frosting oily.
- Powdered Sugar: Also known as confectioners’ sugar. This is what gives the frosting its sweetness and structure.
- Milk: Adds moisture to the frosting and helps to create a smooth consistency.
- Vanilla Extract: Enhances the flavor of the peanut butter frosting.
For the Finishing Touch:
- Chopped Peanut Butter Cups: For decorating the cake. These add a delicious peanut butter flavor and a festive look.
Crafting Your Chocolate Peanut Butter Layer Cake: Step-by-Step
Ready to bake the moistest chocolate peanut butter layer cake you’ve ever tasted? Don’t be intimidated; the process is easier than you think. The most important thing is to follow the steps carefully and not overmix the batter. The hot water trick is key, so don’t skip it! Let’s get started!
- Preheat and Prep: Begin by preheating your oven to 350°F (175°C). While the oven warms up, thoroughly grease and flour three 8-inch round cake pans. This will prevent the cakes from sticking and ensure they release easily after baking. A light dusting of cocoa powder instead of flour will help keep the cake’s dark color consistent.
- Combine Dry Ingredients: In a large bowl, whisk together the all-purpose flour, granulated sugar, unsweetened cocoa powder, baking soda, baking powder, and salt. Whisking ensures that all the dry ingredients are evenly distributed, which is essential for a consistent cake texture.
- Mix Wet Ingredients: In a separate medium bowl, whisk together the large eggs, buttermilk, vegetable oil, and vanilla extract. Ensure the eggs are well beaten to incorporate air, contributing to a lighter cake.
- Combine Wet and Dry: Add the wet ingredients to the dry ingredients and mix on medium speed until just combined. Be careful not to overmix at this stage. Overmixing develops the gluten in the flour, resulting in a tough cake.
- The Secret Step – Add Hot Water: This is the magic! While mixing on low speed, carefully pour in the hot water. Continue mixing until the batter is smooth and completely combined, scraping down the sides of the bowl as needed. The hot water blooms the cocoa powder, intensifying its flavor and creating an incredibly moist crumb. Be careful not to overmix; just combine. This step is crucial for achieving that signature moist texture.
- Divide and Conquer: Divide the batter evenly among the prepared cake pans. Using a kitchen scale ensures that each layer is the same thickness, resulting in a more even and visually appealing cake.
- Bake to Perfection: Bake for 30-35 minutes, or until a wooden skewer inserted into the center comes out clean. Start checking for doneness around the 30-minute mark. Overbaking will result in a dry cake, so it’s important to remove the cakes from the oven as soon as they are done.
- Cooling is Key: Let the cakes cool in the pans for 10 minutes before inverting them onto a wire rack to cool completely. This prevents the cakes from sticking and allows them to cool evenly.
- Frosting Time: While the cakes are cooling, prepare the peanut butter frosting. In a large bowl, beat the softened butter and peanut butter together until smooth and creamy. Using softened butter is essential for a smooth, lump-free frosting.
- Perfect the Frosting: Gradually add the powdered sugar alternately with the milk, beginning and ending with powdered sugar, mixing on low speed until combined. This prevents the powdered sugar from creating a cloud of dust. Increase speed to medium and beat until light and fluffy. Stir in the vanilla extract. Add a little more milk if needed for desired consistency.
- Assemble the Masterpiece: Once the cake layers are completely cool, place one layer on a serving plate or cake stand. Spread a generous amount of peanut butter frosting over the top.
- Layer and Repeat: Carefully place the second cake layer on top and repeat with more frosting. Add the third layer and spread the remaining frosting over the top and sides of the cake.
- Decorate and Enjoy: Decorate the top of the cake with chopped peanut butter cups. Slice and serve!
Tips for Perfect Chocolate Peanut Butter Layer Cake Every Time
Want to ensure your Chocolate Peanut Butter Layer Cake turns out flawlessly? Here are some pro tips to keep in mind:
- Measure Accurately: Baking is a science, so accurate measurements are crucial. Use measuring cups and spoons specifically designed for baking, and level off dry ingredients with a knife.
- Don’t Overmix: Overmixing the batter develops the gluten in the flour, resulting in a tough cake. Mix until just combined.
- Room Temperature Ingredients: Using room temperature eggs and butter helps the ingredients to emulsify properly, resulting in a smoother batter and a more tender cake.
- Cool Completely: Make sure the cake layers are completely cool before frosting. Otherwise, the frosting will melt and slide off.
- Chill for Easier Frosting: For easier frosting, you can chill the cake layers in the refrigerator for about 30 minutes before frosting. This will make them firmer and easier to handle.
- Even Layers: If you want perfectly even cake layers, use cake strips wrapped around the outside of the pans. These help to insulate the edges of the cake, preventing them from browning too quickly.
Storing Your Cake
Store leftover cake in an airtight container in the refrigerator for up to 3 days. The cake may dry out slightly, so bring it to room temperature before serving for the best flavor and texture.
Your Chocolate Peanut Butter Layer Cake Questions Answered (FAQ)
Can I make this cake ahead of time?
Yes, you can bake the cake layers ahead of time and store them in the refrigerator for up to 2 days. Wrap them tightly in plastic wrap to prevent them from drying out. You can also make the frosting ahead of time and store it in the refrigerator for up to 3 days. Bring it to room temperature and re-whip it before using. Alternatively, see if this easy chocolate sheet cake recipe will suit you better.
Can I freeze this cake?
Yes, you can freeze the cake layers for up to 2 months. Wrap them tightly in plastic wrap and then in foil. Thaw them in the refrigerator overnight before frosting. You can also freeze the frosted cake, but the frosting may change texture slightly. Place the frosted cake in the freezer for about an hour to harden the frosting, then wrap it tightly in plastic wrap and then in foil.
Can I use a different type of frosting?
Absolutely! While the peanut butter frosting is a classic pairing with chocolate cake, you can certainly experiment with other frostings. A chocolate buttercream, vanilla buttercream, or even a cream cheese frosting would all be delicious options. Or maybe something like the frosting on this chocolate topped cream cake might inspire you.
Can I make this cake gluten-free?
Yes, with a few simple substitutions, you can easily make this cake gluten-free. Substitute the all-purpose flour with a gluten-free all-purpose flour blend. Make sure to choose a blend that contains xanthan gum, as this will help to bind the ingredients together and prevent the cake from being crumbly.
Enjoy Your Homemade Chocolate Peanut Butter Layer Cake!
Congratulations, you’ve just created a truly unforgettable dessert! This Chocolate Peanut Butter Layer Cake is the perfect combination of rich chocolate, creamy peanut butter, and guaranteed moist layers. Whether you’re celebrating a special occasion or simply craving a decadent treat, this cake is sure to satisfy. Don’t forget to leave a comment and let me know how it turned out! Share your photos on social media and tag us – we love to see your creations!
Chocolate Peanut Butter Layer Cake (Guaranteed Moist Layers!)

Ingredients
- For the Cake:
- 2 cups all purpose flour
- 2 cups granulated sugar
- 3/4 cup unsweetened cocoa powder
- 1 1/2 teaspoons baking soda
- 1 teaspoon baking powder
- 1/2 teaspoon salt
- 2 large eggs
- 1 cup buttermilk
- 1 cup vegetable oil
- 2 teaspoons vanilla extract
- 1 cup hot water
- For the Peanut Butter Frosting:
- 1 cup unsalted butter softened
- 1 cup creamy peanut butter
- 4 cups powdered sugar
- 1/2 cup milk
- 1 teaspoon vanilla extract
- For Decorating:
- Chopped peanut butter cups
Directions
- Preheat your oven to 350°F (175°C). Grease and flour three 8 inch round cake pans.
- In a large bowl, whisk together the flour, sugar, cocoa powder, baking soda, baking powder, and salt.
- In a separate medium bowl, whisk together the eggs, buttermilk, vegetable oil, and vanilla extract.
- Add the wet ingredients to the dry ingredients and mix on medium speed until just combined.
- **Here’s the secret to the moist layers:** Carefully pour in the hot water while mixing on low speed. Continue mixing until the batter is smooth and completely combined, scraping down the sides of the bowl as needed. Be careful not to overmix; just combine. The hot water blooms the cocoa powder for richer flavor and creates an incredibly moist crumb.
- Divide the batter evenly among the prepared cake pans.
- Bake for 30-35 minutes, or until a wooden skewer inserted into the center comes out clean.
- Let the cakes cool in the pans for 10 minutes before inverting them onto a wire rack to cool completely.
- While the cakes cool, make the frosting: In a large bowl, beat the softened butter and peanut butter together until smooth and creamy.
- Gradually add the powdered sugar alternately with the milk, beginning and ending with powdered sugar, mixing on low speed until combined. Increase speed to medium and beat until light and fluffy. Stir in the vanilla extract. Add a little more milk if needed for desired consistency.
- Once the cake layers are completely cool, place one layer on a serving plate or cake stand. Spread a generous amount of peanut butter frosting over the top.
- Carefully place the second cake layer on top and repeat with more frosting. Add the third layer and spread the remaining frosting over the top and sides of the cake.
- Decorate the top of the cake with chopped peanut butter cups. Slice and serve!