
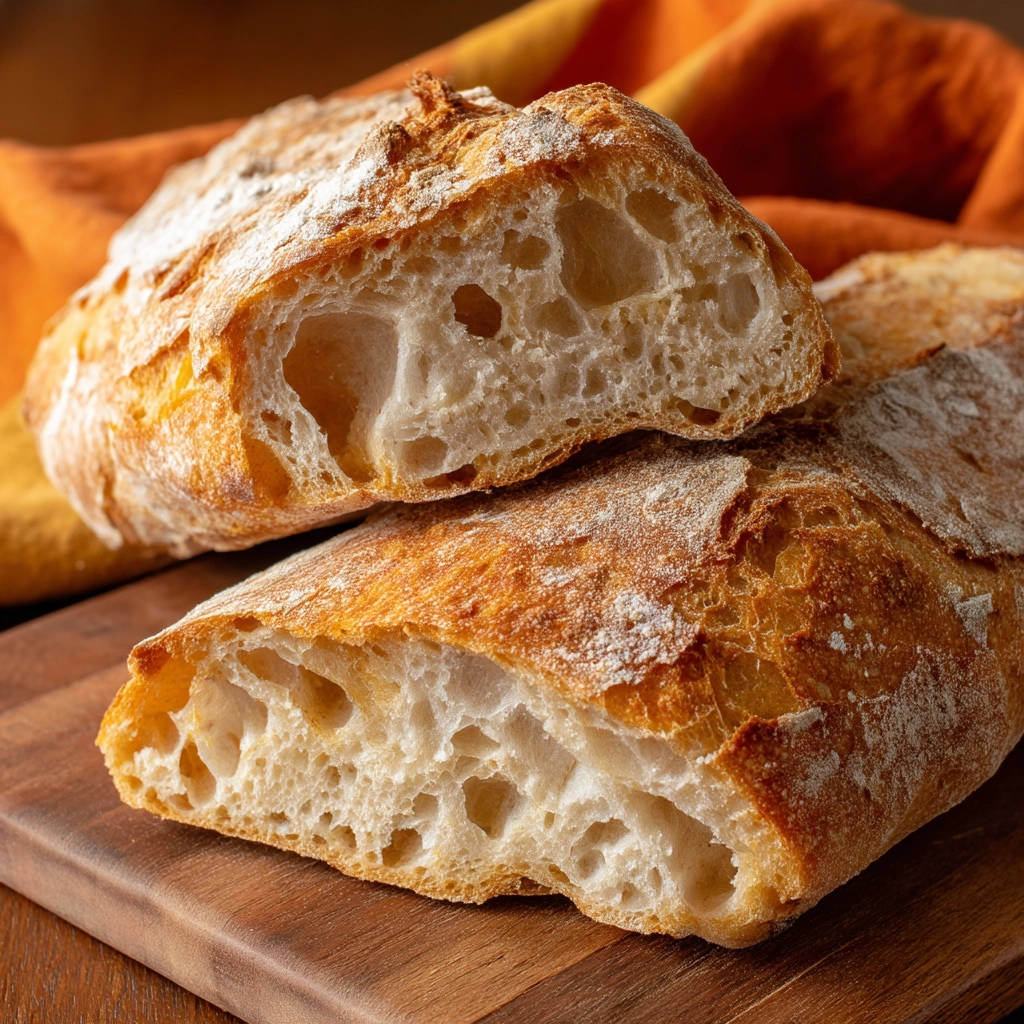
Have you ever bitten into a slice of artisan bread, the crust crackling perfectly, revealing a light, airy interior with beautiful, irregular holes? That’s the open crumb we all crave! For years, my homemade loaves fell short – dense, chewy, and nothing like the bakery beauties. But fear not! After much experimenting, I’ve cracked the code to achieving that elusive open crumb in a crusty artisan loaf, and I’m thrilled to share the secrets with you.
Why You’ll Love This Crusty Artisan Loaf
This isn’t just another bread recipe; it’s a journey to bread-baking bliss. Here’s why you’ll absolutely adore this crusty artisan loaf:
- That Incredible Crust: The crust is thick, deeply golden brown, and shatteringly crisp. Every bite is a symphony of textures.
- The Open Crumb: Forget dense, heavy bread. This loaf boasts a beautifully open and airy crumb, perfect for soaking up olive oil or slathering with your favorite toppings.
- Simple Ingredients: You only need four basic ingredients – flour, water, salt, and yeast. No fancy equipment or hard-to-find items required.
- Impress Your Friends & Family: Imagine the look on their faces when you present a homemade loaf that rivals the finest bakeries.
- It’s Easier Than You Think: With a little patience and these clear instructions, you’ll be baking like a pro in no time.
Gathering Your Ingredients for Crusty Artisan Loaf
Before we embark on our bread-baking adventure, let’s talk about the ingredients. The beauty of this crusty artisan loaf lies in its simplicity, but each ingredient plays a crucial role in the final result. We’re aiming for a classic flavor profile – slightly tangy, with a beautiful wheaty aroma. The key is to use high-quality ingredients and understand their function within the dough.
- 400 grams Bread Flour: This is the foundation of our loaf. Bread flour has a higher protein content than all-purpose flour, which is essential for developing the gluten structure that gives the bread its chewiness and that amazing open crumb. Look for bread flour with a protein content of 12-14%.
- 320 grams Warm Water (around 85-95°F): Water activates the yeast and hydrates the flour, initiating the fermentation process. The temperature is important; too cold, and the yeast won’t activate properly; too hot, and you risk killing the yeast. A kitchen thermometer is your friend here!
- 8 grams Fine Sea Salt: Salt not only enhances the flavor of the bread but also controls the yeast activity and strengthens the gluten structure. Don’t skip it! I prefer fine sea salt for even distribution.
- 0.5 teaspoon Instant Dry Yeast: This is what makes our bread rise! Instant dry yeast is convenient and easy to use. Make sure it’s fresh; old yeast may not be as effective. You can test the yeast by mixing it with a little warm water and sugar; if it foams up after a few minutes, it’s good to go.
Crafting Your Crusty Artisan Loaf: Step-by-Step
Ready to transform these humble ingredients into a masterpiece? Don’t be intimidated! Bread baking is a process, and each step contributes to the final outcome. The most important thing is to be patient and trust the process. This recipe focuses on a slow fermentation, which develops incredible flavor and that signature open crumb. Now, let’s get baking!
- Combine the Ingredients: In a large bowl, whisk together the bread flour, fine sea salt, and instant dry yeast. Then, add the warm water. Use a spoon or spatula to mix until just combined, ensuring no dry flour remains at the bottom of the bowl. The dough will be very wet and shaggy – don’t worry, that’s exactly what we want! Resist the urge to knead vigorously at this stage; we’re just bringing everything together.
- The Initial Rest (Autolyse): Cover the bowl with a lid or plastic wrap and let it rest at room temperature for 30 minutes. This process, called autolyse, allows the flour to fully hydrate and the gluten to start developing naturally, leading to a more extensible and elastic dough.
- Stretch and Folds (Building Strength): Over the next 2 hours, perform 3 or 4 “stretch and folds” every 30 minutes. This technique gently builds strength and structure in the dough without the need for traditional kneading. To do this, wet your hands to prevent sticking. Grab one side of the dough, stretch it upwards, and fold it over the center. Rotate the bowl 90 degrees and repeat with the other three sides. Think of it as giving your dough a gentle workout.
- The Long, Cold Fermentation: After the stretch and folds, cover the bowl again and refrigerate the dough for at least 12 hours, or up to 48 hours. This slow, cold fermentation is the key to developing both flavor and that open crumb structure. The extended time allows the yeast to work its magic, creating complex flavors and strengthening the gluten. Don’t skip this step! It’s what separates great bread from good bread.
- Shaping the Loaf: About an hour before you plan to bake, gently turn the cold dough out onto a lightly floured surface. Be gentle to avoid degassing the dough too much. Shape it into a loaf shape by gently folding it over on itself a few times, being careful not to press out those precious gas bubbles. Think of it as tucking the dough into a cozy blanket.
- Proofing Time: Place the shaped loaf seam-side up in a well-floured proofing basket (banneton) or seam-side down onto parchment paper or a cornmeal-dusted baking peel. Let it rest for 20-30 minutes while your oven preheats. This final proof allows the dough to relax and rise slightly before baking.
- Preheating with Steam Power: Preheat your oven to 450°F (230°C) with a baking stone or steel inside if you have one. The stone or steel will help to create a crispier crust. Here’s the secret to that amazing crust: steam! Place a metal tray on the bottom rack of your oven during preheating. Just before putting the bread in, carefully pour about a cup of hot water into the hot tray. Close the oven door quickly to trap the steam. Alternatively, you can carefully toss a handful of ice cubes onto the bottom of the oven. The steam creates a humid environment that allows the crust to expand fully before setting.
- Scoring the Loaf: Use a sharp knife or razor blade (lame) to score the top of the loaf. Scoring allows the bread to expand evenly in the oven and prevents it from bursting in unpredictable places. A single slash down the center or a more elaborate pattern will work.
- Baking with Steam: Slide the loaf (on parchment or from the peel) onto the hot baking stone/steel in the steamy oven. Bake for 20 minutes with steam.
- Finishing the Bake: Carefully remove the steam tray (or open the door briefly to let the steam escape if using ice) and reduce the oven temperature to 425°F (220°C). Bake for another 20-25 minutes, or until the crust is deeply golden brown and the internal temperature reaches 200-210°F (93-99°C). Use a thermometer to ensure it’s fully baked.
- Cooling Completely: Let the bread cool completely on a wire rack before slicing. This is crucial! Cutting into the bread while it’s still warm will result in a gummy texture. Patience is key here.
Tips for Perfect Crusty Artisan Loaf Every Time
Want to ensure bread-baking success? Here are a few extra tips and tricks to help you achieve the perfect crusty artisan loaf every time:
- Use a Kitchen Scale: Baking is a science, and accuracy matters. Using a kitchen scale to measure your ingredients ensures consistent results.
- Don’t Over-Knead: This recipe relies on stretch and folds, not traditional kneading. Over-kneading can result in a tough loaf.
- Be Gentle When Shaping: Handle the dough with care when shaping it to avoid degassing it too much.
- Steam is Key: Don’t skip the steam! It’s essential for a crispy crust. If you don’t have a baking stone or steel, you can bake the bread in a Dutch oven.
- Cool Completely: Resist the urge to slice into the bread while it’s still warm. Let it cool completely on a wire rack to allow the crumb to set properly.
- Experiment with Flours: Try using different types of bread flour, such as whole wheat or rye, for a different flavor profile.
What to Serve With Crusty Artisan Loaf
This crusty artisan loaf is incredibly versatile and pairs well with a variety of dishes. It’s perfect for:
For a hearty and comforting meal, serve this crusty bread with our slow cooker cheesy potatoes. The creamy potatoes and the crusty bread make for a perfect combination.
Your Crusty Artisan Loaf Questions Answered (FAQ)
Why is my bread dense and not airy?
Several factors can contribute to a dense loaf. It could be due to using all-purpose flour instead of bread flour, not fermenting the dough long enough, over-kneading, or not creating enough steam in the oven. Make sure to follow the recipe carefully and pay attention to each step.
Can I use all-purpose flour instead of bread flour?
While you can use all-purpose flour, the results will not be the same. Bread flour has a higher protein content, which is essential for developing the gluten structure that gives the bread its chewiness and open crumb. If you use all-purpose flour, your loaf will likely be denser and less airy. You can try adding a tablespoon of vital wheat gluten per cup of all-purpose flour to help improve the texture.
How do I know when the bread is done?
The best way to tell if the bread is done is to use a thermometer. The internal temperature should reach 200-210°F (93-99°C). You can also tap on the bottom of the loaf; if it sounds hollow, it’s likely done. The crust should also be deeply golden brown.
Can I freeze this crusty artisan loaf?
Yes! Let the bread cool completely, then wrap it tightly in plastic wrap and place it in a freezer bag. It can be stored in the freezer for up to 2 months. To thaw, let it sit at room temperature for a few hours or overnight. You can also reheat it in the oven to crisp up the crust.
If you have any leftover bread and are looking for a creative way to use it, consider making a savory bread bake. It’s a great way to minimize food waste and create a delicious dish!
Enjoy Your Homemade Crusty Artisan Loaf!
Congratulations! You’ve just baked your own crusty artisan loaf with that coveted open crumb. This recipe is more than just a set of instructions; it’s an invitation to slow down, enjoy the process, and create something truly special. Now, slice it up, share it with loved ones, and savor the satisfaction of homemade goodness. Let me know how your bread turns out in the comments below! Don’t forget to rate the recipe if you loved it!