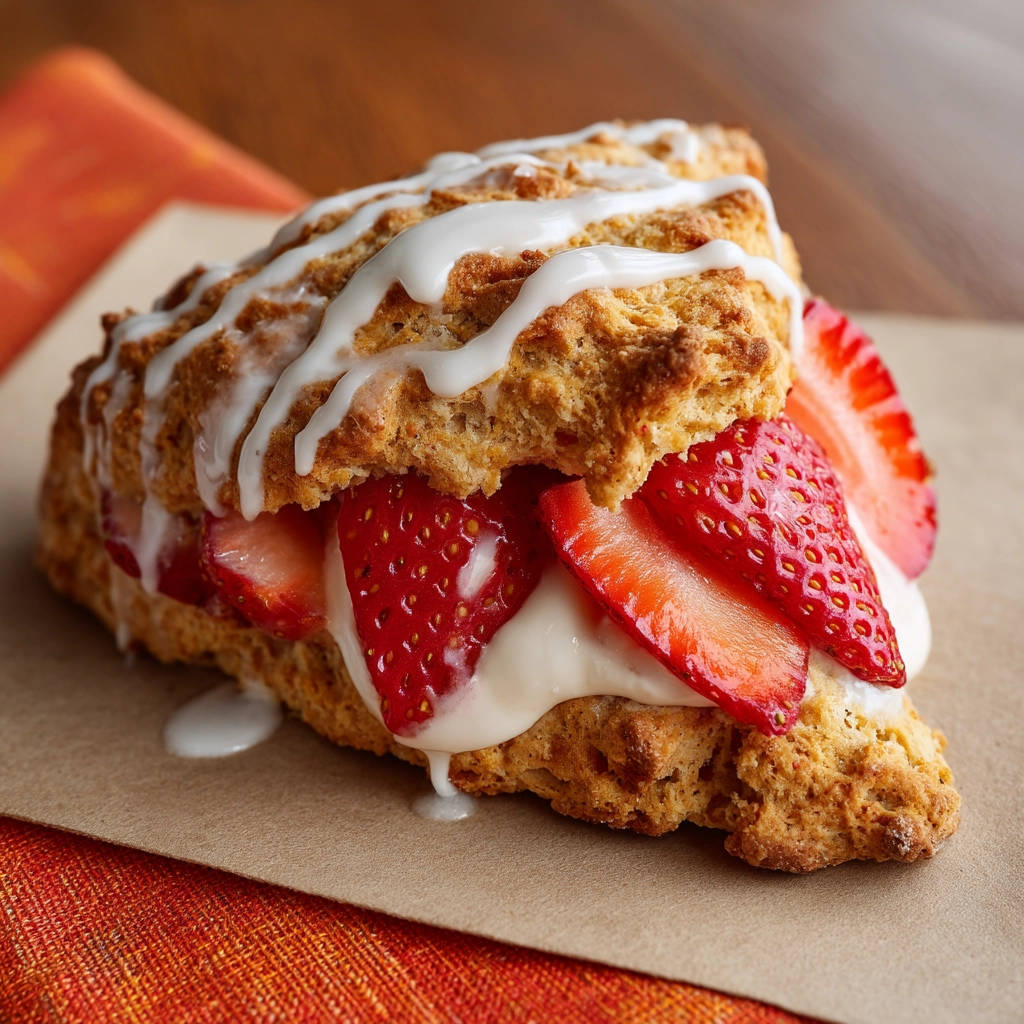
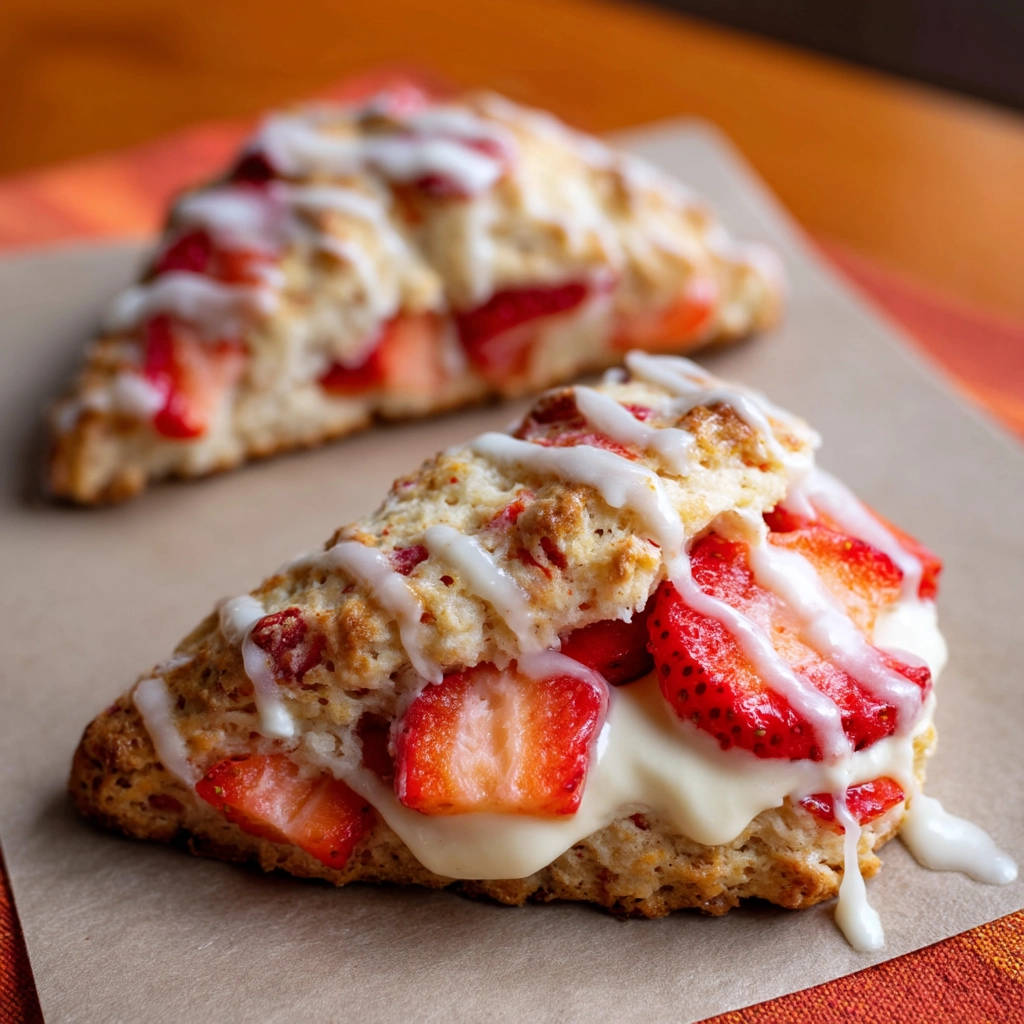
Is there anything more delightful than a warm, fluffy scone, bursting with juicy strawberries and topped with sweet cream and a delicate glaze? These Strawberry Cream Scones are not your average, dry, crumbly scones. This recipe guarantees a light, tender texture that will have you reaching for seconds (and thirds!).
Why You’ll Love These Strawberry Cream Scones
These scones are a delightful treat, perfect for breakfast, brunch, or a special afternoon tea. Here’s why you’ll fall in love with them:
- Incredibly Fluffy: Forget dense, hockey-puck scones. The technique in this recipe ensures a beautifully light and airy texture.
- Bursting with Flavor: The combination of fresh strawberries, creamy filling, and sweet glaze is simply irresistible.
- Surprisingly Easy: Despite their impressive taste and texture, these scones are straightforward to make at home.
- Perfect for Any Occasion: Whether you’re hosting a brunch or simply want a special treat, these scones are always a hit.
Gathering Your Ingredients for Strawberry Cream Scones
Let’s talk ingredients! The success of these Strawberry Cream Scones lies in using quality components and paying attention to a few key details. We’re aiming for a delicate balance of flavors and textures. The base of the scone requires some staple ingredients, the cream filling adds richness and moisture, and the glaze provides the perfect touch of sweetness.
Here’s what you’ll need to create these irresistible treats:
- All-Purpose Flour: 2 cups. This forms the structure of the scone. We use all-purpose flour for its reliable results, but you can experiment with other flours (see tips below!).
- Granulated Sugar: 1/3 cup. Sweetens the scones and adds a touch of crispness to the edges.
- Baking Powder: 2 teaspoons. This is your primary leavening agent, helping the scones rise beautifully. Make sure it’s fresh!
- Baking Soda: 1/2 teaspoon. Works in conjunction with the buttermilk to create a tender crumb and a slightly tangy flavor.
- Salt: 1/4 teaspoon. Enhances the sweetness and balances the flavors.
- Unsalted Butter: 1/2 cup (1 stick), very cold and cut into small cubes. This is crucial for creating a flaky, tender scone. The cold butter creates pockets of steam as it melts in the oven, resulting in that light, airy texture.
- Large Egg: 1. Adds richness and helps bind the dough.
- Buttermilk: 1/2 cup, very cold. Buttermilk’s acidity helps tenderize the gluten in the flour, resulting in a more tender scone. If you don’t have buttermilk, you can make a substitute by adding 1/2 tablespoon of lemon juice or vinegar to 1/2 cup of regular milk and letting it sit for 5 minutes.
- Vanilla Extract: 1 teaspoon. Enhances the overall flavor.
- Fresh Strawberries: 1 cup sliced. Adds a burst of fresh, fruity flavor. Choose ripe, but firm, strawberries for the best results.
For the Cream Filling:
- Cream Cheese: 4 ounces, softened. Provides a tangy and creamy base for the filling. Make sure it’s softened for a smooth texture.
- Powdered Sugar: 2 tablespoons. Sweetens the filling and helps create a smooth consistency.
- Milk: 1 tablespoon. Adds moisture and helps thin the filling to a spreadable consistency.
- Vanilla Extract: 1/2 teaspoon. Enhances the flavor of the filling.
For the Glaze:
- Powdered Sugar: 1/2 cup. Forms the base of the glaze.
- Milk or Lemon Juice: 1-2 tablespoons. Adds moisture and creates a drizzlable consistency. Lemon juice will add a tangy kick to the glaze.
Crafting Your Strawberry Cream Scones: Step-by-Step
Ready to bake some seriously delicious scones? Don’t be intimidated! This recipe is straightforward, and I’ll guide you through each step. The most important thing to remember is to keep your ingredients cold and to avoid overmixing the dough. This ensures a light and tender scone. Let’s get started!
- Preheat and Prep: Get your oven roaring at 400°F (200°C). This high heat is essential for creating a good rise. Line a baking sheet with parchment paper. This prevents sticking and makes cleanup a breeze.
- Whisk the Dry Ingredients: In a large bowl, whisk together the 2 cups of all-purpose flour, 1/3 cup of granulated sugar, 2 teaspoons of baking powder, 1/2 teaspoon of baking soda, and 1/4 teaspoon of salt. Whisking ensures that the leavening agents are evenly distributed, leading to a more consistent rise.
- Cut in the Cold Butter: This is the crucial step for fluffiness! Add the 1/2 cup (1 stick) of very cold, cubed unsalted butter to the dry ingredients. Use a pastry blender, forks, or your fingertips to quickly cut the butter into the flour mixture. The goal is to create coarse crumbs with some pea-sized pieces of butter remaining. Work quickly to prevent the butter from melting. Chilled butter is key!
- Combine the Wet Ingredients: In a separate small bowl, whisk together the 1 cold large egg, 1/2 cup of cold buttermilk, and 1 teaspoon of vanilla extract. Make sure your buttermilk is thoroughly mixed with the egg and vanilla.
- Gently Combine Wet and Dry: Pour the wet ingredients into the dry ingredients. Use a fork or spatula to gently mix until just combined. Do not overmix! The dough should be shaggy and a little sticky. Overmixing develops gluten, which will result in tough scones.
- Shape the Dough: Lightly flour a clean surface. Turn the dough out and gently bring it together a few times until it roughly forms a ball. Avoid kneading! Gently pat the dough into a disc about 3/4 inch thick.
- Cut into Wedges: Use a sharp knife or bench scraper to cut the disc into 8 wedges. Sharp utensils will help achieve cleaner cuts, contributing to a better rise in the oven. Place the wedges on the prepared baking sheet, separating them slightly to allow for even baking.
- Bake to Golden Perfection: Bake for 15-18 minutes, or until the scones are golden brown on top and a wooden skewer inserted into the center comes out clean. Keep a close eye on them, as baking times can vary depending on your oven.
- Cool and Prepare the Filling: Let the scones cool slightly on the baking sheet before transferring them to a wire rack to cool completely. While the scones cool, make the cream filling: In a small bowl, beat together the 4 ounces of softened cream cheese, 2 tablespoons of powdered sugar, 1 tablespoon of milk, and 1/2 teaspoon of vanilla extract until smooth and creamy.
- Whisk the Glaze: Now, let’s make the glaze: In a small bowl, whisk together the 1/2 cup of powdered sugar and 1-2 tablespoons of milk or lemon juice until smooth and drizzlable. Adjust the amount of liquid to achieve your desired consistency.
- Assemble and Enjoy!: Once cool, split each scone in half horizontally. Spread a generous amount of cream filling on the bottom half, layer with sliced strawberries, then top with the other scone half. Drizzle the glaze over the assembled scones. Serve immediately and enjoy the heavenly goodness!
Tips for Perfect Strawberry Cream Scones Every Time
Want to ensure scone-baking success? Here are a few extra tips to elevate your Strawberry Cream Scones to the next level:
- Keep Everything Cold: This cannot be stressed enough! Cold ingredients are key to creating a tender, flaky scone. Consider chilling your flour and bowl before starting.
- Don’t Overmix: Overmixing develops gluten, resulting in tough scones. Mix until just combined, leaving the dough shaggy.
- Handle with Care: Be gentle when shaping the dough. Avoid kneading, which will also develop gluten.
- Fresh is Best: Use the freshest strawberries you can find for the most flavorful scones.
- Customize Your Glaze: Experiment with different flavors for your glaze. A little lemon zest or a dash of almond extract can add a unique twist.
- Storage: Scones are best enjoyed fresh, but leftovers can be stored in an airtight container at room temperature for up to 2 days. For longer storage, freeze the scones without the cream filling and glaze.
What to Serve With Strawberry Cream Scones
These Strawberry Cream Scones are a treat all on their own, but they also pair beautifully with other dishes. Consider serving them alongside a fresh fruit salad for a light and refreshing brunch. They would also be a fantastic addition to a dessert spread or afternoon tea. For something a bit more savory, you could pair them with a quiche or a simple egg dish.
Your Strawberry Cream Scones Questions Answered (FAQ)
Can I use frozen strawberries?
While fresh strawberries are preferred, you can use frozen strawberries in a pinch. Thaw them completely and pat them dry before adding them to the dough. Be aware that frozen strawberries may release more moisture, so your dough might be a bit wetter.
Can I make these scones ahead of time?
You can prepare the dough ahead of time and store it in the refrigerator for up to 24 hours. However, it’s best to bake the scones fresh for the best texture. You can also make the cream filling and glaze ahead of time and store them separately in the refrigerator.
Can I make these scones gluten-free?
Yes, you can adapt this recipe to be gluten-free. Substitute the all-purpose flour with a good-quality gluten-free all-purpose flour blend. Be sure to also check that your baking powder is gluten-free. The texture may be slightly different, but they will still be delicious. You can find more information about flour substitutions in our detailed guide on flour types.
My scones are flat. What did I do wrong?
Flat scones are usually caused by one of two things: warm ingredients or overmixing. Make sure your butter and buttermilk are very cold, and avoid overmixing the dough. It’s also important to use fresh baking powder.
Can I freeze these scones?
Yes! Freeze the unglazed, unfilled scones on a baking sheet until solid, then transfer to a freezer bag. Thaw completely before adding the cream filling and glaze.
Enjoy Your Homemade Strawberry Cream Scones!
There you have it – a guaranteed recipe for perfectly fluffy Strawberry Cream Scones. These scones are a delightful way to brighten any day, and I hope you enjoy making and sharing them as much as I do. Don’t forget to leave a comment below and let me know how your scones turned out! Share your creations on social media too – I’d love to see them!