
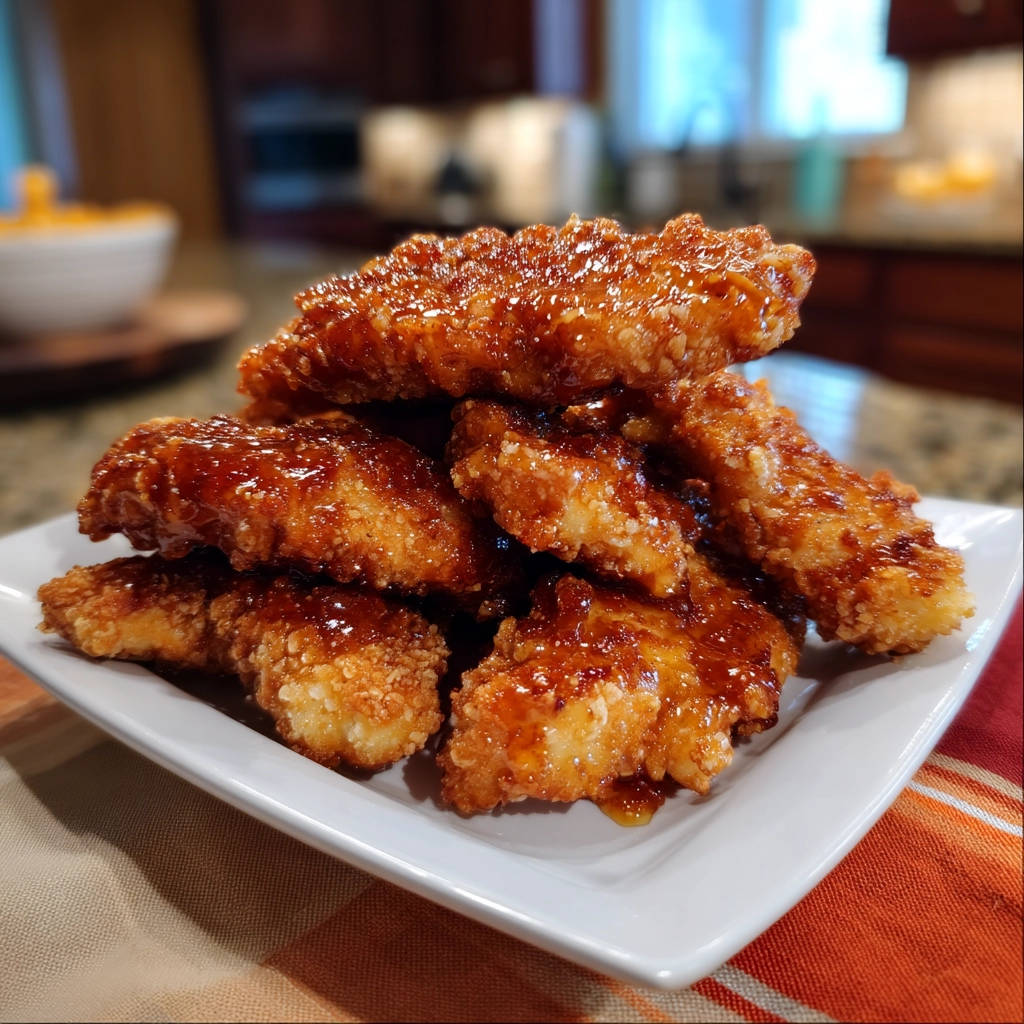
Okay, confession time. Is there anything more disappointing than sinking your teeth into what should be a gloriously crunchy chicken tender, only for it to yield with a sad, soggy sigh because it’s covered in sauce? We’ve all been there. That struggle is real! For the longest time, I avoided saucing my crispy fried chicken for this very reason. But I missed that delicious sweet and spicy coating! After countless experiments and maybe a few too many less-than-perfect batches, I finally unlocked the secret to making Spicy Glazed Chicken Tenders that boast a shatteringly crisp exterior, even when generously coated in a sticky, flavorful sauce. It’s a total game-changer for anyone who loves both crunch and glaze!
Why These Spicy Glazed Chicken Tenders Are a Must-Make
Forget compromising between flavor and texture. This recipe for spicy glazed chicken tenders delivers the best of both worlds. Here’s why you’ll find yourself coming back to this one again and again:
- Unbeatable Crispiness: The technique used ensures the breading stays delightfully crisp, even after being tossed in the glaze. No more soggy chicken!
- Flavor Explosion: The glaze hits all the right notes – spicy from the hot sauce, sweet from the honey and brown sugar, and savory with a hint of aromatic garlic and ginger.
- Crowd-Pleaser: Perfect for game day, a casual dinner, or even a fun appetizer. Kids and adults alike devour them.
- Relatively Quick: While there’s a bit of frying involved, the process is straightforward and doesn’t take hours.
- Customizable Spice: You can easily adjust the heat level of the glaze to suit your preference.
If you’re a fan of crispy chicken, you might also love our Crispy Golden Chicken Cutlets or even give our Crispy Chicken Bites a try for a different take!
Gathering Your Ingredients for Spicy Glazed Chicken Tenders
Creating these perfectly balanced spicy glazed chicken tenders requires a few pantry staples and fresh aromatics. Each ingredient plays a crucial role in building both the irresistible crispy coating and the vibrant, sticky glaze. Let’s break down what you’ll need to have on hand.
For the star of the show, you’ll need about a pound of boneless, skinless chicken tenders. You can buy pre-cut tenders or simply slice boneless, skinless chicken breasts into similarly sized strips for even cooking. Ensure they are relatively uniform in thickness.
The crispy coating is achieved through a classic three-part breading station, but with a special touch. You’ll start with all-purpose flour, which provides the initial layer for the egg to adhere to and helps create that first bit of crispness. Seasoning the flour is key for flavor right from the start – we’re using standard pantry heroes like salt, black pepper, garlic powder, and paprika. These seasonings infuse the chicken itself as well as the breading.
Next in the breading assembly line is the wet component: a mixture of large eggs whisked with either milk or water. The liquid helps thin out the eggs slightly, allowing for a more even coating that the breadcrumbs can really stick to. The final layer, and arguably the most important for this level of crisp, is panko breadcrumbs. Unlike standard breadcrumbs, panko are larger, flakier crumbs that fry up incredibly light and crispy, creating that sought-after airy crunch.
Of course, for frying, you’ll need vegetable oil. Choose an oil with a high smoke point, like vegetable, canola, or peanut oil, as you’ll be frying at a relatively high temperature.
Now, onto that glorious glaze! This is where the “spicy” and “glazed” parts come into play. The foundation of the heat comes from hot sauce. A classic bright and tangy hot sauce works wonderfully, or you could opt for something like sriracha for a slightly different profile. Remember, you can always adjust the amount based on your spice tolerance!
To balance the heat and provide that beautiful glaze consistency, you’ll need honey. Its natural sweetness and sticky texture are essential. Dark or light brown sugar adds another layer of sweetness and a touch of molasses flavor, which pairs perfectly with the other savory components.
Soy sauce brings in the necessary salty and umami notes, providing depth to the glaze. Fresh aromatics are crucial for lifting the flavor profile: freshly minced garlic and grated fresh ginger add pungent warmth and brightness that make this glaze truly special. Using fresh ginger here really makes a difference compared to dried!
Here’s a quick overview of everything you’ll need:
- 1 pound boneless, skinless chicken tenders
- 1 ½ cups all-purpose flour
- 1 teaspoon salt
- ½ teaspoon black pepper
- 1 teaspoon garlic powder
- ½ teaspoon paprika
- 2 large eggs
- ¼ cup milk or water
- 2 cups panko breadcrumbs
- Vegetable oil, for frying
For the Glaze:
- ½ cup hot sauce (like sriracha or similar)
- ¼ cup honey
- 2 tablespoons brown sugar
- 1 tablespoon soy sauce
- 1 clove garlic, minced
- 1 teaspoon grated fresh ginger
Crafting Your Spicy Glazed Chicken Tenders: Step-by-Step
Ready to turn these simple ingredients into crispy, glazed perfection? Follow these steps carefully, paying special attention to the key techniques that ensure ultimate crispiness!
- Prepare the Chicken: Your very first step, and a critical one for crispiness, is to remove as much surface moisture from the chicken as possible. Pat each chicken tender very dry using paper towels. Excess moisture creates steam in the oil, which works against a crispy coating. Take your time with this!
- Set Up Your Breading Station: Get organized before you start dipping. You’ll need three shallow dishes or pie plates. In the first dish, whisk together the all-purpose flour with the salt, black pepper, garlic powder, and paprika until well combined. This ensures every bite has flavor. In the second dish, whisk the eggs with the milk or water until smooth – this creates the binder for the breadcrumbs. In the third dish, pour the panko breadcrumbs in an even layer. Having this station set up makes the breading process smooth and efficient.
- Bread the Chicken: This is where it all comes together! Take each dried chicken tender and dredge it completely in the seasoned flour, gently shaking off any extra flour. The goal is a light, even coating. Next, dip the floured tender into the egg mixture, allowing any surplus egg to drip back into the dish. Finally, transfer the tender to the panko breadcrumbs. Press the breadcrumbs onto the chicken firmly but gently, ensuring it is fully coated on all sides. The panko should stick well thanks to the egg wash. Place the breaded tenders on a wire rack set over a baking sheet. Using a wire rack now allows air to circulate around the tenders, preventing the bottom from getting soggy while you bread the rest.
- Heat the Oil: Pour about 1 inch of vegetable oil into a large, deep skillet or heavy-bottomed pot. Use a thermometer to heat the oil over medium-high heat until it reaches approximately 350 degrees Fahrenheit. This temperature is crucial – too cool and the chicken will absorb excess oil and be greasy; too hot and the outside will burn before the inside is cooked.
- Fry the Tenders: Carefully add the breaded chicken tenders to the hot oil, working in batches. Do NOT overcrowd the pan; leave enough space between each tender so the oil temperature doesn’t drop too drastically and they fry rather than steam. Fry for about 4 to 6 minutes total, flipping them halfway through with tongs, until they are beautifully golden brown on all sides and cooked through to an internal temperature of 165°F (74°C).
- Drain on a Wire Rack: As each batch finishes frying, remove the tenders from the oil using tongs and immediately place them on a clean wire rack positioned over a baking sheet. This is perhaps THE most critical step for maintaining crispiness! Letting them drain on a wire rack allows air to circulate underneath, preventing steam buildup that leads to sogginess. Don’t skip this! Let all the tenders drain here while you prepare the glaze.
- Make the Glaze: While the chicken is draining and staying crispy, quickly whip up the spicy glaze. In a small saucepan, whisk together the hot sauce, honey, brown sugar, soy sauce, minced garlic, and grated fresh ginger. Place the saucepan over medium heat and bring the mixture to a gentle simmer, stirring continuously. Simmer for just 2 to 3 minutes, stirring until the sugar is fully dissolved and the glaze has thickened slightly. It will thicken a bit more as it cools.
- The Crispy Secret Implementation: Here it is! Once ALL of the chicken tenders are fried and resting on the wire rack, transfer them to a large mixing bowl. Pour the warm, finished glaze directly over the tenders in the bowl.
- Toss and Serve IMMEDIATELY: Gently toss the tenders in the glaze using tongs or a spatula, coating each piece evenly. The key is to do this just before serving. The brief exposure to the warm glaze is enough to coat them in delicious flavor without giving the sauce time to penetrate the crispy breading and make it soft. Serve these glorious spicy glazed chicken tenders right away to enjoy that perfect harmony of crunchy and coated!
Tips for Perfect Spicy Glazed Chicken Tenders Every Time
Mastering these spicy glazed chicken tenders is simple, but a few extra tips can elevate them from great to absolutely unforgettable. Here’s how to ensure success and maybe even play around with variations.
Oil Temperature is King: As mentioned in the steps, maintaining the oil temperature around 350°F (175°C) is non-negotiable for perfectly crispy, non-greasy chicken. Use a thermometer and adjust the heat as needed between batches. If the oil gets too cool, the breading absorbs oil and becomes heavy; if it’s too hot, the outside burns before the inside cooks.
Don’t Crowd the Pan: Frying in batches might seem like an extra step, but it’s essential. Overcrowding cools the oil dramatically and prevents proper browning and crisping. Give those tenders room to swim!
The Wire Rack is Your Best Friend: Whether after breading or after frying, always place the chicken on a wire rack. This allows for airflow and prevents the bottoms from getting soggy from sitting in their own steam or residual oil. It makes a huge difference in the final texture.
Timing the Glaze Toss: This is the “secret revealed” moment! Only toss the chicken in the glaze right before serving. The less time the sauce sits on the crispy coating, the longer it will retain its crunch. Seriously, wait until everyone is seated and ready!
Spice Level Adjustment: The recipe calls for ½ cup of hot sauce, which provides a good kick. If you prefer milder tenders, start with ¼ cup and add more to taste. For extra heat, use a spicier hot sauce or add a pinch of cayenne pepper to the glaze.
Glaze Thickness: The glaze should thicken slightly on the stove, but not become a paste. It should be pourable but cling to the chicken. If it gets too thick, you can whisk in a tiny splash of hot water or hot sauce off the heat to loosen it up.
Make it Baked? While frying offers the ultimate crispness for this recipe, you could adapt it for baking. Bread the tenders as directed, place them on a wire rack set over a baking sheet, spray them generously with cooking spray, and bake at a high temperature (around 400-425°F or 200-220°C) until cooked through and golden, flipping halfway. Then, toss immediately in the warm glaze before serving. Baking won’t be quite as crispy as frying, but it’s a healthier option.
Gluten-Free Option: For a gluten-free version, substitute the all-purpose flour with a gluten-free all-purpose blend and use gluten-free panko breadcrumbs. Ensure your soy sauce is also gluten-free.
Proper storage of any leftovers is important, although these are best enjoyed fresh. Store leftover tenders and any remaining glaze separately in airtight containers in the refrigerator. Reheat the chicken gently in an oven or air fryer to regain some crispness before tossing with warmed glaze.
What to Serve With Your Spicy Glazed Chicken Tenders
These spicy glazed chicken tenders are versatile and pair well with a variety of sides. Here are a few ideas to complete your meal:
- Rice: A simple steamed white or brown rice is perfect for soaking up any extra glaze. Our Restaurant Style Fried Rice would make a fantastic pairing!
- Vegetables: Roasted vegetables like broccoli, green beans, or even our Golden Roasted Potatoes or Perfectly Roasted Veggies are healthy and colorful additions.
- Salad: A fresh, crisp green salad with a light vinaigrette provides a nice contrast to the richness of the chicken and glaze.
- Coleslaw: Creamy coleslaw offers a cool, tangy counterpoint to the spicy heat.
- Potatoes: Crispy fries, mashed potatoes, or even sweet potato fries are always popular choices.
Your Spicy Glazed Chicken Tenders Questions Answered (FAQ)
Got questions about making the best spicy glazed chicken tenders? Here are some answers to common queries:
Can I use chicken breasts instead of tenders?
Absolutely! Boneless, skinless chicken breasts work just as well. Simply slice them into strips about ½ inch thick to create your own tenders. Ensure the strips are uniform in size for even cooking.
What’s the best hot sauce to use for the glaze?
The “best” hot sauce is subjective and depends on your preference! A cayenne-pepper-based sauce like Frank’s RedHot provides classic flavor. Sriracha gives a garlicky heat. Gochujang or a similar Asian-style hot sauce could offer a different dimension. Experiment with your favorites!
Why do I need to pat the chicken dry?
Patting the chicken dry removes surface moisture. Moisture turns to steam when it hits hot oil, which hinders the formation of a truly crispy crust. Dry chicken = crispier breading!
Can I prepare the breaded chicken ahead of time?
You can bread the chicken a couple of hours in advance and store it uncovered on a wire rack in the refrigerator. This actually helps the breading adhere better. However, for the absolute crispiest results, frying them immediately after breading is best.
How do I reheat leftover spicy glazed chicken tenders?
The best way to reheat them and regain some crispness is in a preheated oven at around 375°F (190°C) or in an air fryer until heated through, usually about 8-12 minutes. Avoid the microwave, which will make them rubbery and soggy. Reheat the glaze gently on the stovetop or in the microwave before tossing the reheated chicken.
My glaze seized up / is too thick. What happened?
This usually happens if it was simmered for too long or over too high heat. If it’s too thick, you can try adding a tiny splash of hot water or hot sauce and whisking vigorously off the heat to loosen it back up to a pourable consistency.
Enjoy Your Homemade Spicy Glazed Chicken Tenders!
There you have it! The not-so-secret anymore trick to achieving gloriously crispy, perfectly coated spicy glazed chicken tenders right in your own kitchen. No more soggy disappointment, just pure crunchy, sweet, and spicy satisfaction. These are guaranteed to become a favorite for weeknight dinners, weekend gatherings, or whenever that chicken tender craving strikes.
Give this recipe a try and let me know what you think! Did you find the crispy secret as much of a game-changer as I did? Leave a comment below and share your experience!
Spicy Glazed Chicken Tenders

Ingredients
- 1 pound boneless, skinless chicken tenders
- 1 and 1/2 cups all-purpose flour
- 1 teaspoon salt
- 1/2 teaspoon black pepper
- 1 teaspoon garlic powder
- 1/2 teaspoon paprika
- 2 large eggs
- 1/4 cup milk or water
- 2 cups panko breadcrumbs
- Vegetable oil for frying
- For the Glaze:
- 1/2 cup hot sauce (like sriracha or similar)
- 1/4 cup honey
- 2 tablespoons brown sugar
- 1 tablespoon soy sauce
- 1 clove garlic, minced
- 1 teaspoon grated fresh ginger
Directions
- Start by patting your chicken tenders very dry with paper towels. This step is crucial for a crispy coating.
- Set up your breading station. In a shallow dish, whisk together the flour, salt, pepper, garlic powder, and paprika. In a second shallow dish, whisk the eggs with milk or water. In a third shallow dish, place the panko breadcrumbs.
- Dredge each chicken tender first in the seasoned flour, shaking off any excess. Then dip it into the egg mixture, letting any extra drip back into the dish. Finally, coat the tender generously in the panko breadcrumbs, pressing lightly to make sure the crumbs stick well. Place the breaded tenders on a wire rack.
- Heat about 1 inch of vegetable oil in a large, deep skillet or pot over medium-high heat until it reaches around 350 degrees Fahrenheit.
- Carefully add a few chicken tenders to the hot oil, making sure not to overcrowd the pan. Fry for 4 to 6 minutes, flipping halfway through, until they are golden brown and cooked through.
- Using tongs, remove the fried tenders from the oil and place them on a clean wire rack set over a baking sheet. This is a key step; letting them drain on a wire rack helps air circulate and keeps them crispy as you finish frying the rest and make the sauce.
- While the chicken drains, make the glaze. In a small saucepan, whisk together the hot sauce, honey, brown sugar, soy sauce, minced garlic, and grated ginger. Bring the mixture to a simmer over medium heat, stirring until the sugar is dissolved and the sauce is slightly thickened, about 2 to 3 minutes.
- The Crispy Secret Revealed: Once all the chicken is fried and drained, transfer the tenders to a large bowl. Pour the warm glaze over the tenders and gently toss to coat evenly.
- Serve the glazed tenders immediately. Tossing them in the sauce right before you serve is the absolute best way to enjoy that perfect crispy coating with the delicious glaze!