There’s something magical about Halloween night, isn’t there? The crisp air, the costumes, and of course, the treats! And while candy is great, nothing beats a homemade baked good. But let’s be honest, biting into a dry, crumbly brownie when you were expecting a rich, dense, fudgy bite is one of life’s little disappointments, especially around spooky season.
I used to struggle with this myself for years. My homemade brownies were often cakey disasters instead of the luscious, fudgy squares I dreamed of. But after countless batches and a lot of experimentation, I finally uncovered the simple secret to achieving that perfectly dense and moist texture every single time. It’s a trick that’s surprisingly easy, and the results are absolutely worth the minor adjustment to your baking process.
These aren’t just any brownies; they are guaranteed fudgy Halloween brownies, dressed up in their festive best. Imagine sinking your teeth into a thick, chocolatey square, so dense it feels like pure fudge, topped with smooth frosting and playful, spooky decorations. They’re the ultimate Halloween party treat or just a fun way to get into the spirit at home.
Ready to ditch the dry brownies forever and master the art of making truly fudgy treats? Let’s get started!
Why You’ll Fall for These Fudgy Halloween Brownies
So, what makes these fudgy Halloween brownies the ones you absolutely need in your life this October (and honestly, probably year-round)?
- Guaranteed Fudgy Texture: This is the star of the show! We focus on a specific baking technique that locks in moisture for that irresistible, dense, melt-in-your-mouth experience.
- Deep Chocolate Flavor: Using quality cocoa powder is key to that rich, satisfying chocolatey taste that complements the fudgy texture.
- Simple Ingredients: You likely have most, if not all, of the basic ingredients in your pantry right now. No need for fancy chocolate melting or complicated steps for the base brownie.
- Perfectly Portable & Shareable: Brownies are ideal for parties, lunchboxes, or sharing with neighbors (if you can bear to part with them!).
- Festively Fun: The Halloween decorations are simple but transform these humble brownies into spooky delights that everyone will love.
Gathering Your Ingredients for Spooky Fudgy Brownies
Creating that perfect fudgy brownie base requires a specific balance of fats, sugars, and dry ingredients. For our spooky Halloween version, we’ll also add some simple decorations to bring them to life. Here’s what you’ll need on hand:

The foundation of our fudgy texture starts with plenty of fat and sugar. We use unsalted butter, which provides a clean, rich base without adding extra salt that might throw off the flavor balance. Combined with granulated sugar, which helps create that desirable crinkly top and contributes to the dense interior, we’re building a moist environment for our chocolate goodness.
Eggs play a crucial role here, binding everything together while adding richness and contributing to the fudgy texture. We’ll use two large eggs, adding them one at a time to ensure they are fully incorporated. A splash of vanilla extract is essential for enhancing the chocolate flavor and adding a touch of warmth.
For the chocolate element, unsweetened cocoa powder is our go-to. This provides intense chocolate flavor without the added sugar found in sweetened varieties, allowing us to control the sweetness and achieve a deep, dark color. Paired with just half a cup of all-purpose flour, salt to balance the sweetness, and a tiny touch of baking powder (just a quarter teaspoon!), we’re creating a structure that supports fudginess rather than puffing up into a cake.
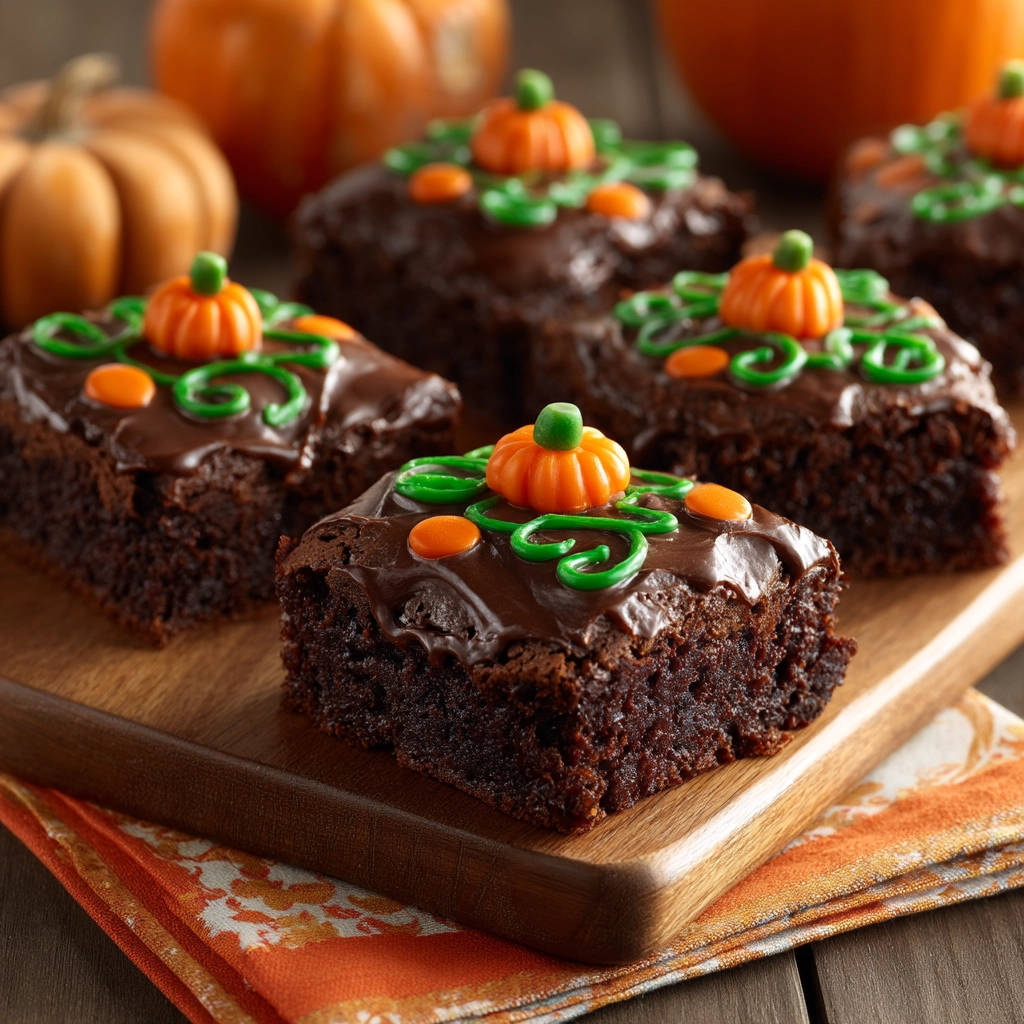
Finally, the fun part! You’ll need chocolate frosting or ganache for a smooth, rich topping. Don’t worry about making it from scratch if you’re short on time – store-bought works perfectly fine! To make them Halloween-ready, gather some green decorating icing for spooky swirls, small candy pumpkins, and orange candy dots for festive pops of color.
- 1/2 cup unsalted butter
- 1 cup granulated sugar
- 2 large eggs
- 1 teaspoon vanilla extract
- 1/2 cup unsweetened cocoa powder
- 1/2 cup all-purpose flour
- 1/4 teaspoon salt
- 1/4 teaspoon baking powder
- Chocolate frosting or ganache (your favorite kind!)
- Green decorating icing
- Small candy pumpkins
- Orange candy dots
Baking Your Way to Fudgy Halloween Brownies: Step-by-Step Guide
Ready to unlock the secret to truly fudgy brownies? Follow these steps closely. It’s not complicated, but paying attention to the details, especially the baking time, is where the magic happens.
- Prepare Your Baking Stage: First things first, preheat your oven to 350 degrees Fahrenheit (175 degrees Celsius). Getting the oven to the correct temperature before the batter goes in is important for even baking. While it heats up, prepare your 8×8 inch baking pan. Grease the bottom and sides thoroughly with butter or cooking spray, then lightly flour it. This ensures your precious fudgy brownies won’t stick, making them easy to remove and cut later. Shake out any excess flour.
- Melt and Combine Wet Ingredients (Part 1): Grab a medium saucepan and melt the unsalted butter over low heat. Melting the butter contributes to the dense, fudgy texture because it adds moisture directly to the mix without the aeration you get from creaming butter and sugar. Once the butter is melted, remove the pan from the heat immediately. This prevents the butter from getting too hot, which could potentially scramble the eggs in the next step. Stir the granulated sugar into the melted butter until it’s well combined. The sugar will start to dissolve slightly in the warm butter.
- Combine Wet Ingredients (Part 2): Now, add your large eggs to the butter-sugar mixture, one at a time. Beat well after each addition. This step is crucial; adding the eggs individually and beating helps create an emulsion, which leads to a smoother, more cohesive batter and ultimately a better texture. Stir in the vanilla extract. That warm, sweet scent is already getting things ready!
- Whisk Together Dry Ingredients: In a separate medium bowl, gather all your dry ingredients: the unsweetened cocoa powder, all-purpose flour, salt, and baking powder. Give them a good whisk together. Whisking ensures that the salt and baking powder are evenly distributed throughout the flour and cocoa, preventing pockets of bitterness or uneven leavening. It also breaks up any lumps in the cocoa powder.
- Combine Wet and Dry (Gently!): This step is key to avoiding cakey brownies. Gradually add the whisked dry ingredients to the wet ingredients in the saucepan. Mix just until everything is combined. Use a spatula or wooden spoon and mix until you no longer see streaks of dry flour. Do NOT overmix! Overmixing develops the gluten in the flour, which gives baked goods structure, but in brownies, too much gluten leads to a tough, cakey result instead of fudgy. A few small lumps in the batter are perfectly okay and even desirable – it means you haven’t overmixed.
- Pour and Spread: Pour the gloriously thick, chocolatey batter into your prepared 8×8 inch baking pan. Use your spatula to spread the batter evenly into the corners and ensure the top is relatively smooth.
- The Fudgy Secret: Bake Just Right: Place the pan in the preheated oven. Bake for 20 to 25 minutes. Now, here is the MOST critical part for achieving that guaranteed fudgy texture: you are baking until a toothpick inserted into the center comes out with moist crumbs attached, but NOT completely clean. If the toothpick comes out completely clean or with dry crumbs, your brownies are overbaked, and they will be cakey. Moist crumbs mean there’s still enough moisture in the center to create that dense, fudgy interior as they cool. Start checking around the 20-minute mark. Ovens vary, so your bake time might be slightly shorter or longer.
- Cool Completely: Once you pull those perfectly baked (slightly underbaked!) brownies from the oven, resist the urge to cut into them immediately. It’s crucial to let them cool completely in the pan set on a wire rack. As the brownies cool, they continue to set up and become denser. Attempting to cut them while warm will result in a crumbly mess. Cooling completely is essential before frosting and cutting.
- Frosting Fun: Once your brownies are completely cool (patience, they’re worth it!), spread a generous layer of chocolate frosting or ganache evenly over the top. Use an offset spatula for a smooth finish, or swirl it decorately.
- Get Festive with Decorations: Now for the Halloween magic! Cut the cooled, frosted brownies into squares. Use green decorating icing to pipe spooky swirls or spiderwebs onto each square. Place a small candy pumpkin on each one, and scatter a few orange candy dots for extra festive flair. Let the frosting set slightly before serving.
Pro Tips for Ultimate Fudgy Halloween Brownies
Making these fudgy Halloween brownies is straightforward, but a few extra tips can take them from great to absolutely phenomenal:
- Quality Cocoa Matters: The flavor of your cocoa powder will heavily influence the final chocolate taste. Use a good quality unsweetened cocoa powder for the best results.
- Don’t Overmix, Seriously: I know I mentioned it in the steps, but it bears repeating. Overmixing is the number one culprit behind cakey brownies. Mix just until the dry ingredients disappear.
- Trust the Toothpick Test (with crumbs!): Get comfortable with the idea of slightly underbaking. That toothpick test with moist crumbs is your best friend for fudginess. Err on the side of checking early.
- Cooling is Non-Negotiable: I know the smell of warm brownies is intoxicating, but let them cool completely in the pan. This isn’t just for easy cutting; it allows the texture to develop fully.
- Clean Cuts: For neat squares, use a sharp knife and wipe it clean between each cut. For extra clean cuts, you can slightly warm the knife under hot water and dry it before cutting.
- Mix-In Magic: Want to add more chocolate? Stir in about 1/2 to 3/4 cup of chocolate chips (dark, milk, or white) with the dry ingredients before combining with the wet. Chopped nuts or even some peanut butter swirls before baking can also be fun additions! Speaking of fun add-ins, you might also enjoy trying our recipe for Fudgy Strawberry Brownies for a fruity twist on the classic fudgy base.
- Get Creative with Decorations: Beyond the pumpkins and orange dots, think candy corn, gummy worms, chocolate spiders, or even edible googly eyes! The possibilities for spooky fun are endless. If you’re in the mood for more festive baking around this time of year, our Amazing Pumpkin Chocolate Chip Bars are another crowd-pleaser.
Serving Suggestions for Spooky Brownies
These fudgy Halloween brownies are delicious enough to eat straight from the pan (once cooled, of course!), but here are a few ways to serve them:
- Plain and Perfect: Sometimes, the simple perfection of a fudgy brownie topped with chocolate frosting is all you need.
- A La Mode: Serve a slightly warmed brownie square with a scoop of vanilla ice cream. The contrast of warm and cold, fudgy and creamy, is divine.
- With a Drink: Pair them with a glass of milk, a mug of hot cocoa, or your favorite non-alcoholic fall beverage.
- Part of a Dessert Platter: Arrange them alongside other spooky treats like cookies, cupcakes, and candy. If you’re looking for another impressive chocolate dessert, our Deep Dark Chocolate Layer Cake is a showstopper.
Your Fudgy Brownie Questions Answered (FAQ)
Got questions about making the perfect fudgy brownies? I’ve got answers!
Why did my brownies turn out cakey instead of fudgy?
This is the most common issue! The main culprits are usually overmixing the batter (which develops too much gluten) or overbaking. Remember to mix the wet and dry ingredients just until combined and rely on the moist crumb toothpick test to avoid baking for too long.
How can I tell when these fudgy brownies are done baking?
Forget the completely clean toothpick test! For fudgy brownies, you want to insert a toothpick into the center, and it should come out with moist crumbs attached, but no wet batter. If it comes out with liquid batter, it needs a little more time. If it comes out completely clean or dry, they’re already heading towards cakey.
Can I use a different size baking pan?
This recipe is calibrated for an 8×8 inch metal pan. If you use a larger pan (like 9×13), the brownies will be thinner and bake faster. You’ll need to significantly reduce the baking time and start checking for doneness much earlier (around 15 minutes). If you use a smaller pan, they’ll be thicker and take longer. An 8×8 pan is highly recommended for the best results with this specific recipe’s texture.
Can I add chocolate chips or nuts to the batter?
Absolutely! For extra chocolatey goodness, fold in about 1/2 to 3/4 cup of your favorite chocolate chips (semi-sweet, dark, or milk) along with the dry ingredients. If you like nuts, add the same amount of chopped walnuts or pecans at the same time. Just remember not to overmix once they’re added!
How should I store leftover fudgy Halloween brownies?
Once cooled and cut, store the brownies in an airtight container at room temperature for up to 3-4 days. If you want them to last longer, you can store them in the refrigerator for about a week or wrap individual squares tightly and freeze them for up to 3 months. Thaw frozen brownies at room temperature.
Get Spooky with These Fudgy Halloween Brownies!
See? Making truly fudgy brownies isn’t some complicated science; it just requires knowing the right technique and resisting the urge to overbake or overmix. These Fudgy Halloween Brownies are the perfect combination of simple baking and festive fun, guaranteed to be a hit with anyone who tries them.
Whether you’re baking for a party, trick-or-treaters, or just for yourself (no judgment here!), this recipe delivers on its promise of rich, dense, chocolatey goodness every time. So gather your ingredients, crank up your favorite spooky playlist, and get ready to bake some magic!
I’d absolutely love to see your creations! Bake a batch, share a photo, and let me know what you think in the comments below. Happy Halloween baking!
Fudgy Halloween Brownies

Ingredients
- 1/2 cup unsalted butter
- 1 cup granulated sugar
- 2 large eggs
- 1 teaspoon vanilla extract
- 1/2 cup unsweetened cocoa powder
- 1/2 cup all purpose flour
- 1/4 teaspoon salt
- 1/4 teaspoon baking powder
- Chocolate frosting or ganache
- Green decorating icing
- Small candy pumpkins
- Orange candy dots
Directions
- Preheat oven to 350 degrees F (175 degrees C). Grease and flour an 8×8 inch baking pan.
- In a medium saucepan, melt the butter over low heat. Remove from heat and stir in the sugar.
- Add the eggs one at a time, beating well after each addition. Stir in the vanilla.
- In a separate bowl, whisk together the cocoa powder, flour, salt, and baking powder.
- Gradually add the dry ingredients to the wet ingredients, mixing just until combined. Do not overmix; overmixing can develop gluten and lead to a tougher, cakey texture. A few small lumps are okay.
- Pour the batter into the prepared pan and spread evenly.
- Bake for 20 to 25 minutes, or until a toothpick inserted into the center comes out with moist crumbs attached, but not completely clean. This is the critical step for fudginess; slightly underbaking ensures that moist, dense texture. Avoid baking until the toothpick is dry, as this will result in dry brownies.
- Let the brownies cool completely in the pan set on a wire rack before frosting and cutting.
- Once cooled, spread a layer of chocolate frosting or ganache over the top.
- Cut the brownies into squares. Decorate each square with green icing swirls, orange candy dots, and a candy pumpkin to create a festive look.