Oh, the humble savory pocket! It promises so much – a delightful handheld meal, a burst of flavor wrapped in golden, flaky pastry. But how many times have you eagerly bitten into one, only to be met with that dreaded, sad, soggy bottom? You expect a satisfying crunch, a delicate crispness, but instead, you get limp, uncooked-feeling dough. It’s a culinary heartbreak!
For years, I wrestled with this exact problem when making cheesy bacon beef pockets. My fillings were delicious, my tops were beautifully browned, but the bottoms remained stubbornly damp. I tried everything – different temperatures, different pan types, shorter baking times. Nothing seemed to work consistently. But after much experimentation, I finally unlocked the secret to achieving perfectly crispy, golden bottoms on these delightful savory pastries, every single time. It comes down to a few simple, yet crucial, techniques that make all the difference. Get ready to say goodbye to soggy bottoms forever!
Why These Cheesy Bacon Beef Pockets Are a Keeper
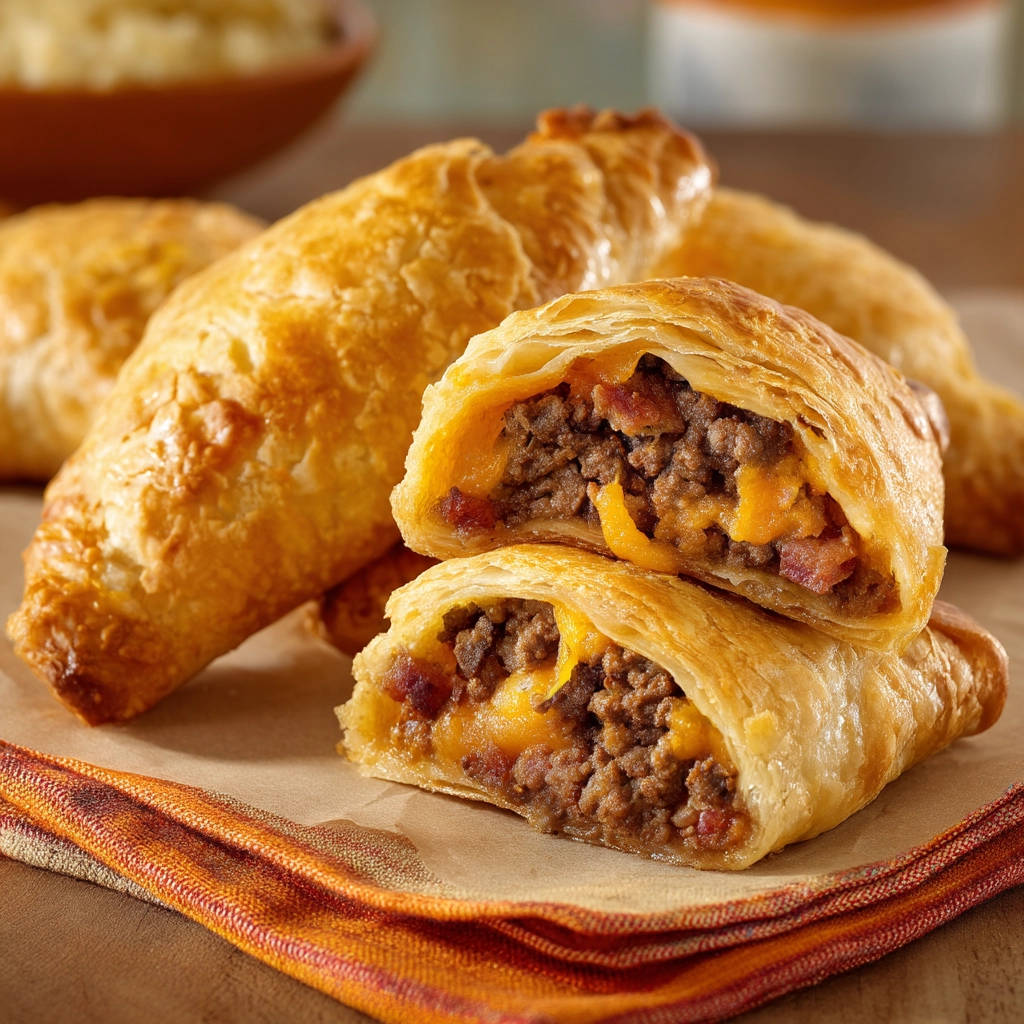
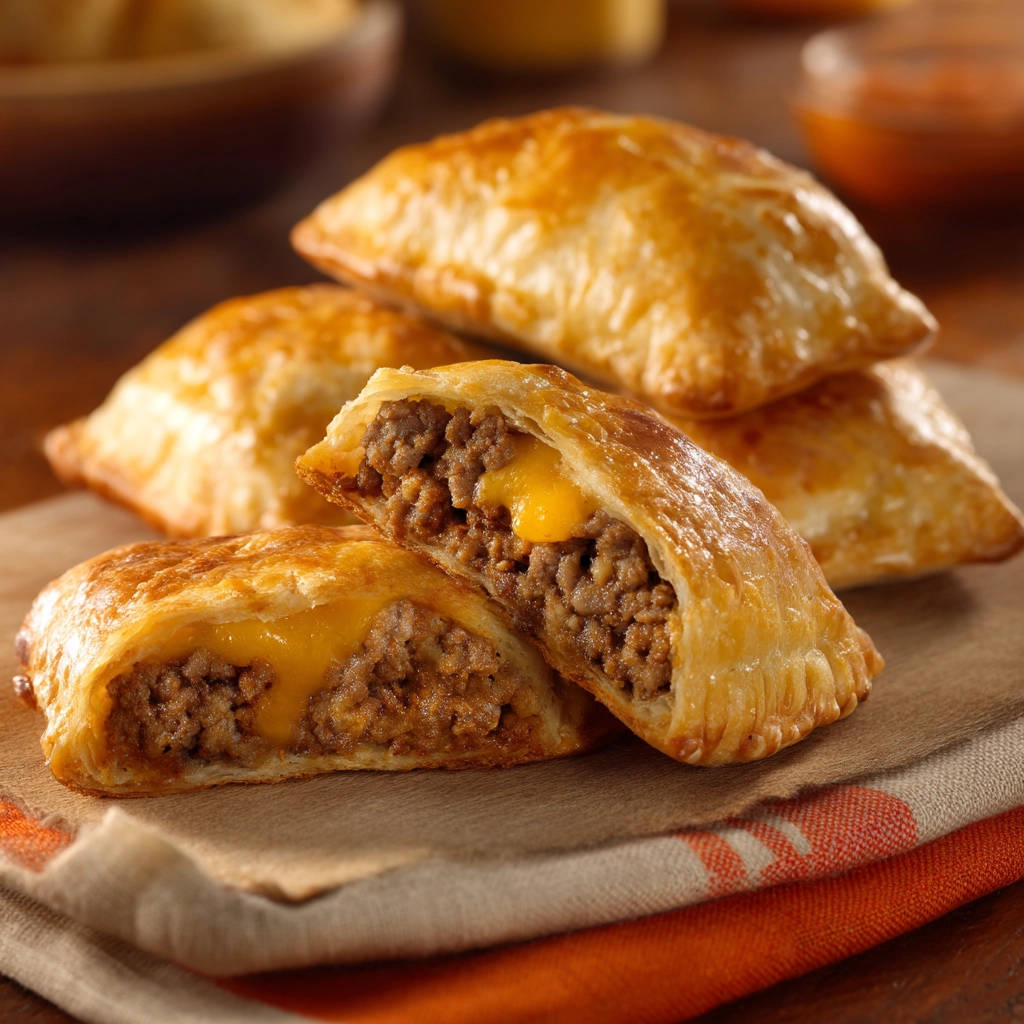
Beyond solving the soggy bottom dilemma (which, let’s be honest, is reason enough!), these cheesy bacon beef pockets offer a whole lot more to love. They are incredibly satisfying, packing a punch of savory flavor in every bite. The combination of hearty ground beef, smoky bacon, and gooey melted cheddar cheese is a classic for a reason.
They’re perfect for so many occasions: a quick weeknight dinner, a portable lunch, a fantastic party appetizer (just make them a bit smaller!), or even a hearty snack. Because they’re self-contained, they’re less messy than a burger or a plate of mac and cheese, making them ideal for eating on the go or while curled up on the couch. Plus, the puff pastry provides that luxurious, flaky texture that just elevates the whole experience. It’s comfort food, elevated and made crispy!
Gathering Your Ingredients for Crispy Cheesy Bacon Beef Pockets
Creating these delicious pockets starts with selecting the right components. While the list is relatively short, each ingredient plays a vital role in building flavor and ensuring that coveted crispy crust. We’re building a savory filling that’s rich and hearty, designed to be wrapped in a delicate, flaky shell.
Here’s what you’ll need:
- 1 pound ground beef
- 4 ounces bacon, chopped
- 1 cup shredded cheddar cheese
- 2 sheets puff pastry, thawed
- 1 tablespoon vegetable oil (optional)
- Salt to taste
- Black pepper to taste
- 1 large egg, beaten
Let’s talk a bit more about some of these key players. For the ground beef, I usually opt for an 85% lean variety. While you might think fattier beef equals more flavor, excess fat is one of the primary culprits behind soggy bottoms. We’ll be draining the fat thoroughly anyway, so starting with something slightly leaner helps minimize grease. If you use a fattier blend like 80/20, just be extra diligent about draining.
Ah, bacon! This is where a good amount of smoky, salty flavor comes from. Chopping it before cooking helps it crisp up evenly and distributes those delicious little bits throughout the filling. Remember, the goal is crisp bacon. This not only adds great texture but, more importantly, cooking it thoroughly renders out the fat, which we absolutely need to drain off to keep our filling dry. Just “bacon” is all you need!
Shredded cheddar cheese provides that wonderful, melty gooeyness that complements the beef and bacon so well. I highly recommend shredding your own cheese from a block rather than buying pre-shredded. Pre-shredded cheese often contains anti-caking agents that can affect how smoothly it melts. Sharp cheddar gives a nice tang, but mild or medium cheddar works too. Feel free to experiment with other cheeses like Monterey Jack or a blend if you like!
Puff pastry is the magical vessel that holds all this goodness. It’s designed to puff up into hundreds of flaky layers when baked, creating that irresistible crispness. Ensuring it’s properly thawed but still cold is key. It should be pliable enough to unfold and work with, but not warm and sticky. Follow the package instructions for thawing, usually overnight in the fridge or for a short time at room temperature.
A single large egg, beaten, serves two important purposes. First, we’ll use a little bit to help seal the edges of our pockets, acting like glue to prevent leaks. Second, brushing the tops with the remaining egg wash gives them that beautiful, glossy golden-brown color as they bake, adding to their visual appeal and crispness.
Simple salt and black pepper are all that’s needed to season the filling and let the flavors of the beef, bacon, and cheese shine through. Taste the filling after you mix in the cheese and adjust the seasoning as needed before filling the pastry.
Finally, vegetable oil is listed as optional. I often find that the rendered bacon fat is sufficient to help brown the beef, but if your beef is exceptionally lean or your pan seems dry, a tablespoon of vegetable oil can help get things started.
Crafting Your Crispy Cheesy Bacon Beef Pockets: Step-by-Step
Ready to assemble these handheld wonders? The process is straightforward, but paying attention to a few details, especially regarding moisture management, is crucial for achieving that perfect crispy finish.
- Brown the Beef: Grab a large skillet – one that gives you plenty of room to work. Place it over medium-high heat. Add your pound of ground beef. If you’re using very lean beef or your pan needs it, add that tablespoon of vegetable oil now. Begin breaking apart the beef with a spoon as it cooks. We want to brown it thoroughly until there is absolutely no pink color left. Cooking it completely at this stage is important for texture and safety.
- Drain the Fat (Seriously, Drain It All): This is perhaps the single most important step for preventing soggy bottoms! Once the beef is fully browned, carefully tilt the skillet and drain off all, and I mean all, of the rendered fat. You can use a spoon to hold the meat back or carefully pour it into a heat-safe container. Excess grease in the filling is the enemy of crispy pastry.
- Add the Bacon and Crisp It Up: Now, add your chopped bacon to the skillet with the browned, drained beef. Cook the bacon, stirring occasionally, until it gets nice and crisp. We want those chewy-crispy bits of bacon dispersed throughout the filling. As the bacon cooks, it will render more fat.
- Drain the Fat AGAIN: Yes, another draining step! Once the bacon is crisp, it’s time to remove all the additional fat that rendered out. Tilt the pan again and drain it thoroughly. You can even press the meat mixture slightly against the side of the pan with your spoon to encourage more fat to release. A dry filling is paramount for a crispy pocket.
- Mix in the Cheese and Cool the Filling: Remove the skillet from the heat. This is key! Stir in your shredded cheddar cheese, along with salt and black pepper to taste. Give it a good mix to distribute the cheese evenly. Now, let the filling sit and cool down for about 10-15 minutes. Putting hot filling into cold puff pastry creates steam inside the pocket as it bakes. That trapped steam turns into condensation, making the inside of the pastry soggy. Letting it cool minimizes this effect significantly.
- Preheat the Oven and Your Secret Weapon: While the filling cools, preheat your oven to 400 degrees Fahrenheit (200 degrees Celsius). And here’s the true secret weapon for the crispy bottom: If you have one, place a baking sheet in the oven while it preheats. Baking the pockets directly on a preheated hot surface helps the bottom crust start crisping up the moment it hits the pan. It’s like giving the bottom a head start against any potential moisture.
- Prepare the Puff Pastry: Lightly flour a clean work surface. Unfold your thawed puff pastry sheets carefully. Each standard sheet will typically yield four pockets. Use a knife or pastry cutter to cut each sheet into four equal squares or rectangles. Handle the pastry gently; we want to preserve those delicate layers!
- Fill the Pockets (But Don’t Overfill!): Spoon about a quarter cup of your cooled beef and bacon filling onto one half of each pastry piece. It might not look like a lot, but trust me, do not overfill! Overfilling is another common cause of leaks and soggy spots. The filling expands slightly as the cheese melts, and too much pressure can cause the seams to burst or the filling to ooze out, making a mess and creating wet spots on your pastry.
- Seal Them Up Tight: Take your beaten egg and a pastry brush. Lightly brush the edges of the pastry all the way around the filling. This egg wash acts as the “glue.” Now, carefully fold the other half of the pastry over the filling to create your pocket shape. Press the edges firmly together with your fingers to seal them. For extra security and a classic look, you can use the tines of a fork to crimp the edges. A tight seal is critical for keeping any residual moisture and steam inside the pocket and away from the pastry crust.
- Transfer and Egg Wash Tops: Carefully transfer the sealed pockets onto the preheated baking sheet you placed in the oven earlier. Be gentle so you don’t disrupt the seal or shape. Leave a little space between each pocket for airflow. Brush the tops of the pockets with the remaining beaten egg wash. This gives them that gorgeous golden-brown finish and helps with crisping.
- Bake to Golden Perfection: Slide the baking sheet back into the preheated oven. Bake for 15 to 20 minutes. Keep an eye on them; baking time can vary depending on your oven. They are ready when the pastry is significantly puffed up, beautifully golden brown all over (tops AND bottoms!), and the filling is hot and bubbly (you might see a bit of cheese peaking out). The hot baking sheet does its magic during this step, ensuring that bottom crust gets wonderfully crisp.
- Cool Slightly and Serve: It’s tempting to dive right in, but give them a few minutes to cool on the baking sheet before serving. The filling inside will be molten hot! Letting them rest briefly allows the filling to set slightly and prevents burned tongues.
Tips for Perfect Crispy Cheesy Bacon Beef Pockets Every Time
Getting that perfect bite is all about technique and attention to detail. Here are some extra tips to ensure your Cheesy Bacon Beef Pockets are a resounding success:
- Master the Drain: I can’t stress this enough – thoroughly draining the fat from BOTH the beef and the bacon is the number one key to preventing soggy bottoms. Don’t rush this step!
- Chill Your Pastry: Work with cold puff pastry. If it gets too warm and soft, it becomes difficult to handle and the layers won’t puff as well. If your kitchen is warm, pop the pastry back in the fridge for a few minutes if needed.
- Don’t Skimp on Sealing: A good seal is your best friend. Pressing firmly and then crimping with a fork ensures the filling stays put and moisture doesn’t seep out onto the bottom crust.
- The Hot Pan is Non-Negotiable: Preheating the baking sheet in the oven is a game-changer for bottom crust crispness. Make it a habit!
- Check Your Oven Temperature: Use an oven thermometer if you suspect your oven runs hot or cold. Accurate temperature is important for proper baking and puffing.
- Filling Variations: Want to mix it up? While the beef and bacon combo is classic, you could add some finely diced, sautéed onions or bell peppers (make sure they are cooked until soft and any moisture has evaporated!). Just be mindful of adding extra moisture.
- Cheese, Please!: Experiment with different shredded cheeses or cheese blends. Monterey Jack, Colby Jack, or even a spicy Pepper Jack could add fun variations.
- Seasoning Boost: A pinch of garlic powder or onion powder can add an extra layer of savory flavor to the beef mixture.
What to Serve With Your Savory Pockets
Cheesy Bacon Beef Pockets are pretty substantial on their own, but they pair beautifully with simple side dishes. A fresh green salad with a light vinaigrette is a classic choice, offering a nice contrast to the rich filling. For something a bit heartier, try serving them alongside some crispy baked potato wedges or a scoop of creamy potato salad. If you’re looking for other delicious beef dishes to add to your repertoire, you might enjoy exploring recipes like Hearty Beef Chili or Classic Pot Roast.
Your Cheesy Bacon Beef Pocket Questions Answered (FAQ)
Got questions about making these perfect pockets? Here are some common ones:
Why are my puff pastry bottoms still soggy?
This is the million-dollar question! The most common reasons are: 1) Not thoroughly draining the fat from the cooked beef and bacon – excess grease is the enemy! 2) Putting hot filling into the pastry – the steam creates condensation. Always let the filling cool! 3) Not preheating your baking sheet – placing the pockets on a hot surface helps the bottom crisp instantly. 4) Not sealing the edges tightly – this allows moisture and steam to escape onto the bottom crust.
Can I use ground turkey or chicken instead of beef?
Absolutely! Ground turkey or chicken would work well, offering a slightly lighter option. Make sure to cook it completely and drain any fat or liquid thoroughly, just as you would with the beef. The cooking time for the meat might be slightly different, but the assembly and baking steps remain the same.
Can I make these Cheesy Bacon Beef Pockets ahead of time?
Yes! You can assemble the pockets and place them on a baking sheet lined with parchment paper. You can then cover them loosely and refrigerate for a few hours before baking. For longer storage, freeze the assembled, unbaked pockets solid on a baking sheet, then transfer them to a freezer-safe bag or container. Bake from frozen, adding about 5-10 minutes to the baking time, keeping an eye on them until they are golden and puffed.
How do I reheat leftover pockets?
For the best results and to regain crispness, reheat leftover pockets in a preheated oven or toaster oven at around 350F (175C) for 10-15 minutes, or until heated through and crispy again. Microwaving will heat the filling but will likely make the pastry soft and chewy.
Can I use pie crust instead of puff pastry?
While you could fill pie crust with this mixture, the result will be very different. Pie crust is flaky and tender, but it doesn’t create the numerous airy layers and significant puff that puff pastry does. Puff pastry is key to achieving the specific crispy, light texture intended for these pockets.
Enjoy Your Homemade Cheesy Bacon Beef Pockets!
There you have it! The secrets to making perfectly crispy, incredibly delicious Cheesy Bacon Beef Pockets without the disappointment of a soggy bottom. These savory hand pies are truly a revelation – packed with flavor and wrapped in golden, flaky goodness. They’re simple enough for a casual meal but impressive enough to share.
Give this recipe a try and experience the joy of that satisfying crunch with every bite. I’d love to hear how they turn out for you! Leave a comment below to share your experience or any favorite variations you try. Happy baking!
Cheesy Bacon Beef Pockets

Ingredients
- 1 pound ground beef
- 4 ounces bacon, chopped
- 1 cup shredded cheddar cheese
- 2 sheets puff pastry, thawed
- 1 tablespoon vegetable oil (if needed for browning beef)
- Salt to taste
- Black pepper to taste
- 1 large egg, beaten
Directions
- In a large skillet over medium-high heat, brown the ground beef, breaking it apart with a spoon. Cook until no pink remains. Carefully drain off all excess fat.
- Add the chopped bacon to the skillet with the beef. Cook, stirring occasionally, until the bacon is crisp. Drain off any additional fat thoroughly. This step of draining fat is crucial to prevent a wet filling that causes soggy bottoms.
- Remove the skillet from the heat. Stir the shredded cheddar cheese, salt, and pepper into the beef and bacon mixture. Let the filling cool for about 10-15 minutes. Allowing the filling to cool slightly helps reduce steam build-up inside the pastry during baking.
- Preheat your oven to 400 degrees Fahrenheit. If you have one, place a baking sheet in the oven while it preheats. Baking on a preheated hot surface helps the bottom crust crisp up faster.
- Unfold the thawed puff pastry sheets onto a lightly floured surface. Cut each sheet into four squares or rectangles.
- Spoon about a quarter cup of the cooled filling onto one half of each pastry piece. Do not overfill, as this can cause leaks and soggy spots.
- Lightly brush the edges of the pastry with the beaten egg. Fold the other half of the pastry over the filling to create a pocket. Press the edges firmly together to seal. You can crimp the edges with a fork to ensure a tight seal, which is key to keeping moisture in the filling and off the pastry bottom.
- Carefully transfer the sealed pockets to the preheated baking sheet. Brush the tops of the pockets with the remaining beaten egg for a golden finish.
- Bake for 15 to 20 minutes, or until the pastry is puffed, golden brown, and cooked through. The preheated baking sheet helps achieve that desirable crispy bottom crust.
- Let cool for a few minutes before serving.