
Okay, let’s be honest. There’s almost nothing more frustrating in the kitchen than excitedly plating up a beautiful chicken dinner, only to cut in and find… well, let’s just say less-than-ideal dryness. We’ve all been there, staring down a plate that promised juicy deliciousness but delivered disappointment. But what if I told you achieving perfectly moist, tender chicken every single time was not only possible but surprisingly simple? Especially when that chicken is nestled in a bed of fluffy rice and coated in a dreamy, bright, creamy dill sauce?
Get ready to say goodbye to dry chicken forever. This Creamy Dill Chicken with Rice recipe isn’t just about the incredible flavor combination of fresh dill and a smooth, tangy sauce; it’s about mastering a foundational technique that guarantees juicy results. It’s a comforting, flavorful meal that’s perfect for a weeknight but feels special enough for guests. Let’s dive in!
Why You’ll Fall Head Over Heels for This Dish
Beyond finally conquering the dreaded dry chicken, there are so many reasons this Creamy Dill Chicken with Rice will become a staple in your rotation.
- Consistently Juicy Chicken: The simple trick we’ll cover ensures your chicken stays moist and tender.
- Incredible Flavor: The fresh dill combined with the creamy base creates a sauce that’s bright, tangy, and utterly addictive. Garlic adds a wonderful depth.
- One-Pan (Mostly!) Wonder: While you’ll need a separate pot for rice, the main chicken and sauce components come together beautifully in one skillet, minimizing cleanup.
- Quick & Easy: This recipe is surprisingly fast, making it ideal for busy weeknights when you want something homemade and satisfying without spending hours in the kitchen.
- Comfort Food Vibes: Creamy chicken and rice is the definition of comfort food, elevated by the fresh, herbaceous dill.
Gathering Your Flavorful Essentials
Creating this dish starts with selecting quality ingredients that work together to build layers of flavor and texture. You don’t need a long list of obscure items; just simple pantry staples and fresh elements.
Here’s what you’ll need to bring this Creamy Dill Chicken with Rice to life:
- Boneless, Skinless Chicken Breasts: We’re using chicken breasts for their lean profile and quick cooking time. Cutting them into uniform 1-inch pieces ensures they cook evenly and quickly, which is crucial for preventing dryness. Aim for pieces that are roughly the same size.
- Olive Oil: A good quality olive oil is essential for seasoning the chicken and getting that initial golden-brown sear in the skillet. It helps conduct heat and adds a little richness.
- Seasoning Blend: A simple but effective mix of salt, black pepper, garlic powder, and paprika is used to coat the chicken pieces. This blend provides basic seasoning, a hint of warmth from the paprika, and aromatic depth from the garlic powder.
- Cooked White Rice: The base of our meal! Fluffy white rice soaks up the creamy sauce beautifully. You’ll need about a cup of already cooked rice. Day-old rice works wonderfully if you have it on hand. If you need tips on getting perfectly fluffy rice, check out our guide to perfect rice (though any white rice cooked to your liking is great here!).
- Plain Greek Yogurt or Sour Cream: This is the heart of our creamy sauce. Plain Greek yogurt adds a lovely tang and creaminess with a protein boost, while sour cream offers a richer, more indulgent texture. Either works wonderfully; choose based on your preference and what you have available. Ensure it’s plain and full-fat for the best results.
- Fresh Dill: Dill is non-negotiable for that signature bright, herbaceous flavor that defines this dish. You’ll need a generous ¼ cup of finely chopped fresh dill, plus a little extra for garnishing at the end. Dried dill can be substituted in a pinch, but use less (about 1 tablespoon) as its flavor is more concentrated and lacks the fresh brightness.
- Fresh Garlic: Just one clove, minced, adds a pungent base note to the creamy dill sauce, complementing both the chicken and the herbs.
Crafting Your Dreamy Creamy Dill Chicken: A Step-by-Step Journey
Follow these steps closely, paying special attention to the technique that keeps the chicken incredibly moist. It’s simpler than you think!
Prepare the Chicken for Peak Searing Potential: The very first step, and a critical one for achieving that lovely golden crust and locking in juices, is to thoroughly pat your chicken pieces dry. Use paper towels and press firmly on all sides. Excess moisture will steam the chicken instead of letting it sear properly in the hot pan, hindering that desirable browned exterior.
Season Generously and Evenly: Place the dried chicken pieces in a medium-sized bowl. Drizzle them with the tablespoon of olive oil. Then, sprinkle the salt, black pepper, garlic powder, and paprika over the chicken. Use your hands or a spoon to toss everything together, making sure each piece of chicken is well coated in the oil and seasonings. This ensures flavor in every bite.
Sear the Chicken to Golden Perfection: Heat a large skillet over medium-high heat. You want the pan to be hot before adding the chicken, but not smoking. Add the seasoned chicken pieces in a single layer. It’s vital not to overcrowd the pan. If your skillet isn’t large enough, cook the chicken in batches. Overcrowding lowers the pan temperature and leads to steaming rather than searing. Let the chicken cook undisturbed for 3-4 minutes per side. You’re looking for a beautiful golden-brown color on the outside. Flip and cook for another 3-4 minutes, or until the chicken is cooked through. The safest way to check is with an instant-read thermometer; the internal temperature should register 165°F (74°C) in the thickest part of the largest piece. Resist the urge to move the chicken around constantly while it’s searing – letting it sit allows that crust to form.
The Game-Changing Resting Step: This is the secret weapon against dry chicken! Once the chicken is cooked through and golden brown, immediately remove all the pieces from the skillet and place them on a clean plate. Loosely tent the plate with aluminum foil. Let the chicken rest for at least 5 minutes (longer is even better!). During this resting period, the juices that were pushed to the center of the meat during cooking redistribute throughout the entire piece. Skipping this step means those precious juices will run out onto your plate when you cut into the chicken, leaving you with dry meat. Don’t skip the rest!
Whip Up the Creamy Dill Sauce: While your chicken is enjoying its well-deserved rest and becoming incredibly juicy, you’ll make the star sauce. In a small bowl, combine the plain Greek yogurt (or sour cream), the finely chopped fresh dill, and the minced garlic. Whisk these ingredients together until they are smooth and well combined. Take a look at the consistency – if it seems too thick for your liking and you want a looser sauce to coat the chicken and rice, whisk in a tablespoon or two of water or milk (any kind works) until it reaches your desired pourable consistency. Give the sauce a taste and add a pinch more salt and pepper if you feel it needs it.
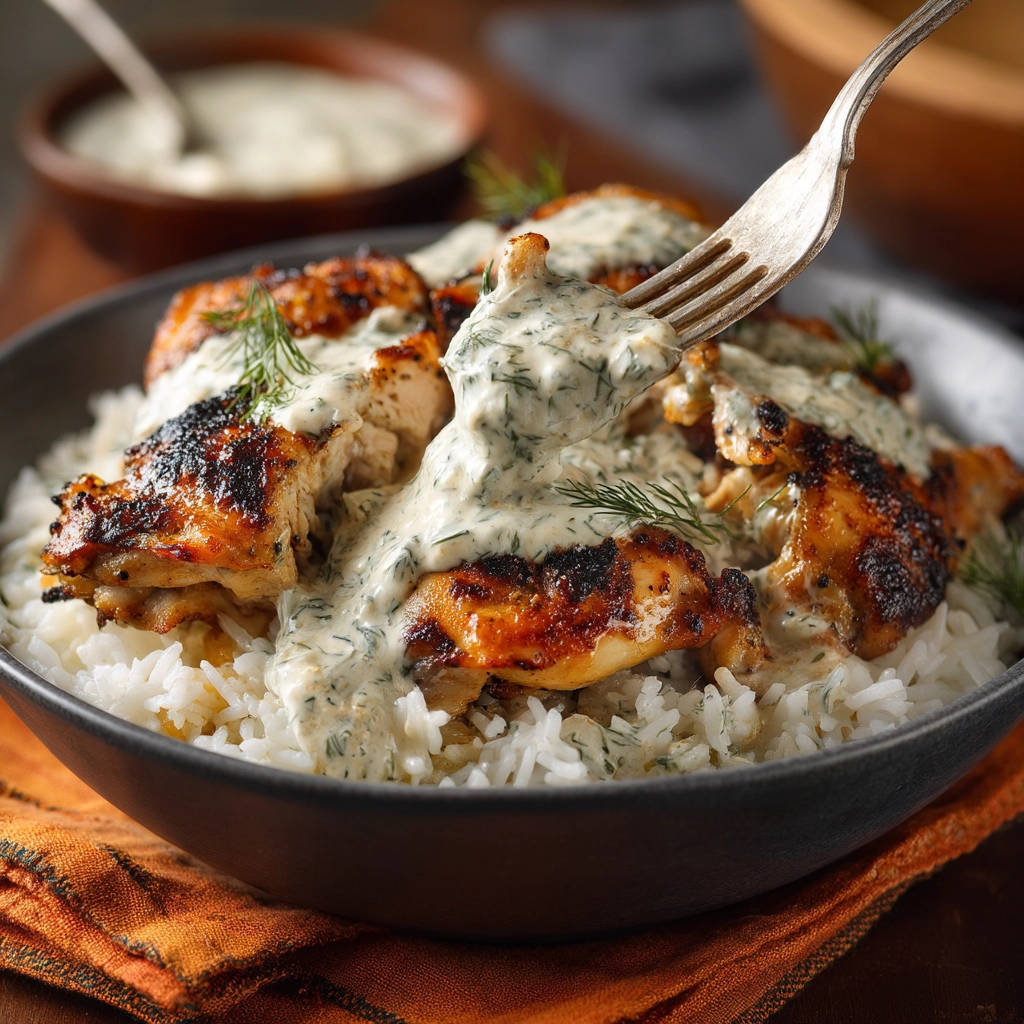
Assemble and Serve Your Masterpiece: Now for the delicious payoff! Spoon a generous portion of your fluffy cooked white rice into individual bowls. Arrange the rested, juicy chicken pieces over the rice. Finally, spoon that luscious creamy dill sauce generously over the chicken and rice. The sauce will slightly warm from the chicken and rice. For a final touch of freshness and visual appeal, sprinkle a little extra finely chopped fresh dill over the top before serving. Enjoy immediately!
Tips for Perfect Creamy Dill Chicken Every Time
Here are a few extra pointers to ensure your dish is a roaring success:
- Don’t Rush the Sear: Patience is key in step 3. Let the chicken sit long enough on each side to develop that beautiful golden crust. It adds flavor and texture.
- Use Fresh Dill: While dried dill can work in a pinch, fresh dill has a brighter, more vibrant flavor that truly makes this sauce sing.
- Adjust Sauce Consistency: Don’t be afraid to add a little water or milk to the sauce if it’s too thick. You want it to be creamy and coat the chicken and rice easily, not be a solid dollop.
- Taste and Adjust Seasoning: Always taste your food as you go! The chicken seasoning is set before cooking, but the sauce can be adjusted with salt and pepper right before serving.
- Prep Ahead: You can chop the dill and mince the garlic ahead of time. You can also cook the rice in advance. The sauce can be made a few hours ahead and stored in the fridge; you might need to give it a quick whisk and potentially add a tiny bit more liquid before serving as it can thicken slightly.
- Storage: Leftovers can be stored in an airtight container in the refrigerator for 3-4 days. Reheat gently on the stovetop with a splash of water or milk to loosen the sauce, or in the microwave. Be careful not to overheat the chicken, which can dry it out.
Serving Suggestions for Your Creamy Dill Chicken
This Creamy Dill Chicken with Rice is a satisfying meal on its own, thanks to the protein from the chicken and carbs from the rice. However, adding a simple side can round out the plate beautifully.
Consider pairing it with a light green salad with a simple vinaigrette to add freshness and crunch. Roasted or steamed vegetables like broccoli, asparagus, or green beans are also excellent companions. The bright green of roasted broccoli offers a nice color contrast and complements the dill flavor. If you’re looking for other delicious side dish ideas, you might enjoy our Perfectly Roasted Veggies.
Can I Use Chicken Thighs?
Absolutely! Boneless, skinless chicken thighs would work well in this recipe. Thighs are naturally more forgiving and less likely to dry out than breasts due to their higher fat content. The cooking time might need to be adjusted slightly (likely a bit longer), and you’ll still want to sear them and let them rest for maximum juiciness.
Can I Make the Sauce Ahead of Time?
Yes, the creamy dill sauce can be made a few hours in advance and kept covered in the refrigerator. Just give it a good whisk before serving. You might find it thickens slightly as it chills, so having a tablespoon or two of water or milk ready to loosen it up again is a good idea.
What if I Don’t Have Fresh Dill?
Fresh dill is highly recommended for the best flavor in this Creamy Dill Chicken with Rice. If you absolutely cannot find fresh dill, you can substitute dried dill, but use much less – about 1 tablespoon instead of 1/4 cup. Dried herbs are more potent than fresh ones. The flavor won’t be quite as bright and fresh, but it will still provide that characteristic dill note.
Is This Recipe Gluten-Free?
As written, yes, this recipe is gluten-free, assuming your white rice is cooked separately and contains no added gluten. The chicken, seasonings, yogurt/sour cream, dill, and garlic are all naturally gluten-free.
What’s the Difference Between Using Greek Yogurt and Sour Cream?
Both options create a creamy sauce, but they offer slightly different profiles. Greek yogurt tends to be thicker and tangier than sour cream, and it’s higher in protein. Sour cream is richer and has a milder, creamier flavor. Choose whichever you prefer or have on hand!
Enjoy Your Homemade Creamy Dill Chicken!
You’ve done it! You’ve created a dish that’s not only incredibly flavorful and comforting but also boasts chicken that’s guaranteed to be juicy. This Creamy Dill Chicken with Rice is a testament to how simple techniques, like properly searing and resting meat, can elevate everyday ingredients into something truly special. The bright, fresh dill sauce is the perfect counterpoint to the rich, creamy base, making every bite a delight.
Give this recipe a try tonight and experience the difference perfectly cooked, juicy chicken makes. Don’t forget to leave a comment below and let me know how it turned out, or if you have any favorite variations! Happy cooking!
Creamy Dill Chicken with Rice

Ingredients
- 2 Boneless, skinless chicken breasts, cut into 1-inch pieces
- 1 tablespoon olive oil
- 1 teaspoon salt
- 1/2 teaspoon black pepper
- 1/2 teaspoon garlic powder
- 1/4 teaspoon paprika
- 1 cup cooked white rice
- 1 cup plain Greek yogurt or sour cream
- 1/4 cup fresh dill, finely chopped, plus extra for garnish
- 1 clove garlic, minced
Directions
- Pat the chicken pieces thoroughly dry with paper towels. This is key for getting a nice sear.
- In a medium bowl, toss the chicken pieces with olive oil, salt, pepper, garlic powder, and paprika until evenly coated.
- Heat a large skillet over medium-high heat. Once hot, add the seasoned chicken in a single layer, making sure not to overcrowd the pan. Cook for 3-4 minutes per side, or until golden brown and cooked through. The internal temperature should reach 165 degrees F. Avoid moving the chicken too much while it’s searing.
- This is the crucial step: Once the chicken is cooked, remove it from the skillet and place it on a plate. Loosely tent it with foil and let it rest for at least 5 minutes. This allows the juices to redistribute within the meat, ensuring it stays incredibly moist.
- While the chicken rests, prepare the sauce. In a small bowl, whisk together the Greek yogurt or sour cream, chopped dill, and minced garlic. If the sauce is too thick, you can add a tablespoon or two of water or milk to reach your desired consistency. Season the sauce with a pinch of salt and pepper if needed.
- To serve, spoon the cooked rice into bowls. Top the rice with the rested chicken pieces. Spoon the creamy dill sauce generously over the chicken. Garnish with extra fresh dill if desired.