Welcome back to the blog! If you’ve ever embarked on the noble quest of making homemade flatbreads, you know the potential pitfalls. Dry, stiff, crackers instead of wrappers, pieces that snap rather than bend when you try to scoop up a delicious dip or wrap around savory fillings. It’s frustrating, right?
I’ve been there! I spent ages tweaking ratios, trying different flours, adjusting cooking times, all in pursuit of that perfect, pliable flatbread. And after much experimentation, I finally cracked the code. The addition of mashed sweet potato does wonders for texture and a hint of natural sweetness, but there’s also one simple, crucial step in the process that makes all the difference. Prepare to say goodbye to brittle flatbreads forever and hello to the most amazing, soft, and flexible homemade flatbreads you’ve ever made!
Why These Sweet Potato Flatbreads Are a Keeper
Beyond just avoiding the dreaded dryness, these sweet potato flatbreads offer so much more. They are incredibly easy to make with minimal ingredients, making them a perfect weekend project or even a weeknight win.
The sweet potato adds a subtle earthy sweetness and a beautiful golden hue, plus it’s naturally packed with nutrients. They are endlessly versatile, serving as the perfect vehicle for everything from simple spreads to hearty fillings. And that guaranteed softness? It means they’re ideal for folding, rolling, or tearing off pieces for dipping into your favorite sauces or stews.
Gathering Your Ingredients for Sweet Potato Flatbreads
Making these soft and flexible sweet potato flatbreads requires just a handful of kitchen staples, plus the star ingredient! The beauty of this recipe lies in its simplicity, allowing the natural goodness of the sweet potato to shine through while contributing significantly to the desired texture.
Here’s a look at what you’ll need:
- All-Purpose Flour: This forms the structure of our flatbreads. While you could experiment with other flours, standard all-purpose provides a reliable base for achieving a soft yet sturdy result.
- Salt: Just a touch of salt enhances the flavor of both the flour and the sweet potato, bringing everything into balance.
- Warm Water: The temperature of the water is important here. Warm water (around 100-110°F or roughly the temperature of a comfortable bath) helps activate the gluten development in the flour more efficiently and helps the dough come together smoothly.
- Mashed Cooked Sweet Potato: This is our secret weapon for softness! Ensure your sweet potato is cooked until very tender (boiling, steaming, or roasting all work) and mashed until completely smooth, with no lumps. It should be plain – no added butter, sugar, or spices at this stage. The natural moisture and starch in the sweet potato contribute to the incredibly tender crumb of the finished flatbreads.
- Vegetable Oil (plus more for cooking): A little oil in the dough adds richness and further promotes a soft texture. Using a little more oil on the cooking surface helps prevent sticking and also contributes to a more flexible flatbread compared to cooking completely dry.
That’s it! Simple, right? With these basic items, you’re well on your way to delicious, pliable flatbreads.
Crafting Your Sweet Potato Flatbreads: Step-by-Step
Let’s walk through the process of transforming these humble ingredients into glorious, soft sweet potato flatbreads. It’s a straightforward process, but paying attention to a couple of key stages will ensure your success.
- Begin by combining your dry ingredients. In a spacious mixing bowl, measure out your all-purpose flour and add the salt. Give them a quick whisk together. This helps to evenly distribute the salt throughout the flour before you add any liquid.
- In a separate bowl, prepare your wet ingredients. Measure out the warm water (remember, that ideal 100-110°F range!), add your perfectly smooth mashed sweet potato, and the tablespoon of vegetable oil. Stir everything together until it’s nicely combined. The sweet potato should be fully incorporated into the liquid mixture.
- Now, it’s time to bring everything together. Pour the bowl of wet ingredients into the bowl with your dry mixture. Grab a sturdy spoon or a spatula and start stirring. At first, it will look quite messy and uneven, forming what’s often called a “shaggy dough.” Keep stirring until most of the flour is incorporated and it forms a cohesive mass, but it doesn’t need to be smooth yet.
- Turn the shaggy dough out onto a surface that you’ve lightly dusted with flour. This is where you’ll develop the gluten structure through kneading. Knead the dough for about 5 to 7 minutes. You’re aiming for a dough that feels smooth and elastic under your hands. It should be soft and slightly tacky, but it shouldn’t stick excessively to your hands or the counter. If you find it’s too sticky, add just a tiny sprinkle more flour, literally a tablespoon at a time, kneading it in until the dough reaches the right consistency. Conversely, if your dough feels too stiff or dry, knead in a tiny amount more warm water.
- Once your dough is beautifully smooth and elastic, place it back into the mixing bowl. Cover the bowl snugly with a clean kitchen towel or a piece of plastic wrap. Let this dough rest at room temperature for a minimum of 30 minutes. This resting period is absolutely crucial! It allows the gluten you developed during kneading to relax, which makes the dough much easier to roll out thinly without snapping back. It also contributes significantly to the softness of the finished flatbreads.
- After the dough has rested, turn it out again and divide it into 8 roughly equal portions. You can weigh them for precision, but eyeballing works fine. Roll each piece into a smooth ball.
- While you’re preparing the dough portions, start heating your cooking surface. Place a flat griddle or a heavy-bottomed skillet over medium-high heat. Once hot, add just a very thin film of vegetable oil. While you can cook flatbreads dry, a little oil really helps them stay flexible and encourages those lovely golden brown spots without drying them out as quickly.
- Now, roll out the dough balls. Take one dough ball and gently flatten it with your hand on a lightly floured surface. Use a rolling pin to roll it out into a thin circle, aiming for about 6 to 8 inches in diameter. Try to make the thickness as even as possible so it cooks uniformly.
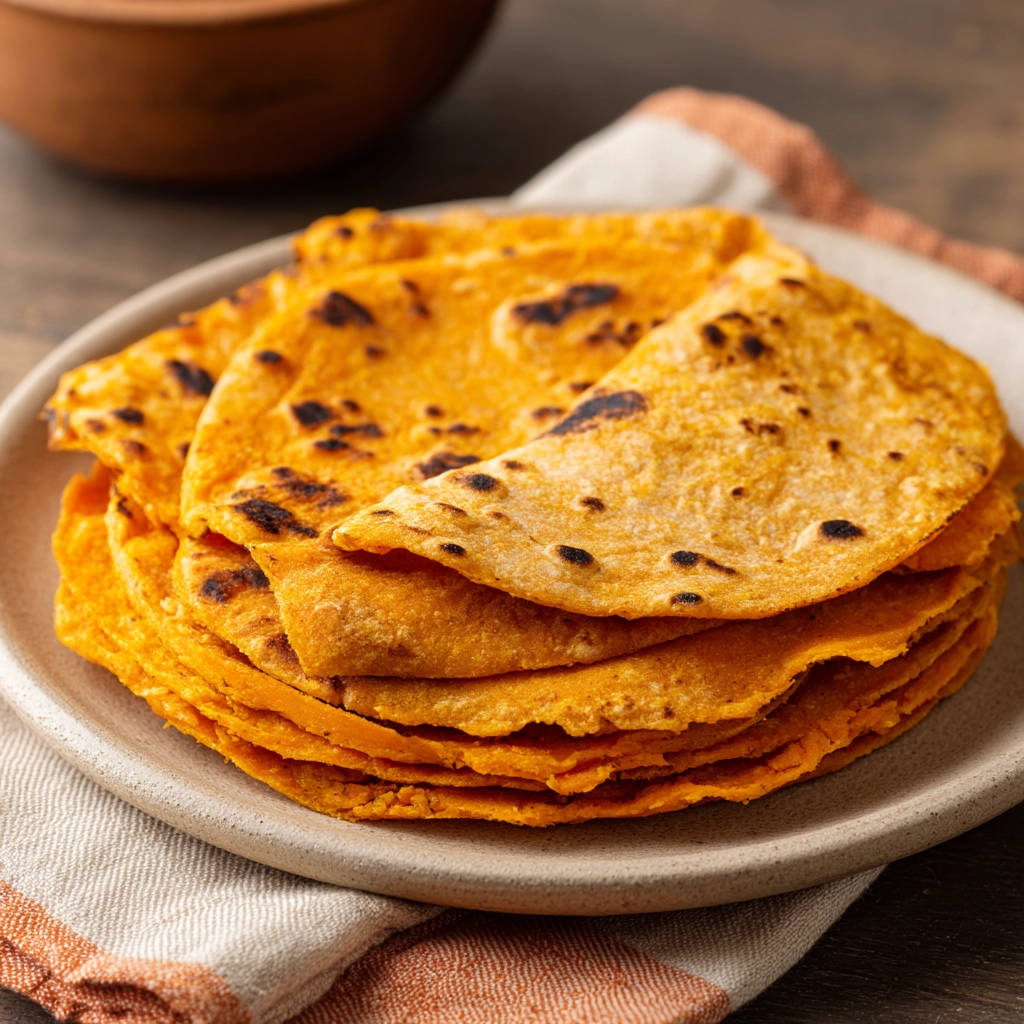
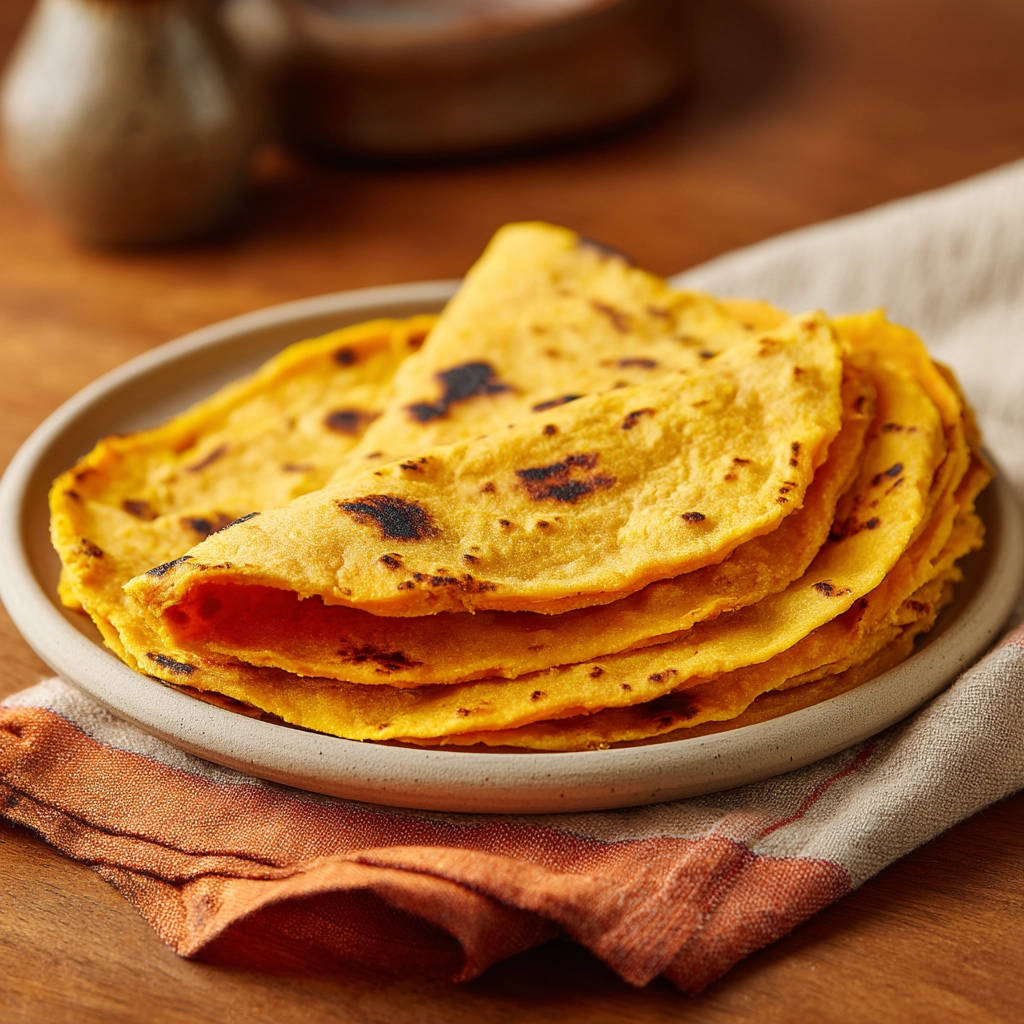
- Carefully transfer the rolled flatbread onto your preheated griddle. Cook for about 1 to 2 minutes per side. You’ll see bubbles starting to form on the surface, and the underside will develop beautiful golden brown spots and even some darker char marks, which add wonderful flavor. Use a spatula to flip it and cook the other side for another 1 to 2 minutes. Watch closely and avoid the temptation to overcook, as this is a common culprit for dry flatbreads.
- Here is the absolute key step, the secret that guarantees softness! As soon as EACH flatbread is cooked, immediately transfer it from the hot griddle to a plate. As soon as it’s on the plate, cover it tightly. You can use a clean kitchen towel draped directly over the stack, or better yet, transfer them into a container with a lid. The steam trapped under the cover is what keeps the flatbreads moist and pliable as they cool, preventing them from drying out and becoming stiff. This step cannot be skipped for maximum flexibility!
- Continue the process, rolling out and cooking the remaining dough balls one by one. As they cook, stack them directly onto the plate under the towel or into your covered container, allowing the steam from each hot flatbread to keep the others soft.
- Serve your sweet potato flatbreads warm or at room temperature. They are ready to be enjoyed in countless ways!
Tips for Perfect Sweet Potato Flatbreads Every Time
These sweet potato flatbreads are forgiving, but a few expert tips can elevate them from good to absolutely perfect. Achieving that consistently soft and flexible texture is the goal, and these pointers will help you get there.
- Perfecting the Sweet Potato: Make sure your mashed sweet potato is incredibly smooth. Any lumps can affect the dough’s consistency and rolling ease. Baking or steaming sweet potatoes often yields a drier, less watery mash than boiling, which is ideal for dough.
- Dough Consistency is Key: The dough should be soft and elastic after kneading, but not overly wet or sticky. Trust your hands! If it feels too wet, add flour very gradually. If it feels stiff, add warm water a tiny bit at a time. The sweet potato adds moisture, so you likely won’t need much extra liquid.
- Don’t Skip the Rest: That 30-minute rest isn’t just for show. Gluten relaxation is essential for a dough that rolls easily and yields soft, tender flatbreads. If you try to roll it out too soon, it will fight you and spring back.
- Heating Your Pan: Ensure your griddle or skillet is properly heated before adding the flatbread. If the pan isn’t hot enough, the flatbread will take too long to cook, potentially drying out before it develops those desirable brown spots. Medium-high heat is usually the sweet spot.
- Oil or No Oil?: While you can cook them dry, a thin film of oil on the pan really does contribute to a more flexible result and better browning. It also helps prevent sticking, making the process smoother.
- The Golden Rule (and Secret!): Immediately covering the cooked flatbreads is the most important step for softness. Don’t let them sit exposed to the air, even for a minute, or they will start to stiffen as they cool. Stack them up and keep them covered!
- Avoid Overcooking: Flatbreads cook quickly! Aim for 1-2 minutes per side. They should have golden spots and some char, but they shouldn’t be brittle. Overcooking is the enemy of softness.
Sweet Potato Flatbread Variations
Once you’ve mastered the basic sweet potato flatbread, feel free to get creative! You can easily adapt this recipe with simple additions:
- Herb Infusion: Knead in a tablespoon or two of finely chopped fresh herbs like rosemary, thyme, or chives along with the dry ingredients.
- Spicy Kick: Add a pinch of cayenne pepper or red pepper flakes to the dry ingredients for a little warmth.
- Garlic Goodness: Mix in a teaspoon of garlic powder or a finely minced clove of garlic (use garlic powder for more even distribution) with the dry ingredients.
- Seed Sensations: Incorporate a tablespoon of sesame seeds, nigella seeds, or poppy seeds into the dough.
- Different Veggies: While sweet potato is fantastic for softness, you could experiment with other smooth mashed vegetables like butternut squash or even smooth mashed potatoes, though the moisture content might need slight adjustment.
What to Serve With Sweet Potato Flatbreads
These soft sweet potato flatbreads are incredibly versatile. Their mild, slightly sweet flavor pairs well with a wide range of dishes.
Use them as:
- Wraps for savory fillings like chicken curry, roasted vegetables, or grilled meats.
- The base for quick and easy tacos.
- Scoops for dips like hummus, pico de gallo, or a simple yogurt dip.
- A side bread for hearty chili, soups, or stews.
- A simple snack brushed with garlic butter or olive oil and sprinkled with herbs.
Your Sweet Potato Flatbreads Questions Answered (FAQ)
Let’s tackle some common questions you might have about making these delightful sweet potato flatbreads.
Can I use cold water instead of warm water?
While you could technically use cold water, warm water (around 100-110°F) is highly recommended. The warmth helps the gluten in the flour develop more easily and quickly during kneading, resulting in a smoother, more elastic dough that is easier to work with and ultimately leads to softer flatbreads. Using very cold water can make the dough stiff and harder to knead effectively.
What kind of sweet potato should I use, and how should I cook it?
Any variety of sweet potato works, as long as it’s cooked until very soft and mashed completely smooth. You want a texture that’s like baby food, with no stringy bits or lumps. Boiling, steaming, or baking are all good methods. Baking or steaming often results in a slightly drier mash than boiling, which can be beneficial for controlling the dough’s hydration, but any method that yields a smooth, plain mash is fine.
Can I use gluten-free flour for this recipe?
This recipe relies on the gluten development in all-purpose flour for structure and elasticity. Substituting directly with a gluten-free flour blend may not yield the same soft and flexible results. You might need to experiment with a gluten-free blend designed for yeasted or flatbread recipes, and potentially adjust the liquid amount, as gluten-free flours can absorb moisture differently. The sweet potato will still contribute moisture, but the lack of gluten structure will change the dough’s properties significantly.
How do I store leftover sweet potato flatbreads?
Once they are completely cooled (while still covered to maintain softness), store the flatbreads in an airtight container or a resealable plastic bag at room temperature for 2-3 days. For longer storage, they freeze beautifully. Place a small piece of parchment paper between each flatbread to prevent sticking, then wrap the stack tightly in plastic wrap and place in a freezer-safe bag or container. They can be frozen for up to 3 months.
How do I reheat stored flatbreads?
To reheat, you can quickly warm them on a dry skillet over medium heat for about 30-60 seconds per side until pliable. You can also microwave them for a few seconds (be careful not to overcook or they can get tough) or wrap them loosely in foil and warm in a low oven.
Why is covering the flatbreads right after cooking so important?
This is the absolute secret to keeping them soft and flexible! When the hot flatbreads are covered, they trap their own steam. This steam creates a humid environment that keeps the flatbreads moist as they cool. If you leave them exposed to the air, the moisture evaporates quickly, leading to dry, stiff, and brittle flatbreads that crack when you try to fold them. The trapped steam ensures they cool down into perfectly pliable bread.
My dough is too sticky/dry. What should I do?
Don’t panic! Dough hydration can be affected by factors like humidity, the exact consistency of your sweet potato mash, and even how you measure your flour. If the dough is too sticky after initial kneading, add just a tablespoon of flour at a time, kneading after each addition, until it’s soft but manageable and not sticking excessively. If it’s too dry and stiff, add a teaspoon of warm water at a time, kneading until it becomes smooth and elastic.
Enjoy Your Homemade Sweet Potato Flatbreads!
There you have it! A simple, tried-and-true method for making soft, flexible, and absolutely delicious sweet potato flatbreads right in your own kitchen. Forget those disappointing, stiff results of the past. With the magic of sweet potato and that crucial covering step, you’ll achieve flatbread perfection every time.
Give this recipe a try this week! They are fantastic for wraps, tacos, dipping, or just enjoying on their own. I promise they’ll become a staple in your kitchen.
Did you make these sweet potato flatbreads? I’d love to hear how they turned out! Leave a comment below and let me know your favorite way to use them. Happy baking!
Sweet Potato Flatbreads

Ingredients
- 2 cups all purpose flour
- 1 teaspoon salt
- 1 cup warm water (about 100-110°F)
- 1/2 cup mashed cooked sweet potato (plain, no added sugar or butter)
- 1 tablespoon vegetable oil, plus more for cooking
Directions
- In a large bowl, whisk together the flour and salt.
- In a separate bowl, combine the warm water, mashed sweet potato, and 1 tablespoon vegetable oil. Stir until well combined.
- Pour the wet ingredients into the dry ingredients. Stir with a spoon or spatula until a shaggy dough forms.
- Turn the dough out onto a lightly floured surface. Knead for about 5-7 minutes until the dough is smooth and elastic. It should be soft but not overly sticky. If it is too sticky, add a tiny bit more flour, a tablespoon at a time. If it is too dry, add a tiny bit more warm water.
- Place the dough back in the bowl, cover with a clean kitchen towel or plastic wrap, and let rest for at least 30 minutes at room temperature. This resting period is important for gluten relaxation, which helps make the dough easier to roll and the final flatbreads softer.
- Divide the dough into 8 equal pieces. Roll each piece into a ball.
- Heat a flat griddle or heavy skillet over medium-high heat. Add a very thin film of vegetable oil or cook dry if preferred (cooking dry can sometimes make them stiffer, a little oil helps flexibility).
- While the pan heats, take one dough ball and flatten it slightly with your hand. On a lightly floured surface, roll the dough ball into a thin circle, about 6-8 inches in diameter. Aim for an even thickness.
- Carefully place the rolled flatbread onto the hot griddle. Cook for about 1-2 minutes per side, until bubbles form and the surface has golden brown spots and darker char marks, like you see in the picture. Flip and cook the other side for another 1-2 minutes. Do not overcook, as this will make them dry.
- IMMEDIATELY AS EACH FLATBREAD IS COOKED, transfer it to a plate and cover it tightly with a clean kitchen towel or place it directly into a container with a lid. This step is the secret! The trapped steam keeps the flatbreads moist and pliable as they cool, ensuring they stay soft and flexible instead of drying out.
- Continue rolling and cooking the remaining dough balls, stacking the cooked flatbreads under the towel/lid as you go.
- Serve warm or at room temperature. They are perfect for wraps, tacos, or dipping!