If you’ve ever cooked boneless, skinless chicken breasts, you know the heartbreak. One moment they look perfect, the next they’re dry, tough, and frankly, disappointing. It feels like a culinary tightrope walk! I’ve certainly walked that line many times, ending up with chicken that was less-than-stellar, despite a beautiful sauce or glaze.
But guess what? The struggle is over! After much experimentation, I’ve unlocked a simple method that guarantees incredibly moist and juicy glazed chicken dinner every single time. This isn’t just chicken; it’s chicken you’ll actually look forward to eating. Paired with creamy mashed potatoes and sweet roasted carrots, it’s a complete meal that’s comforting, flavorful, and surprisingly easy.
Reasons This Glazed Chicken Dinner is a Keeper
Why should this recipe become a staple in your kitchen? Let me count the ways:
- Guaranteed Juiciness: The core technique specifically prevents the dreaded dry chicken breast. No more hoping for the best!
- Flavor Explosion: The sweet and savory glaze is absolutely addictive and coats everything beautifully.
- Complete Meal: This recipe includes perfectly roasted carrots and creamy mashed potatoes, making it a one-pan (mostly!) dinner dream.
- Weeknight Friendly: While it looks impressive, it’s straightforward enough for a busy weeknight meal.
- Simple Ingredients: You likely have most of the pantry staples already.
Gathering Your Ingredients for a Perfect Glazed Chicken Dinner
Creating this incredibly moist glazed chicken dinner starts with understanding the role each ingredient plays. We’re building layers of flavor and ensuring every component of the meal works in harmony.
For the main event, we need boneless, skinless chicken breasts. The recipe calls for two, which is perfect for a standard meal size. Look for breasts that are roughly equal in thickness for even cooking. Alongside the chicken, we prepare the essential sides: baby carrots and russet potatoes. Baby carrots are fantastic because they require minimal prep – just a quick scrub! Russet potatoes are the classic choice for fluffy, creamy mashed potatoes, absorbing the milk and butter beautifully.
Our flavorful glaze is the star here. It’s a beautiful balance of sweet, savory, and tangy notes. Chicken broth forms the liquid base, adding depth. Honey or brown sugar provides the necessary sweetness for that gorgeous glaze and helps with caramelization. Soy sauce (or coconut aminos for a gluten-free option) brings essential umami and saltiness. Apple cider vinegar cuts through the sweetness with a bright tang, balancing the rich flavors. Tomato paste adds a subtle depth and richness, helping to thicken the sauce slightly.
A few aromatics and fats are key to building flavor throughout the dish. Olive oil is used for roasting the vegetables and searing the chicken, providing a lovely base. A small onion and fresh garlic are sautéed to create an aromatic foundation for the sauce. Finally, fresh thyme adds an earthy, herbaceous note that complements both the chicken and the vegetables, while fresh parsley provides a pop of color and freshness as a garnish.
Here’s the full list of ingredients you’ll need:
- 2 boneless, skinless chicken breasts
- 1 pound baby carrots, scrubbed
- 2 pounds russet potatoes, peeled and quartered
- 1/2 cup milk or half-and-half
- 1/4 cup butter
- 2 tablespoons olive oil
- 1 small onion, finely chopped
- 2 cloves garlic, minced
- 1/2 cup chicken broth
- 1/4 cup honey or brown sugar
- 2 tablespoons soy sauce or coconut aminos
- 1 tablespoon apple cider vinegar
- 1 tablespoon tomato paste
- Fresh thyme sprigs
- Fresh parsley, chopped, for garnish
- Salt
- Black pepper
Crafting Your Glazed Chicken Dinner: Step-by-Step to Juiciness
Let’s walk through the process, breaking down each stage to ensure your glazed chicken dinner turns out perfectly moist and delicious, from the crispy-edged carrots to the velvety mashed potatoes and, of course, that star juicy chicken.
- Prep the Oven and Carrots: Begin by preheating your oven to 400 degrees F (200 degrees C). Getting the oven hot first ensures the carrots roast properly and develop those lovely caramelized edges. Take your scrubbed baby carrots, toss them right on a baking sheet with a drizzle of olive oil, and season them generously with salt and pepper. Spread them out in a single layer so they roast evenly. Pop them into the hot oven to roast for about 20-25 minutes. If you like, you can toss in a couple sprigs of fresh thyme during the last 10 minutes of roasting for an extra layer of flavor. Roasting the carrots first allows them to become tender while you work on the other components.
- Start the Mashed Potatoes: While the carrots are doing their thing in the oven, get the potatoes going. Place your peeled and quartered russet potatoes in a large pot. Cover them with cold, salted water – starting with cold water allows the potatoes to cook more evenly as the water heats up. Bring the pot to a boil, then reduce the heat to a gentle simmer. Let them cook for 15-20 minutes, or until they are tender enough to be easily pierced with a fork. Drain the potatoes well, then return them to the hot pot. Add your milk (or half-and-half for extra richness!) and butter. Mash them until they are smooth and creamy. Don’t forget to season them with salt and pepper to taste. Keep them warm while you finish the rest of the dish.
- Season the Chicken: Now, turn your attention to the chicken breasts. Pat them dry thoroughly with paper towels – this is important for achieving a good sear. Season both sides generously with salt and black pepper. Don’t be shy with the seasoning!
- Sear the Chicken: Heat 1 tablespoon of olive oil in a large skillet over medium-high heat. This is a crucial step for developing flavor and locking in moisture. Once the oil is shimmering (but not smoking!), carefully add the seasoned chicken breasts. Sear them for 4-5 minutes per side. You’re looking for a beautiful golden-brown crust. Remember, the goal here is not to cook the chicken all the way through. You’re just building that exterior texture and color.
- Rest the Chicken: After searing, remove the chicken breasts from the skillet and place them on a clean plate. It’s okay that they aren’t fully cooked yet – this is part of the secret to keeping them juicy! They’ll finish cooking later in the sauce.
- Build the Sauce Base: Add the remaining 1 tablespoon of olive oil to the same skillet if needed. Reduce the heat to medium. Add the finely chopped onion and cook, stirring occasionally, until it softens and becomes translucent, which should take about 3-4 minutes. Add the minced garlic and cook for just another minute, until it becomes fragrant. Be careful not to burn the garlic.
- Create the Glaze: Pour the chicken broth into the skillet, scraping up any browned bits (fond) from the bottom of the pan with a wooden spoon. These bits are packed with flavor! Stir in the honey or brown sugar, soy sauce or coconut aminos, apple cider vinegar, and tomato paste. Add a few fresh sprigs of thyme to infuse the sauce. Bring the sauce to a gentle simmer.
- Finish Cooking in the Sauce: Return the partially cooked chicken breasts to the skillet, nestling them into the simmering sauce. Reduce the heat to medium-low. Cover the skillet and let the chicken continue cooking in the sauce for 8-10 minutes. This gentle poaching and simmering in the flavorful liquid is the key technique that keeps the chicken incredibly tender and juicy while the sauce thickens around it. Use a meat thermometer to ensure the internal temperature of the thickest part of the chicken reaches 165 degrees F (74 degrees C).
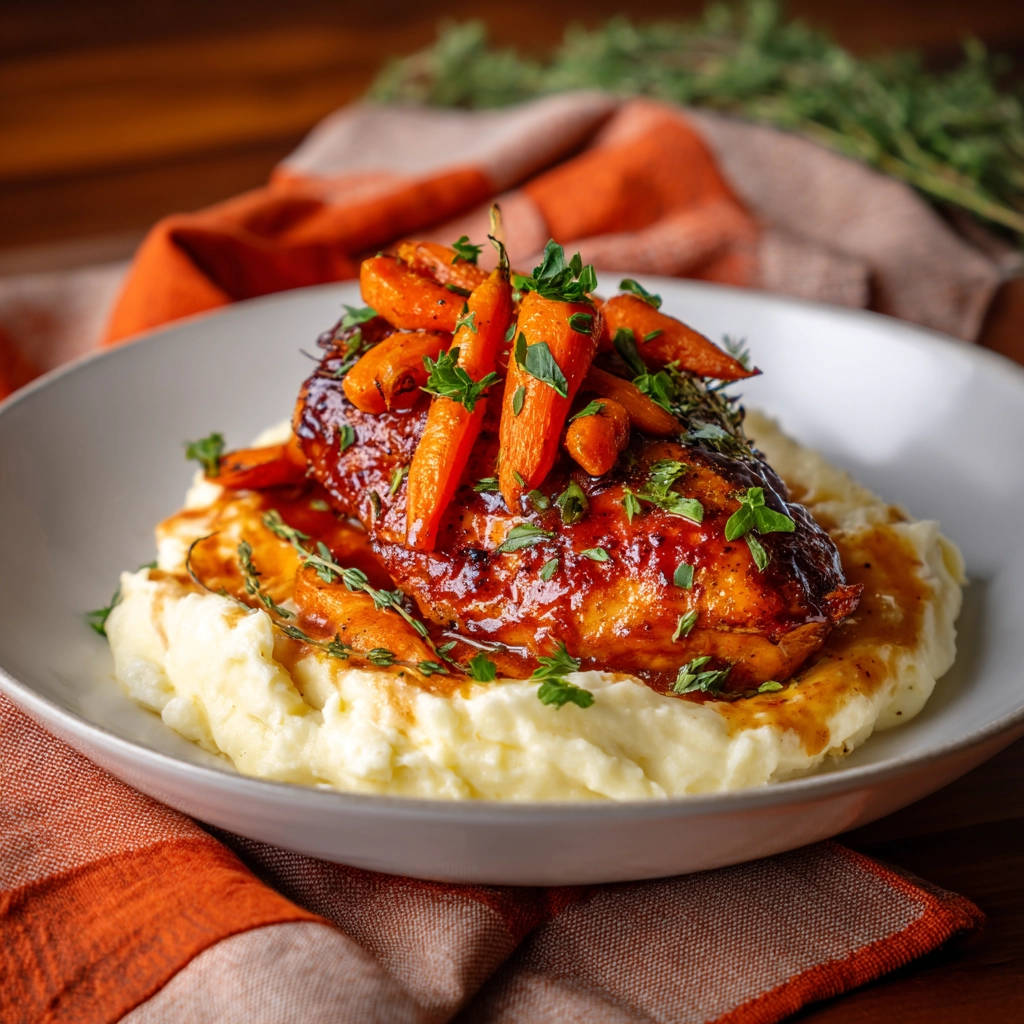
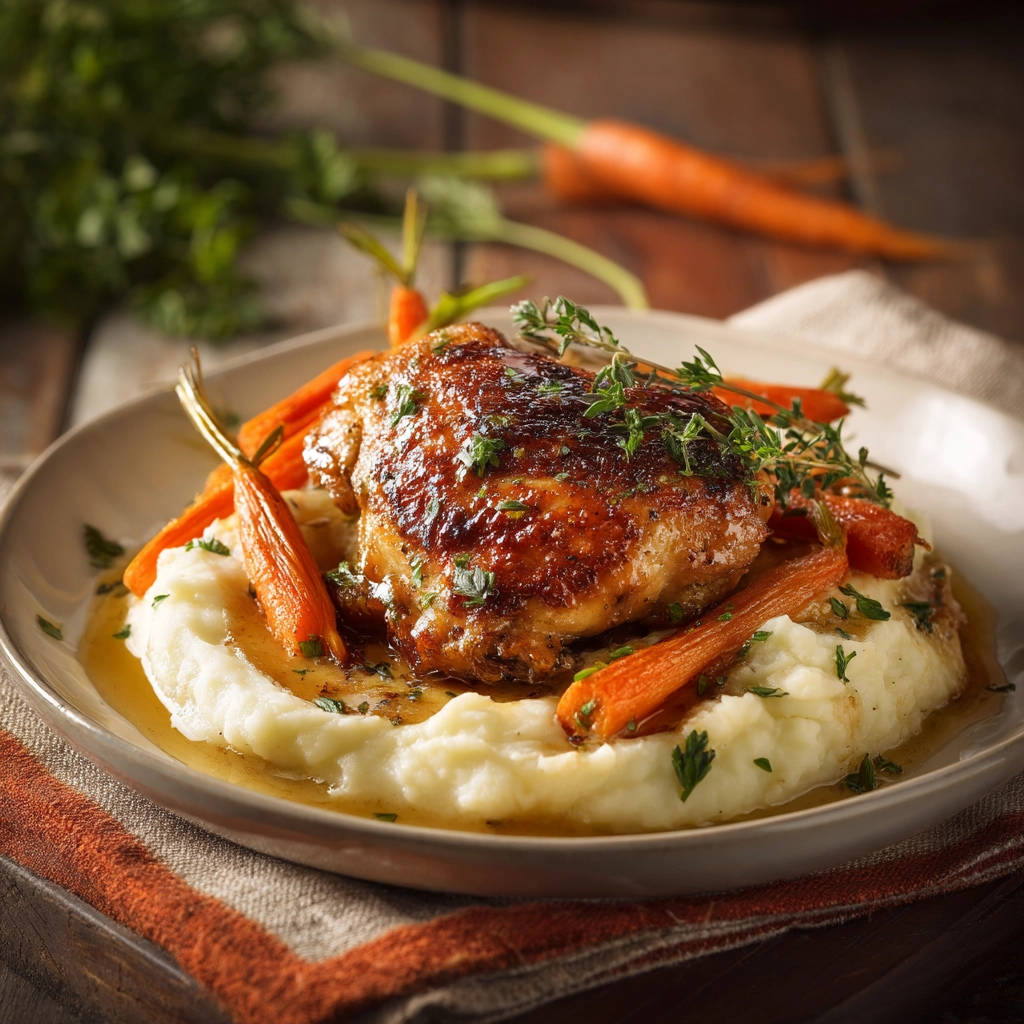
- Serve Your Delicious Dinner: Once the chicken is cooked through, remove the thyme sprigs from the sauce. It’s time to plate! Spoon a generous portion of the warm mashed potatoes onto each plate. Place a glazed chicken breast over the potatoes. Spoon plenty of that glorious, thickened sauce over both the chicken and the mashed potatoes. Top with your roasted carrots and garnish everything with fresh chopped parsley for brightness. Serve immediately and enjoy your perfectly juicy glazed chicken dinner!
Tips for a Perfect Glazed Chicken Dinner Every Time
Achieving chicken breast perfection is easier with a few insider tips. Here’s how to make this glazed chicken dinner consistently fantastic:
- Don’t Skip the Sear: That initial sear isn’t just for looks; it builds crucial flavor on the surface of the chicken. Just remember not to cook it all the way through at this stage!
- Temperature is Key: Using a meat thermometer is the most reliable way to know when your chicken is perfectly cooked. 165°F (74°C) is the target internal temperature. Cooking it in the sauce helps prevent it from overshooting this mark and drying out.
- Thyme Power: Don’t underestimate the fresh thyme! Adding it to the roasting carrots and the simmering sauce infuses the whole dish with wonderful earthy notes. Remember to remove the sprigs before serving.
- Adjust the Glaze: Taste the sauce after it simmers. Want it sweeter? Add a touch more honey or brown sugar. Need more tang? A little more apple cider vinegar does the trick. A splash more broth or even water can thin it out if it gets too thick.
- Mashed Potato Substitutions: While russets are classic, you could also use Yukon Gold potatoes for a slightly creamier mash. For a different texture, try serving crispy baked potatoes on the side instead of mashed.
- Vegetable Variations: Not a fan of carrots? This method of roasting works beautifully with other vegetables too! Consider roasting broccoli florets, asparagus, or even Brussels sprouts alongside the potatoes. Need more veggie side ideas? Check out our guide to perfectly roasted vegetables.
What to Serve With Your Glazed Chicken Dinner
This recipe thoughtfully includes mashed potatoes and roasted carrots, making it a complete meal. However, you can always add or swap sides! A simple green salad tossed with a light vinaigrette would be lovely. Some cheesy garlic bread is always a hit for soaking up that delicious glaze. Steamed green beans or a side of creamy corn could also be delightful additions.
Your Glazed Chicken Dinner Questions Answered (FAQ)
Have questions about making this glazed chicken dinner? Here are some common ones:
Can I use chicken thighs instead of breasts?
Yes, absolutely! Chicken thighs are naturally more forgiving and less prone to drying out due to their higher fat content. You can follow the same searing and simmering method, but they may require a few extra minutes to reach the internal temperature of 165°F (74°C). If you love chicken thighs, check out our recipe for Glazed Chicken Thighs!
How can I make the sauce thicker?
The sauce should thicken as it simmers with the chicken. If it’s still too thin for your liking after the chicken is cooked, remove the chicken breasts from the skillet, increase the heat slightly, and let the sauce simmer uncovered for a few more minutes, stirring occasionally, until it reduces to your desired consistency.
Can I prepare parts of this dish ahead of time?
Yes! You can roast the carrots ahead of time and gently reheat them before serving. The mashed potatoes can also be made ahead and gently reheated on the stovetop with a splash more milk or butter, or in the microwave. It’s best to cook the chicken and make the sauce just before serving for optimal texture and flavor.
What can I use if I don’t have chicken broth?
Vegetable broth can be used as a substitute for chicken broth, though it may slightly alter the flavor profile of the sauce. In a pinch, water could work, but the sauce won’t have as much depth of flavor.
Can I freeze leftover Glazed Chicken Dinner?
Yes, leftovers can be stored in an airtight container in the refrigerator for 3-4 days. You can also freeze the chicken and sauce (separately from the potatoes and carrots, if possible) for up to 2-3 months. Thaw overnight in the refrigerator and reheat gently on the stovetop or in the microwave.
Enjoy Your Homemade Glazed Chicken Dinner!
Say goodbye to dry, boring chicken breast forever! This glazed chicken dinner recipe provides a simple, foolproof method for achieving perfectly juicy results every single time, all coated in a sweet and savory glaze you won’t be able to get enough of. Paired with creamy mashed potatoes and tender roasted carrots, it’s a comforting, satisfying meal that’s perfect for family dinners or entertaining friends.
Give this recipe a try and let me know what you think! Leave a comment below and tell me how juicy your chicken turned out. Happy cooking!
Glazed Chicken Dinner

Ingredients
- 2 boneless, skinless chicken breasts
- 1 pound baby carrots, scrubbed
- 2 pounds russet potatoes, peeled and quartered
- 1/2 cup milk or half-and-half
- 1/4 cup butter
- 2 tablespoons olive oil
- 1 small onion, finely chopped
- 2 cloves garlic, minced
- 1/2 cup chicken broth
- 1/4 cup honey or brown sugar
- 2 tablespoons soy sauce or coconut aminos
- 1 tablespoon apple cider vinegar
- 1 tablespoon tomato paste
- Fresh thyme sprigs
- Fresh parsley, chopped, for garnish
- Salt
- Black pepper
Directions
- Preheat oven to 400 degrees F (200 degrees C). Toss carrots with a drizzle of olive oil, salt, and pepper. Roast for 20-25 minutes, or until tender and slightly caramelized. Add a couple sprigs of thyme to the pan for the last 10 minutes if desired.
- While carrots roast, place potatoes in a large pot and cover with cold, salted water. Bring to a boil, then reduce heat and simmer for 15-20 minutes, or until fork-tender. Drain potatoes and return to the hot pot. Add milk and butter. Mash until smooth, seasoning with salt and pepper to taste. Keep warm.
- Season chicken breasts generously with salt and pepper.
- Heat 1 tablespoon olive oil in a large skillet over medium-high heat. Add chicken breasts and sear for 4-5 minutes per side, until golden brown. This is key to locking in moisture: do not cook the chicken all the way through at this stage.
- Remove chicken from the skillet and set aside on a plate. It will not be fully cooked.
- Add the remaining 1 tablespoon olive oil to the skillet if needed. Add chopped onion and cook over medium heat until softened, about 3-4 minutes. Add minced garlic and cook for 1 minute more until fragrant.
- Pour in chicken broth, honey or brown sugar, soy sauce, apple cider vinegar, and tomato paste. Add a few sprigs of fresh thyme. Bring the sauce to a simmer, scraping up any browned bits from the bottom of the skillet.
- Return the chicken breasts to the skillet, nesting them in the simmering sauce. Reduce heat to medium-low, cover the skillet, and let the chicken finish cooking in the sauce for 8-10 minutes, or until the internal temperature reaches 165 degrees F (74 degrees C). Finishing the chicken in the sauce this way keeps it incredibly tender and juicy while the sauce thickens.
- Remove thyme sprigs from the sauce. Spoon mashed potatoes onto plates. Place a glazed chicken breast over the potatoes. Spoon plenty of the glorious sauce over the chicken and mashed potatoes. Top with roasted carrots and garnish with fresh chopped parsley. Serve immediately.