Ever embarked on the sweet journey of making homemade lemon bars, only to find yourself facing a lovely, yet infuriatingly unset mess? You know, the kind that refuses to hold its shape, turning slicing into a sticky, frustrating endeavor? I’ve been there, staring forlornly at a pan of deliciousness that just wouldn’t cooperate.
Getting those beautiful, distinct layers to set just right can feel like a culinary mystery. But guess what? It doesn’t have to be! I’m thrilled to share a simple, foolproof method for making Creamy Lemon Layer Bars that set perfectly every single time, yielding slices so clean and crisp, you’ll feel like a baking pro. This recipe takes the guesswork out of achieving that dreamy, layered perfection we all crave.
Why These Creamy Lemon Layer Bars Are a Keeper
Aside from the guaranteed perfect set (which, let’s be honest, is a major win!), these Creamy Lemon Layer Bars offer a multitude of reasons to become your go-to recipe:
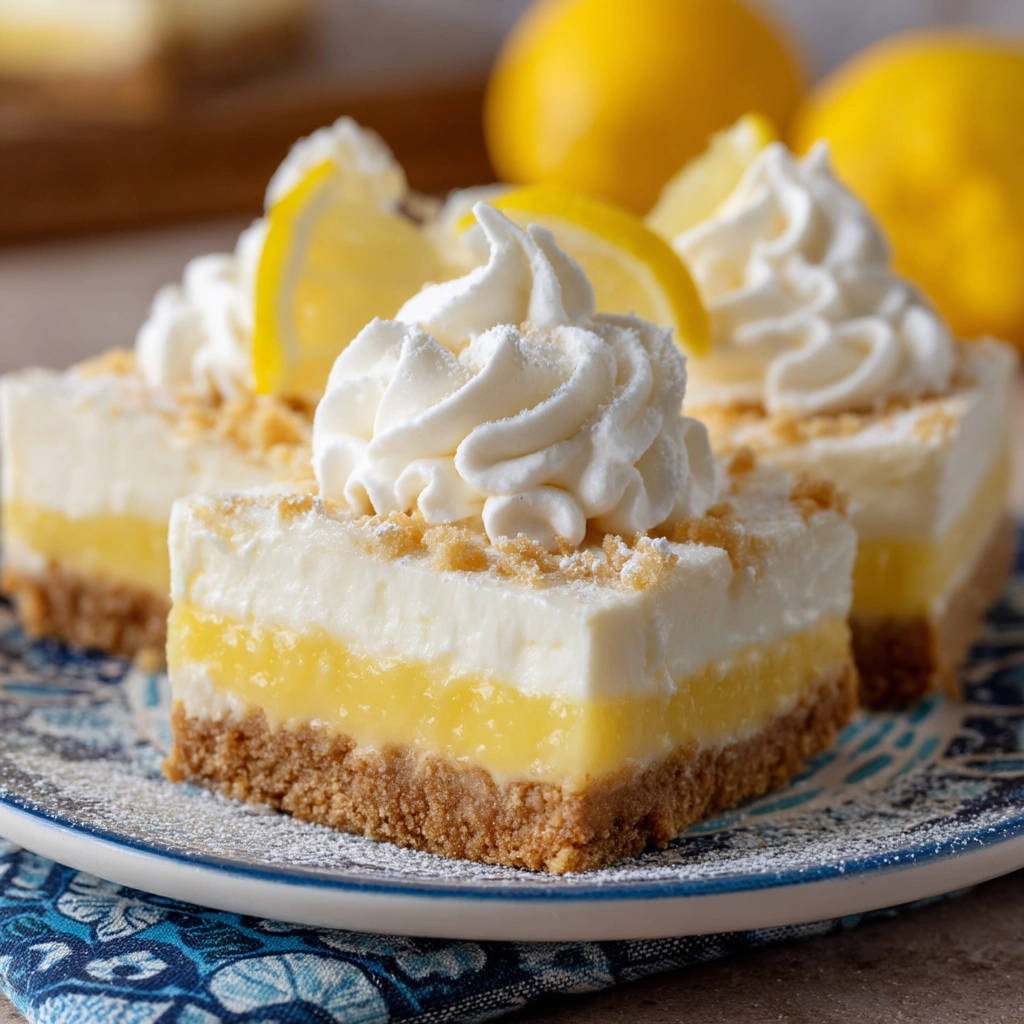
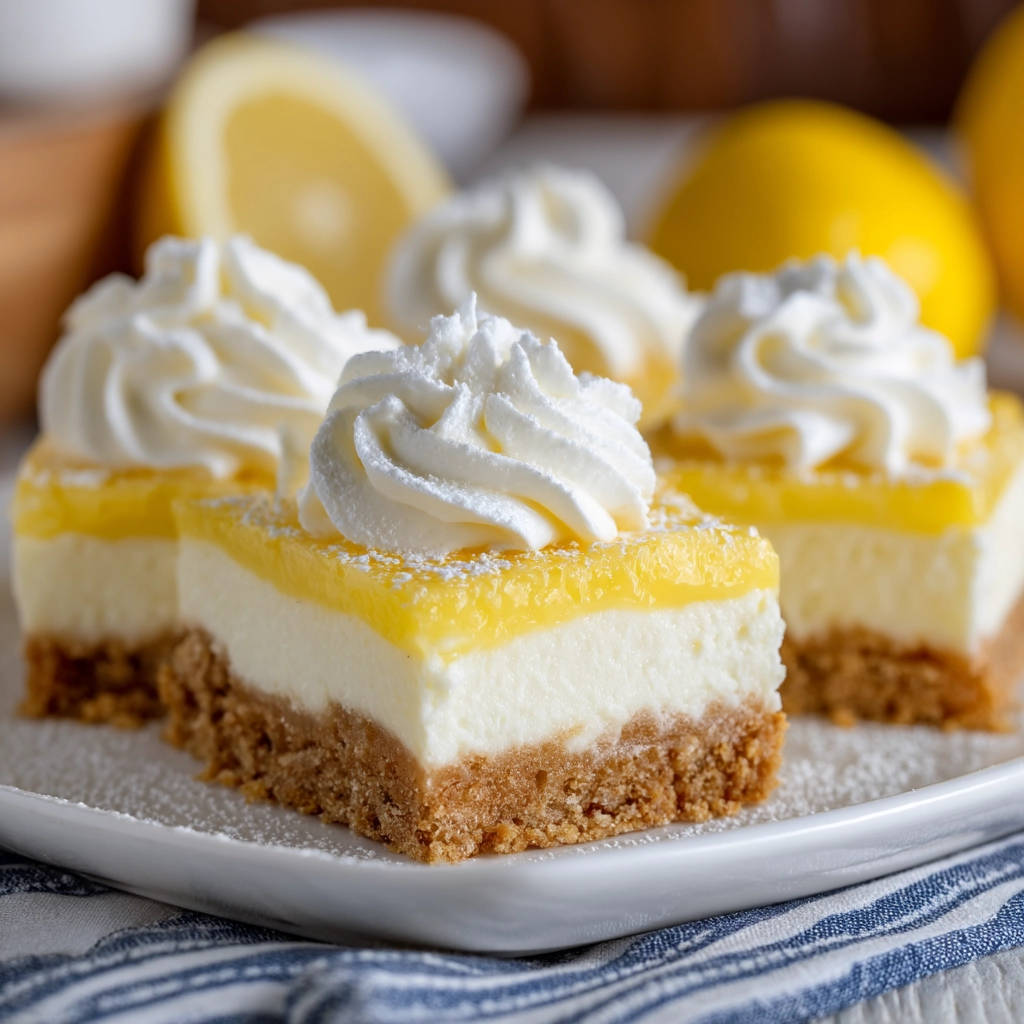
- Luscious Layers: You get a sturdy, buttery graham cracker base, a sweet, smooth cream cheese filling, and a bright, tangy lemon layer – a delightful textural and flavor combination.
- Bright, Fresh Flavor: Using fresh lemon juice and zest provides that essential zippy, vibrant citrus taste that defines a truly great lemon bar.
- Surprisingly Simple: Despite the impressive layered appearance, the steps are straightforward and don’t require any complex techniques like baking custards or using a water bath.
- Perfectly Portable: Once set, these bars are easy to cut and transport, making them ideal for picnics, potlucks, or just sharing with friends and family.
- Customizable: While incredible as is, they’re also easy to adapt with different toppings or small flavor tweaks.
Gathering Your Ingredients for Bright & Creamy Lemon Bars
Creating these delightful bars starts with assembling a few simple, yet essential, components. Each ingredient plays a crucial role in building the distinct layers and ensuring that perfect texture and bright flavor profile. Think of them as the building blocks for your perfectly set dessert!
For the sturdy base, we start with the classic combination of graham cracker crumbs, melted butter, and a touch of sugar. The graham cracker crumbs form the structural foundation, while the melted butter binds them together into a firm crust. The sugar adds just a hint of sweetness to complement the later layers.
The luxurious middle layer is all about creamy indulgence. You’ll need softened cream cheese – make sure it’s truly at room temperature for effortless beating and a silky smooth layer – along with powdered sugar for sweetness without graininess, and vanilla extract to enhance the overall flavor profile.
The star of the show, the tangy lemon layer, relies on the magical interaction of sweetened condensed milk and fresh lemon juice. The acidity in the lemon juice reacts with the condensed milk, causing it to thicken beautifully as it chills. Adding fresh lemon zest is non-negotiable; it provides intense lemon aroma and flavor without adding extra liquid, ensuring that bright, zesty punch.
Finally, for that elegant finishing touch, you’ll want some heavy cream for whipping into fluffy peaks. Optional garnishes like extra graham cracker crumbs or thin lemon slices add visual appeal and extra flavor.
Here is a summary of everything you’ll need:
- 1 and 1/2 cups graham cracker crumbs
- 1/3 cup melted butter
- 1/4 cup sugar
- 8 ounces cream cheese, softened
- 1 cup powdered sugar
- 1 teaspoon vanilla extract
- 1 can (14 ounces) sweetened condensed milk
- 1/2 cup fresh lemon juice
- 1 tablespoon lemon zest
- Heavy cream for whipping
- Optional extra crumbs and lemon slices for garnish
Crafting Your Perfectly Set Lemon Bars: Step-by-Step
Ready to create baking magic? Follow these steps closely, paying special attention to the chilling times, which are key to achieving those clean layers and sliceable bars. This process breaks down into preparing the crust, the creamy layer, the lemon layer, and most importantly, the essential setting time.
- Start with the Foundation: In a medium bowl, combine the graham cracker crumbs, melted butter, and granulated sugar. Stir everything together until the crumbs are evenly moistened by the butter. This mixture should resemble wet sand. Transfer this delicious mixture into an 8×8 inch baking pan. Use the bottom of a glass or a flat-bottomed measuring cup to firmly press the mixture into an even layer across the bottom of the pan. A well-compacted crust is essential for structure. Once pressed, pop the pan into the freezer for 15 minutes or the refrigerator for 30 minutes. This brief chill helps the crust firm up before adding the next layer.
- Prepare the Creamy Middle: While the crust chills, work on the rich cream cheese layer. In a separate mixing bowl, take your softened cream cheese (remember, room temperature is your friend here!) and beat it with an electric mixer until it’s smooth and free of lumps. Gradually beat in the powdered sugar until it’s fully incorporated and the mixture is creamy and fluffy. Stir in the vanilla extract. Carefully spread this delightful cream cheese mixture evenly over the chilled graham cracker crust. A small offset spatula or the back of a spoon works well for this. Return the pan to the refrigerator to keep everything cool while you prepare the final layer. This is similar to the process for making Mini Cheesecakes, where a smooth, chilled base layer is crucial.
- Mix the Tangy Topping: Now for the bright, lemony goodness! In a third bowl, whisk together the sweetened condensed milk, fresh lemon juice, and the fragrant lemon zest. As you whisk, you’ll notice the mixture starting to thicken almost immediately. This is the acid in the lemon juice reacting with the protein in the condensed milk – pretty cool, right? Keep whisking until everything is well combined and the mixture has a uniform consistency. Gently and evenly pour this thickened lemon mixture over the chilled cream cheese layer in the pan. Try to pour slowly and distribute it across the surface.
- The Critical Setting Time: This is arguably the most crucial step for achieving those perfectly set bars that slice beautifully: Refrigeration! Cover the pan loosely with plastic wrap or foil. Place the covered pan in the refrigerator and chill for a minimum of 4 hours. For the absolute best results, cleanest slices, and firmest layers, chilling overnight (8 hours or more) is highly, highly recommended. This extended time in the cold allows the lemon mixture to gel and the cream cheese layer to firm up completely, binding all the layers together so they hold their shape when cut. Don’t rush this step!
- Slice and Serve: Once your bars are completely set and firm to the touch, it’s time to reveal their glory! Use a sharp knife to cut the slab into squares or bars. For the neatest, cleanest cuts, wipe your knife clean with a damp cloth or rinse it under hot water and dry it between each slice. This prevents the layers from sticking to the blade and getting messy. Before serving, top each bar with a swirl of freshly whipped cream. If you like, garnish with a sprinkle of extra graham cracker crumbs or a thin slice of fresh lemon for extra visual appeal and a burst of aroma.
Tips for Perfect Creamy Lemon Layer Bars Every Time
While this recipe is designed for success, a few extra tips can ensure your Creamy Lemon Layer Bars turn out absolutely perfect:
- Room Temperature Cream Cheese: I cannot stress this enough! Cold cream cheese will result in a lumpy layer that’s impossible to smooth evenly. Plan ahead and let it sit out for at least an hour (or gently soften it in the microwave for a few seconds on low power).
- Fresh is Best for Lemon: Always use fresh lemon juice and zest. Bottled juice lacks the vibrant flavor and acidity needed for the reaction with the condensed milk, and pre-grated zest doesn’t compare in terms of aroma and flavor.
- Don’t Skip the Chill: Resist the urge to cut the chilling time short. The 4-hour minimum is necessary, but overnight truly makes the difference between “okay” bars and ones that slice like a dream. It’s the secret to the “sets perfectly” promise!
- Pan Prep: For easiest removal, you can line your 8×8 inch pan with parchment paper, leaving an overhang on the sides. Once chilled and set, you can lift the whole block out before slicing.
- Variations: Feel free to experiment with the crust! While graham cracker is classic, you could potentially use shortbread cookies or even vanilla wafers crushed into crumbs. Or, for another delightful citrus bar experience, try your hand at Strawberry Lemon Bars!
What to Serve With Creamy Lemon Layer Bars
These zesty bars are delightful on their own, but pairing them can elevate the experience. A dollop or swirl of fresh whipped cream is essential for balancing the tartness. For a simple beverage, a refreshing glass of Perfect Iced Tea hits the spot. If you’re serving them as part of a dessert spread, they pair beautifully with other fruit-based treats or lighter options. Thinking citrus? Our Key Lime Pie offers a similar tangy profile but in a different format.
Your Creamy Lemon Layer Bar Questions Answered (FAQ)
Have questions about making these layered lemon bars? Here are some answers to common queries:
Can I use bottled lemon juice instead of fresh?
While technically possible, it’s not recommended for the best flavor and setting results. Fresh lemon juice has a higher acidity level that reacts more effectively with the sweetened condensed milk, which is crucial for the lemon layer to firm up properly. Bottled juice often contains preservatives and lacks the vibrant, fresh taste. Use fresh lemons for guaranteed success!
Why didn’t my lemon layer set properly?
The most common reason is insufficient chilling time. The chemical reaction between the lemon juice and condensed milk needs ample time in the cold to thicken and set. Ensure you chill the bars for the full minimum of 4 hours, and ideally, leave them overnight for the best results. Using bottled lemon juice or old condensed milk could also be contributing factors.
Can I use low-fat cream cheese or condensed milk?
I strongly advise against using low-fat or fat-free versions for this recipe. The fat content in full-fat cream cheese and the composition of regular sweetened condensed milk are essential for achieving the correct texture, creaminess, and setting consistency of the layers. Substituting these can lead to a runny or less flavorful result.
How long do Creamy Lemon Layer Bars last?
Properly stored in an airtight container in the refrigerator, these bars will stay fresh for 3-5 days. The flavors can even meld and improve slightly on the second day!
Can I freeze these lemon bars?
Yes, you can! Once the bars are fully set and sliced, place them in a single layer on a baking sheet and freeze until solid. Then, transfer them to an airtight freezer-safe container, separating layers with parchment paper. They can be frozen for up to 1-2 months. Thaw them in the refrigerator before serving. Note that the texture of the cream cheese layer might change slightly after freezing and thawing.
What size pan should I use?
This recipe is specifically designed for an 8×8 inch square pan. Using a larger pan will result in thinner layers that may not set correctly and a higher crust-to-filling ratio. Using a smaller pan might make the layers too thick and require longer chilling.
Enjoy Your Homemade Lemon Layer Bars!
You’ve done it! You’ve conquered the unset lemon bar problem and created a batch of these irresistible Creamy Lemon Layer Bars with picture-perfect layers. The combination of the crisp crust, smooth cream cheese, and tangy lemon is simply divine, making them a fantastic dessert for any occasion or just a special treat for yourself.
Give this recipe a try, savor the process, and most importantly, enjoy every bite of these perfectly set, bright, and creamy bars. I’d love to hear how yours turn out! Leave a comment below, or better yet, snap a photo and share your success with me. Happy baking!
Creamy Lemon Layer Bars

Ingredients
- 1 and 1/2 cups graham cracker crumbs
- 1/3 cup melted butter
- 1/4 cup sugar
- 8 ounces cream cheese softened
- 1 cup powdered sugar
- 1 teaspoon vanilla extract
- 1 can (14 ounces) sweetened condensed milk
- 1/2 cup fresh lemon juice
- 1 tablespoon lemon zest
- Heavy cream for whipping
- Optional extra crumbs and lemon slices for garnish
Directions
- Combine graham cracker crumbs, melted butter, and sugar in a bowl. Press this mixture firmly into the bottom of an 8×8 inch pan. Chill crust for 15 minutes in the freezer or 30 minutes in the refrigerator.
- In a separate bowl, beat the softened cream cheese until smooth. Beat in the powdered sugar and vanilla extract until combined and fluffy. Spread this mixture evenly over the chilled graham cracker crust. Return pan to the refrigerator.
- In a third bowl, whisk together the sweetened condensed milk, fresh lemon juice, and lemon zest until well combined and slightly thickened from the lemon juice reacting with the condensed milk. Pour this lemon mixture gently and evenly over the cream cheese layer in the pan.
- This is the crucial step for achieving perfectly set bars: Cover the pan loosely and refrigerate for a minimum of 4 hours. For the best results and cleanest slices, chilling overnight is highly recommended. This extended chilling time allows all the layers, especially the lemon and cream cheese layers, to firm up completely, ensuring they hold their shape beautifully when cut.
- Once the bars are completely set and firm, use a sharp knife to cut into squares or bars. For the neatest cuts, wipe the knife clean with a damp cloth between slices. Top each bar with a swirl of freshly whipped cream. Garnish with extra graham cracker crumbs and a thin slice of lemon if desired before serving.