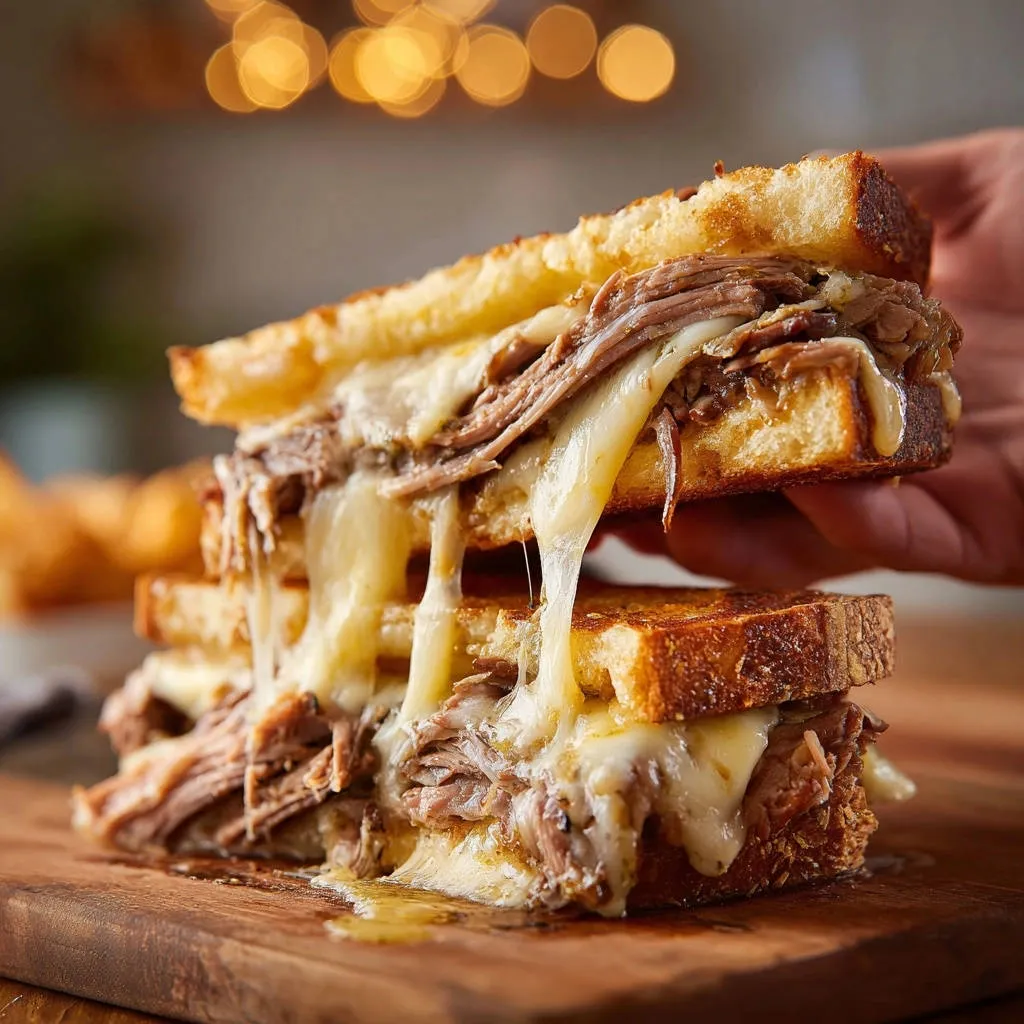
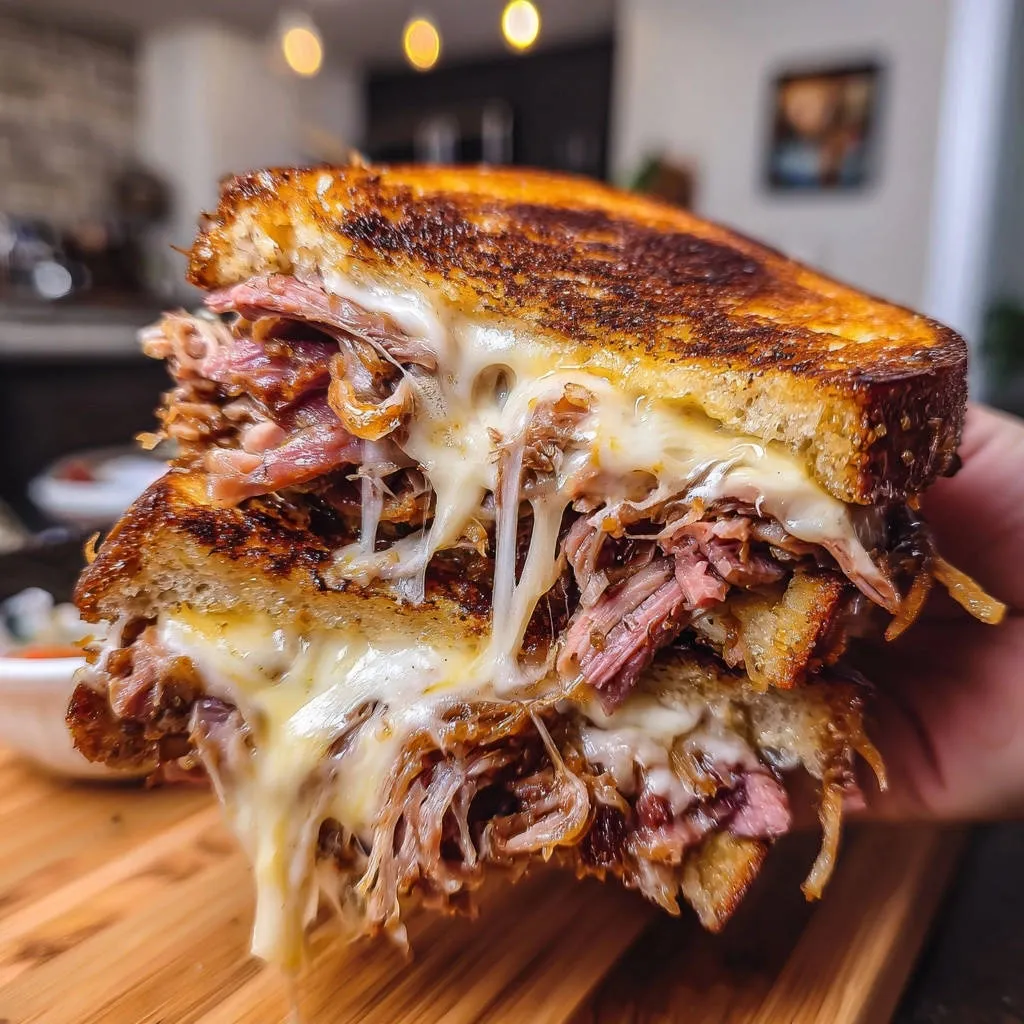
Let’s talk about sandwiches. Not just any sandwich, but the kind that makes you close your eyes with the first bite – warm, savory beef piled high, encased in perfectly golden, crispy bread, and held together by an avalanche of ridiculously gooey, stretchy, melted cheese. Ah, the ultimate beef and cheese melt. It sounds simple, right? Bread, meat, cheese, heat. But anyone who’s tried to achieve this level of melty perfection at home knows the struggle. You get the bread beautifully browned on the outside, maybe even a little charred, only to find the cheese inside is still stubbornly unmelted, a cold, sad layer separating you from sandwich bliss. I’ve been there more times than I care to admit, staring at a beautiful golden crust with a disappointing, unmelted core.
Years of experimenting, and yes, a few slightly-too-brown bread casualties, led me to one simple, game-changing technique. It’s the secret handshake of grilled sandwiches, the whisper that turns frustration into pure, drippy, cheesy joy. This method ensures your bread is perfectly golden and crisp on the outside while the cheese achieves maximum meltiness on the inside, wrapping around that flavorful beef in a warm embrace. Forget burnt bread and sad cheese; get ready for the ultimate beef and cheese melt experience.
Why You’ll Fall in Love with This Beef Melt
This isn’t just another sandwich recipe. This is the blueprint for beefy, cheesy success. Here’s why this Ultimate Beef and Cheese Melt will become a regular in your rotation:
- Guaranteed Gooey Cheese: That one simple trick eliminates the guesswork and ensures your cheese is always wonderfully melted from edge to edge. No more unmelted centers!
- Perfectly Golden Bread: Say goodbye to burnt crusts and hello to a consistently beautiful, golden-brown exterior with a delightful crunch.
- Uses Up Leftovers Gloriously: Got leftover pot roast or other shredded beef? This is the absolute best way to give it a delicious encore.
- Comfort Food at Its Finest: Warm, savory, and utterly satisfying. It’s a hug in sandwich form, perfect for a cozy lunch or a quick, hearty dinner.
- Simple Ingredients, Epic Flavor: You don’t need a pantry full of obscure items to make something truly delicious. Basic components combine for maximum impact.
Gathering Your Ingredients for Ultimate Beefy Goodness
The beauty of this sandwich lies in its simplicity, allowing the quality of each core ingredient to shine. Building the perfect ultimate beef and cheese melt starts with selecting the right components.
For the foundation of our glorious melt, you’ll need:
- Thick-Cut Bread (4 slices): This is crucial for structure. Thin slices can get soggy or fall apart under the weight of the fillings. Think substantial loaves like sourdough, country white, or even a hearty Texas toast. The thicker cut provides a good base and holds up well to the cooking process, developing a beautiful crust while staying soft inside.
- Shredded Cooked Beef (1 cup): This is where the magic happens. Leftover pot roast is the absolute dream here – tender, flavorful, and already cooked! You could also use other shredded cuts, perhaps from a roast beef or even finely shredded steak. The key is that it’s already cooked and easy to shred for even distribution. A hearty dish like a classic pot roast is perfect for creating leftovers for this melt.
- Shredded Cheese (1.5 cups): The heart of the melt! A mix of provolone and mozzarella is suggested, and for good reason. Provolone brings a lovely mild tang and melts beautifully, while mozzarella offers that classic, irresistible stretch and gooeyness. Shredding your own cheese is always recommended, as pre-shredded cheeses sometimes contain anti-caking agents that can slightly hinder melting. However, store-bought shredded cheese will still work just fine. Feel free to experiment with other good melting cheeses like Gruyere, Monterey Jack, or a blend that speaks to you.
- Unsalted Butter or Mayonnaise (2 tablespoons, softened): This is what gives the bread its golden, crispy exterior. Both butter and mayonnaise have their champions. Butter provides that classic grilled cheese flavor and crispiness. Mayonnaise, surprisingly, spreads incredibly easily and often yields an even crispier, beautifully browned crust with a subtle tangy note. Choose your fighter! Ensure it’s softened (for butter) or easily spreadable (for mayo) for even coating.
That’s it! Simple ingredients promising extraordinary results when treated with the right technique.
Crafting Your Ultimate Beef and Cheese Melt: Step-by-Step
Now for the fun part – assembly and cooking! We’re going to transform these simple ingredients into a sandwich masterpiece using that special trick for the ultimate melt without burning the bread.
- Prep the Beef for Maximum Melt Potential: Start by taking your shredded cooked beef and gently warming it up. You can do this in a small pan over very low heat for just a few minutes, or even give it a quick 30-second burst in the microwave. The goal is not to cook it further, but simply to take the chill off. Warm beef helps the cheese melt more efficiently and evenly once assembled in the sandwich, preventing a cold spot in the middle. Make sure it’s warm, not hot enough to start melting the cheese prematurely.
- Prepare Your Bread for the Perfect Crust: Lay your four slices of thick-cut bread out on a clean surface. Take your softened unsalted butter or mayonnaise and spread it evenly, all the way to the edges, on one side of each of the four slices. This is the side that will face outwards when the sandwich is assembled and will be responsible for that gorgeous golden crust. Getting good coverage ensures even browning.
- Build the Foundation of Cheese: Flip two of the buttered/mayonnaised slices over so the plain, unbuttered side is facing up. These will be the bottom halves of your two sandwiches. On each of these two slices, layer half of your shredded cheese mixture. Creating a base layer of cheese directly on the bread is important; it helps ‘glue’ the sandwich together as it melts and creates the initial gooey layer.
- Add the Hearty Beef Layer: Now, take your gently warmed shredded beef. Divide the cup of beef equally between the two slices of bread, piling it directly on top of the first layer of cheese. Distribute the beef evenly across the cheese layer so you get beef in every bite.
- Top with More Cheese for Maximum Gooiness: Take the remaining shredded cheese and divide it equally, layering it generously over the beef on both sandwich halves. This top layer of cheese is just as important as the bottom layer; it traps the beef and, as it melts, binds everything together into that irresistible, gooey core. You’re essentially creating a beef filling encased in cheese.
- Complete the Sandwich Assembly: Carefully take the remaining two slices of bread (the ones you buttered/mayonnaised on one side) and place them on top of the cheese-covered beef layers, with the buttered or mayonnaised side facing upwards. You should now have two assembled sandwiches, ready for the skillet.
- Preheat Your Skillet with Patience: Grab a large non-stick skillet or griddle – non-stick makes cleanup a breeze, but any heavy-bottomed pan will work. Heat the pan over medium-low heat. This part is absolutely crucial and is a key component of the “perfect melt” trick. High heat is the enemy of the beef and cheese melt; it burns the bread before the cheese has a chance to truly melt through. Be patient and let the pan heat slowly.
- Introduce Your Sandwiches to the Heat: Once your skillet is heated to a gentle medium-low temperature, carefully place your assembled sandwiches into the dry pan. Don’t overcrowd the skillet; cook only as many as fit comfortably without touching, usually two at a time for a standard pan. The low and slow heat begins to gently warm the bread and fillings.
- The Game-Changing Trick: Cover the Skillet! Here it is, the simple secret to a perfectly melted beef and cheese melt: once the sandwiches are in the pan, immediately cover the skillet tightly with a lid. This is the magic step! Covering the pan traps the heat and moisture released from the warming ingredients, creating a steamy, oven-like environment inside the skillet. This trapped heat surrounds the sandwich, allowing the cheese to melt evenly and thoroughly all the way to the center before the bread has a chance to burn on the bottom. It’s indirect melting combined with direct crisping.
- Monitor and Flip: Let the sandwiches cook, covered, for 3 to 5 minutes on the first side. Keep a close eye on the bread by lifting the edge slightly with a spatula to check the color. You’re looking for a beautiful, even golden brown crust. Once the first side is perfectly colored, carefully slide your spatula under the sandwich, ensuring it’s fully underneath, and gently flip it over to the second side.
- Cover and Finish the Melt: Immediately after flipping, cover the skillet with the lid again. Continue to cook the second side, covered, for another 3 to 5 minutes. Again, peek occasionally to check for that gorgeous golden brown color. You’ll know the sandwich is done when the second side is golden brown and, most importantly, when you can see the cheese is completely melted and starting to ooze out the sides. This indicates the inside is perfectly gooey and ready.
- Rest and Serve Immediately: Once both sides are golden and the cheese is gloriously melted, remove the sandwiches from the skillet. Place them on a cutting board or plate and let them rest for just about one minute. This short resting period allows the cheese to set slightly, making slicing easier and preventing all the gooey goodness from running out immediately. Then, slice them in half (diagonal is classic!) and serve them hot and fresh. Prepare for the cheese pull!
Tips for Your Most Delicious Beef and Cheese Melt Yet
While the core technique is simple, a few extra pointers can elevate your Ultimate Beef and Cheese Melt from great to absolutely unforgettable.
- Don’t Rush the Heat: Seriously, medium-low heat is your best friend here. It requires a little patience, but it’s the key to preventing burnt bread while the cheese melts. If your bread is browning too quickly, turn the heat down further.
- The Lid is Non-Negotiable: For that even, top-to-bottom melt, the lid is essential. It creates the steam that gently melts the cheese throughout the sandwich.
- Shred Your Own Cheese: If possible, buy blocks of cheese and shred them yourself. Pre-shredded cheese often contains starches that prevent clumping, which can sometimes make the cheese melt slightly less smoothly. Freshly shredded cheese melts like a dream.
- Experiment with Cheese Blends: While provolone and mozzarella are fantastic, feel free to try other combinations. Sharp cheddar adds tang, Swiss adds nutty depth, or Monterey Jack for extra mild meltiness. Just ensure you use cheeses known for good melting properties.
- Consider Your Beef: Leftover pot roast is ideal because it’s usually very tender and flavorful. If using other beef, make sure it’s finely shredded or thinly sliced so it distributes well and warms through quickly. Season your beef well if it’s not already seasoned from a previous dish.
- Mayonnaise vs. Butter: Try both and see which you prefer for the crust! Mayonnaise gives a different kind of crispiness and a slightly tangy flavor that some absolutely love.
Perfect Pairings: What to Serve With Your Melt
A hearty sandwich like the Ultimate Beef and Cheese Melt deserves some equally delicious companions. Keep it simple or go all out!
Classic sides like a crisp green salad or a bowl of creamy potato soup or even classic chicken noodle soup are always welcome. For something crunchy, homemade potato chips or crispy potato wedges are perfect. Fresh sides like simple marinated tomatoes or even a light elevated avocado salad can provide a refreshing contrast to the richness of the melt.
Your Ultimate Beef and Cheese Melt Questions Answered (FAQ)
Got questions about making the perfect melt? Here are some common ones:
Can I use cold leftover beef?
While you can, gently warming the beef first is highly recommended. Cold beef acts as a heat sink and can significantly slow down the cheese melting around it, potentially leading to your bread overbrowning before the inside is ready. A quick warm-up makes all the difference for that even, gooey melt.
What if my bread is getting too dark before the cheese melts?
This is the classic problem this recipe solves! If this is happening even with the lid on, your heat is still too high. Immediately reduce the heat on your stove. Remember, medium-low is key. The lid helps trap heat for melting, but the low temperature prevents the rapid browning of the bread.
Can I use different types of shredded beef?
Absolutely! Leftover pot roast is fantastic, but shredded brisket, pulled beef from another recipe, or even thinly sliced deli roast beef (chopped or shredded) can work. The key is that it’s cooked and in a form that’s easy to layer and will heat through quickly.
Is mayonnaise really better than butter for the outside?
It’s a matter of preference! Mayonnaise, when heated, essentially turns into oil and emulsifiers, which can create a very even, golden-brown crust. It also spreads more easily on soft bread. Butter provides a richer, classic flavor. Try both and decide which “crunch” you prefer!
Can I add other fillings?
You can, but try not to overload the sandwich, especially when you’re just starting with this technique. Caramelized onions or sautéed mushrooms are delicious additions, but add them in moderation so they don’t prevent the cheese from melting properly around the beef. Ensure any added veggies are cooked and relatively dry.
How do I get that amazing cheese pull?
The cheese pull comes from using the right cheese blend (like provolone and mozzarella!) and ensuring it’s thoroughly melted. Following the lid trick and letting the cheese get completely gooey is the secret. Slicing the sandwich in half right after a minute of resting also helps showcase that beautiful pull!
Enjoy Your Homemade Ultimate Beef and Cheese Melt!
There you have it – the simple secret to achieving beefy, cheesy sandwich perfection right in your own kitchen. No more compromising on the melt or ending up with sad, burnt bread. With just a little patience on the heat and the magic of covering the skillet, you’re moments away from a truly satisfying, unbelievably gooey Ultimate Beef and Cheese Melt.
Give this recipe a try and prepare to be amazed by the results. If you make it, I’d love to hear how it turned out! Leave a comment below and tell me about your perfect melt experience.
Ultimate Beef and Cheese Melt

Ingredients
- 4 slices thick-cut bread (like sourdough or country white)
- 1 cup shredded cooked beef (like pot roast or similar)
- 1.5 cups shredded cheese (a mix of provolone and mozzarella works well)
- 2 tablespoons unsalted butter or mayonnaise, softened
Directions
- Gently warm the shredded beef in a small pan over low heat or briefly in the microwave. You want it warm but not hot enough to start melting the cheese yet.
- Lay out the bread slices. Butter or spread mayonnaise evenly on one side of each slice. This will be the outside of your sandwich.
- Flip two slices over so the unbuttered side is facing up. Layer half of the shredded cheese on each of these slices.
- Divide the warm beef equally and place it over the cheese layers.
- Layer the remaining shredded cheese on top of the beef.
- Place the other two slices of bread on top, buttered side up, to complete the sandwiches.
- Heat a large non-stick skillet or griddle over medium-low heat.
- Carefully place the sandwiches in the skillet. This low and slow heat is key.
- Here is the trick for the perfect melt: Cover the skillet with a lid. This traps the heat and creates a steamy environment that melts the cheese through evenly before the bread has a chance to burn.
- Cook for 3-5 minutes per side, checking occasionally. When the first side is golden brown, carefully flip the sandwiches.
- Cover again with the lid and cook for another 3-5 minutes, or until the second side is golden brown and the cheese is completely melted and gooey.
- Remove from the skillet, let rest for just a minute, then slice and serve immediately.