For years, I faced the classic kitchen dilemma: a dry, crumbly meatloaf instead of the tender, juicy comfort food I craved. This changed when I discovered a few simple, game-changing tricks that make all the difference, ensuring this Classic Meatloaf recipe turns out perfectly every single time.
Get ready to rediscover your favorite homemade meal, brimming with rich flavor and a melt-in-your-mouth texture. This recipe is your reliable path to a consistently delicious tender meatloaf that will gather everyone around the table.
Why This Classic Meatloaf Will Be Your New Favorite
This isn’t just another meatloaf recipe; it’s a meticulously crafted guide designed to eliminate common pitfalls and elevate a beloved dish. We’re focusing on simple techniques that guarantee unparalleled results, making it the only meatloaf recipe you’ll ever need.
The End of Dry Meatloaf Disappointment
Many struggle with meatloaf that comes out tough and dry. This recipe specifically targets that issue, using methods to lock in moisture from start to finish. You’ll find out how simple adjustments lead to a dramatically improved texture.
Unlocking Unbeatable Moisture and Flavor
Our approach ensures every slice is incredibly moist and packed with savory flavor. We achieve this through careful ingredient selection and a specific mixing technique, delivering a truly juicy meatloaf that’s a joy to eat.
A Timeless Comfort Dish, Perfected
Meatloaf is the quintessential comfort food, conjuring up warm memories and hearty meals. This perfected version of classic meatloaf respects that tradition while enhancing its core qualities. It’s perfect for family dinners or meal prepping delicious leftovers.
Essential Tools for Your Meatloaf Masterpiece
Having the right equipment ensures a smooth cooking process and the best possible results. These few tools are fundamental for achieving a consistently moist and flavorful meatloaf.
-
Large Mixing Bowl: A spacious bowl is crucial for comfortably combining all ingredients without spilling. This allows for gentle, even mixing, which is key to a tender result.
-
Baking Sheet or Loaf Pan: You can form your meatloaf on a baking sheet for a free-form shape with more crust, or use a loaf pan for a classic, uniform slice. Both work beautifully, but the baking sheet might yield a slightly crispier exterior.
-
Instant-Read Meat Thermometer: This is your best friend for perfect doneness. It eliminates guesswork, ensuring your meatloaf reaches a safe internal temperature of 160°F (71°C) without overcooking and drying out.
-
Whisk and Saucepan: These are essential for creating the rich, simple gravy that perfectly complements your meatloaf. A good whisk prevents lumps, and a sturdy saucepan ensures even heat distribution.
Gather Your Essentials: Key Ingredients for Success
Every ingredient in this homemade meatloaf plays a vital role in its flavor, texture, and overall success. Selecting quality components is the first step to a truly delicious dish.
For the Irresistible Meatloaf Base
These ingredients come together to form the flavorful foundation of your tender meatloaf.
-
Ground Beef (80/20 Blend): This fat ratio is highly recommended for optimal flavor and moisture. The fat renders during baking, keeping the meatloaf juicy and preventing it from becoming dry or crumbly.
-
Breadcrumbs & Liquid (Milk/Broth): This combination is one of the most critical moisture-retaining tricks. The breadcrumbs absorb the liquid, creating a sponge-like effect that helps hold moisture within the meat mixture during cooking.
-
Egg: The egg acts as a vital binder, helping to hold the meatloaf mixture together. It prevents the loaf from crumbling apart when sliced, ensuring neat, intact portions.
-
Finely Chopped Onion: Beyond adding a subtle savory flavor, the onion contributes moisture to the loaf. Chopping it finely ensures it integrates seamlessly into the mixture.
-
Ketchup or Tomato Paste: This adds a touch of acidity and umami, deepening the meatloaf’s savory profile. It also contributes to the rich color of the loaf.
-
Italian Seasoning, Salt & Pepper: These provide the classic, well-balanced seasoning that makes meatloaf so comforting. The blend of herbs complements the beef beautifully.
Simple Gravy Building Blocks
A silky, savory gravy is the perfect companion for your Classic Meatloaf.
-
Butter & All-Purpose Flour: These are the traditional components for creating a roux. The roux forms the base of your gravy, providing both flavor and a thickening agent.
-
Beef Broth: This liquid foundation is essential for a rich and flavorful gravy. It provides the body and deep beefy notes that pair perfectly with the meatloaf.
-
Salt & Pepper: Simple seasoning is all that’s needed to perfectly balance the flavors of the gravy. Adjust these to your personal preference for the ideal taste.
Your Step-by-Step Guide to Perfect Classic Meatloaf
Follow these detailed steps to achieve a perfectly moist and flavorful homemade meatloaf every time. Precision and gentle handling are key to its success.
-
Phase 1: Preparing the Mixture (Moisture is Key!)
Preheat your oven to 375°F (190°C) to ensure it’s ready when your mixture is prepared. Line a baking sheet with parchment paper for easy cleanup, or lightly grease your loaf pan.
In a large mixing bowl, combine the dry breadcrumbs with the milk or beef broth. Allow this mixture to stand for a few minutes; this critical step gives the breadcrumbs time to fully absorb the liquid, creating a hydrated binder that prevents your meatloaf from becoming dry.
Next, add the egg, finely chopped onion, ketchup or tomato paste, Italian seasoning, salt, and pepper to the soaked breadcrumbs. Use a spoon or your clean hands to gently stir these wet ingredients until they are well combined.
Finally, add the ground beef to the bowl. Use your hands to mix all ingredients together just until combined. This is crucial: overmixing can develop the proteins in the meat, leading to a tough, dense, and ultimately dry meatloaf. The mixture should feel moist but still hold its shape.
-
Phase 2: Forming and Baking to Perfection
Carefully form the mixture into a compact loaf shape on your prepared baking sheet or press it evenly into a loaf pan. If using a baking sheet, ensure the loaf is shaped firmly to maintain its structure during baking.
Bake the meatloaf for 45-55 minutes, or until its internal temperature, measured with an instant-read meat thermometer inserted into the thickest part of the center, reaches 160°F (71°C). This precision ensures your meatloaf is cooked perfectly through without drying out, delivering a truly juicy meatloaf.
-
Phase 3: The Crucial Rest & Slice
Once baked, remove the Classic Meatloaf from the oven and let it rest undisturbed for 5-10 minutes before slicing. This resting period is incredibly important as it allows the internal juices to redistribute throughout the meatloaf, resulting in a significantly more moist and tender result.
-
Crafting the Simple Savory Gravy
While your meatloaf rests, you can prepare the simple gravy if desired. In a medium saucepan, melt the butter over medium heat. Whisk in the all-purpose flour and cook for 1-2 minutes, stirring constantly, until the mixture turns a light golden color, creating a perfect roux.
Gradually whisk in the beef broth, pouring slowly and stirring vigorously to prevent any lumps from forming. Bring the mixture to a gentle simmer, continuing to stir constantly until the gravy thickens to your preferred consistency.
Season the finished gravy generously with salt and pepper to taste. Adjust as needed until you achieve a perfectly balanced and savory flavor that complements your tender meatloaf.
Chef’s Secrets: Elevating Your Meatloaf Game
Beyond the core recipe, these expert tips will help you consistently achieve the best possible Classic Meatloaf.
-
Mastering the Mix: Avoiding Toughness: Always use your hands for mixing the meatloaf, but remember to be gentle and stop as soon as everything is just combined. Overmixing develops the gluten in the meat, leading to a dense, rubbery texture instead of a tender one.
-
Temperature Precision: The Golden Rule: An instant-read meat thermometer is truly indispensable for perfect meatloaf. Baking until it reaches 160°F (71°C) ensures it’s safe to eat while remaining wonderfully moist. This takes the guesswork out of cooking time.
-
The Power of Resting: Juicy Every Time: Resist the urge to slice immediately. The 5-10 minute resting period allows the muscle fibers to relax and reabsorb the juices that have migrated to the center during cooking. This ensures every slice of your homemade meatloaf is incredibly juicy.
-
Flavor Boosters & Adaptations: Feel free to experiment! A dash of Worcestershire sauce adds deep umami, while a pinch of smoked paprika can introduce a subtle smoky note. You can also mix in minced garlic or finely chopped bell peppers for extra flavor and texture. For more delicious beef ideas, consider our Classic Beef and Barley Soup.
-
Optional Glaze for Extra Zing: For a beautiful finish and an extra layer of flavor, consider adding a simple glaze during the last 15 minutes of baking. A mixture of ketchup, a touch of brown sugar, and a hint of mustard makes a fantastic topping that caramelizes beautifully.
Troubleshooting Common Meatloaf Mishaps
Even the best cooks run into occasional issues. Here are solutions to common Classic Meatloaf problems.
Why Is My Meatloaf Dry?
The most common culprit for dry meatloaf is overcooking. Ensure you use a meat thermometer and remove it promptly at 160°F (71°C). Additionally, using a leaner ground beef than the recommended 80/20 blend can reduce moisture; opt for at least 20% fat for the best results.
Another reason for dryness can be insufficient liquid or binder. Ensure your breadcrumbs fully absorb the milk or broth, and don’t skip the egg. These elements are crucial for retaining moisture throughout the cooking process.
Meatloaf Crumbles: What Went Wrong?
If your meatloaf falls apart, it often means there wasn’t enough binder (like the egg or soaked breadcrumbs) or the mixture was overmixed. Overmixing can break down the meat’s structure, preventing it from holding together properly.
Not allowing the meatloaf to rest after baking is another reason it might crumble. The resting period allows the internal structure to set and the juices to redistribute, helping the loaf firm up for clean slices.
My Gravy is Lumpy/Too Thin
Lumpy gravy is usually caused by not whisking the flour into the butter (roux) thoroughly, or adding the broth too quickly. Always whisk continuously as you gradually pour in the broth. If lumps occur, pass the gravy through a fine-mesh sieve.
If your gravy is too thin, continue to simmer it gently, stirring occasionally, until it reduces and thickens to your desired consistency. For gravy that’s too thick, simply whisk in a tablespoon or two of additional beef broth until it reaches the perfect pourable consistency.
Perfect Pairings: Serving Your Classic Meatloaf
A delicious Classic Meatloaf deserves equally delightful companions. Here are some ideas to complete your meal.
Traditional Comfort: Sides & Garnishes
Classic pairings are timeless for a reason. Creamy mashed potatoes are an absolute must, perfect for soaking up all that rich gravy. Steamed or roasted vegetables like green beans, carrots, or asparagus add freshness and color.
For a heartier side, consider our creamy potatoes and mushrooms or some crispy roasted Brussels sprouts. A simple side salad can also provide a refreshing counterpoint to the rich meatloaf.
Creative Serving Ideas
Don’t limit meatloaf to just a plated dinner. Leftover slices make fantastic meatloaf sandwiches, especially on toasted bread with a dollop of extra gravy or a slice of cheese. You can also crumble leftover meatloaf and use it as a base for pasta sauce or a savory shepherd’s pie filling.
Storing & Prepping Ahead: Enjoying Your Leftovers
This homemade meatloaf is just as delicious the next day, making it excellent for meal prep.
Refrigeration and Freezing Best Practices
Store leftover cooked meatloaf in an airtight container in the refrigerator for up to 3-4 days. For longer storage, slice the cooled meatloaf and wrap individual portions tightly in plastic wrap, then aluminum foil. Freeze for up to 2-3 months. Thaw overnight in the refrigerator before reheating.
Make-Ahead Tips for Busy Weeknights
You can prepare the meatloaf mixture completely (up to the point of baking) and store it tightly covered in the refrigerator for up to 24 hours before baking. This saves valuable time on busy weeknights. Alternatively, bake the meatloaf fully, cool it, slice it, and then reheat portions as needed.
Your Meatloaf Questions Answered
Here are answers to some frequently asked questions about making the perfect Classic Meatloaf.
Can I Use Different Ground Meats?
Yes, absolutely! While ground beef (80/20) is recommended for this specific Classic Meatloaf, you can certainly experiment. A combination of ground beef, ground pork, and ground veal (often called “meatloaf mix”) yields an incredibly tender and flavorful result. Ground turkey or chicken can also be used, though you might need to add a bit more fat (like a tablespoon of olive oil) and ensure it doesn’t dry out, as poultry is leaner. Consider adapting this to our Umami Meatloaf for unique flavor.
How Do I Know When It’s Done?
The only reliable way to know your meatloaf is perfectly cooked is by using an instant-read meat thermometer. Insert it into the thickest part of the loaf, ensuring it reaches an internal temperature of 160°F (71°C). The color is not a reliable indicator, especially with mixtures containing vegetables or sauces.
Can I Make This Gluten-Free?
Yes, this recipe can easily be adapted to be gluten-free. Simply substitute the dry breadcrumbs with gluten-free breadcrumbs or an equal amount of gluten-free rolled oats. Ensure all other ingredients, like broths and seasonings, are also certified gluten-free.
Can I Bake It in a Different Pan?
Yes, you can! For mini meatloaves, bake the mixture in muffin tins; this will significantly reduce the baking time (around 20-25 minutes). If using a smaller or larger loaf pan, adjust baking time accordingly and always rely on the internal temperature to confirm doneness.
What if I Don’t Have Fresh Onion?
If fresh onion isn’t available, you can substitute it with onion powder or dried minced onion. Use about 1 teaspoon of onion powder or 1 tablespoon of dried minced onion for every 1/4 cup of fresh chopped onion. Rehydrate dried minced onion in a tablespoon of warm water before adding to the mixture for best results.
Ready to Create Your Own Meatloaf Masterpiece?
Now that you have all the insider tips and tricks, you’re ready to bake the most delicious, perfectly juicy Classic Meatloaf you’ve ever tasted. This recipe is more than just instructions; it’s a pathway to consistent culinary success and a new family favorite.
Don’t wait any longer to bring this ultimate comfort food to your table. Give this tender meatloaf recipe a try tonight, and prepare to be amazed by the incredible flavor and texture. We can’t wait to hear how much you love it!
Classic Meatloaf
Course: Main CourseCuisine: American CuisineDifficulty: easy4
servings20
minutes50
minutes70
minutesAmerican Cuisine
Ingredients
1 pound ground beef (80/20 blend recommended for flavor and moisture)
1/2 cup dry breadcrumbs
1/4 cup milk or beef broth
1 egg
1/4 cup finely chopped onion
1 tablespoon ketchup or tomato paste
1 teaspoon dried Italian seasoning
1/2 teaspoon salt
1/4 teaspoon black pepper
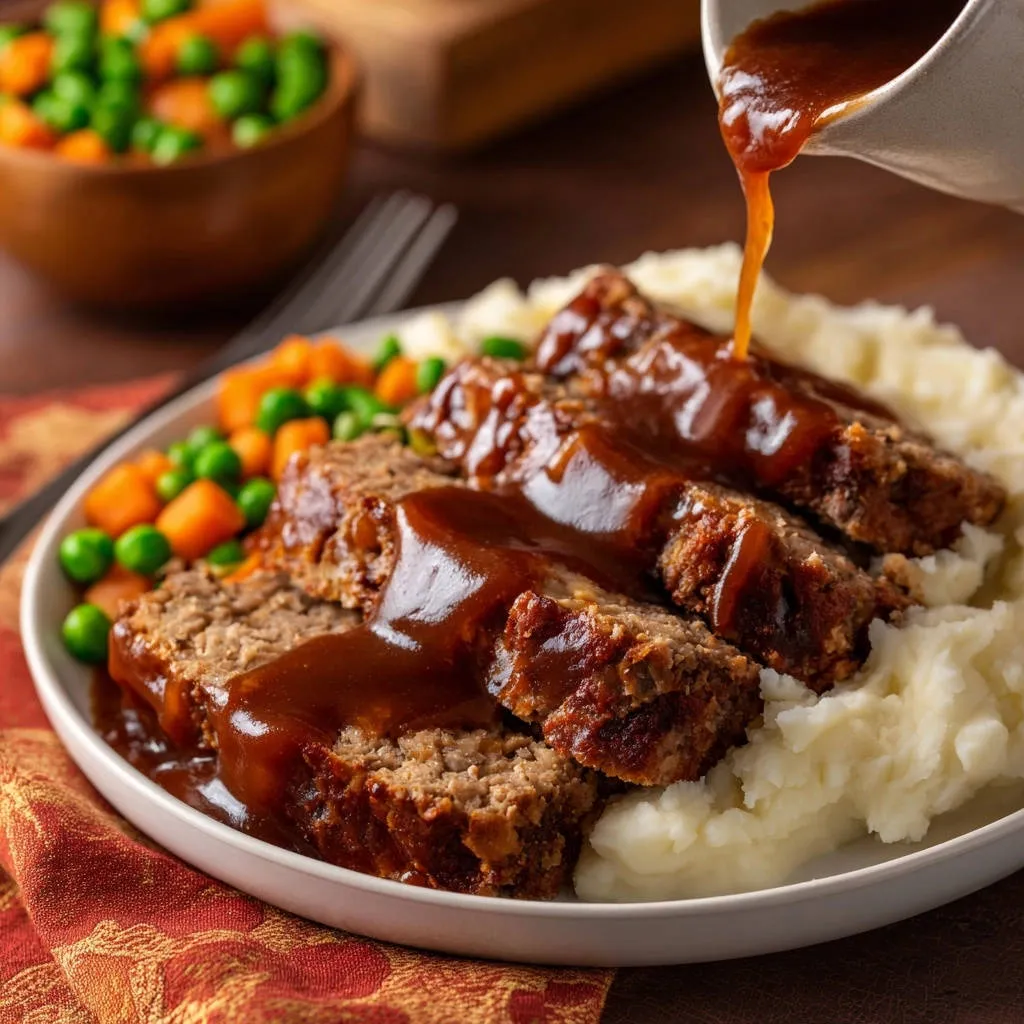
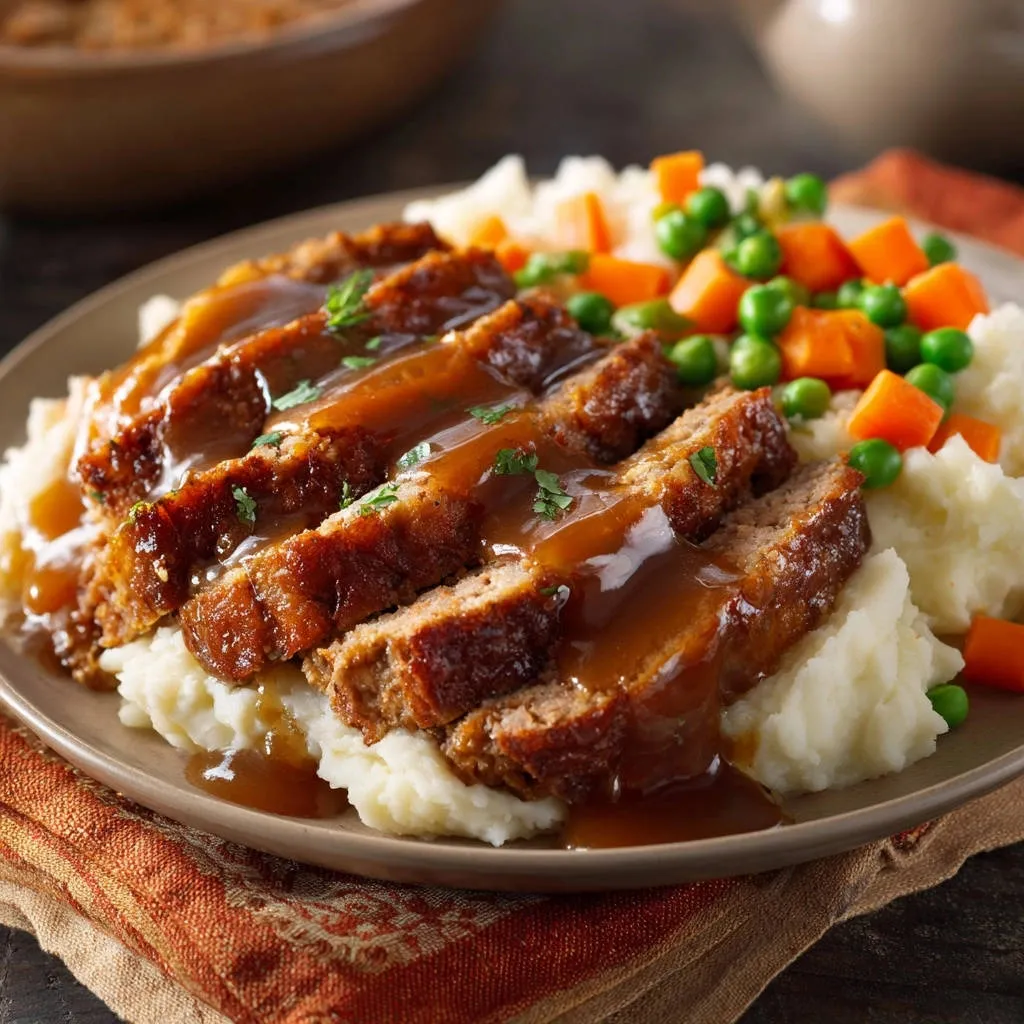
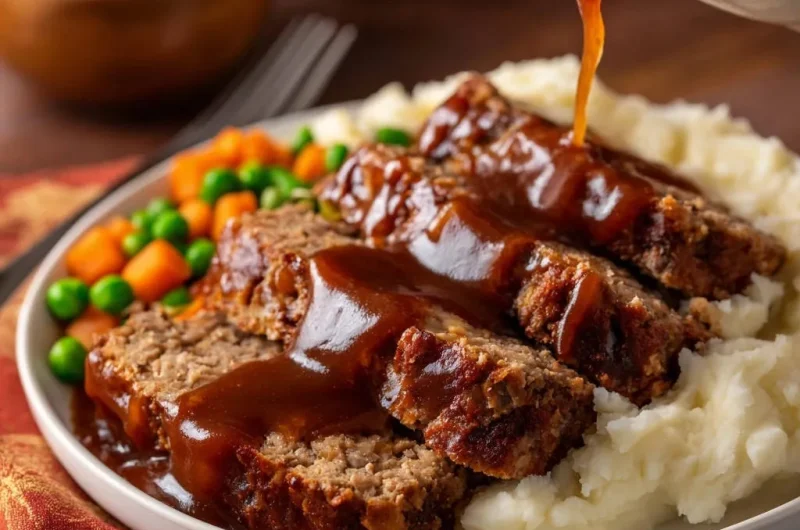
For Serving (from image):
3 cups mashed potatoes
1 cup cooked peas and carrots
For Simple Gravy (from image):
2 tablespoons butter
2 tablespoons all-purpose flour
1 1/2 cups beef broth
Salt and pepper to taste
Directions
- Meatloaf:
- Preheat oven to 375°F (190°C).
- In a large bowl, combine the breadcrumbs and milk or beef broth. Let stand for a few minutes to allow the breadcrumbs to absorb the liquid. This is one key to preventing dryness.
- Add the egg, finely chopped onion, ketchup or tomato paste, Italian seasoning, salt, and pepper to the breadcrumb mixture. Stir gently to combine the wet ingredients.
- Add the ground beef to the bowl. Use your hands to gently mix the ingredients until just combined. Do not overmix; overmixing is another major cause of tough, dry meatloaf. The mixture should be moist but still hold its shape.
- Form the mixture into a loaf shape on a baking sheet or in a loaf pan. If using a baking sheet, make sure the loaf is compact but not compressed.
- Bake for 45-55 minutes, or until the internal temperature reaches 160°F (71°C). Using a meat thermometer ensures you cook it perfectly without drying it out.
- Let the meatloaf rest for 5-10 minutes after removing it from the oven before slicing. This allows the juices to redistribute, keeping it moist.
- Simple Gravy:
- While the meatloaf rests, make the gravy if desired. In a saucepan, melt the butter over medium heat.
- Whisk in the flour and cook for 1-2 minutes, stirring constantly, until lightly golden.
- Gradually whisk in the beef broth, stirring to prevent lumps.
- Bring the mixture to a simmer, stirring constantly, until the gravy thickens to your desired consistency.
- Season with salt and pepper to taste.
- Serving:
- Slice the meatloaf and serve hot with mashed potatoes, peas, carrots, and plenty of gravy poured over top.
Notes
- Key tips for moist, tender meatloaf: use an 80/20 beef blend, don’t overmix, let breadcrumbs soak, use a meat thermometer, and allow meatloaf to rest after baking.