For years, I sought the secret to truly golden, perfectly crispy breadsticks that elevate any meal. Many recipes fell short, but through diligent testing, I uncovered the exact trick that transforms simple dough into extraordinary Cheesy Garlic Breadsticks. This recipe guarantees that delightful exterior crunch and a soft, flavorful interior, bringing restaurant-quality goodness right to your table.
Why This Cheesy Garlic Breadsticks Recipe Shines
The Golden-Crisp Secret Revealed
This recipe distinguishes itself with a crucial “butter wash” step. This generous coating, combined with high oven heat, creates an unparalleled golden-brown crust. It’s the simple trick for that coveted crispy exterior every time, far surpassing dry or pale versions.
You’ll achieve a professional-looking finish with minimal effort, thanks to this genius technique. Forget soggy or undercooked breadsticks; prepare for consistent, delicious results.
Effortless Elegance: From Dough to Dinner
Utilizing pre-made pizza or bread dough is a game-changer for speed and simplicity. This choice eliminates the need for complex yeast work, making the recipe accessible to all skill levels.
In mere minutes, you can transform a humble ingredient into an elegant side dish. These Cheesy Garlic Breadsticks are perfect for busy weeknights, last-minute entertaining, or simply elevating a casual family dinner.
Flavor Fusion: Garlic, Parmesan & Fresh Parsley
The classic combination of aromatic garlic, savory Parmesan, and vibrant fresh parsley creates an incredibly addictive flavor profile. Each ingredient plays a vital role in building layers of deliciousness.
This harmonious blend ensures every bite is bursting with rich, comforting taste. They’re so irresistible, you might find yourself making a double batch!
The Simple Ingredients Behind Irresistible Breadsticks
Each component in this recipe is chosen for its specific contribution to flavor and texture. Quality ingredients truly make a difference in the final outcome.
Dough Selection: Your Foundation for Fluffy Bites
Pre-made pizza dough or bread dough: This is your shortcut to success, saving significant time and effort. Look for fresh dough in the refrigerated section of your grocery store, ensuring it’s pliable and easy to work with.
The beauty of using pre-made dough is its consistency and convenience. It provides a reliable base for your golden, crispy homemade breadsticks.
The Flavorful Trio: Butter, Garlic & Salt
Unsalted butter: Melted butter is the cornerstone of the golden crispiness, providing essential fat for browning and rich flavor. Using unsalted butter allows you to control the overall seasoning.
Garlic powder: This provides an intense, evenly distributed garlic flavor without the risk of burning fresh garlic. It infuses every inch of the breadstick with that classic aroma.
Salt (optional, to taste): Enhances all the flavors, balancing the richness of the butter and the sharpness of the garlic. Adjust according to your preference and the salt content of your chosen dough.
Finishing Touches: Parmesan & Fresh Parsley
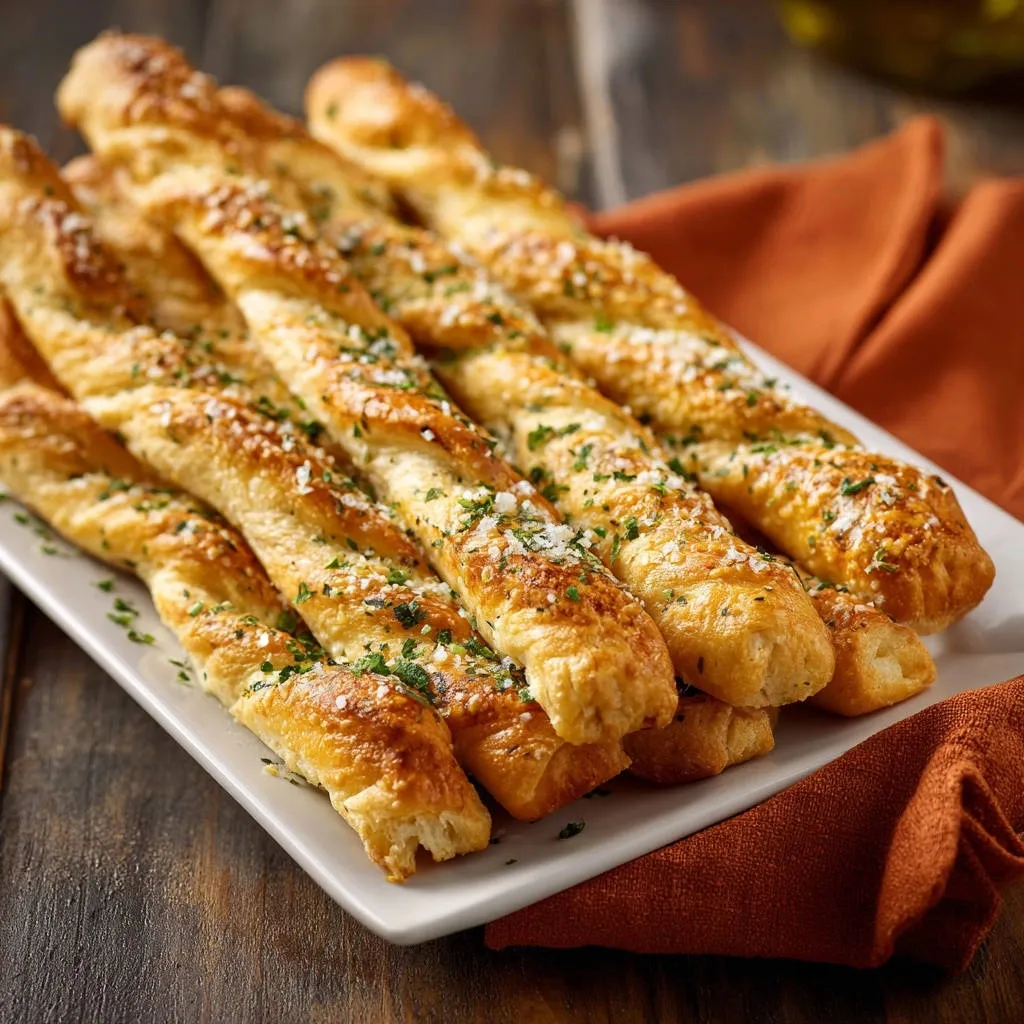
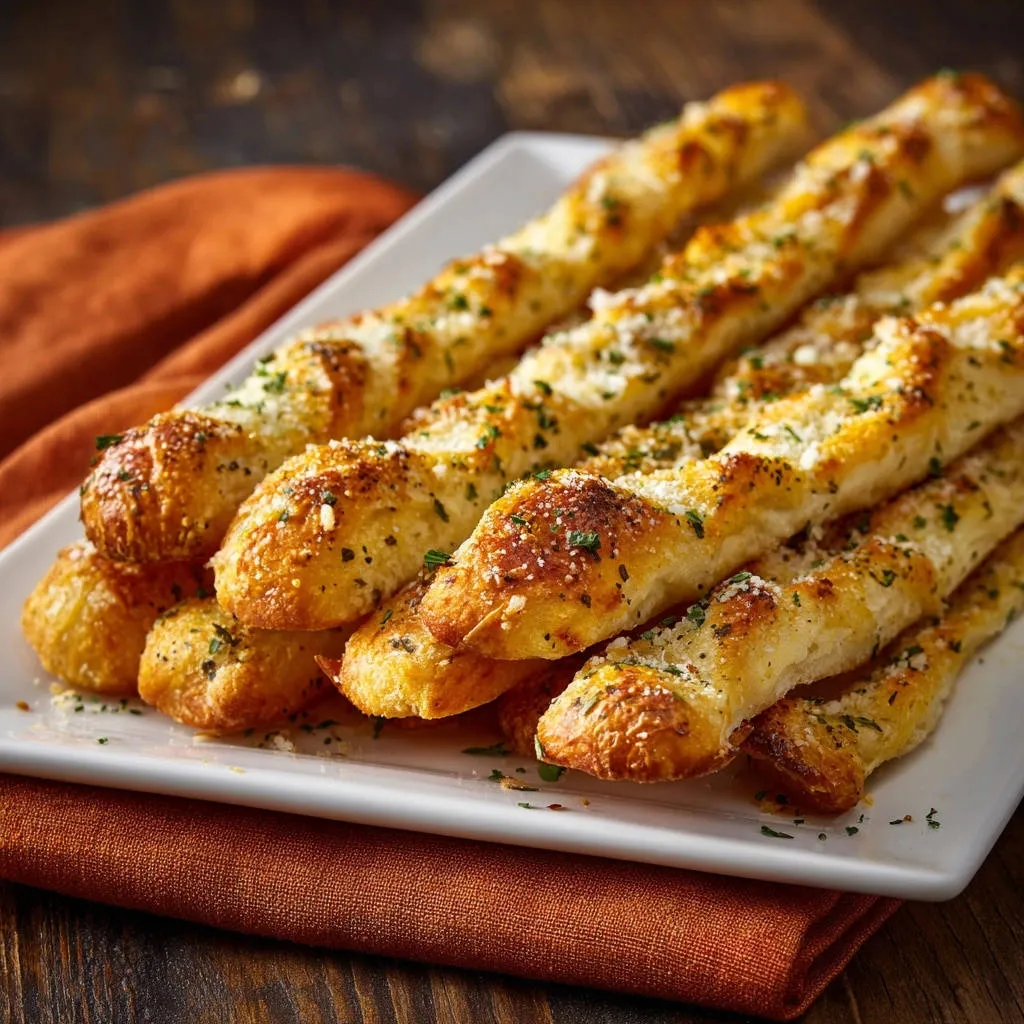
Grated Parmesan cheese: Sprinkled on warm, it melts slightly to form a savory, salty, and wonderfully cheesy layer. It adds an irresistible umami depth that makes these breadsticks truly “cheesy garlic.”
Fresh parsley, finely chopped: Offers a pop of fresh, herbaceous flavor and vibrant color, elevating the breadsticks visually and texturally. It provides a bright contrast to the rich garlic and cheese.
Tools for Breadstick Success: What You’ll Need
Having the right kitchen tools on hand makes the process smooth and enjoyable. These simple essentials ensure perfect results.
Kitchen Essentials for Perfect Twists
Large baking sheet: Provides ample space for the breadsticks, allowing for proper air circulation during baking.
Parchment paper: Lines the baking sheet, preventing sticking and making cleanup a breeze. It also helps with even heat distribution.
Rolling pin: Essential for rolling the dough to an even thickness, which is crucial for uniform baking and texture.
Pastry brush: Key for applying the butter mixture generously and evenly, ensuring that golden, crispy crust.
Crafting Your Cheesy Garlic Breadsticks: A Step-by-Step Guide
Follow these detailed steps to create perfectly golden and crispy Cheesy Garlic Breadsticks every time. Precision in each stage leads to delightful results.
- Prepare Your Baking Canvas:
Preheat your oven to 400°F (200°C) and line a large baking sheet with parchment paper. This critical first step ensures your oven is at the optimal temperature for immediate crisping and prevents any sticking.
- Roll and Cut Your Dough:
On a lightly floured surface, roll out the dough into a large rectangle, aiming for about 1/4 inch thickness. Uniform thickness is paramount here; it guarantees even baking and consistent texture throughout your homemade breadsticks.
Once rolled, use a sharp knife or pizza cutter to cut the dough into 1-inch wide strips, preparing them for the signature twist that defines a breadstick.
- The Signature Twist:
Take each dough strip and gently twist it several times from end to end. This creates their classic breadstick shape, adding visual appeal and contributing to that desirable chewy-crispy texture.
Don’t twist too tightly, as this can make them dense. A gentle, even twist is all that’s needed.
- Arrange for Success:
Arrange the twisted dough strips on the prepared baking sheet, leaving approximately 1 inch of space between each. This crucial spacing allows hot air to circulate freely around each breadstick, promoting optimal browning and crispiness on all sides.
- Master the Butter Wash:
In a small bowl, combine the melted butter, garlic powder, and optional salt. This mixture is the secret sauce for achieving that irresistible golden crust and infusing intense garlic flavor.
Generously brush each breadstick with the butter mixture, ensuring you coat all sides evenly. This fat layer is absolutely crucial for achieving that beautiful golden color and a truly crispy texture, making these the best garlic breadsticks.
- Bake to Golden Perfection:
Bake for 12-15 minutes, or until the breadsticks are deep golden brown and wonderfully crispy. Keep a close eye on them, as oven temperatures can vary slightly, and some ovens run hotter than others.
The high heat combined with the butter wash will yield that desirable restaurant-quality finish you’re aiming for.
- The Finishing Flourish:
While the breadsticks are still warm, immediately sprinkle them generously with the grated Parmesan cheese and fresh chopped parsley. The residual heat will help the cheese melt slightly and the parsley adhere, enhancing both flavor and presentation.
- Serve and Savor:
Serve your perfectly golden, crispy Cheesy Garlic Breadsticks warm and enjoy the delicious outcome of your efforts! They are best enjoyed fresh from the oven, when the cheese is melty and the crust is at its crispiest.
Unlock Perfection: Expert Tips for Your Breadsticks
Elevate your breadstick game with these invaluable tips, ensuring every batch is a resounding success.
Mastering the Butter Wash for Unrivaled Crispness
The key to truly golden, crispy breadsticks lies in the butter wash. Don’t be shy; apply it generously to all surfaces of each dough strip.
The fat from the butter helps conduct heat and creates a barrier, promoting that desirable crispy exterior. Uneven application can lead to patchy browning or softer spots.
Twist and Shape: Achieving Uniformity
When twisting the dough, aim for consistent thickness and twists across all strips. This uniformity ensures that all your Cheesy Garlic Breadsticks bake at the same rate, preventing some from burning while others remain undercooked.
A gentle, even twist creates the classic spiral shape without compacting the dough too much, allowing for a light, airy interior.
The Perfect Bake: Color & Timing Cues
Don’t rely solely on the timer; trust your eyes for the perfect bake. Breadsticks should be a deep, rich golden brown, not just pale yellow.
Keep a close watch, especially during the last few minutes, as they can go from perfectly done to over-browned quickly. Remember, a truly crispy garlic breadstick has visual cues.
Serving Warm: The Golden Rule for Flavor
These Cheesy Garlic Breadsticks are undeniably best when served immediately, fresh from the oven. The warmth melts the Parmesan beautifully and activates the garlic aroma, creating an irresistible experience.
While they can be reheated, the peak flavor and texture are experienced within minutes of baking.
Troubleshooting Your Cheesy Garlic Breadsticks: Common Hurdles & Fixes
Even expert bakers encounter challenges. Here are solutions to common breadstick issues, ensuring your success.
Breadsticks Too Pale or Soft?
If your breadsticks lack that signature golden crispness, they likely need more baking time. Extend the cooking by 2-3 minute increments until they reach a deep golden brown.
Also, ensure your oven is fully preheated to the correct temperature, and don’t skimp on the butter wash; a generous coating is essential for browning.
Overly Browned or Dry?
If your breadsticks are getting too dark too fast or are becoming dry, your oven might be running hot, or they were baked for too long. Try reducing the bake time by a few minutes or lowering the oven temperature by 25°F (15°C) for your next batch.
Additionally, ensure your dough isn’t rolled excessively thin, as thinner breadsticks will cook and dry out faster.
Dough Difficult to Work With?
If your dough is too sticky, lightly dust your work surface and hands with a bit more flour. If it’s too elastic and springs back when rolled, cover it loosely and let it rest for 5-10 minutes; this allows the gluten to relax, making it easier to handle.
Pairing & Presentation: Elevate Your Cheesy Garlic Breadsticks
These versatile Cheesy Garlic Breadsticks complement a wide array of dishes, making them a fantastic addition to almost any meal.
Perfect Companions for Every Meal
They are an ideal partner for classic Italian pasta dishes, complementing rich sauces perfectly. Pair them with a hearty soup, like a comforting beef stew, or a fresh, crisp salad for a lighter meal.
They also serve as an excellent side for grilled chicken, fish, or a simple steak, adding a gourmet touch without extra fuss.
Creative Ways to Serve
Enhance the experience by serving your warm Cheesy Garlic Breadsticks with a side of marinara sauce for dipping. For an extra treat, try them with our perfect creamy garlic dip.
You can also garnish them with extra grated Parmesan, a sprinkle of red pepper flakes for a kick, or a dusting of dried Italian herbs for added depth.
Making Ahead & Storing Your Delicious Breadsticks
Plan ahead for quick meal prep or ensure your leftovers stay fresh and delicious with these storage tips.
Prepping Dough in Advance
You can roll and cut the dough strips, then twist them and arrange them on a parchment-lined baking sheet. Cover the sheet tightly with plastic wrap and refrigerate for up to 24 hours.
When ready to bake, simply remove from the fridge, brush with butter mixture, and bake as directed, potentially adding a minute or two to the bake time.
Storing Leftovers for Freshness
Once baked and cooled, store leftover Cheesy Garlic Breadsticks in an airtight container at room temperature for up to 1-2 days. For longer storage, refrigerate for up to 3-4 days.
Reheating for Optimal Enjoyment
To best regain their crispiness, reheat cold breadsticks in a preheated oven at 350°F (175°C) for 5-7 minutes. Avoid microwaving, as this tends to make them soft and chewy rather than crispy.
The oven method ensures they maintain their delicious texture and warmed cheese.
Your Cheesy Garlic Breadsticks Questions Answered
Here are answers to some common questions you might have about making these delightful breadsticks.
Can I use homemade dough instead of store-bought?
Absolutely! If you have a favorite homemade pizza or bread dough recipe, feel free to use it. Just ensure your dough has a consistent, pliable texture that’s easy to roll and twist.
What if I don’t have fresh parsley?
While fresh parsley offers the best flavor and color, you can substitute with dried parsley, using about half the amount. Other fresh herbs like finely chopped chives or a tiny pinch of dried oregano can also work in a pinch.
Can I make these gluten-free?
Yes, you can use a gluten-free pre-made pizza dough. Be aware that the texture might be slightly different, often a bit denser or less elastic than traditional wheat-based dough. Baking times may also vary, so watch them closely.
How long do these breadsticks stay fresh?
These breadsticks are truly best enjoyed fresh from the oven for peak crispiness and flavor. They remain quite good for 1-2 days at room temperature in an airtight container, or up to 3-4 days if refrigerated.
Is it possible to freeze the dough strips before baking?
Yes, you can! After twisting the dough strips, arrange them on a baking sheet and freeze until solid (about 1-2 hours). Once frozen, transfer them to a freezer-safe bag or container for up to 1 month. When ready to bake, place them on a parchment-lined sheet, brush with the butter mixture, and bake from frozen, adding 5-10 minutes to the original bake time.
Ready to Bake? Your Cheesy Garlic Breadsticks Adventure Awaits!
Now that you’re armed with all the secrets, it’s time to bring these incredible Cheesy Garlic Breadsticks to life in your own kitchen. This simple recipe truly delivers on its promise of golden crispiness and irresistible flavor, turning any meal into a special occasion.
Don’t hesitate to dive in and experience the joy of making these foolproof breadsticks yourself. For more delicious and easy side dish ideas, be sure to explore our cheesy pull-apart bread recipe and other delightful creations!

Cheesy Garlic Breadsticks
Course: Side DishCuisine: Italian-American cuisineDifficulty: easy4
about 16 breadsticks15
minutes15
minutes30
minutesItalian-American cuisine
Ingredients
1 lb pre-made pizza dough or bread dough (store-bought or your favorite recipe)
1/4 cup unsalted butter, melted
1 teaspoon garlic powder
1/2 teaspoon salt (optional, to taste)
1/4 cup grated Parmesan cheese
2 tablespoons fresh parsley, finely chopped
Directions
- Preheat your oven to 400°F (200°C). Line a large baking sheet with parchment paper.
- On a lightly floured surface, roll out the dough into a large rectangle, about 1/4 inch thick.
- Cut the dough into 1-inch wide strips. Take each strip and gently twist it several times from end to end.
- Arrange the twisted dough strips on the prepared baking sheet, leaving about 1 inch between each for even baking.
- In a small bowl, combine the melted butter, garlic powder, and optional salt.
- This is the key step for golden crispiness: Generously brush each breadstick with the butter mixture. Be sure to coat all sides evenly. This fat layer is essential for achieving that beautiful golden crust and crispy texture.
- Bake for 12-15 minutes, or until the breadsticks are deep golden brown and crispy. Keep a close eye on them, as oven temperatures can vary. The high heat combined with the butter wash will give you the perfect finish.
- While the breadsticks are still warm, sprinkle them immediately with the grated Parmesan cheese and fresh chopped parsley.
- Serve warm and enjoy your perfectly golden crispy breadsticks!