
Oh, the glorious fried chicken sandwich. It’s a comfort food icon, a handheld masterpiece that promises that perfect crunch followed by tender, juicy chicken. We’ve all chased that dream, right? But if you’re anything like me, you might have faced the ultimate sandwich betrayal: the dreaded soggy coating. You take that first glorious bite, savoring the crispiness, only to find the breading turns limp and sad halfway through. It’s a tragedy! But fear not, fellow food lovers, because I’ve cracked the code. After much trial and error, I’ve developed a method for making a crispy fried chicken sandwich where the crispiness actually stays crispy, from the first delicious bite right down to the last.
This isn’t just any fried chicken sandwich recipe; it’s a guide to achieving and maintaining that coveted crunch, even when loaded with toppings. Forget those disappointing, steamy experiences. We’re going to build a sandwich that stands up to the challenge, delivering consistent texture and incredible flavor every single time. Ready to master the art of the non-soggy crispy chicken sandwich? Let’s dive in!
Why You’ll Fall in Love with This Recipe
Beyond the obvious joy of eating a fantastic fried chicken sandwich, this specific recipe brings a few key things to the table that elevate it above the rest:
- Unwavering Crispiness: This is the star. We employ specific techniques designed to maximize crunch and prevent sogginess, ensuring that glorious texture lasts.
- Flavorful Chicken: The chicken itself is seasoned perfectly, guaranteeing a tasty bite even before you hit the toppings.
- Simple Yet Effective Steps: You don’t need to be a professional chef. These steps are straightforward and focus on the fundamentals that make a big difference.
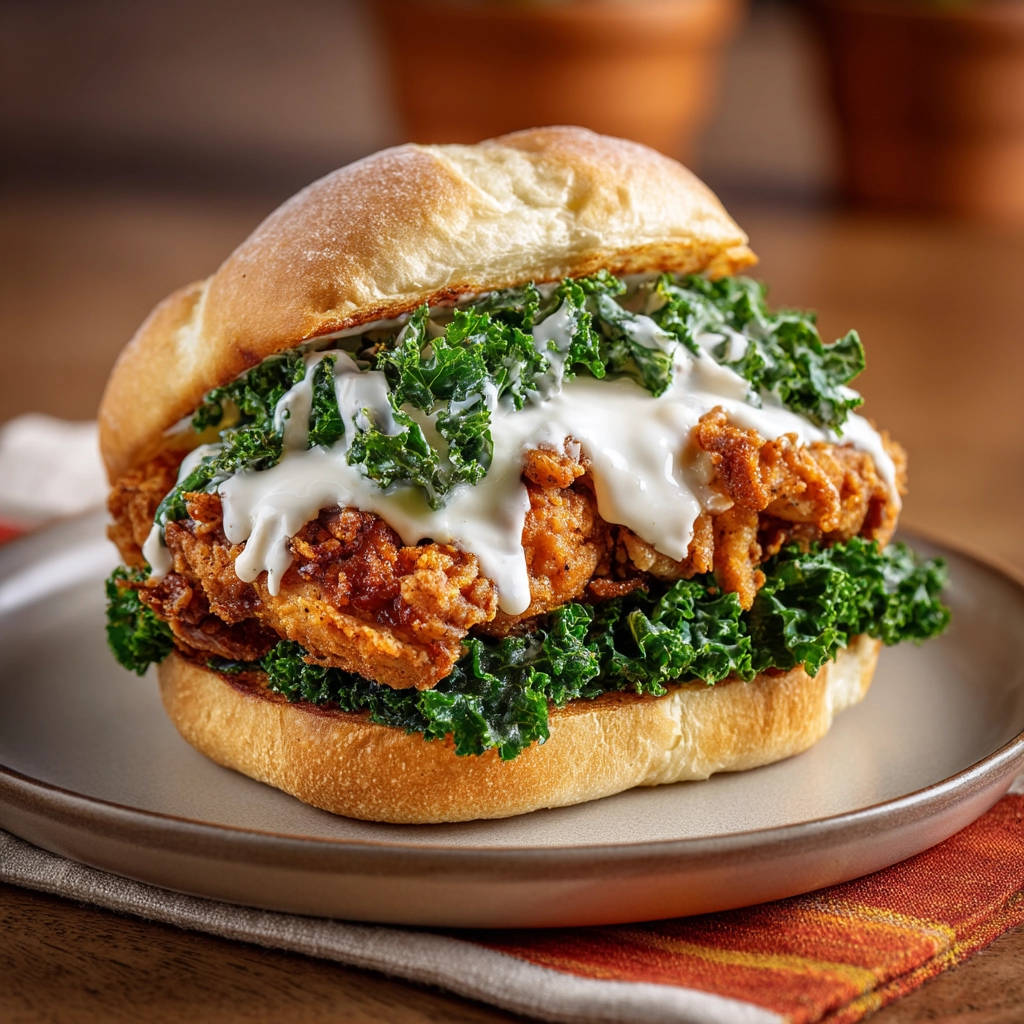
- Balancing Act: The addition of the tangy massaged kale salad provides a fresh, bright counterpoint to the rich fried chicken and creamy sauce, creating a truly balanced bite.
- Customizable Fun: While the base is perfect, it’s also a fantastic canvas for your favorite sauces and toppings.
If you’ve been searching for a reliable way to make a truly satisfying crispy chicken sandwich at home, this is your recipe. It’s about building layers of flavor and texture, ensuring every component plays its part in creating sandwich perfection.
Gathering Your Ingredients for Crispy Fried Chicken Sandwich Success
Building an amazing fried chicken sandwich starts with selecting the right components. We’re not just listing items; we’re thinking about how each ingredient contributes to that final, irresistible bite. The goal is a harmonious blend of savory, tangy, and creamy, all wrapped up in that essential crispy crunch.
For the core of our sandwich, you’ll need:
- Chicken: One boneless, skinless chicken breast or thigh. Both work beautifully! A breast is leaner and requires careful pounding for even cooking, while a thigh offers a bit more natural moisture and richness. Choose your preference, knowing either will yield a delicious result.
- All-Purpose Flour: This is the foundation of our crispy breading. Standard all-purpose flour works wonderfully to create that light, crunchy shell.
- Seasoning Staples: Salt, black pepper, paprika, and garlic powder. This simple blend is key to infusing flavor directly into the coating. Paprika adds a lovely color and subtle sweetness, while garlic powder brings that essential savory depth.
- The Wet Bind: A large egg and 1/4 cup of milk or buttermilk. This mixture acts as the glue, helping the dry flour coating adhere to the chicken. Buttermilk adds a touch of tang and can help tenderize the chicken slightly, while regular milk is perfectly fine for binding.
- Frying Oil: Vegetable oil is recommended for frying. You’ll need enough to fill your pan with about 1 inch of oil, ensuring the chicken is partially submerged for even cooking and browning. The type of oil matters for heat stability and a neutral flavor.
And for assembling our perfect sandwich, we’ll gather:
- Soft Sandwich Bun: The vessel for our crispy creation. A soft bun provides a pleasant contrast to the crunchy chicken and creamy fillings. Choose your favorite! If you’re feeling ambitious, mastering your own bread can be rewarding; perhaps try a recipe like our soft sandwich bread recipe sometime.
- Kale for Brightness: 1 cup of chopped kale, stems removed. This might seem unconventional, but the slightly bitter, earthy kale, when prepared correctly, adds a fantastic textural and flavorful element.
- Kale Dressing Components: 1 tablespoon mayonnaise, 1 teaspoon apple cider vinegar, and a pinch of salt. These ingredients transform the tough kale into a tender, tangy salad that cuts through the richness of the fried chicken.
- Creamy Sauce: 2 tablespoons of a creamy sauce, like mayonnaise or a ranch-style dressing. This adds moisture, richness, and a familiar, comforting flavor layer. Use your favorite condiment here!
Having everything measured and ready before you start is a pro tip for any recipe, and especially helpful when frying!
Crafting Your Crispy Fried Chicken Sandwich: Step-by-Step Mastery
Alright, let’s turn these simple ingredients into a crispy, juicy, flavor-packed sandwich. Each step here is designed with that ultimate crispiness in mind, so pay close attention to the techniques – they make all the difference!
Prepare Your Chicken Piece: Start with your boneless, skinless chicken breast or thigh. If you’re using a thicker breast, place it between two sheets of plastic wrap or in a plastic bag and gently pound it to an even thickness, aiming for about 1/2 to 3/4 inch. This isn’t about making it super thin, but creating a uniform piece so it cooks through evenly without the thinner parts overcooking or the thicker parts staying raw. Uniform thickness is key for predictable frying times. Once flattened (if needed), pat the chicken piece completely dry using paper towels. I cannot stress this enough – moisture on the surface of the chicken is the enemy of a crispy coating. The drier the surface, the better the breading will adhere and crisp up.
Set Up Your Breading Stations: You’ll need two shallow dishes or plates. In the first dish, whisk together your dry ingredients: the cup of all-purpose flour, salt, black pepper, paprika, and garlic powder. Whisking ensures all those lovely seasonings are evenly distributed throughout the flour, so every part of your chicken gets flavored. In the second shallow dish, whisk together the large egg and the milk or buttermilk until well combined. This wet mixture is the binder that allows the dry coating to stick.
Give the Chicken Its Crispy Armor (Dredging): This is where the magic starts to happen! Take your very dry chicken piece and coat it thoroughly in the seasoned flour mixture. Make sure every nook and cranny is covered. Gently shake off any excess flour; you want a good, even coating, not clumps. Next, dip the floured chicken into the egg and milk mixture, letting any extra wet mixture drip back into the dish. Finally, return the chicken to the seasoned flour for a second coating. This time, press the flour gently onto the chicken with your hands to ensure it really adheres well. The double dip creates layers that contribute significantly to the final crispy texture. Once fully breaded, place the chicken on a clean wire rack set over a baking sheet. Let it rest here for 10-15 minutes. This resting period is crucial! It allows the moisture from the chicken and the egg mixture to hydrate the flour, creating a sticky paste that adheres firmly during frying, preventing that sad separation and ensuring a super crispy crust.
Fry Until Golden Perfection: While the chicken rests, heat about 1 inch of vegetable oil in a heavy skillet over medium-high heat. A heavy skillet, like cast iron or a Dutch oven, helps maintain a consistent oil temperature. Use a thermometer to monitor the oil temperature – you’re aiming for 350°F (175°C). Getting the temperature right is vital; oil that’s too cool results in greasy chicken, while oil that’s too hot will burn the coating before the chicken is cooked through. Carefully lower the breaded chicken into the hot oil. Don’t overcrowd the pan! Fry only one piece at a time in a standard skillet; overcrowding cools the oil rapidly and leads to soggy results. Fry for 4-6 minutes per side, or until the coating is deeply golden brown and the internal temperature of the thickest part of the chicken reaches 165°F (74°C). Use a meat thermometer to check for doneness.
Drain for Maximum Crispness (The Other Critical Step): This step is just as important as drying the chicken! Once your fried chicken is cooked and beautifully golden, carefully remove it from the hot oil. Do NOT place it on paper towels. Paper towels trap steam against the crust, which immediately begins to soften and turn it soggy. Instead, place the fried chicken on a clean wire rack set over a baking sheet. This allows air to circulate all around the chicken, letting the steam escape and helping that crispy coating stay crisp as it cools slightly.
Prepare the Tangy Kale Topping: While the chicken is resting briefly on the rack, prepare the kale salad. In a small bowl, combine the chopped kale (stems removed), mayonnaise, apple cider vinegar, and a pinch of salt. Use your hands to gently massage the kale for 1-2 minutes. This might feel a little odd, but massaging helps to break down the tough fibers in the kale, making it much more tender and pleasant to eat raw. It also ensures the dressing is evenly distributed, creating a vibrant, tangy topping that’s a perfect contrast to the rich chicken.
Assemble and Serve Immediately: It’s time to bring it all together! Slice your soft sandwich bun horizontally. Place your beautifully crispy fried chicken piece on the bottom half of the bun. Top generously with the massaged kale salad. Drizzle with your favorite creamy sauce – whether it’s more mayo, ranch, or something else you love. Place the top bun on top, press gently, and serve immediately. The sooner you enjoy it after assembly, the better the crispiness will be!
Tips for Perfect, Crispy Fried Chicken Every Time
Achieving that perfect, lasting crunch isn’t hard, but it does require paying attention to a few details. Here are my top tips to ensure your crispy fried chicken sandwich is always a triumph:
- Temperature Control is King: Invest in a good instant-read thermometer for both the oil and the chicken. Maintaining the oil at 350°F (175°C) is crucial for cooking the chicken through while achieving a golden, crispy crust without burning.
- Don’t Rush the Rest: Allowing the breaded chicken to rest for 10-15 minutes before frying is a non-negotiable step for preventing the coating from falling off in the hot oil. That brief rest lets the coating hydrate and adhere properly.
- Drain Smart: Always use a wire rack set over a baking sheet to drain your fried chicken. This allows air circulation and prevents steam from gathering and making the bottom soggy. Paper towels might soak up excess oil initially, but they also trap steam.
- Pat Dry, Then Dry More: Seriously, the chicken piece needs to be as dry as humanly possible before it hits the flour. Use extra paper towels if needed!
- Consider Buttermilk: While milk works, buttermilk’s acidity can help tenderize the chicken slightly and adds a lovely subtle tang to the wet mixture, which translates to flavor in the final crust.
- Spice it Up: Want some heat? Add a pinch or two of cayenne pepper to the dry flour mixture for a spicy kick!
- Mix Up Your Sauces: Don’t feel limited to mayo or ranch. Honey mustard, a spicy aioli, or even a drizzle of hot honey can take this sandwich in delicious new directions.
Following these simple tips will dramatically improve your fried chicken game and ensure your sandwich stays wonderfully crispy.
What to Serve With Your Crispy Creation
A sandwich this good deserves equally great company! Pairing sides with your crispy fried chicken sandwich can complete the meal and add extra layers of flavor and texture. Here are a few ideas:
Classic pairings like coleslaw, potato salad, or crispy french fries are always winners. For something a little different, consider serving it alongside tangy pico de gallo or simple marinated tomatoes for a fresh, vibrant counterpoint. Roasted vegetables like golden roasted potatoes or crispy broccoli are also fantastic options that add nutrition and flavor without overpowering the main event.
Feeling like something a bit more substantial? A warm bowl of creamy cheesy creamed corn provides a sweet and savory balance. And don’t forget the chips! Crispy homemade potato chips can be a fun and satisfying side.
Whatever you choose, make sure it complements, rather than competes with, the star of the show: that perfectly crispy chicken sandwich.
Your Crispy Fried Chicken Sandwich Questions Answered (FAQ)
Got questions about making the ultimate crispy fried chicken sandwich? I’ve got answers! Here are some common queries that pop up:
Why does my fried chicken sandwich coating always get soggy?
Sogginess is usually caused by steam trapped between the chicken and the breading, or between the chicken and the bun/toppings. The most common culprits are not patting the chicken dry enough initially, skipping the resting step after breading, or draining the fried chicken on paper towels instead of a wire rack. Moisture is the enemy of crispness! Our recipe addresses these points specifically to combat sogginess.
Can I use chicken thighs instead of breasts?
Absolutely! The recipe specifically calls for either a boneless, skinless chicken breast or thigh. Chicken thighs are often more forgiving and juicy due to their higher fat content, and they fry up beautifully. The preparation and frying steps remain the same.
Can I bake this chicken instead of frying it?
While you can adapt many recipes for baking, achieving the same level of intense, all-over crispiness that defines a classic fried chicken sandwich can be challenging in the oven. Baking tends to yield a crispier baked coating, but not the distinct crunch of deep frying. If you prefer a baked option, look for recipes specifically designed for crispy baked chicken, like our crispy baked chicken bites, and adjust the seasoning and cooking time for a larger piece of chicken. However, for this crispy fried sandwich experience, frying is recommended.
What’s the best kind of bun to use?
A soft sandwich bun is ideal. Something like a brioche bun, potato roll, or classic white bread bun works well. The softness provides a lovely textural contrast to the crispy chicken, and they’re sturdy enough to hold everything together without being too dense.
Do I have to use kale for the topping?
No, the kale is a fantastic addition for its texture and tangy flavor, but it’s not strictly required. If kale isn’t your thing, classic lettuce, tomato, and pickles are also wonderful sandwich toppings. You could also experiment with a simple coleslaw or even some spicy candied jalapeños.
How should I reheat leftover fried chicken for a sandwich?
Reheating fried chicken in a microwave is a sure path to sogginess. The best way to reheat fried chicken while preserving crispiness is in an air fryer (around 375°F or 190°C for 5-8 minutes) or in a conventional oven (on a wire rack set over a baking sheet at around 400°F or 200°C for 10-15 minutes) until heated through and re-crisped.
Enjoy Your Homemade Crispy Fried Chicken Sandwich!
There you have it – the not-so-secret secrets to a crispy fried chicken sandwich that stays gloriously crunchy from the first bite to the very last. No more soggy disappointments! This recipe is a game-changer for anyone who loves this classic comfort food but wants to achieve perfect results at home.
Whip up this sandwich for a weekend treat, a satisfying lunch, or a fun dinner. Pair it with your favorite sides, pour yourself a cold drink, and prepare to enjoy the ultimate crispy chicken experience. I promise, the effort is more than worth the reward!
Have you tried this recipe? What are your favorite toppings? Let me know in the comments below! And if you loved this, don’t forget to share it with your friends!
Crispy Fried Chicken Sandwich

Ingredients
- 1 boneless skinless chicken breast or thigh
- 1 cup all-purpose flour
- 1 teaspoon salt
- 1/2 teaspoon black pepper
- 1/2 teaspoon paprika
- 1/4 teaspoon garlic powder
- 1 large egg
- 1/4 cup milk or buttermilk
- Vegetable oil for frying
- 1 soft sandwich bun
- 1 cup chopped kale, stems removed
- 1 tablespoon mayonnaise
- 1 teaspoon apple cider vinegar
- Pinch of salt for kale
- 2 tablespoons creamy sauce (like mayonnaise or a ranch-style dressing)
Directions
- Prepare the chicken: If using a thick breast, pound it gently to an even thickness of about 1/2 to 3/4 inch. Pat the chicken completely dry with paper towels. This is a key step for crispiness.
- Set up dredging stations: In a shallow dish, whisk together the flour, salt, pepper, paprika, and garlic powder. In another shallow dish, whisk the egg and milk or buttermilk.
- Dredge the chicken: First, coat the dry chicken thoroughly in the seasoned flour, shaking off any excess. Then dip it into the egg mixture, letting any extra drip off. Finally, coat it again in the seasoned flour, pressing gently to ensure the flour adheres well. Let the breaded chicken rest on a wire rack for 10-15 minutes. This helps the coating stick better.
- Fry the chicken: Heat about 1 inch of vegetable oil in a heavy skillet over medium-high heat to 350°F (175°C). Carefully place the breaded chicken in the hot oil, ensuring not to overcrowd the pan. Fry for 4-6 minutes per side, or until deeply golden brown and the internal temperature reaches 165°F (74°C).
- Drain properly: This is another crucial crispiness step. Remove the fried chicken from the oil and place it on a clean wire rack set over a baking sheet. Avoid draining it on paper towels, as this can trap steam and make the coating soggy.
- Prepare the kale: In a small bowl, combine the chopped kale, mayonnaise, apple cider vinegar, and a pinch of salt. Use your hands to gently massage the kale for 1-2 minutes until it softens slightly and is evenly coated.
- Assemble the sandwich: Slice the bun horizontally. Place the crispy fried chicken on the bottom half of the bun. Top with the massaged kale salad. Drizzle generously with the creamy sauce. Place the top bun on top. Serve immediately to enjoy maximum crispness.