
Have you ever tried making those glorious, stuffed rolls wrapped in bacon, only to end up with greasy, chewy bacon and a dry filling? It’s a common frustration in the kitchen! We dream of perfectly crisp bacon encasing a tender, savory meat filling overflowing with gooey, melted cheese. Achieving that balance can feel like culinary magic.
For the longest time, I struggled to get it just right. My bacon-wrapped creations were often delicious inside, but the exterior lacked that satisfying crunch. After much trial and error, I finally discovered a simple technique that makes all the difference. This method ensures your bacon renders beautifully and crisps up evenly, while protecting the delicious interior from getting dried out. Get ready for the best Bacon-Wrapped Meat & Cheese Rolls you’ve ever made!
Why You’ll Fall in Love with These Rolls
Beyond just tasting incredible, these bacon-wrapped delights offer a few compelling reasons to make them a staple in your cooking rotation:
- Guaranteed Crispy Bacon: The secret technique we’ll dive into ensures that coveted crispy exterior. No more floppy, undercooked bacon!
- Perfectly Melted Cheese: The method protects the cheese, allowing it to melt into a luscious, stringy dream without burning.
- Flavor Explosion: Savory ground beef, your favorite melting cheese, and salty bacon – it’s a combination that’s simply irresistible.
- Simple Secret, Big Results: You’ll be amazed at how easy the key step is and the dramatic improvement it makes.
- Versatile & Fun: These rolls are fantastic for dinner, game day, parties, or even a hearty lunch.
Gathering Your Ingredients for Delicious Bacon-Wrapped Meat & Cheese Rolls
Creating these craveable rolls starts with selecting the right components. We’re building layers of flavor and texture, so choosing quality ingredients is key, but the beauty is in their simplicity.
First up, the heart of our filling: a pound of ground beef. I recommend using a blend that’s not too lean, maybe 80/20 or 85/15. A little fat helps keep the meat moist as it bakes inside the dough. We’ll season it simply with essential flavor builders: salt and black pepper. You also have the option to add a touch of onion powder and garlic powder. These dried spices integrate seamlessly into the meat mixture, providing a savory base that complements the other flavors beautifully. Don’t skip them if you have them on hand!
Next, we need the wrapper and the gooey center. For convenience, a package of prepared pizza dough or bread dough works wonderfully. Look for a package around 14 ounces. This saves time and effort, allowing you to get to the delicious part faster! The cheese is crucial – you need about 8 ounces of a good melting cheese. Shredded or sliced works, just make sure it’s something that gets nice and gooey when heated. Mozzarella is a classic choice for its stretch and mild flavor, while provolone adds a little more tang. A blend of the two is also fantastic! Finally, the star of the show (for many of us!): bacon. You’ll need 12 slices to wrap our rolls in that beautiful, crispy embrace.
Here’s a simple list of what you’ll need:
- 1 pound ground beef
- 1/2 teaspoon salt
- 1/4 teaspoon black pepper
- 1/4 teaspoon onion powder (optional)
- 1/4 teaspoon garlic powder (optional)
- 1 package (about 14 ounces) prepared pizza dough or bread dough
- 8 ounces melting cheese, sliced or shredded (like mozzarella or provolone)
- 12 slices bacon
Crafting Your Bacon-Wrapped Meat & Cheese Rolls: Step-by-Step
Let’s get these savory rolls assembled! The process is straightforward, but paying attention to a few details will ensure your success, especially when it comes to achieving that perfect crispy bacon exterior.
- Your first step is to get the oven ready for baking these magnificent rolls. Preheat your oven to 375 degrees F (190 degrees C). While the oven heats up, prepare your baking setup. Place a wire rack inside a baking sheet. This simple setup is going to be crucial for the crispy bacon secret we discussed!
- In a medium-sized mixing bowl, gently combine your ground beef with the salt, black pepper, onion powder (if using), and garlic powder (if using). Use your hands or a spoon to mix everything until it’s just incorporated. Be mindful not to overmix the meat, as this can result in a tougher texture after baking.
- Take your prepared dough – whether it’s pizza or bread dough – and divide it into four equal portions. You can use a knife or a bench scraper for this.
- Now, work with one dough portion at a time. On a lightly floured surface, roll or stretch each piece of dough into a rectangle shape, aiming for a size roughly 6 inches by 4 inches. This size is easy to work with and provides enough dough to encase the filling securely.
- Divide your seasoned meat mixture into four equal portions as well. Take one portion and shape it into a log. The log should be slightly shorter than the width of your dough rectangle. This makes the rolling process easier and ensures the meat is fully covered. Place one meat log onto each dough rectangle.
- Now it’s time for the cheesy goodness! Divide about a quarter of your cheese slices or shredded cheese and place it evenly over the top of the meat log on each dough rectangle. Don’t be shy with the cheese – it’s part of the magic!
- Carefully fold the dough over the filling, bringing the longer edges together. Pinch the seams firmly to seal the roll completely. You want to make sure the filling is fully enclosed so the cheese doesn’t escape during baking.
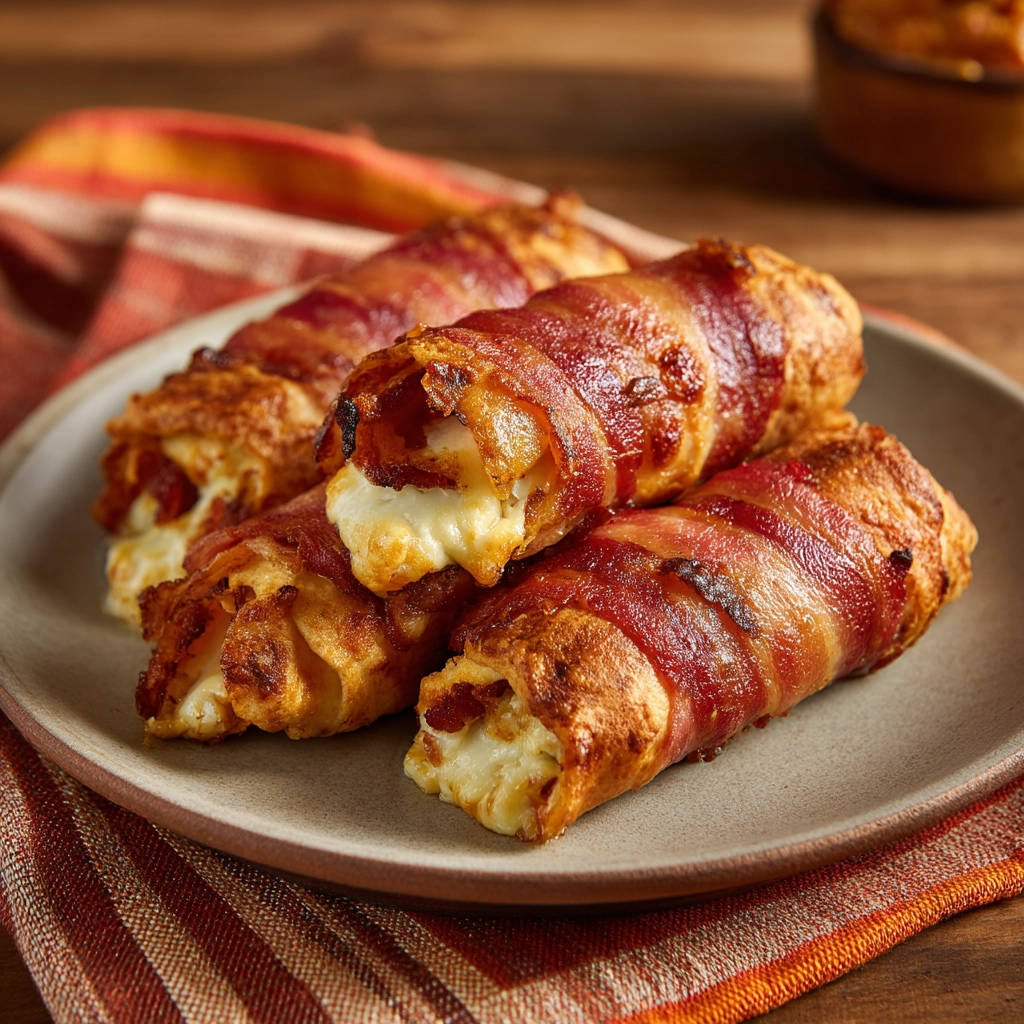
- Next comes the bacon wrapping! Take three slices of bacon for each roll. Starting at one end, wrap the bacon around the dough roll, spiraling it slightly as you go. Try to cover the entire surface of the roll with the bacon, tucking the ends underneath if needed. This bacon layer will crisp up beautifully and add incredible flavor.
- Now, here is the absolute KEY step for achieving that perfect crispy bacon and wonderfully melted cheese: Place the bacon-wrapped rolls seam side down onto the wire rack that’s set inside your baking sheet. This setup is essential! The wire rack allows hot air to circulate around the entire roll, especially underneath, ensuring the bacon crisps evenly on all sides. It also lets the bacon grease drip away onto the baking sheet below, preventing the rolls from becoming soggy. This circulation and grease drainage are the secrets to preventing chewy bacon and ensuring the cheese inside melts perfectly without drying out.
- Bake the rolls in your preheated oven for 35 to 40 minutes. You’ll know they’re done when the bacon is deeply golden brown and crispy, the dough is golden, and the rolls are cooked through. To be absolutely sure the meat is safe to eat, an instant-read thermometer inserted into the center of a roll (avoiding the cheese pocket) should register 160 degrees F (71 degrees C). If you notice the bacon getting too dark before the dough and meat are done, you can loosely tent the baking sheet with aluminum foil. Just be sure to remove the foil for the last 10 minutes of baking to allow the bacon to re-crisp.
- Once they’re out of the oven, resist the urge to slice into them immediately! Let the rolls rest on the wire rack for just a few minutes. This allows the juices to settle slightly and prevents the cheese from all oozing out in one go. Be aware that the cheese inside will be incredibly hot.
Tips for Perfect Bacon-Wrapped Meat & Cheese Rolls Every Time
Making these rolls is pretty straightforward, but a few extra pointers can help ensure absolute perfection:
- Don’t Overwork the Meat: When mixing the ground beef with seasonings, be gentle. Overmixing can make the meat dense and tough.
- Secure the Dough Seam: Spend a little extra time pinching the dough seam completely closed. This is your first line of defense against cheese leaks.
- Wrap Tightly, But Not Too Tight: When wrapping the bacon, make sure it adheres nicely to the dough roll, but don’t stretch it so tightly that it tears. Covering the surface evenly is the goal.
- The Wire Rack is Non-Negotiable: Seriously, this is the secret! Baking directly on the pan will result in greasy, soggy bottoms. The rack is a game-changer. If you don’t have a wire rack that fits inside a baking sheet, it’s a worthy kitchen investment!
- Monitor Baking Closely: Ovens vary. Start checking around 30 minutes. If bacon crisps faster than the roll cooks, tenting with foil is your friend.
- Internal Temperature Check: Using a meat thermometer is the most reliable way to ensure the beef is cooked through (160°F / 71°C).
Looking for other comforting beef dishes? Our Umami Meatloaf or a hearty Classic Beef and Barley Soup might hit the spot on a different night!
Serving Suggestions for Your Savory Rolls
These bacon-wrapped meat and cheese rolls are hearty and flavorful on their own, but they pair wonderfully with a variety of sides. Think of them as the main event that plays well with others!
A simple green salad with a light vinaigrette provides a fresh contrast to the richness of the meat and cheese. Or, consider a classic potato side – Golden Roasted Potatoes or even Crispy Baked Hasselback Potatoes would be excellent companions. If you’re looking for something a little different, a side of Cheesy Creamed Corn adds sweetness and extra indulgence.
Don’t forget dipping sauces! Ketchup is classic, but you could also offer marinara sauce (like for pizza rolls), a savory barbecue sauce, or even a simple ranch dip. Get creative with what you have on hand!
Your Bacon-Wrapped Meat & Cheese Roll Questions Answered (FAQ)
Let’s tackle some common questions you might have about making these irresistible rolls.
Can I use a different type of ground meat?
Absolutely! While ground beef is called for here, you could certainly experiment. Ground chicken or turkey would make a lighter roll, though they might be slightly less juicy unless you add a bit more seasoning or maybe some finely minced onion to the mix. Just ensure the internal temperature reaches 165°F (74°C) for poultry.
What other cheeses can I use?
Any good melting cheese will work! Cheddar is a popular choice, as are Monterey Jack, Colby Jack, or even a spicy Pepper Jack for a kick. A smoked gouda could add a lovely depth of flavor. Just make sure it melts smoothly.
Can I make these ahead of time?
Yes, you can prep these partially or fully ahead! You can assemble the rolls (steps 1-7) and store them, uncooked, seam-side down on the wire rack set in the baking sheet in the refrigerator for up to 24 hours. Wrap the whole tray loosely with plastic wrap. When ready to bake, unwrap and bake as directed, adding a few extra minutes to the baking time as they will be going in cold.
Can I freeze Bacon-Wrapped Meat & Cheese Rolls?
Freezing is a great option for meal prep! Assemble the rolls completely (steps 1-7), but do NOT wrap them in bacon yet. Flash freeze the uncooked rolls on a baking sheet until solid, then transfer them to a freezer-safe bag or container. They can be frozen for up to 2-3 months. When ready to bake, thaw overnight in the refrigerator, then wrap with bacon (step 7) and bake as directed (steps 8-10), adding extra baking time as needed.
My bacon isn’t crisping, what went wrong?
The most common reasons are not using a wire rack, wrapping the bacon too loosely, or not baking long enough. Ensure you are using the wire rack so air circulates and fat drips away. Make sure the bacon is wrapped snugly around the roll. And sometimes, you just need a few extra minutes in the oven, perhaps with the foil tenting removed to allow the bacon to get crispy.
How do I reheat leftover rolls?
The best way to reheat is in the oven or an air fryer to help re-crisp the bacon. Place leftover rolls on a small baking sheet (or in the air fryer basket) and heat at 350°F (175°C) for about 10-15 minutes, or until heated through and the bacon is crispy again.
Enjoy Your Homemade Bacon-Wrapped Meat & Cheese Rolls!
There you have it – the secret to achieving those perfectly crispy, cheesy, meaty rolls you’ve been dreaming of! This recipe takes a potentially tricky concept and makes it simple, all thanks to that crucial wire rack step. They’re satisfying, easy to make, and guaranteed to be a hit with anyone who loves the combination of savory meat, melted cheese, and glorious, crispy bacon.
Give this recipe for Bacon-Wrapped Meat & Cheese Rolls a try tonight and see the magic for yourself! We’d love to hear how they turn out for you. Leave a comment below and let us know your favorite cheese to use or what sides you paired them with. Happy cooking!
Bacon-Wrapped Meat & Cheese Rolls

Ingredients
- 1 pound ground beef
- 1/2 teaspoon salt
- 1/4 teaspoon black pepper
- 1/4 teaspoon onion powder (optional)
- 1/4 teaspoon garlic powder (optional)
- 1 package (about 14 ounces) prepared pizza dough or bread dough
- 8 ounces melting cheese, sliced or shredded (like mozzarella or provolone)
- 12 slices bacon
Directions
- Preheat your oven to 375 degrees F. Place a wire rack inside a baking sheet.
- In a medium bowl, mix together the ground beef, salt, black pepper, onion powder, and garlic powder until just combined. Do not overmix.
- Divide the dough into 4 equal portions. Roll or stretch each portion into a rectangle about 6×4 inches.
- Divide the meat mixture into 4 equal portions. Shape each portion into a log slightly shorter than the dough width. Place one meat log onto each dough rectangle.
- Top the meat log with about 1/4 of the cheese slices or shredded cheese.
- Fold the dough over the filling, pinching the seams closed to form a sealed roll.
- Wrap each dough roll with 3 slices of bacon, spiraling them around the roll to cover it completely.
- This is the key step for crispy bacon and perfectly melted cheese: Place the bacon wrapped rolls seam side down on the wire rack set inside the baking sheet. Using the rack allows air circulation and grease to drip away, which is essential for crisping the bacon evenly and preventing a soggy bottom, while protecting the cheese inside from overcooking before the bacon is done.
- Bake for 35-40 minutes, or until the bacon is crispy and the rolls are golden brown and cooked through. The internal temperature of the meat should reach 160 degrees F. If the bacon is crisping too quickly, you can loosely tent the rolls with foil, removing it for the last 10 minutes.
- Let rest for a few minutes before serving. The cheese will be very hot.