For years, my exotic stews failed because the sauce was thin and watery, refusing to cling to the meat. This recipe for Braised Apricot and Olive Chicken solves that common problem with the “gloss trick,” resulting in a rich, jewel-toned sauce that locks onto every bite.
The Braise Breakthrough: Why This Recipe Gets Rave Reviews
The Secret to the Signature Glossy Sauce (The Texture Lock-In)
The secret to the velvety finish lies in rapid reduction combined with a final emulsification step.
After the chicken is cooked, boiling the sauce down concentrates its natural flavors and thickens it by about one-third. Stirring in the honey or preserves off-heat then binds the reduced liquid and fat, creating the signature thick, glossy sheen-our crucial texture lock-in.
Flavor Foundation: Why Caramelizing Onions is Non-Negotiable
Rushing the onion step is the number one mistake in flavorful braising. Cooking the onions slowly for a full 8 to 10 minutes allows their sugars to caramelize fully, developing a deep brown fond.
This foundational sweetness and savory depth is critical for achieving the complex, jewel-toned color and rich profile that defines this tagine-style dish.
Unlocking Depth: Spice Blend Synergy (Cumin and Ginger)
A simple yet potent blend of ground cumin and ground ginger elevates this dish beyond a basic chicken stew.

Cumin provides warmth and earthiness, while ginger adds a subtle, fragrant brightness, contributing to the overall North African-inspired complexity.
Gathering Your Tagine-Style Essentials: Key Ingredients Breakdown
Choosing Your Protein: Bone-In vs. Boneless Thighs
We recommend bone-in, skin-on chicken thighs for maximum flavor depth and richness, as the bone releases collagen during the slow braise.
If you prefer quicker cooking and easier prep, boneless, skinless thighs are perfectly acceptable, but reduce the braising time slightly to prevent them from drying out.
The Power of Dried Fruit and Brine: Apricots and Green Olives
Dried apricots are the central sweet element, plumping up during braising and softening the sharp acidity of the spices.
The pitted green olives introduce necessary salinity and briny contrast, ensuring the overall flavor profile is balanced and savory, not overly sweet.
Building the Braising Liquid: Broth and Aromatics
Use a high-quality, low-sodium chicken broth to control the seasoning, as the olives already contribute significant salt.
Fresh thyme is essential for its woody aroma, and the final addition of honey or apricot preserves provides the necessary sugar for the signature glossy finish.
Preparation Secrets: Setting the Stage for Success
Essential Tools for Heavy-Bottomed Braising
Dutch Oven: A heavy, enameled cast iron Dutch oven is ideal because it holds and distributes heat evenly, ensuring the best possible sear on the chicken.
Heavy-Bottomed Pot: If a Dutch oven isn’t available, use any heavy-bottomed stainless steel pot to achieve high heat for the sear without scorching the onions during the long caramelization.
The Crucial Step: Seasoning and Drying the Chicken
Patting the chicken thoroughly dry with paper towels is paramount; any excess moisture will steam the skin rather than allowing it to develop a deeply golden, crispy crust during searing.
Apply the salt, pepper, cumin, and ginger directly to the dry chicken thighs as a pre-sear rub to infuse the meat deeply with flavor before the braise begins.
Step-by-Step Mastery: Cooking Your Braised Apricot and Olive Chicken
Phase 1: Searing for Deep Color and Texture
- Prepare and Season: Pat the chicken dry and season heavily with salt, pepper, cumin, and ginger.
- The Perfect Sear: Heat oil in a large, heavy-bottomed pot over medium-high heat and place the chicken skin-side down.
Do not move the chicken during the initial sear (5-7 minutes) to ensure maximum browning and crispness. A dark, golden sear is the irreplaceable foundation of this dish’s flavor.
- Build the Aromatic Base: Remove the chicken and scrape up the fond (browned bits) while caramelizing the onions.
Reduce the heat to medium and cook the onions for 8 to 10 minutes until deeply softened and caramelized. The moisture released from the onions naturally lifts the savory fond, enriching your sauce base.
Phase 2: Low and Slow Braising Technique
- Combine and Simmer: Return the chicken to the pot. Add the chicken broth, dried apricots, green olives, and 3 sprigs of fresh thyme.
- Cover and Cook: Bring the liquid just to a gentle simmer, then cover the pot tightly and reduce the heat to low.
Braising gently for 30 minutes ensures the chicken remains moist and fall-apart tender. Always verify the internal temperature of the chicken reaches 165°F for safety.
Phase 3: The Rapid Reduction and Finishing Glaze
- The Gloss Trick (Texture Lock-In): Remove the cooked chicken and thyme sprigs, setting the chicken aside to keep warm, then boil the sauce rapidly, uncovered.
This rapid reduction concentrates the liquid, thickening it naturally by about one-third. Test the sauce by checking if it thinly coats the back of a spoon-this visual cue confirms the perfect consistency.
- Final Polish: Remove the pot from the heat and stir in the 1 tablespoon of honey or apricot preserves until fully dissolved.
The addition of sugar at this stage emulsifies the fats and the reduced liquids, delivering the signature thick, glossy sheen that clings perfectly to the Braised Apricot and Olive Chicken.
Chef’s Secrets: Elevate Your Braised Apricot and Olive Chicken Game
Use Quality Thyme: Ensure you use fresh thyme for braising, as dried thyme cannot replicate the subtle, woody aroma it imparts during the long cook.
Salt Control: Because olives are naturally salty and the broth contains sodium, only adjust the final seasoning after the sauce reduction step (Phase 3) when the flavors have fully concentrated.
Achieving Deep Caramelization: Dedicate the full 8 to 10 minutes to the onions; rushing this step sacrifices the deepest flavor notes and the rich, complex color of the finished sauce.
Braising Liquid Check: Only cover the chicken about halfway or two-thirds with broth. Too much liquid will prevent the necessary concentration needed for the final glossy reduction, guaranteeing a watery sauce.
Beyond the Pot: Serving Suggestions and Perfect Pairings
Why Quick-Cooking Couscous is the Ideal Companion
Quick-cooking couscous is the traditional and ideal accompaniment for this dish.
Its speed of preparation (usually 5 minutes of steaming) and its light, fluffy texture are perfect for soaking up the abundance of rich, glossy sauce and savory juices without overpowering the Braised Apricot and Olive Chicken.
Alternative Sides to Complement the Sweet and Savory Profile
For alternative sides, consider serving the braise over fluffy saffron rice for added luxury and color, or pairing it with a simple, crusty rustic bread for dipping.
A light, acidic side like a simple green salad dressed with a bright lemon vinaigrette provides a necessary contrast to the richness of the stew.
Storage and Make-Ahead Tips for Richer Flavor
Leftovers of the braised chicken store beautifully in an airtight container in the refrigerator for up to four days.
This is truly a dish that benefits from being made one day ahead; the time allows the spices, apricots, and olives to fully marry into the sauce, deepening the complexity of the finished flavor.
Troubleshooting Your Braised Chicken: Common Fixes
“My Sauce is Still Watery!” Fixing a Thin Braising Liquid
If the sauce seems thin, the issue is almost certainly insufficient reduction time during Phase 3.
Continue boiling the liquid rapidly, uncovered, until the sauce reduces significantly and coats the back of a spoon. Do not add the honey until the desired consistency is reached.
The Chicken Skin isn’t Crispy Anymore
It is normal for the chicken skin to soften during the wet braising process.
To restore crispness, remove the chicken 5 minutes before serving. Place the thighs skin-side up on a baking sheet and slide them under a hot broiler for 2 to 3 minutes while the sauce finishes reducing.
Too Salty or Too Sweet? Balancing the Final Flavor
If the final sauce tastes too sweet, counteract it immediately with a splash of fresh lemon juice or a small measure of vinegar.
If the sauce is overly salty (often due to the olives or broth), stir in a teaspoon of water or additional broth, or serve it alongside a plain, neutral base like unseasoned yogurt or plain couscous to dilute the flavor.
Ready to Impress? Share Your Braised Apricot and Olive Chicken Masterpiece!
Mastering the technique for a rich, glossy sauce is the ultimate secret to success in savory, exotic braises.
This Braised Apricot and Olive Chicken offers a stunning balance of sweet, savory, and briny notes, proving that complex, deep flavor doesn’t have to be complicated to achieve. Now that you have the glossy sauce secret, gather your ingredients and prepare to transform your kitchen into a North African culinary sanctuary!

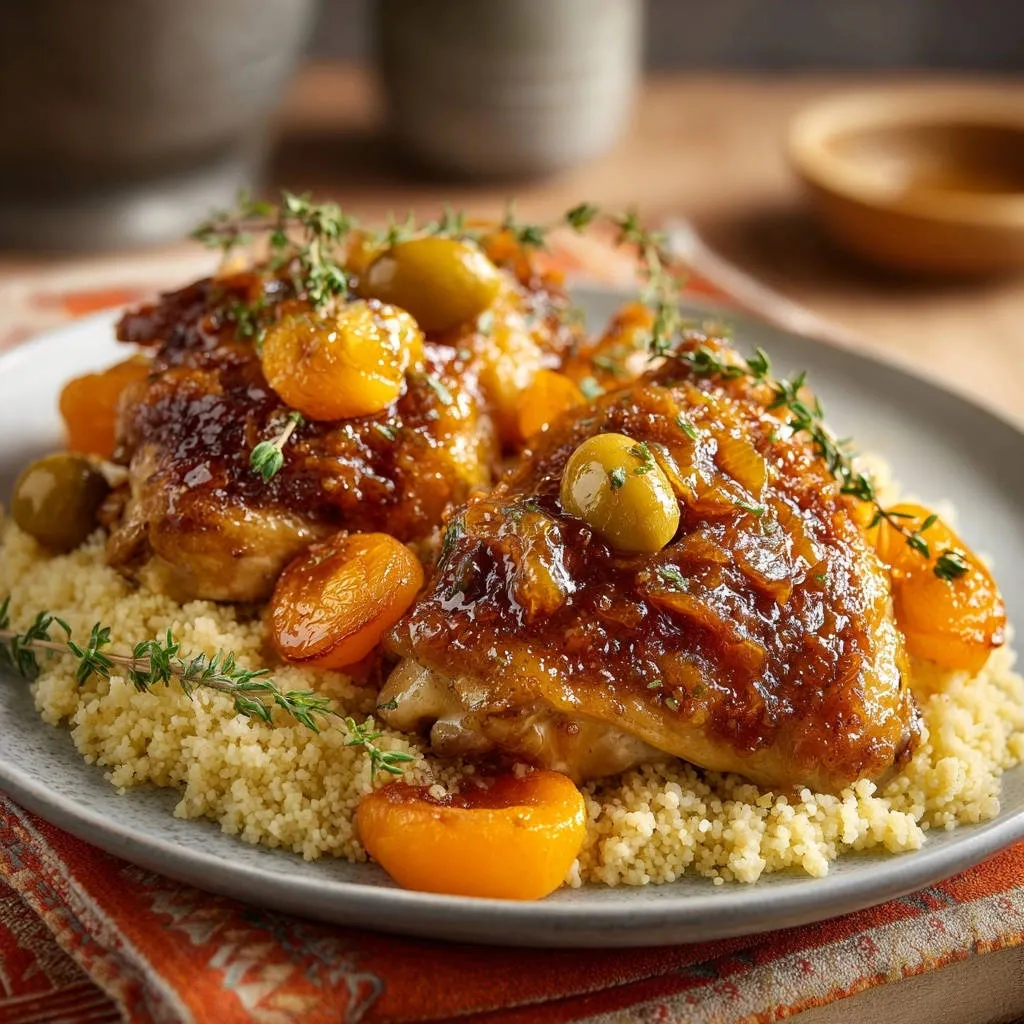
Braised Apricot and Olive Chicken
Course: Main CourseCuisine: Mediterranean cuisineDifficulty: easy4
servings15
minutes1
hour60
minutesMediterranean cuisine
Ingredients
4 Bone-in, skin-on chicken thighs (or boneless, skinless)
1 tablespoon Olive Oil
1 large Yellow Onion, thinly sliced
4 cloves Garlic, minced
1 cup Chicken Broth
1/2 cup Dried Apricots, halved
1/2 cup Green Olives, pitted
1 tablespoon Honey or Apricot Preserves
1 teaspoon Ground Cumin
1/2 teaspoon Ground Ginger
Salt and Black Pepper, to taste
Fresh Thyme sprigs, for braising and garnish
1 cup Quick-cooking Couscous
Directions
- Prepare the Chicken: Pat the chicken thighs thoroughly dry and season heavily with salt, pepper, cumin, and ginger. Set aside.
- Sear the Chicken: Heat the olive oil in a large, heavy-bottomed pot or Dutch oven over medium-high heat. Place the chicken skin-side down (if using skin-on) and sear undisturbed for 5 to 7 minutes until deeply golden brown and crispy. Remove the chicken and set it aside, leaving the fat in the pot.
- Build the Base: Reduce the heat to medium. Add the sliced onion to the pot and cook, scraping up any browned bits from the chicken, for 8 to 10 minutes until the onions are soft and caramelized (this depth of flavor is critical). Add the minced garlic and cook for 1 minute more until fragrant.
- Braise: Return the chicken to the pot. Add the chicken broth, dried apricots, green olives, and 3 sprigs of fresh thyme. Bring the liquid to a simmer, then cover the pot and reduce the heat to low. Braise gently for 30 minutes, or until the internal temperature of the chicken reaches 165 degrees F.
- THE GLOSS TRICK (Texture Lock-In): Remove the cooked chicken and thyme sprigs from the pot and set the chicken aside, keeping it warm. Increase the heat to high beneath the sauce remaining in the pot. Allow the sauce to boil rapidly, uncovered, stirring occasionally, until the liquid has reduced by about one-third and begins to thicken naturally (about 5 to 8 minutes). The sauce should cling slightly to the back of a spoon.
- Finish the Sauce: Remove the pot from the heat. Stir in the 1 tablespoon of honey or apricot preserves until fully dissolved. This sugar will emulsify with the reduced liquids and fat, creating the signature thick, glossy sheen. Taste the sauce and adjust seasonings if necessary.
- Prepare Couscous: While the sauce reduces, prepare the couscous according to package directions (typically mixing 1 cup of couscous with 1 cup of boiling water or broth, covering, and steaming for 5 minutes, then fluffing).
- Serve: Place a generous bed of fluffy couscous on each plate. Nest the glazed chicken thighs over the couscous and spoon the extra thick, glossy sauce, apricots, and olives directly over the top. Garnish with fresh thyme sprigs before serving hot.
Notes
- The final reduction step is critical for achieving the signature thick, glossy sauce texture.