Ah, cheesy baked pasta. It’s the ultimate comfort food, isn’t it? A bubbling pan of pasta, rich tomato sauce, savory meat, and gooey, melted cheese. Pure bliss! But let’s be honest, sometimes, despite our best efforts, a baked pasta dish can turn out disappointingly dry, especially those edges that cling to the pan. Nobody wants a tough, dried-out mess when you’re craving that perfect balance of saucy, cheesy goodness with tender pasta in every single bite.
If you’ve ever faced the dreaded dry baked pasta dilemma, you’re not alone. It’s a common kitchen woe! I’ve experimented over the years, trying different techniques and ingredient ratios, and I’m thrilled to share that I’ve finally cracked the code on getting cheesy baked rotini perfectly moist and utterly delicious every single time. And guess what? The secret is simpler than you might think! This recipe delivers on flavor, texture, and that comforting feeling only a great baked pasta can provide.
Reasons This Cheesy Baked Rotini is a Keeper
Beyond just being a crowd-pleasing dish, this Cheesy Baked Rotini recipe boasts several features that make it a regular in our meal rotation:
- Guaranteed Moistness: Say goodbye to dry edges! The technique used ensures every forkful is wonderfully saucy and tender.
- Classic Comfort: It hits all the right notes for a hearty, satisfying dinner that feels like a warm hug.
- Simple Ingredients: Made with everyday pantry staples you likely already have on hand or can easily find.
- Family Favorite: Kids and adults alike devour this dish. It’s perfect for busy weeknights or feeding a hungry crowd.
- Great for Leftovers: If there’s any left (a big “if”!), it reheats beautifully while maintaining its moisture.
Gathering Your Ingredients for Cheesy Baked Rotini Perfection
Creating this incredibly moist and flavorful cheesy baked rotini starts with selecting quality ingredients. The beauty of this dish lies in its simplicity, allowing the core flavors to shine. We’ll build a robust meat sauce base and layer it with perfectly cooked pasta and plenty of cheese for that signature gooey finish.
Here’s what you’ll need to gather:
- Rotini Pasta (1 pound): The corkscrew shape of rotini is fantastic for baked dishes because it holds onto the sauce in all those nooks and crannies. While rotini is my go-to for this recipe, feel free to use other shapes like penne, ziti, or even elbow macaroni if that’s what you have.
- Olive Oil (1 tablespoon): Just enough to get our aromatics and ground beef cooking. A good quality extra virgin olive oil adds a nice subtle flavor depth.
- Ground Beef (1 pound): The heart of our meat sauce. I typically use lean ground beef (85-90%) to minimize excess fat, but anything around 80/20 works too – just be sure to drain off any extra grease after browning. If you’re looking for other hearty beef dishes, our Hearty Beef Chili or Classic Pot Roast are also comforting options.
- Medium Onion, diced (1): A kitchen essential! Diced onion adds sweetness and aromatic depth to the sauce as it softens.
- Garlic, minced (2 cloves): Garlic is non-negotiable in a good pasta sauce. Mincing helps release its pungent, wonderful flavor.
- Crushed Tomatoes (28 ounce can): This provides the main body and chunky texture of our sauce. Look for good quality crushed tomatoes for the best flavor.
- Tomato Sauce (15 ounce can): Added to the crushed tomatoes, this helps create a smoother, more cohesive sauce consistency that coats the pasta beautifully. The combination is key for the right sauciness.
- Dried Italian Seasoning (1 teaspoon): A simple blend of herbs like oregano, basil, thyme, and rosemary that brings classic Italian-American flavor to the sauce. You can adjust this amount or add other herbs like a pinch of dried basil or oregano if you prefer.
- Salt and Black Pepper (to taste): Essential for seasoning and bringing out all the other flavors. You’ll season the sauce and can adjust again after everything is combined.
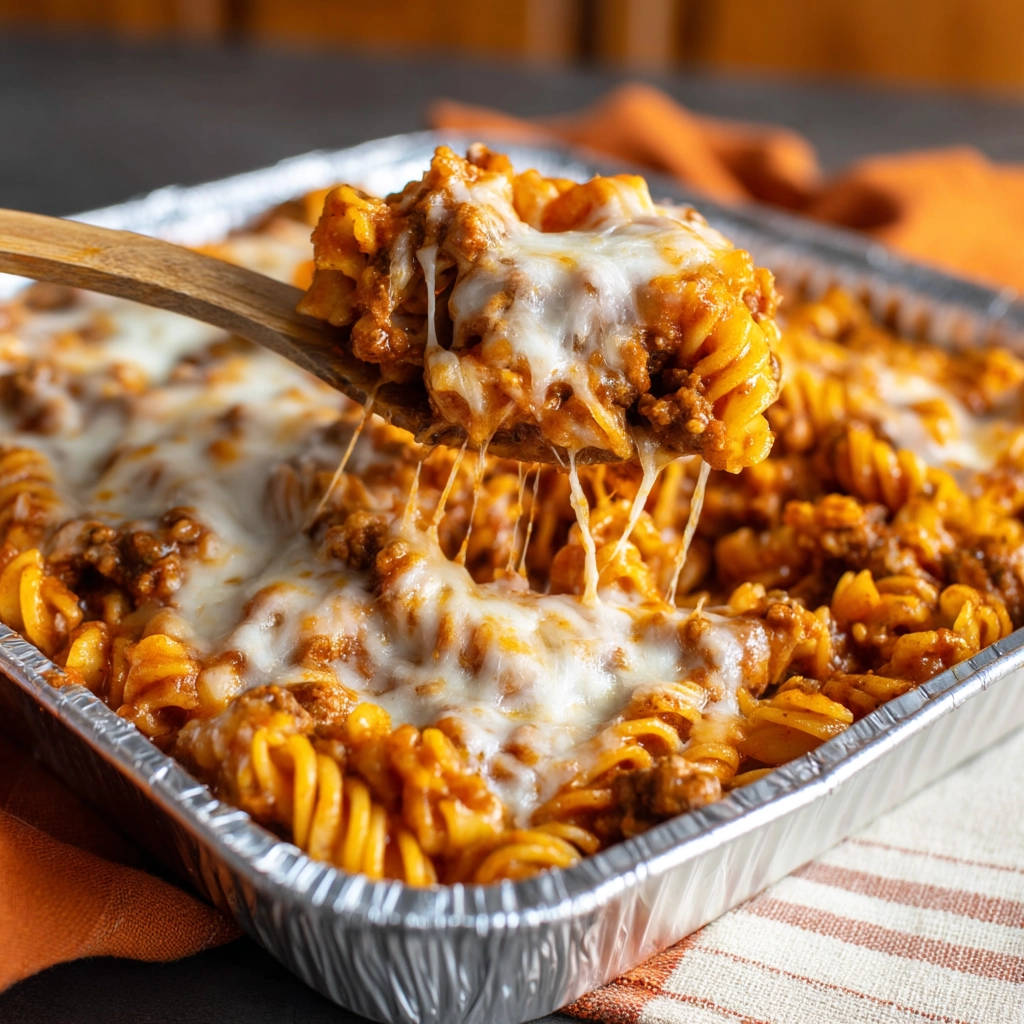
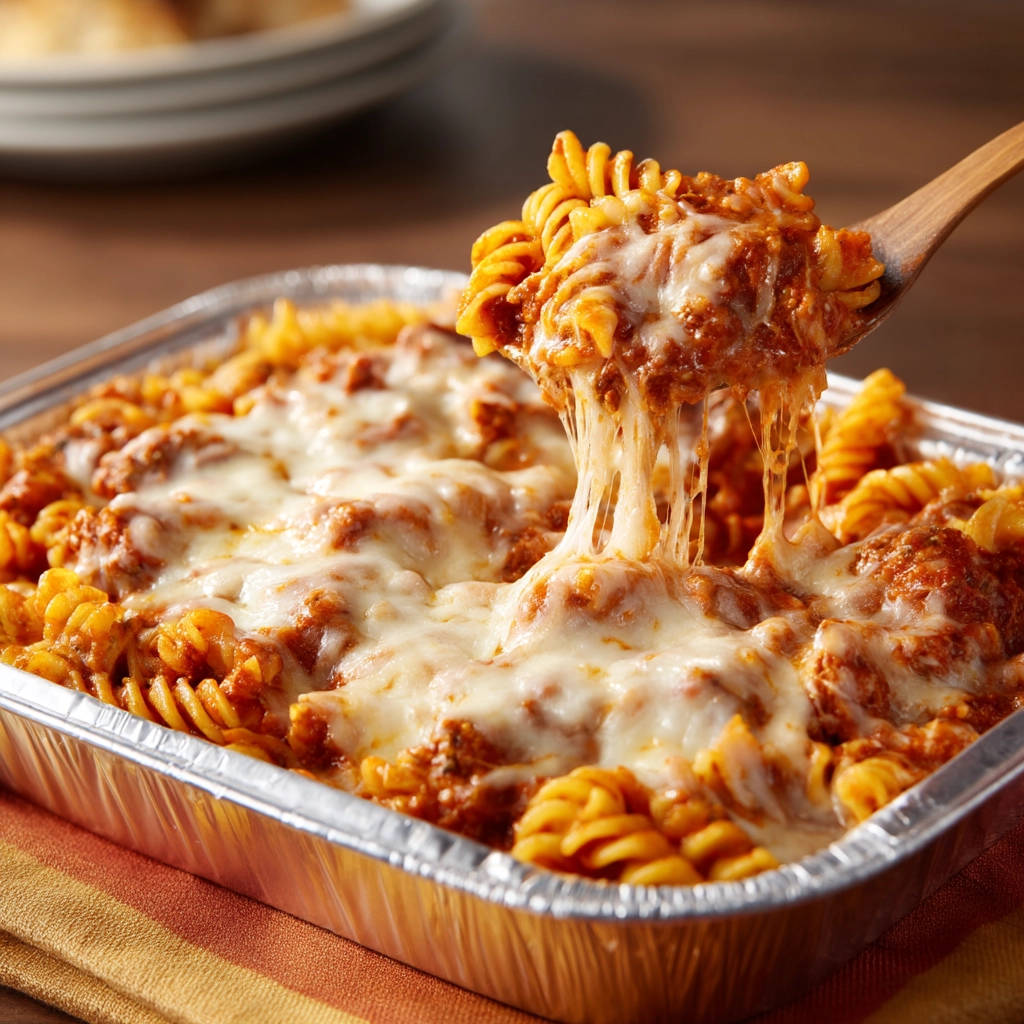
- Shredded Mozzarella Cheese (2 cups): The star of the cheesy topping! Mozzarella melts beautifully and creates that desirable gooey, stretchy layer. Freshly shredding cheese often melts better than pre-shredded, but pre-shredded is perfectly fine for convenience.
Crafting Your Cheesy Baked Rotini: A Detailed Guide
Ready to make the best cheesy baked pasta you’ve ever had? Follow these steps, paying close attention to a couple of key moments, and you’ll be rewarded with a moist, flavorful masterpiece.
Prepare the Pasta: The Al Dente Secret
Start by preheating your oven to 375 degrees F (190 degrees C). Now, bring a large pot of salted water to a rolling boil for your rotini pasta. Cook the pasta according to the package directions, but here’s the first crucial tip: drain it about 2 minutes before it reaches the recommended al dente time. This slight undercooking is vital because the pasta will continue to cook and absorb sauce in the oven. Starting it slightly firm prevents it from turning mushy during the baking process.Brown the Beef Base
While your pasta is doing its thing, heat the tablespoon of olive oil in a large pot or Dutch oven over medium heat. Add the pound of ground beef to the hot pot. Use a spoon or meat chopper to break it up into small pieces as it cooks. Stir occasionally until the beef is completely browned through. Once browned, carefully drain off any excess fat from the pot. This step is essential for a clean, less greasy sauce.Sauté the Aromatics
With the beef browned and drained, add the diced medium onion to the pot with the cooked beef. Cook, stirring occasionally, until the onion softens and becomes translucent, which usually takes about 5 minutes. Next, stir in the minced garlic. Cook for just about 1 minute more, stirring constantly, until you can smell its wonderful fragrance. Be careful not to burn the garlic, as it can turn bitter quickly.Simmer the Sauce to Perfection
Pour in the can of crushed tomatoes and the can of tomato sauce. Add the dried Italian seasoning, and season generously with salt and black pepper to your taste. Stir everything together well, scraping up any browned bits from the bottom of the pot – those are flavor boosters! Bring the sauce mixture to a gentle simmer, then reduce the heat to low. Let the sauce simmer uncovered for about 10 minutes, stirring occasionally. This simmering time allows the flavors to meld and deepen. You want the sauce to be relatively thick, enough to coat the pasta, but still pourable. If it seems too thick, a splash of water (or even beef broth for extra flavor, though not strictly necessary per the source) can loosen it up.Combine Pasta and Sauce
Now for the magic marriage! Add the slightly undercooked and drained pasta directly into the pot with the simmering sauce. Use a large spoon or spatula to gently stir the pasta, ensuring every piece is completely coated in the rich, savory sauce. Work carefully to avoid breaking up the pasta.Assemble for Baking
Pour the glorious pasta and sauce mixture into a 9×13 inch baking dish. A ceramic dish or a disposable foil pan both work perfectly. Smooth the top of the mixture evenly in the dish so it’s all at roughly the same level.Top with Cheese
Generously sprinkle the shredded mozzarella cheese evenly over the entire surface of the pasta and sauce. Get it all the way to the edges! This cheese layer will become your bubbly, golden crust.The Key to Moisture: Cover & Bake!
This is the crucial step that guarantees a moist baked pasta! Tightly cover the baking dish with aluminum foil. Make sure it’s sealed well around the edges. Baking covered creates a steamy environment within the dish. This trapped steam keeps the pasta and sauce underneath from drying out while the dish heats through.Initial Covered Bake
Place the tightly covered baking dish in your preheated 375 degree F oven. Bake for 20 minutes. During this time, the pasta continues to absorb moisture, the sauce warms thoroughly, and the steam works its magic.Uncover and Finish
After the initial 20 minutes, carefully remove the aluminum foil. Be cautious of the steam escaping! Return the uncovered dish to the oven and bake for an additional 10 to 15 minutes. This final uncovered bake allows the mozzarella cheese on top to melt completely, become beautifully bubbly, and achieve that desirable slightly browned, golden crust. You’ll know it’s ready when the cheese is melted and bubbly and the edges of the dish are heated through and bubbling as well.Rest Before Serving
Once baked to perfection, remove the cheesy baked rotini from the oven. Let it stand for about 5 minutes before serving. This resting period is important; it allows the sauce to settle and the pasta to finish absorbing any surface liquid, resulting in the best possible texture. It also makes serving easier!
Tips for Perfect Cheesy Baked Rotini Every Time
Want to make this already fantastic recipe even better? Here are a few extra tips and tricks:
- Don’t Overcook the Pasta (Seriously): We already stressed this in the steps, but it’s the most important factor in preventing dry baked pasta. Two minutes before al dente is the sweet spot.
- Ensure Your Sauce is Not Too Thick: A very thick sauce will be completely absorbed by the pasta during baking, leading to dryness. It should be pourable and definitely not pasty before you add the pasta. Add that splash of water or broth in step 4 if needed.
- Cover Tightly: A loose foil cover won’t trap enough steam. Really crimp the edges down around the dish.
- Cheesy Variations: While mozzarella is classic, feel free to mix in other cheeses! A little shredded cheddar or provolone can add sharpness, or some grated Parmesan cheese sprinkled on top before serving adds a salty, nutty finish. For another cheesy favorite, check out our Extra Cheesy Mac and Cheese!
- Add Some Veggies: Want to sneak in more vegetables? Sauté diced bell peppers or zucchini along with the onion, or stir in a few handfuls of fresh spinach with the crushed tomatoes in step 4.
- Spice It Up: For a kick, add a pinch of red pepper flakes to the sauce along with the Italian seasoning.
- Make Ahead: You can assemble the entire dish (steps 1-7) up to 24 hours ahead of time. Cover it tightly (with plastic wrap then foil) and refrigerate. When ready to bake, add about 10-15 minutes to the initial covered baking time since it’s going in cold.
What to Serve With Your Cheesy Baked Rotini
This hearty baked pasta is practically a meal in itself, but pairing it with a simple side can round things out perfectly.
A crisp green salad with a light vinaigrette offers a refreshing contrast to the rich, cheesy pasta. You could also serve it alongside some Simple Marinated Tomatoes for a burst of freshness. If you’re craving something warm and comforting, a side of perfectly roasted vegetables would complement it nicely.
Your Cheesy Baked Rotini Questions Answered (FAQ)
Can I use a different type of pasta?
Absolutely! While rotini works wonderfully by holding onto the sauce, you can substitute it with other shapes like penne, ziti, rigatoni, or even large elbow macaroni. Just remember the key is to undercook it slightly before mixing with the sauce and baking.
Can I substitute the ground beef with other meat?
Yes, you can! Ground turkey or chicken are leaner alternatives that work well, though they may result in a slightly less rich sauce unless you add a bit more flavor. You could also use Italian sausage (sweet or spicy), removing it from its casings before browning. For another delicious beef option, you might enjoy our Tender Beef Tips and Tortelloni.
How can I make this recipe vegetarian?
To make this dish vegetarian, simply omit the ground beef. You can replace it with a combination of sautéed mushrooms, zucchini, bell peppers, or even a can of rinsed and drained lentils or cannellini beans added to the sauce. Our Creamy Tomato Pasta is another fantastic meat-free pasta option.
Can I freeze leftover Cheesy Baked Rotini?
Yes, baked pasta freezes beautifully! Allow the leftovers to cool completely. You can freeze individual portions in airtight containers or freeze the entire dish (if you used a freezer-safe dish) wrapped tightly in plastic wrap and then foil. Thaw overnight in the refrigerator and reheat in the oven or microwave. It might need a splash of water or broth when reheating to maintain moisture.
My baked pasta still turned out dry, what went wrong?
The most common culprits for dry baked pasta are overcooking the pasta initially or not having enough sauce relative to the amount of pasta. Ensure you drain the pasta about 2 minutes before the package recommended time. Also, make sure the sauce isn’t overly thick before combining it with the pasta; it should be pourable. And remember, the key is definitely tightly covering the dish with foil for the initial baking period to trap steam and keep everything moist!
How long does it take to reheat baked rotini?
To reheat a single serving in the microwave, cover and heat for 2-4 minutes, stirring halfway through. To reheat a larger portion or the whole dish in the oven, cover with foil and bake at 350°F (175°C) for 20-30 minutes, or until heated through. You might want to add a tablespoon or two of water or broth before covering to help create steam.
Enjoy Your Homemade Cheesy Baked Rotini!
There you have it – the secret to a perfectly moist and incredibly delicious cheesy baked rotini! This recipe is a true crowd-pleaser, perfect for family dinners, potlucks, or simply curling up on the couch with a big bowl of comfort. The combination of tender pasta, rich meat sauce, and bubbly cheese is simply irresistible.
I hope you give this recipe a try and see for yourself how easy it is to achieve baked pasta perfection. Let me know in the comments below how it turned out for you! And if you loved this, be sure to explore other cozy recipes on the site.
Cheesy Baked Rotini

Ingredients
- 1 pound rotini pasta
- 1 tablespoon olive oil
- 1 pound ground beef
- 1 medium onion diced
- 2 cloves garlic minced
- 28 ounce can crushed tomatoes
- 15 ounce can tomato sauce
- 1 teaspoon dried Italian seasoning
- Salt to taste
- Black pepper to taste
- 2 cups shredded mozzarella cheese
Directions
- Preheat oven to 375 degrees F. Cook the rotini pasta according to package directions, but drain it about 2 minutes before it reaches al dente. This helps prevent it from getting mushy during baking.
- While the pasta cooks, heat the olive oil in a large pot or Dutch oven over medium heat. Add the ground beef and cook, breaking it up with a spoon, until browned. Drain excess fat.
- Add the diced onion to the pot and cook until softened, about 5 minutes. Stir in the minced garlic and cook for 1 minute more until fragrant.
- Pour in the crushed tomatoes and tomato sauce. Add the Italian seasoning, salt, and pepper. Stir everything together and bring to a simmer. Reduce heat to low and let it simmer for 10 minutes, stirring occasionally. The sauce should be relatively thick but still pourable. If it seems too thick, add a splash of water.
- Add the slightly undercooked pasta to the sauce in the pot and stir gently to coat all the pasta evenly.
- Pour the pasta and sauce mixture into a 9×13 inch baking dish or foil pan. Smooth the top evenly.
- Sprinkle the shredded mozzarella cheese over the top.
- Here is the key step for a moist bake: Tightly cover the baking dish with aluminum foil.
- Bake covered for 20 minutes. Removing the foil for the final part of baking allows the cheese to get bubbly and slightly browned on top while keeping the pasta underneath perfectly moist from the steam trapped by the foil.
- Remove the foil and bake for an additional 10-15 minutes, or until the cheese is melted and bubbly and the edges are heated through.
- Let stand for 5 minutes before serving for the best texture.