BrüMate Era 40 oz Tumbler with Handle and Straw | 100% Leakproof Insulated Water Bottle Tumbler with Lid and Flexible SoftSip Straw | Made of Stainless Steel | Cup Holder Friendly | 40oz (Mocha)
$44.99 (as of December 20, 2025 09:13 GMT +00:00 - More infoProduct prices and availability are accurate as of the date/time indicated and are subject to change. Any price and availability information displayed on [relevant Amazon Site(s), as applicable] at the time of purchase will apply to the purchase of this product.)
STANLEY Quencher H2.0 Tumbler with Handle and Straw 40 oz | Flowstate 3-Position Lid | Cup Holder Compatible for Travel | Insulated Stainless Steel Cup | BPA-Free | Pomelo
(as of December 20, 2025 09:13 GMT +00:00 - More infoProduct prices and availability are accurate as of the date/time indicated and are subject to change. Any price and availability information displayed on [relevant Amazon Site(s), as applicable] at the time of purchase will apply to the purchase of this product.)
8 Blade All-in-1 Vegetable Chopper Mandoline Slicer with Container, Food Chopper, Onion Chopper, Veggie Cutter for Salad, Kitchen Gadgets Accessories Essentials, White
$19.99 (as of December 20, 2025 09:13 GMT +00:00 - More infoProduct prices and availability are accurate as of the date/time indicated and are subject to change. Any price and availability information displayed on [relevant Amazon Site(s), as applicable] at the time of purchase will apply to the purchase of this product.)
Rubbermaid Brilliance Food Storage Containers BPA Free Airtight Lids Ideal for Lunch Meal Prep & Leftovers Set of 5 (3.2 Cup)
$29.98 (as of December 20, 2025 09:13 GMT +00:00 - More infoProduct prices and availability are accurate as of the date/time indicated and are subject to change. Any price and availability information displayed on [relevant Amazon Site(s), as applicable] at the time of purchase will apply to the purchase of this product.)
Tervis Highpoint University Emblem Individual Tumbler, 16 oz, Clear
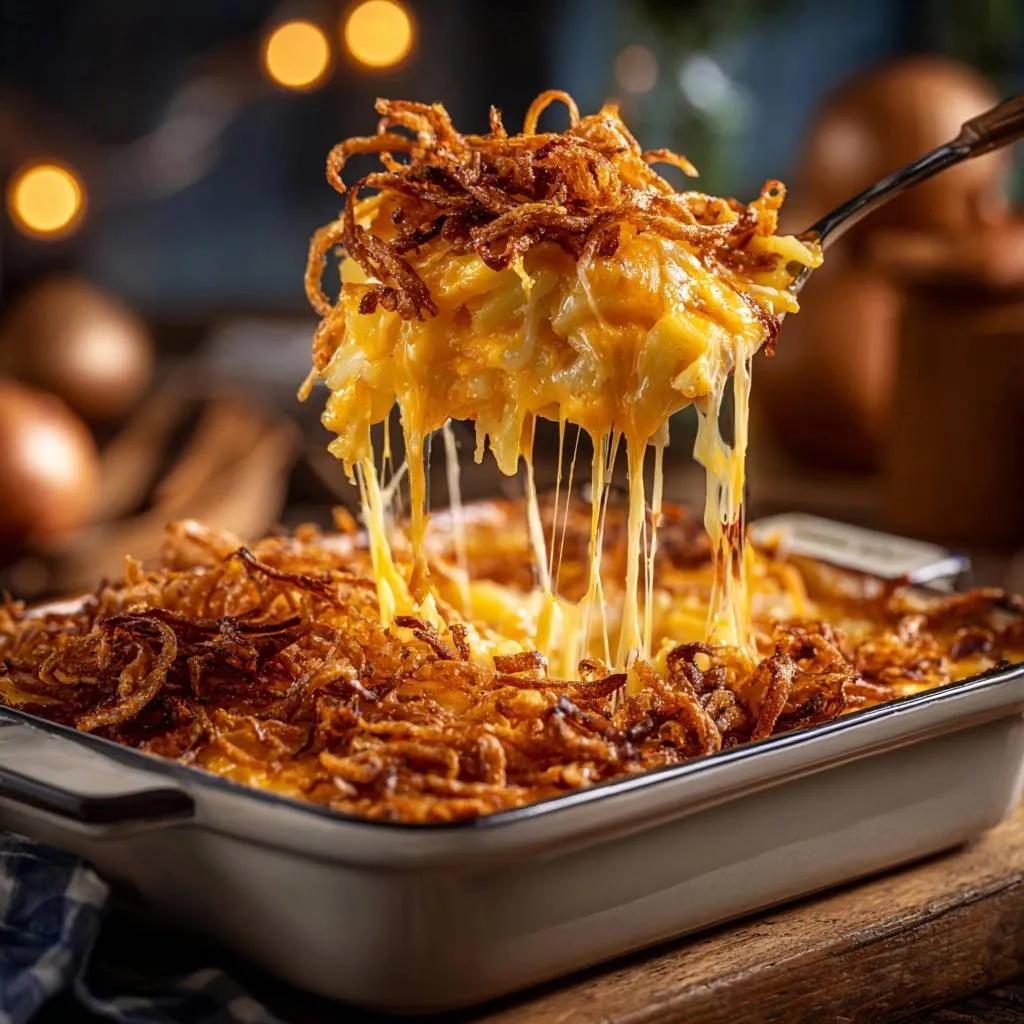
(as of December 20, 2025 09:13 GMT +00:00 - More infoProduct prices and availability are accurate as of the date/time indicated and are subject to change. Any price and availability information displayed on [relevant Amazon Site(s), as applicable] at the time of purchase will apply to the purchase of this product.)Picture this: layers of tender, creamy potatoes swimming in sharp cheddar sauce, all crowned with fried onions that snap with every bite. But here’s the heartbreak most folks face with cheesy potato casserole, those toppings turn into a soggy mess by the time you serve it. I’ve heard from so many readers who ditched casseroles after one too many mushy disasters at family dinners.
That’s why this cheesy potato casserole changes everything. You get that irresistible melty cheese pull and potato comfort without the disappointment. Plus, it feeds 8-10 easily, perfect for potlucks or weeknights.
The secret lies in scattering those fried onions right on the hot, set cheese, then hitting them with a quick bake or broil. This locks in crunch through the Maillard reaction, no steam to soften them. You’ll nail foolproof results every time.
Why Cheesy Potato Casserole Wins Every Time
This cheesy potato casserole delivers ultimate comfort, way better than bland potato bakes. Its creamy cheddar layers and crispy onion contrast make it a standout. In addition, you can scale it up for holidays or keep it simple for Tuesdays.
Versatility shines here. Make it ahead, transport it easily, or reheat without losing texture. Therefore, it beats standard versions that dry out or sog out. Crowd-pleasers like this cheddar potato bake disappear fast.
Perfect for Family Dinners or Potlucks
Serves 8-10 generously in a 9×13 dish. Reheats beautifully at 350°F covered in foil. For potlucks, wrap the dish in towels to stay warm during travel. Affordable staples keep costs low, around $10 total.

Key Ingredients for Ultimate Cheesy Potato Casserole
Russet potatoes form the starchy base that absorbs sauce perfectly. Shredded cheddar brings sharp meltiness, split for layers and topping. Crispy fried onions provide crunch, while the roux of butter, flour, and milk creates silky sauce. Garlic powder adds depth without overpowering.
Thinly slice potatoes for even cooking, no graininess. Use full-fat milk for creaminess; low-fat leads to watery sauce. Freshly shred block cheese, it melts smoother than pre-shredded.
Russet Potatoes: Starchy Base Choice
Russets beat waxy potatoes because higher starch holds structure and soaks up sauce. Peel for smooth texture, or leave skins for rustic bite. Use a mandoline safely for thin, uniform slices, about 1/8-inch, to ensure tenderness without crunch.
Cheddar Cheese and Fried Onions Duo
Shred your own cheddar for superior melt, 2 cups total. Split it: half in sauce, half on top. Store-bought fried onions save time and stay crisp with our method, though homemade works if you drain oil well.
Building the Creamy Cheese Sauce Base
Butter and flour roux thickens milk into velvety sauce. Whisk constantly to avoid lumps. Season with 1 teaspoon salt, 1/2 teaspoon pepper and garlic powder for balanced savoriness that elevates the cheesy potato casserole.
Science of Crispy Topping in Cheesy Potato Casserole
The crispy fried onions owe their goldeness to the Maillard reaction during quick final heat. Add them late, after cheese sets as a barrier, so steam doesn’t penetrate. This prevents sogginess in your cheesy potato casserole.
Potato starch gelatinizes at 375°F for fork-tender bites. Foil first traps moisture evenly, then uncovered bake browns the top. Therefore, layers stay distinct and delicious.
Roux Thickening for Silky Texture
Cook flour-butter roux 1 minute to cook out raw taste. Slowly whisk in cold milk to prevent lumps, stirring until bubbly and thick. This signals perfect sauce consistency.
Layering Locks in Potato Tenderness
Foil cover seals steam for even heat through layers. After 30 minutes, potatoes pierce easily with a fork. Remove foil to evaporate excess moisture and crisp the cheesy top.
Equipment Essentials for Cheesy Potato Casserole
Grab a 9×13 baking dish for even baking. Use a skillet for onions and roux, plus a whisk for smooth sauce. A mandoline speeds thin potato slicing safely with the hand guard.
Grease with butter for flavor, not spray. Broil crisps onions faster than baking, but watch closely to avoid burning. Therefore, you control that perfect snap.
Skillet and Baking Dish Specifics
Cast iron skillet holds heat for golden onions. Glass dishes heat evenly but slower; metal conducts faster for crispier bottoms. Both work, just adjust time by 5 minutes if needed.
Step-by-Step: Mastering Cheesy Potato Casserole Layers
Preheat oven to 375°F and grease your 9×13 dish with 1 tablespoon butter. This prevents sticking and adds richness. You’ll smell it right away.
Phase 1: Caramelize Onions and Prep Roux
Melt 2 tablespoons butter in skillet over medium heat. Add yellow onion slices, cook 8-10 minutes stirring often until soft and golden, releasing sweet aroma. Set aside.
In same skillet, melt 1 tablespoon butter. Whisk in flour 1 minute till nutty. Slowly pour milk, whisk constantly 4-5 minutes until thick and bubbly. Stir in 1 cup cheese and seasonings till smooth.
Phase 2: Layer Potatoes and Sauce
Layer half the thin potato slices in dish. Top with cooked onions, pour half sauce evenly. Repeat with potatoes and sauce. Cover tight with foil.
Bake 30 minutes. Potatoes tenderize, fork slides in easily. Don’t skip foil, it steams for even cooking.
Phase 3: Crisp Fried Onions to Perfection
Remove foil, sprinkle 1 cup cheese over top. Bake uncovered 10 minutes till melted and bubbly. Pull out, scatter fried onions evenly on hot cheese.
Return to oven 10 minutes or broil 2-3 minutes till golden. Watch closely for crisp without burn. Rest 5 minutes, cheese sets for perfect melty pull.
Avoiding Common Cheesy Potato Casserole Pitfalls
Soggy onions? Add them last only. Grainy sauce means overcooked roux, so time it precisely. Underdone potatoes fix with thinner slices or extra 10 minutes covered.
Taste sauce before pouring, adjust salt. Too thick? Whisk in more milk. These tweaks ensure your cheesy potato casserole shines.
Fixing Sauce and Texture Issues
Prevent lumps by whisking milk into roux gradually over medium heat. Uniform potato slices via mandoline avoid raw spots. If sauce separates, blend briefly and reheat gently.
Make-Ahead and Freezing Cheesy Potato Casserole
Assemble fully through sauce layer, cover, fridge up to 2 days. Bake fresh, adding 10 minutes. Or freeze assembled up to 2 months, thaw overnight in fridge.
Reheat at 350°F covered in foil till hot. Add fresh fried onions post-thaw for crunch. Portion into singles for easy meals.
Storage Durations and Reheating Steps
Fridge leftovers 3-4 days airtight. Freeze unbaked 2 months. Oven reheat best at 350°F foil-covered 20-30 minutes; microwave dries edges, so avoid.
Flavor Variations for Cheesy Potato Casserole
Swap cheddar for gouda or smoked cheese for nuance. Stir in thyme or rosemary for herb lift. Add spinach or mushrooms between layers for veggies.
Spice with jalapeños if you dare. Dairy-free? Use nut milk and cashew cheese, keeping roux with cornstarch. Crispy onions stay the star in cheesy potato casserole.
Vegetarian Boosts and Cheese Swaps
Fresh herbs like chives boost green notes. Melty alternatives like mozzarella work, but cheddar’s sharpness pairs best with potatoes. All keep it vegetarian naturally.
Ideal Pairings for Cheesy Potato Casserole
Pair with roasted chicken or grilled sausages for hearty protein. Balance richness with crisp salad or steamed broccoli. Iced tea or sparkling water refreshes perfectly.
Holidays love it beside baked ham. These combos make weeknight dinners feel special.
Cheesy Potato Casserole FAQ
Can I Use Sweet Potatoes Instead?
Sweet potatoes work but shift flavor sweeter, less neutral. Slice same thinness, bake 5 minutes longer as they firm up slower. Texture stays creamy, onions crisp same way.
How to Keep Fried Onions Crispy?
Add onions only after cheese melts and sets, then quick bake or broil 2-3 minutes. This creates a barrier against steam. Store leftovers uncovered briefly before airtight to maintain snap.
Gluten-Free Cheesy Potato Casserole Adaptation?
Swap flour 1:1 with gluten-free blend or 2 tablespoons cornstarch. Roux thickens same, no lumps if whisked well. Rest holds perfectly.
Scaling for Smaller Batches?
Halve for 4×8 dish or 8×8, same temps but check potatoes at 25 minutes. Sauce scales directly, onions to taste. Bake time shortens 5 minutes.
Vegetarian or Dairy-Free Versions?
Already vegetarian. Dairy-free: coconut or almond milk, vegan cheese shreds. Roux with vegan butter and cornstarch keeps silky creaminess intact.

Cheesy Potato Casserole
Course: Side DishCuisine: AmericanDifficulty: easy8
servings20
minutes1
hour80
Minutes350
kcalAmerican
Ingredients
4 large russet potatoes, peeled and thinly sliced
2 cups shredded cheddar cheese, divided
2 cups crispy fried onion strings (store-bought)
1 large yellow onion, thinly sliced
2 cups milk
3 tablespoons all-purpose flour
4 tablespoons butter, divided
1 teaspoon salt
1/2 teaspoon black pepper
1/2 teaspoon garlic powder
Directions
- Preheat oven to 375 degrees F. Grease a 9×13-inch baking dish with 1 tablespoon butter.
- In a skillet over medium heat, melt 2 tablespoons butter. Add sliced yellow onion and cook 8-10 minutes until soft and golden, stirring often. Set aside.
- In the same skillet over medium heat, melt remaining 1 tablespoon butter. Whisk in flour and cook 1 minute to form roux. Slowly whisk in milk. Cook, stirring constantly, 4-5 minutes until thickened and bubbly. Stir in half the cheese (1 cup), salt, pepper, and garlic powder until smooth. Remove from heat.
- Layer half the potato slices in the dish. Top with cooked onions and pour half the cheese sauce over. Add remaining potatoes and pour remaining sauce evenly over top. Cover with foil and bake 30 minutes until potatoes are tender.
- Remove foil, sprinkle remaining 1 cup cheese over top, and bake uncovered 10 minutes until melted and bubbly.
- Remove from oven. Scatter fried onion strings evenly over the hot cheese. Return to oven for final 10 minutes or broil 2-3 minutes until onions are golden and crisp. Do not stir onions in early—this locks in crunch by letting cheese set first then crisping under quick heat.
- Let rest 5 minutes. Serve hot for perfect melty pull and lasting onion snap.
Notes
- Do not stir onions in early—this locks in crunch by letting cheese set first then crisping under quick heat.
TrendPlain 16oz/470ml Glass Olive Oil Sprayer for Cooking – 2 in 1 Olive Oil Dispenser Bottle for Kitchen Gadgets and Air Fryer Accessories, Salad, BBQ - Black
$9.99 (as of December 20, 2025 09:13 GMT +00:00 - More infoProduct prices and availability are accurate as of the date/time indicated and are subject to change. Any price and availability information displayed on [relevant Amazon Site(s), as applicable] at the time of purchase will apply to the purchase of this product.)
KitchenAid 5 Ultra Power Speed Hand Mixer - KHM512, White
$44.49 (as of December 20, 2025 09:13 GMT +00:00 - More infoProduct prices and availability are accurate as of the date/time indicated and are subject to change. Any price and availability information displayed on [relevant Amazon Site(s), as applicable] at the time of purchase will apply to the purchase of this product.)
STANLEY IceFlow Flip Straw Tumbler with Handle 30 oz | Twist On Lid and Flip Up Straw | Leak Resistant Water Bottle | Insulated Stainless Steel |BPA-Free | Rose Quartz
$35.00 (as of December 20, 2025 09:13 GMT +00:00 - More infoProduct prices and availability are accurate as of the date/time indicated and are subject to change. Any price and availability information displayed on [relevant Amazon Site(s), as applicable] at the time of purchase will apply to the purchase of this product.)
MEATER Plus: Smart Bluetooth Wireless Meat Thermometer Digital | BBQ, Grill, Oven, Smoker, Air Fryer, Kitchen | Perfect for Steak, Chicken, Turkey, and More | Delicious Recipes in App
$66.99 (as of December 20, 2025 09:13 GMT +00:00 - More infoProduct prices and availability are accurate as of the date/time indicated and are subject to change. Any price and availability information displayed on [relevant Amazon Site(s), as applicable] at the time of purchase will apply to the purchase of this product.)