Have you ever spent time creating a beautiful, layered dessert, picturing those distinct stripes of creamy filling and fruit, only to discover when you go to slice it that the cookie or sponge layers have turned into a completely soggy, unappealing mush? It’s frustrating, right? We’ve absolutely been there, and it can feel like a dessert disaster.
But what if I told you there’s a simple secret to achieving a perfect layered dessert every single time? One that leaves your ladyfingers tender and moist, yet still provides that crucial structure and texture? Today, we’re diving into a gorgeous Cherry Tiramisu Layered Dessert, and I’m sharing the absolute key to ensuring those delicate cookies hold up beautifully against the rich, creamy filling and vibrant cherry sauce. Get ready to say goodbye to mushy layers forever and hello to dessert perfection!
Reasons This Cherry Tiramisu is a Keeper
Beyond solving the dreaded soggy layer problem, this Cherry Tiramisu Layered Dessert offers so much to love:
- It’s a no-bake wonder, making it perfect for warmer months or when you just don’t want to turn on the oven.
- The combination of sweet, slightly tart cherries with rich, creamy mascarpone is simply divine.
- It looks stunning! The vibrant red of the cherry sauce against the white cream layers is a feast for the eyes, making it ideal for gatherings or special occasions.
- While elegant, it’s surprisingly straightforward to assemble once you know the technique.
- It’s a make-ahead dream! In fact, it needs time to chill, freeing up your day for other things.
This dessert is a refreshing twist on the classic tiramisu, swapping coffee and cocoa for bright cherries and a luscious cream. If you’re a fan of creamy desserts that are packed with flavor, you’re going to adore this.
Gathering Your Ingredients for Cherry Tiramisu
Creating this delightful Cherry Tiramisu Layered Dessert requires just a handful of key components, each playing a vital role in building flavor and texture. Quality ingredients truly shine here, especially when it comes to the fruit and the cheese.
Here’s what you’ll need:

- Fresh Cherries: You’ll need about 1 and 1/2 cups of fresh cherries, pitted. These are the star of our vibrant sauce! Using fresh cherries provides the best flavor and texture, creating a naturally bright and fruity component.
- Granulated Sugar (divided): A little sugar helps sweeten the cherries as they cook down and also creates the dipping liquid for the ladyfingers.
- Fresh Lemon Juice (optional): Just a tablespoon can add a touch of brightness and acidity to the cherry sauce, balancing the sweetness. If your cherries are particularly tart, you might omit this, but it often enhances the flavor beautifully.
- Water or Cherry Juice: This forms the base of our crucial dipping liquid. Water works perfectly fine, but using a splash of cherry juice can intensify the fruit flavor in the ladyfinger layers. We’ll need about 1/2 cup.
- Mascarpone Cheese: Sixteen ounces of softened mascarpone cheese is the heart of our creamy filling. This Italian cream cheese is incredibly rich, smooth, and luxurious, providing that signature velvety texture. Make sure it’s softened at room temperature for easy beating.
- Heavy Cream: One cup of cold heavy cream is whipped to light, airy perfection before being folded into the mascarpone, giving the filling its delightful lightness and volume. Ensure your cream is very cold for the best whipping results.
- Powdered Sugar: Half a cup of powdered sugar sweetens the creamy filling and helps achieve a smooth, lump-free consistency when combined with the mascarpone.
- Vanilla Extract: A teaspoon of vanilla extract enhances the overall sweetness and brings a subtle warmth to the creamy layers.
- Ladyfingers: You’ll need 24-30 sponge-style ladyfingers. These are the dry, delicate cookies specifically designed to absorb liquid without disintegrating immediately. Choose the drier, sponge-like variety over softer, cake-like ones for the best results in layered desserts.
- Fresh Cherries with Stems (for garnish): A few beautiful fresh cherries with stems are perfect for decorating the top, adding a pop of color and elegance before serving.
- Powdered Sugar (for dusting): A final dusting of powdered sugar gives the finished dessert a classic, polished look.
Having all your ingredients prepped and ready before you start assembling makes the process smooth and enjoyable.
Crafting Your Cherry Tiramisu Layered Dessert: Step-by-Step
Creating this delightful layered dessert is broken down into a few simple stages: making the sauce, preparing the dipping liquid, whipping up the creamy filling, and finally, assembling the layers with our special non-soggy technique! Don’t rush the chilling step – it’s vital for the perfect texture.
Prepare the Cherry Sauce: Grab a small saucepan and toss in your pitted fresh cherries along with the 1/4 cup of granulated sugar. If you’re using it, now is the time to add that optional tablespoon of fresh lemon juice. Place the saucepan over medium heat. As the cherries warm, they’ll start to release their natural juices, mixing with the sugar to form a lovely syrup. Stir occasionally to prevent sticking. You’ll cook this mixture until the cherries are tender and the sauce has visibly thickened slightly, which usually takes about 10 to 15 minutes. Think of it as creating a quick, vibrant cherry compote. Once it looks and smells amazing, remove it from the heat and let it cool completely. This cooling step is important so the warm sauce doesn’t melt your creamy filling later.
Mix the Dipping Liquid: Find a shallow dish that’s wide enough to accommodate a ladyfinger. Pour in the 1/2 cup of water or cherry juice and stir in the 2 tablespoons of granulated sugar until it’s completely dissolved. Give it a quick taste – it should be pleasantly sweet, ready to lightly moisten the ladyfingers.
Whip Up the Creamy Filling: Get two bowls ready. In a large bowl, add the softened mascarpone cheese, powdered sugar, and vanilla extract. Beat these together until the mixture is wonderfully smooth and there are no lumps of mascarpone left. In your separate, cold bowl (using a cold bowl helps the cream whip better!), pour in the cold heavy cream. Whip the cream using an electric mixer until stiff peaks form – you’ll know they’re stiff when you lift the beater and the peak stands straight up without drooping. Now, carefully and gently fold the whipped cream into the mascarpone mixture. Do this in stages, using a spatula, until the two are just combined into a beautiful, light, and airy cream. Be careful not to overmix at this stage, as you want to keep that lovely volume from the whipped cream.
Assemble the Layers (The Game Changer!): This is the most crucial step for avoiding soggy ladyfingers! Take one ladyfinger at a time and dip it into your sugar liquid. The key word here is dip, not soak! Quickly turn it to coat each side for just 1 to 2 seconds total per ladyfinger. You want it to absorb just enough liquid to become tender during chilling, but not so much that it becomes saturated and falls apart. Immediately after dipping each ladyfinger, arrange it in a single layer in the bottom of your serving dish (an 8×8 inch dish works well). Work relatively quickly but carefully, fitting the ladyfingers snugly together to form a solid base layer.
Layer the Filling and Sauce: Now it’s time to add the delicious creamy and fruity layers. Carefully spread exactly half of your beautiful creamy mascarpone filling evenly over the first layer of quickly dipped ladyfingers. Then, take your cooled cherry sauce and spoon about one-third of it in dollops over the creamy layer. You don’t need to spread the sauce perfectly; leaving it in dollops creates lovely pockets of cherry flavor.
Repeat for the Next Layer: Just like you did before, dip and arrange another layer of ladyfingers in the sugar liquid, remembering that super-fast dip (1-2 seconds per side!). Place these over the first layer of cream and sauce. Then, spread the remaining half of the creamy filling evenly over this new layer of ladyfingers. Follow this by spooning another third of the cherry sauce over the filling.
Add the Final Touches and Chill: If your dish is deep enough and you have enough ladyfingers, you can add a third layer using the quick-dip method. Otherwise, stop after two layers. Spoon the final third of the cherry sauce over the very top layer, distributing it nicely. Cover the dish tightly with plastic wrap. This is arguably the second most important step after the dipping technique – chilling! Refrigerate the dessert for at least 4 to 6 hours. Ideally, let it chill overnight. This extended time in the refrigerator allows the ladyfingers to soften just perfectly, the flavors to meld beautifully, and the entire dessert to set up firmly, ensuring clean slices.
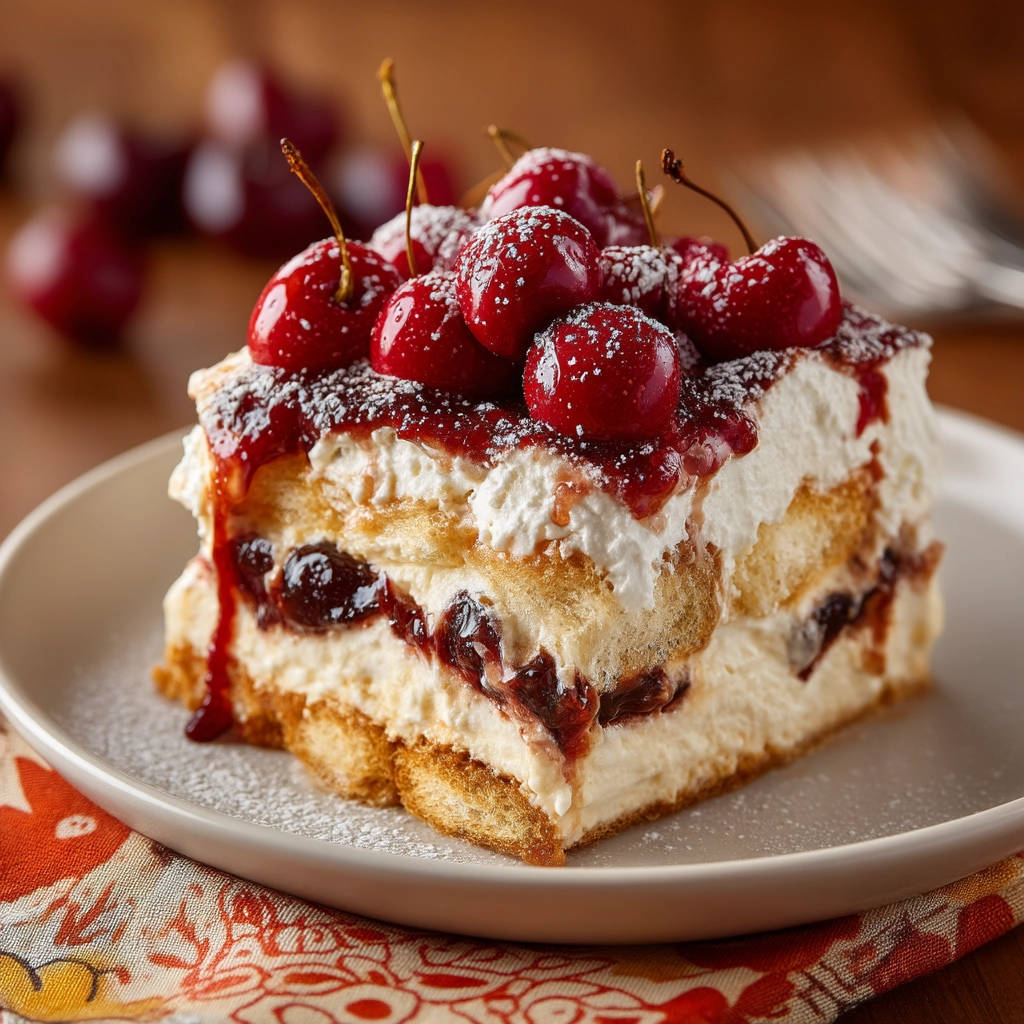
Garnish and Serve: Just before you’re ready to serve this magnificent Cherry Tiramisu Layered Dessert, remove the plastic wrap. Top the dessert with those reserved fresh cherries with stems for a vibrant garnish. Finally, dust generously with powdered sugar using a sieve for a lovely, finished look. Slice the chilled dessert into portions and serve immediately. Each bite will be a delightful balance of creamy, fruity, and tender sponge – without a hint of sogginess!
Tips for Perfect Cherry Tiramisu Every Time
While the quick-dip method is the ultimate secret weapon, a few other tips can elevate your Cherry Tiramisu Layered Dessert from great to absolutely phenomenal:
- Ladyfinger Choice Matters: As mentioned in the ingredients, opt for the dry, Italian-style “savoiardi” ladyfingers. Soft, cakey ones won’t hold their structure, even with the quick dip. If you’re looking for other baking projects, consider making your own easy fluffy biscuits or exploring other layered desserts like our Strawberry Banana Dessert Lasagna.
- Perfectly Pit Your Cherries: A cherry pitter makes quick work of pitting. If you don’t have one, you can use a chopstick or a pastry tip to push the pit out. Just be careful of stains!
- Ingredient Temperature: Ensure your mascarpone is softened, but your heavy cream is very cold. This difference in temperature is key to achieving the correct textures for both parts of the filling.
- Gentle Folding is Key: When combining the whipped cream and mascarpone, fold gently! Overmixing can deflate the whipped cream, resulting in a denser filling instead of a light and airy one.
- Chill Time is Non-Negotiable: Seriously, don’t skimp on the chilling time. This is when the magic happens – the flavors meld, the ladyfingers absorb just enough moisture to become tender, and the layers set firmly. Overnight chilling yields the best results for this Cherry Tiramisu.
- Serving Dish Size: An 8×8 inch square dish is ideal for the quantities listed, allowing for nice deep layers. A similar sized rectangular dish or even individual glasses would also work, though dipping and arranging might be slightly different.
Following these simple tips alongside the special dipping technique will guarantee a spectacular Cherry Tiramisu Layered Dessert experience.
Serving Suggestions for Your Cherry Delight
This Cherry Tiramisu Layered Dessert is a showstopper on its own, perfect after a meal or as the centerpiece of a dessert table. It pairs wonderfully with a simple cup of tea or coffee. For a truly decadent spread, you could serve it alongside other homemade treats like Perfect Chocolate Cheesecake Bites or some Soft Snickerdoodles. The bright cherry flavor also makes it a lovely contrast to richer dishes. If you’re planning a larger menu, consider balancing this sweet treat with savory options like Classic Beef and Barley Soup or Creamy Chicken and Rice Casserole beforehand.
Your Cherry Tiramisu Questions Answered (FAQ)
Let’s address some common questions you might have about making this delightful Cherry Tiramisu Layered Dessert.
Can I use frozen cherries instead of fresh?
Yes, you absolutely can. If using frozen cherries, thaw them first and drain off any excess liquid before using them in the sauce. The cooking time might be slightly less as they will soften quickly.
What if I can’t find mascarpone cheese?
Mascarpone has a unique richness, but in a pinch, you could try substituting with a mixture of cream cheese and heavy cream. Whip softened cream cheese until very smooth, then fold in softly whipped heavy cream. The texture won’t be identical, but it can work as an alternative for the creamy layer in this Cherry Tiramisu.
How long does this Cherry Tiramisu last in the refrigerator?
Properly covered, this Cherry Tiramisu Layered Dessert will last for 2-3 days in the refrigerator. The flavors often deepen on the second day, making it even better!
Can I freeze Cherry Tiramisu?
Layered desserts like this can be frozen, but the texture of the ladyfingers and the cream might change slightly upon thawing, sometimes becoming a little watery. If you do freeze it, ensure it’s tightly wrapped, and thaw it slowly in the refrigerator overnight. It’s best enjoyed fresh or after proper chilling.
What size dish should I use?
An 8×8 inch square baking dish or serving dish is ideal. It allows for two generous layers and holds the quantity of ingredients well. Any dish with a similar volume and depth will work, just adjust the arrangement of ladyfingers as needed.
Enjoy Your Homemade Cherry Tiramisu Layered Dessert!
Armed with the secret to non-soggy ladyfingers, you are now ready to create a truly spectacular Cherry Tiramisu Layered Dessert. This recipe is more than just a dessert; it’s a celebration of fresh fruit and creamy indulgence, made all the better by knowing your layers will be just right – tender, moist, and perfectly structured. It’s the kind of recipe you’ll return to again and again for its simplicity, elegance, and absolutely delicious results.
Give it a try for your next gathering, family dinner, or just because you deserve a treat! I promise you won’t be disappointed by this delightful Cherry Tiramisu. Don’t forget to leave a comment below and let me know how yours turned out! Happy baking (or rather, no-baking)!
Cherry Tiramisu Layered Dessert

Ingredients
- 1 and 1/2 cups fresh cherries, pitted
- 1/4 cup granulated sugar (for cherries)
- 1 tablespoon fresh lemon juice (optional, for brightness)
- 1/2 cup water or cherry juice (for dipping liquid)
- 2 tablespoons granulated sugar (for dipping liquid)
- 16 ounces mascarpone cheese, softened
- 1 cup heavy cream, cold
- 1/2 cup powdered sugar (for filling)
- 1 teaspoon vanilla extract
- 24-30 ladyfingers (sponge-style)
- Fresh cherries with stems, for garnish
- Powdered sugar, for dusting
Directions
- Make the Cherry Sauce: In a small saucepan, combine the pitted cherries, 1/4 cup granulated sugar, and optional lemon juice. Heat over medium heat, stirring occasionally, until the cherries release their juices and the sauce thickens slightly, about 10-15 minutes. Let cool completely.
- Make the Dipping Liquid: In a shallow dish, combine the water or cherry juice and 2 tablespoons granulated sugar. Stir until the sugar dissolves.
- Make the Creamy Filling: In a large bowl, beat the softened mascarpone cheese with the powdered sugar and vanilla extract until smooth. In a separate cold bowl, whip the cold heavy cream until stiff peaks form. Gently fold the whipped cream into the mascarpone mixture until just combined. Be careful not to overmix.
- Assemble the Dessert (The Anti-Soggy Step): This is the key! Take one ladyfinger at a time and dip it into the dipping liquid for just 1-2 seconds per side. You want it moistened, not soaked through. Immediately arrange the quickly dipped ladyfingers in a single layer in the bottom of an 8×8 inch dish or similar sized serving container.
- Layer the Filling and Sauce: Spread half of the creamy filling evenly over the layer of ladyfingers. Spoon about one third of the cooled cherry sauce over the filling.
- Repeat Layers: Dip and arrange another layer of ladyfingers just as you did in step 4. Spread the remaining half of the creamy filling over this layer. Spoon another third of the cherry sauce over the filling.
- Final Layer and Chill: Add a final layer of quickly dipped ladyfingers if you have enough to form a third layer, otherwise stop at two layers. Spoon the remaining cherry sauce over the top. Cover the dish tightly with plastic wrap. Refrigerate for at least 4-6 hours, or preferably overnight, to allow the flavors to meld and the layers to set firmly. This chilling time is crucial for structure and texture.
- Garnish and Serve: Before serving, top the dessert with fresh cherries with stems and dust generously with powdered sugar. Slice and serve chilled.