
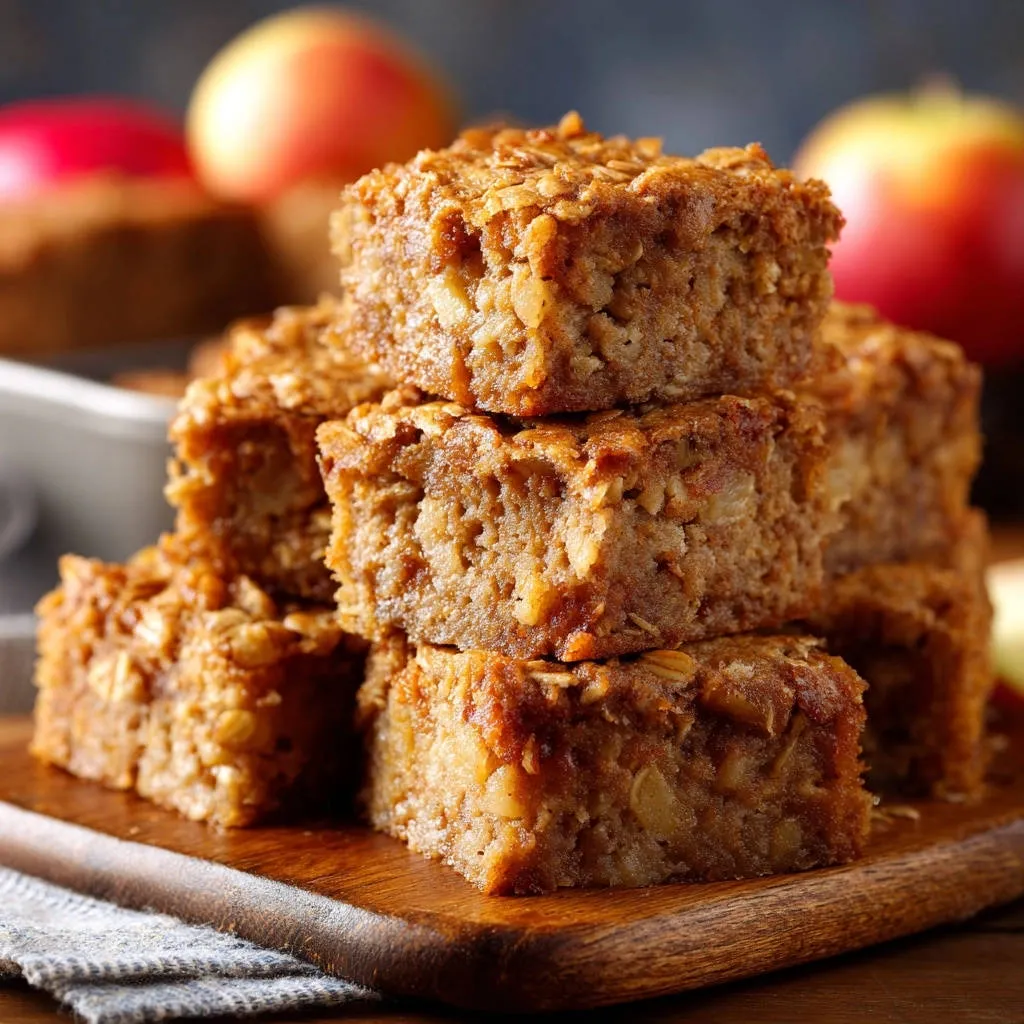
Oh, the humble oatmeal bar. It promises so much comfort, a little bite of homey goodness perfect with your morning coffee or as an afternoon pick-me-up. You picture that ideal texture: soft, yielding, undeniably chewy, with those rustic oats holding it all together. But if you’re like me, you’ve probably encountered the heartbreak of oatmeal bars that turn out dry and crumbly, or worse, hard as rocks. It felt like a baking mystery I just couldn’t solve!
For the longest time, my homemade batches were hit or miss. Sometimes they were okay, sometimes they were a total textural disaster. I tried adjusting baking times, changing the ratio of ingredients, everything I could think of. Then, I stumbled upon one ridiculously simple technique that changed everything. Seriously, it’s a total game-changer for achieving that perfect chewiness you dream of in Chewy Oatmeal Bars. And now, every single batch comes out consistently perfect.
Get ready to ditch the disappointment and bake the best chewy oatmeal bars of your life. This recipe is straightforward, uses pantry staples, and delivers on its promise of guaranteed chewiness. Let’s dive in!
Why These Chewy Oatmeal Bars Are a Game Changer
What makes this recipe stand out from the rest? It’s more than just a collection of ingredients; it’s a method that guarantees success where others might fail. Here are a few reasons you’ll absolutely adore these chewy wonders:
- Unmatched Chewiness: The primary goal, and this recipe delivers thanks to one crucial, often overlooked step.
- Simple Ingredients: You likely have everything you need in your pantry and fridge right now. No fancy, hard-to-find items here!
- Quick Prep Time: Mixing the dough is incredibly fast, making these perfect for a spontaneous baking session.
- Versatile Base: This recipe is a fantastic jumping-off point for endless variations (more on that later!).
- Nostalgic Comfort: There’s just something incredibly comforting and classic about a delicious oatmeal bar.
- Perfectly Portable: Once cooled and cut, they’re easy to pack for lunches, picnics, or road trips.
Essential Ingredients for Guaranteed Chewy Oatmeal Bars
While the technique is key, starting with the right ingredients sets the stage for success. Each component in these chewy oatmeal bars plays a specific role in creating that desirable texture and classic flavor profile. Here’s what you’ll need and a little insight into why:
The foundation starts with fat and sweetener, providing richness and moisture. We’ll use:
- Unsalted Butter: Using melted butter here is crucial. Unlike creaming softened butter, melted butter disperses fat more evenly throughout the mixture, coating the flour and oats. This helps prevent excessive gluten development (which can make things tough) and contributes significantly to the tender, chewy texture. Plus, starting with melted butter is just plain easier!
- Packed Brown Sugar: This is your secret weapon for chewiness within the dough itself. Brown sugar contains molasses, which adds moisture and a slightly acidic component that reacts with other ingredients to promote a softer, chewier result compared to using only white sugar. Make sure it’s firmly packed when you measure!
- Vanilla Extract: A classic flavor enhancer in baked goods. It adds a warm, aromatic note that complements the oats and brown sugar beautifully. Use pure vanilla extract for the best flavor.
For structure and bulk, we turn to the dry elements:
- All-Purpose Flour: Provides structure to hold the bars together. Measuring correctly is important – spoon the flour into your measuring cup and level it off with a straight edge, don’t scoop directly from the bag, which can compact the flour and lead to using too much.
- Salt: Balances the sweetness and enhances all the other flavors, preventing the bars from tasting flat.
- Rolled Oats: The star of the show! Use old-fashioned rolled oats (sometimes labeled as large flake oats). These oats retain their shape and provide that distinct chewy texture and nutty flavor that is characteristic of classic oatmeal bars. Instant oats or steel-cut oats will not work the same way here; they absorb liquid differently and will result in a different texture.
Crafting Your Chewy Oatmeal Bars: Step-by-Step
Ready to unlock the secret to perfect chewiness? Follow these steps closely, paying special attention to the final, critical stage. It’s surprisingly simple, but requires patience!
- Prepare for Baking Success: First things first, let’s get the oven ready. Preheat your oven to 350 degrees Fahrenheit (175 degrees Celsius). While it’s heating up, prepare your baking pan. A standard 9×13 inch baking pan is perfect for this quantity. The key here is to line the pan completely with parchment paper. Make sure you leave a generous overhang on the sides; this will act as handles later, making it incredibly easy to lift the entire slab of bars out of the pan once they’re cooled. This step also ensures absolutely no sticking!
- Combine the Wet Foundation: Grab a large mixing bowl. Add the melted unsalted butter and the packed brown sugar. Whisk them together until they are thoroughly combined and the mixture looks smooth and glossy. The heat from the melted butter helps the brown sugar dissolve slightly. Stir in the vanilla extract until it’s evenly distributed, infusing the wet mixture with its lovely aroma.
- Prepare the Dry Elements: In a separate, medium-sized bowl, measure out your all-purpose flour and add the salt. Give these dry ingredients a quick whisk together. This step helps to evenly distribute the salt throughout the flour, ensuring uniform flavor in every bite and preventing pockets of saltiness.
- Bring Wet and Dry Together (Gently!): Now, add the dry ingredients mixture to the large bowl containing the wet ingredients. Using a spatula or a wooden spoon, stir them together. The crucial part here is to mix just until everything is combined and you no longer see streaks of dry flour. Avoid the temptation to keep mixing once it comes together; overmixing can develop the gluten in the flour too much, leading to tougher bars instead of the desired chewy texture.
- Fold in the Oats: Add the three cups of rolled oats to the dough. Gently fold them in using your spatula or spoon. Continue folding until the oats are evenly distributed throughout the dough. You want every bite to have that wonderful oat texture, so make sure they aren’t clumped in one spot.
- Press into the Pan: Transfer the entire mixture into your prepared 9×13 inch baking pan. Now, this is where you ensure a uniform bar thickness. Use a spatula, the back of a spoon, or even the bottom of a clean drinking glass to press the mixture firmly and evenly into the pan, going all the way to the edges and corners. Compact it well; this helps the bars hold their shape after baking and contributes to a good, consistent texture.
- Bake to Perfection (Almost!): Place the pan in your preheated oven. Bake for approximately 20 to 25 minutes. How do you know they’re ready? The edges should appear lightly golden brown, but the center should still look a bit soft and perhaps slightly underbaked. This slightly soft center is intentional! It’s a key factor in achieving that ultimate chewy texture. Remember, baked goods continue to cook slightly from residual heat after they are removed from the oven.
- THE GAME CHANGER: Cool Completely in the Pan: Here it is, the single most important step for guaranteed chewy oatmeal bars. Once you take the pan out of the oven, place it on a wire rack and leave the bars in the pan to cool completely. I mean completely! This is not a step to rush. This can take at least two hours, sometimes longer depending on the temperature of your kitchen. As the bars cool slowly within the confines of the pan, the moisture redistributes, the sugars set, and the texture develops into that perfect chewiness. Cutting into warm bars is the number one reason they turn out crumbly or dry. Resist the urge! Let patience be your guide here.
- Slice and Enjoy: Only once the bars are completely cool to the touch (they should feel firm and set), use the parchment paper overhang to lift the entire slab of bars out of the pan onto a cutting board. Now you can slice them into squares or rectangles using a sharp knife. Because they’ve cooled properly, they should cut cleanly without crumbling.
Pro Tips for Your Best Chewy Oatmeal Bars
Mastering these chewy oatmeal bars is simple, but a few extra tips can elevate your baking experience and ensure perfect results every time.
- Measure Ingredients Accurately: Baking is a science, and measuring dry ingredients, especially flour and brown sugar, correctly is vital. Spoon flour into cups and level; pack brown sugar firmly. This consistency prevents the dough from being too dry or too wet.
- Don’t Overbake: As mentioned in the steps, slightly underbaking is intentional. Keep an eye on the edges; they should just be turning golden. If the center looks fully firm and golden brown while in the oven, you’ve likely gone too far.
- The Cooling Rule is Non-Negotiable: Seriously, this is the hill to die on for chewy bars. Cooling completely in the pan allows the bars to retain moisture and structure as they cool gradually. This is the secret sauce!
- Invest in Parchment Paper: It makes removing the cooled bars effortless and clean-up a breeze. Leaving an overhang is a simple but genius trick.
- Proper Storage: Once cut, store chewy oatmeal bars in an airtight container at room temperature. They will maintain their chewiness for several days. For longer storage, you can freeze them (see FAQ).
- Consider Altitude: If you live at a high altitude, you might need slight adjustments like reducing baking powder/soda (not used here, but good to know for other recipes), increasing liquid, or adjusting baking time. For this recipe, the main impact might be a slightly shorter baking time, so start checking for doneness on the earlier side.
Fun Variations to Try
This base recipe is fantastic as is, but it’s also a perfect canvas for creativity! Here are a few ideas to switch things up:
- Chocolate Chip Oatmeal Bars: Fold in 1/2 to 1 cup of your favorite chocolate chips (milk, semi-sweet, or dark) along with the oats. Everything is better with chocolate, right?
- Nutty Oatmeal Bars: Add 1/2 cup of chopped nuts like walnuts or pecans for extra crunch and flavor.
- Dried Fruit Delight: Stir in 1/2 cup of dried cranberries, raisins, or chopped dried apricots along with the oats for bursts of fruity flavor and added chewiness. This is a great way to use up leftover dried fruit from other baking projects like Cranberry Orange Scones.
- Spice It Up: Add 1/2 teaspoon of ground cinnamon or a pinch of nutmeg to the dry ingredients for a warmer, spiced flavor profile, reminiscent of cozy desserts like Apple Cinnamon Crumb Cake.
- Half & Half: Use half brown sugar and half granulated sugar for a slightly different texture and less intense molasses flavor, while still maintaining some chewiness.
What to Serve Alongside
These chewy oatmeal bars are delightful on their own, but they pair wonderfully with simple beverages. Enjoy them with:
- A cold glass of milk.
- Your favorite hot coffee or tea.
- A simple scoop of vanilla ice cream if serving slightly warm (though remember the cooling rule for cutting!).
Chewy Oatmeal Bars FAQs
Got questions about getting the perfect chewy texture or storing your delicious bars? Let’s troubleshoot some common queries.
Why are my oatmeal bars hard or crumbly instead of chewy?
This is almost always due to one of two main reasons: overbaking or not cooling completely in the pan. Baking too long dries the bars out, making them hard. Cutting them while warm before they’ve had a chance to set properly in the pan will cause them to crumble and can also lead to a less chewy texture. Ensure you bake until the edges are just golden and the center is still slightly soft, and always let them cool fully in the pan.
Can I use instant oats instead of rolled oats?
No, I strongly recommend against using instant oats (sometimes called quick oats) for this recipe. Rolled oats provide the structure and distinct texture that gives these bars their characteristic chewiness. Instant oats are more finely processed and will absorb liquid much faster, likely resulting in a mushier or drier bar depending on how they react during baking and cooling. Stick with old-fashioned rolled oats for the guaranteed results.
Why is cooling completely in the pan so important?
This is the absolute secret! As the bars cool slowly in the pan, the residual heat allows the starches in the oats and flour to finish cooking gently, while the sugars set and become firm yet flexible. Crucially, the moisture within the bar has time to redistribute evenly. When you cut them while warm, the structure hasn’t fully set, and moisture escapes quickly, leading to crumbling and dryness. Cooling completely in the pan locks in moisture and helps create that dense, chewy texture.
Can I make these gluten-free?
You can often adapt this recipe to be gluten-free. You would need to substitute the all-purpose flour with a good quality gluten-free all-purpose flour blend (one that contains xanthan gum is usually best for structure). Ensure you also use certified gluten-free rolled oats, as standard oats can sometimes be processed in facilities that also handle wheat, leading to cross-contamination. The baking time might need slight adjustment depending on the blend you use.
How should I store these chewy oatmeal bars?
Once they are completely cooled and cut, store the bars in a single layer or separated by parchment paper in an airtight container at room temperature for up to 3-4 days. If stacked without separation, they might stick together.
Can I freeze chewy oatmeal bars?
Yes! Once fully cooled and cut, wrap individual bars tightly in plastic wrap, then place them in a freezer-safe bag or container. They can be frozen for up to 3 months. Thaw them at room temperature or pop one in the microwave for a few seconds for a warm treat (though be mindful microwaving might affect the chewiness slightly compared to room temp).
What if my brown sugar is hard?
Hard brown sugar happens! It’s lost its moisture. You can revive it by placing it in an airtight container with a slice of bread or an apple wedge overnight, or microwave a small amount with a damp paper towel for a few seconds until softened. Soft, packed brown sugar is essential for the right moisture and texture in these bars.
Get Baking Your Perfect Chewy Oatmeal Bars Today!
Seriously, armed with this recipe and the golden rule of cooling, you are just minutes away from enjoying the chewy oatmeal bars you’ve always wanted. They’re simple, satisfying, and guaranteed to disappear quickly. Whether you enjoy them plain, add chocolate chips, or toss in some nuts, they are a delightful treat any time of day.
Give them a try, and let me know how they turn out! Did the cooling trick make a difference for you? Share your experience and any fun variations you try in the comments below. Happy baking!
Chewy Oatmeal Bars

Ingredients
- 1 cup (2 sticks) unsalted butter, melted
- 1 cup packed brown sugar
- 1 teaspoon vanilla extract
- 1 and 1/2 cups all purpose flour
- 1 teaspoon salt
- 3 cups rolled oats
Directions
- Preheat oven to 350 degrees F. Line a 9×13 inch baking pan with parchment paper, leaving an overhang on the sides.
- In a large bowl, whisk together the melted butter and brown sugar until well combined and smooth. Stir in the vanilla extract.
- In a separate medium bowl, whisk together the flour and salt.
- Add the dry ingredients to the wet ingredients and stir until just combined. Do not overmix.
- Fold in the rolled oats until evenly distributed throughout the dough.
- Press the mixture evenly into the prepared baking pan. Use a spatula or the bottom of a glass to compact it firmly.
- Bake for 20 to 25 minutes, or until the edges are lightly golden brown but the center still looks slightly soft. This slightly underbaked center is key.
- Here’s the game changer for chewiness: Allow the bars to cool completely in the pan on a wire rack before attempting to cut them. This can take at least 2 hours, or even longer. Resist the urge to cut them while warm; cooling slowly helps the texture set and prevents crumbling while locking in moisture for that perfect chew.
- Once completely cool, lift the bars out of the pan using the parchment paper overhang and cut into squares.