Oh, chicken enchiladas. They’re one of those ultimate comfort foods, aren’t they? Warm tortillas, savory chicken filling, tangy enchilada sauce, and gooey melted cheese – it’s a combination that just feels like a hug in a dish. We’ve all been there, though. You spend time assembling these beauties, slide them into the oven, and pull them out hoping for perfection, only to find the tortillas on the bottom have turned into a frustratingly soggy mess.
It’s a common culinary heartbreak! But fear not, fellow food lovers. I’ve tinkered and tested and finally landed on a simple, yet incredibly effective, trick that guarantees your chicken enchiladas will come out with tortillas that are just right – perfectly pliable, holding all that delicious filling without falling apart. No more soggy bottoms here! This recipe is designed for success, ensuring every single bite is packed with flavor and the perfect texture.
Why You’ll Absolutely Adore This Chicken Enchilada Recipe
Beyond solving the dreaded soggy tortilla problem, there are so many reasons these chicken enchiladas will become a regular in your meal rotation. They hit all the right notes for a fantastic weeknight dinner or a comforting weekend feast.
- Say Goodbye to Soggy Tortillas: Seriously, this is the game-changer. Our unique preparation method for the tortillas ensures they stay intact and delightful.
- Packed with Flavor: A simple but effective filling mixed with sauce and cheese creates a rich, satisfying core for each enchilada.
- Versatile & Customizable: While the base is chicken, you can easily adapt the filling to suit your preferences or what you have on hand.
- Perfect for Meal Prep: Enchiladas are fantastic leftovers, and this recipe holds up beautifully when reheated.
- Crowd-Pleaser: Who doesn’t love cheesy, saucy enchiladas? This dish is always a hit with family and friends.
- Relatively Quick & Easy: Once your chicken is cooked and shredded, assembling these goes surprisingly fast, making them perfect even on busier evenings.
Gathering Your Ingredients for Fantastic Chicken Enchiladas
Making incredible chicken enchiladas starts with selecting the right components. Each ingredient plays a vital role in building those layers of comforting, savory flavor. We’re using a straightforward list, focusing on freshness and quality to get the best results. Think about the harmonious blend of rich sauce, tender chicken, and melty cheese encased in those perfectly prepared tortillas!
Here’s what you’ll need to bring these beauties to life, with a little insight into why each one matters:
- Shredded Cooked Chicken: This is the star of our filling. Using pre-cooked chicken (like rotisserie chicken, leftover roasted chicken, or chicken breasts you boiled or baked specifically for this) makes assembly a breeze. About 2 cups will fill 8-10 standard tortillas generously. It provides the hearty base and protein for our enchiladas. If you’re looking for another great way to use shredded chicken, you might enjoy our recipe for Shredded Chicken Tacos!
- Enchilada Sauce: The soul of the dish! You’ll need about 1/2 cup for the filling mixture and plenty more for dipping the tortillas and covering the top. Choosing a good quality store-bought sauce you love is key here, or if you have a favorite homemade version, even better! The sauce is what infuses flavor throughout and keeps everything moist.
- Shredded Cheese: Because what are enchiladas without cheese? We use 1/2 cup mixed into the filling for gooey goodness within, and then more for topping to create that irresistible bubbly, golden crust. A Mexican blend, cheddar, Monterey Jack, or a combination works beautifully. The fat in the cheese helps bind the filling and adds richness.
- Corn or Flour Tortillas: The vessel! You’ll need 8-10 standard-sized tortillas. While traditionally enchiladas are made with corn tortillas, flour tortillas are also very popular and work wonderfully in this recipe. The type you choose affects the final texture and flavor subtly, so pick your favorite!
- Chopped Onion (Optional): A quarter cup of finely chopped onion adds a little bite and aromatic depth to the filling. While not strictly visible in the final dish and listed as optional in the source, it’s a classic addition that boosts flavor.
- Chopped Fresh Cilantro: We use a quarter cup mixed into the filling for a burst of fresh, herbaceous flavor, and then more for topping. Cilantro adds brightness and a touch of authenticity.
- Large Tomato, Diced: This is purely for topping and adds a juicy, fresh counterpoint to the rich, baked dish.
Gathering these simple ingredients is the first step to creating a delicious and satisfying meal that your whole family will rave about.
Crafting Your Chicken Enchiladas: The Anti-Soggy Method
Alright, let’s get to the good part – assembling these marvelous chicken enchiladas! Follow these steps closely, paying special attention to that crucial tortilla preparation technique, and you’ll achieve enchilada perfection without the dreaded soggy bottom. We’re not just listing steps here; we’re guiding you through the process, explaining the little nuances that make a big difference.
- Preheat Your Oven and Prep Your Dish: Begin by preheating your oven to 375 degrees F (190 degrees C). Getting the oven to the right temperature is essential for even baking and that perfect bubbly finish. While it’s heating, grab a 9×13 inch baking dish. You’ll want to pour a light layer of enchilada sauce into the bottom of this dish. Just enough to coat it – this prevents the enchiladas from sticking and starts building that saucy foundation.
- Mix the Flavor-Packed Filling: In a medium-sized bowl, combine your shredded cooked chicken, that initial 1/2 cup of enchilada sauce, 1/2 cup of shredded cheese, the chopped onion (if you’re using it), and the chopped cilantro. Stir everything together until the chicken is evenly coated with the sauce and cheese. The mixture should be well-combined but not overly wet; it needs to hold together reasonably well when you scoop it into the tortillas. This is where all the primary savory flavors meld together.
- The Tortilla Transformation (Say NO to Soggy!): This is the absolute key step, the secret sauce if you will, to preventing soggy tortillas. You need to make your tortillas pliable before filling and baking, and give them just a quick dip in sauce.
- First, warm your tortillas one at a time. Why warm them? Because cold tortillas are stiff and crack easily when rolled. Warming makes them flexible. You have a couple of easy options: a quick pass in a hot, dry skillet for a few seconds per side works great, or wrapping a stack loosely in a damp paper towel and microwaving for 30-60 seconds until they’re warm and bendable.
- Immediately after warming a tortilla, quickly dip each side of it into the remaining enchilada sauce. Dip just long enough to get a light coating of sauce on the surface – do not let it soak! The sauce acts as a protective barrier against the moisture in the baking dish and filling during baking, helping the tortilla maintain its structure.
- Fill and Roll with Care: Take one of your warmed and quickly-dipped tortillas. Place about 1/4 to 1/3 cup of the chicken mixture near one edge of the tortilla. Don’t overstuff, or they’ll be hard to roll and prone to breaking. Starting from the edge with the filling, roll the tortilla tightly into a cylinder. As you finish rolling, place the enchilada seam-side down in your prepared baking dish. This helps keep them from unrolling. Repeat this process with the remaining tortillas and filling, lining them up snugly in the dish.
- Generously Cover with More Sauce: Once all your enchiladas are rolled and nestled in the baking dish, pour the rest of your enchilada sauce evenly over the top. Be sure to get good coverage, especially over the ends of the tortillas. This top layer of sauce adds moisture and flavor but also provides another protective layer for the tortillas underneath, helping prevent them from drying out on top while the cheese melts and gets bubbly.
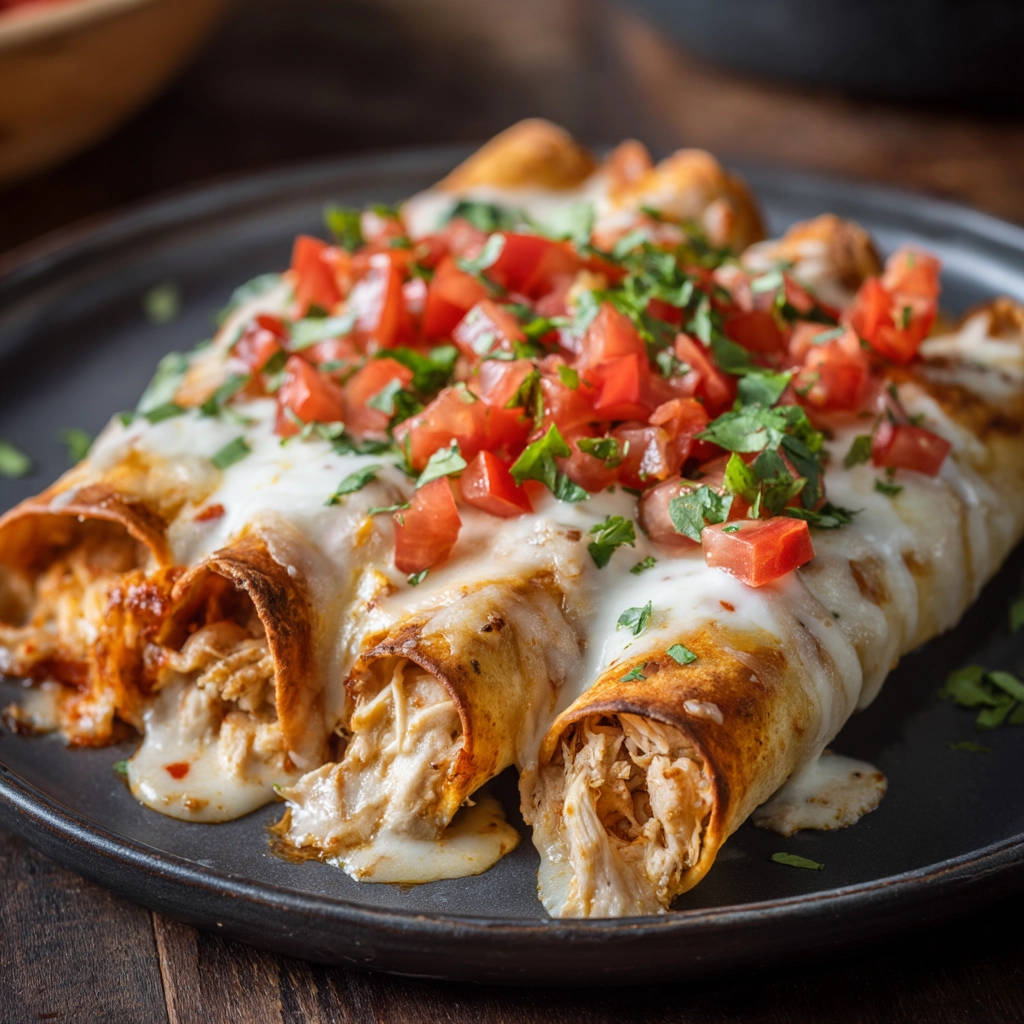
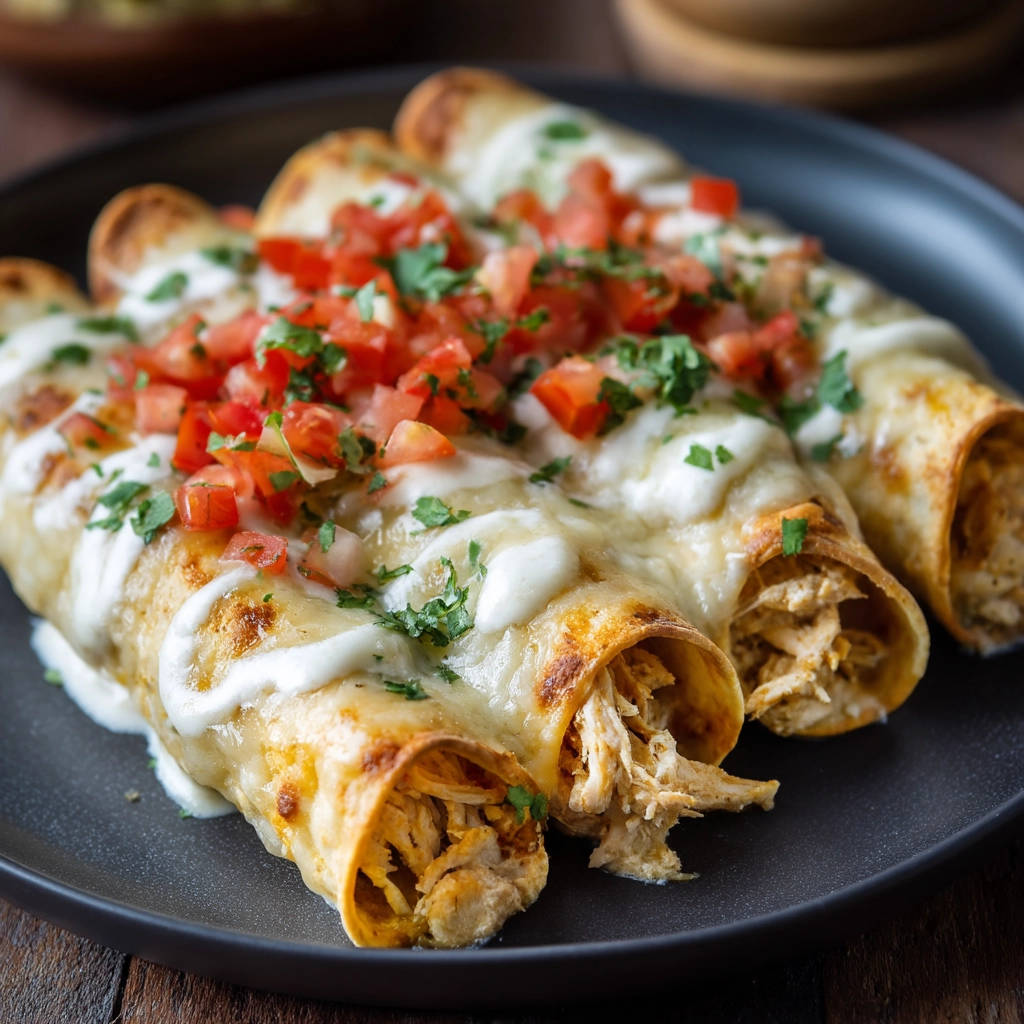
- Top with More Cheesy Goodness: Now for the final touch before baking! Sprinkle the rest of your shredded cheese evenly over the top of the sauce-covered enchiladas. This cheese layer will melt into a glorious, bubbly crust that is a hallmark of classic baked enchiladas. If you’re a cheese lover, feel free to add a little extra here!
- Bake Until Bubbly and Golden: Carefully place the baking dish into your preheated oven. Bake for 20-25 minutes. You’ll know they’re ready when the enchilada sauce is visibly bubbly around the edges and the cheese on top is completely melted and starting to turn a lovely, light golden brown in spots. The exact time may vary slightly depending on your oven.
- Rest Before Serving: This step requires a little patience, but it’s important. Carefully remove the hot dish from the oven and let the enchiladas stand for a few minutes before serving. This resting time allows the sauce and filling to settle slightly, making them easier to serve and less likely to fall apart on the plate.
- Add Fresh Toppings: Just before bringing them to the table, sprinkle the diced fresh tomatoes and extra chopped cilantro over the top. These fresh toppings add a bright contrast in flavor and texture to the warm, rich enchiladas.
And there you have it! Perfectly baked Chicken Enchiladas with tortillas that stand up to the sauce. This method ensures a satisfying bite every single time.
Tips for Perfect Chicken Enchiladas Every Time
While the core recipe is straightforward, a few extra tips can elevate your chicken enchiladas from good to absolutely incredible. These little tricks come from years of making (and eating!) countless batches.
- Cook Your Chicken Right: For the best shredded chicken, cook chicken breasts or thighs gently until they are fork-tender. Boiling, poaching, or using a slow cooker are great methods for achieving chicken that shreds easily and stays moist.
- Quality Sauce Matters: Since enchilada sauce is such a dominant flavor, using one you genuinely enjoy is crucial. Taste test a few brands or try making your own for the freshest flavor.
- Don’t Skip the Tortilla Warm & Dip: I know I mentioned this, but it bears repeating! This is the secret weapon. Warming makes them pliable; the quick dip provides that protective sauce layer. Just be quick – a dip, not a soak!
- Corn vs. Flour: Corn tortillas offer a more traditional, slightly earthier flavor. Flour tortillas are softer and more pliable when warmed, sometimes easier for rolling, especially if you’re new to making enchiladas. Both work, so choose your preference!
- Cheese Choice: While a pre-shredded Mexican blend is convenient, shredding your own cheese from a block often melts smoother and has better flavor. Cheddar and Monterey Jack are classic choices, but don’t hesitate to try Oaxacan cheese or a sprinkle of cotija for a different twist.
- Spice it Up: If you like heat, add a pinch of chili powder, cumin, or a dash of cayenne pepper to the chicken filling. You could also use a spicier enchilada sauce.
- Vary the Filling: While this is a chicken recipe, you could easily adapt the filling. Cooked and seasoned ground beef, shredded beef, or even black beans and roasted vegetables make fantastic alternatives.
- Make Ahead: You can assemble the enchiladas in the baking dish, cover them tightly with foil or plastic wrap, and refrigerate for up to 24 hours before baking. You might need to add an extra few minutes to the baking time if baking from cold.
What to Serve With Your Chicken Enchiladas
Chicken enchiladas are a complete meal on their own, but pairing them with a few simple sides can create a truly memorable feast. Mexican-inspired side dishes complement the flavors perfectly.
A classic choice is rice. Our recipe for Perfect Mexican Rice is a fantastic pairing, offering fluffy grains seasoned with tomato and spices. Another great addition is a fresh salad; a simple green salad with a lime vinaigrette cuts through the richness of the enchiladas. For a refreshing and vibrant topping or side, making some Perfect Pico de Gallo adds a burst of fresh tomato, onion, cilantro, and lime. And if you’re feeling ambitious or serving a crowd, some refried beans round out the plate nicely.
Don’t forget the toppings! Besides the diced tomatoes and cilantro mentioned in the recipe, sour cream, guacamole, or sliced jalapenos are all excellent additions that let everyone customize their plate.
Your Chicken Enchilada Questions Answered (FAQ)
Got questions about making the best chicken enchiladas? Here are some common ones I hear, with answers to help you troubleshoot and perfect your dish.
Can I use corn tortillas instead of flour?
Absolutely! The recipe mentions using either corn or flour tortillas. Corn tortillas are more traditional for enchiladas. The key ‘no soggy’ trick (warming and quickly dipping in sauce) works for both corn and flour tortillas. You might find corn tortillas a little more delicate to roll initially, so ensure they are warm and pliable.
What kind of chicken is best?
Any cooked, shredded chicken works well. A rotisserie chicken is the ultimate shortcut for shredded chicken enchiladas. You can also cook chicken breasts by boiling, poaching, or baking them until tender, then shredding with forks or a stand mixer. Dark meat chicken (thighs) is also delicious and tends to be more moist.
Can I make the filling ahead of time?
Yes, you can definitely prepare the chicken filling mixture (shredded chicken, sauce, cheese, onion, cilantro) a day in advance. Store it in an airtight container in the refrigerator. When you’re ready to assemble, let it sit out for 15-20 minutes to lose some of its chill, then proceed with warming and dipping the tortillas and assembling as directed.
How do I store and reheat leftover chicken enchiladas?
Leftover enchiladas can be stored in an airtight container in the refrigerator for 3-4 days. For reheating, individual portions can be microwaved until heated through. For a crispier result, especially on the cheese topping, you can reheat them in a preheated oven at 350°F (175°C) for about 15-20 minutes, or until bubbly. Covering the dish with foil for the first part of reheating can help prevent them from drying out.
Why do I need to warm the tortillas?
Warming the tortillas is crucial because it makes them flexible and pliable. Cold tortillas are stiff and will break or crack when you try to roll them, making assembly difficult and leading to filling escaping during baking. Warming them makes them soft and easy to work with.
Why dip the tortillas in sauce?
Dipping the warmed tortillas in sauce is the secret weapon against sogginess! The sauce coats the tortilla, creating a barrier that helps prevent it from absorbing too much moisture from the filling and the sauce in the baking dish during the relatively short baking time. It helps the tortilla hold its shape and texture.
My sauce seems too thick/thin. What should I do?
Store-bought enchilada sauce can vary in consistency. If your sauce seems too thick for dipping and pouring, you can whisk in a little chicken broth or water, a tablespoon at a time, until it reaches a pourable consistency. If it’s too thin, you might try simmering it gently on the stovetop for a few minutes to reduce it slightly, but be careful not to reduce it too much, as you need enough to cover the enchiladas.
Enjoy Your Homemade Chicken Enchiladas!
Making homemade Chicken Enchiladas doesn’t have to end in a soggy disappointment. With this simple technique of warming and quickly dipping your tortillas, you can achieve perfect results every single time. The combination of savory chicken, rich sauce, and melted cheese is truly irresistible.
Whether you’re making them for a family dinner, a potluck, or just because you’re craving comfort food, this recipe is a winner. Give it a try and experience the joy of perfectly textured, flavorful chicken enchiladas!
Did you try this recipe? Let me know in the comments below how they turned out! Happy cooking!
Chicken Enchiladas

Ingredients
- 2 cups shredded cooked chicken
- 1/2 cup enchilada sauce, plus more for dipping and covering
- 1/2 cup shredded cheese, plus more for topping
- 8-10 corn or flour tortillas (standard size)
- 1/4 cup chopped onion (optional, not strictly visible but common addition)
- 1/4 cup chopped fresh cilantro, plus more for topping
- 1 large tomato, diced, for topping
Directions
- Preheat oven to 375 degrees F (190 degrees C).
- In a medium bowl, combine the shredded chicken with 1/2 cup enchilada sauce, 1/2 cup shredded cheese, and chopped onion and cilantro if using. Mix well.
- Pour a layer of enchilada sauce into the bottom of a 9×13 inch baking dish, enough to coat the bottom lightly.
- This is the key step to avoid soggy tortillas: Briefly warm your tortillas one at a time until pliable. You can do this quickly in a hot, dry skillet or by wrapping them in a damp paper towel and microwaving for about 30-60 seconds. Immediately after warming, quickly dip each side of the tortilla into the remaining enchilada sauce just long enough to coat, not soak.
- Place about 1/4 to 1/3 cup of the chicken mixture near one edge of the dipped tortilla. Roll tightly and place seam-side down in the prepared baking dish. Repeat with remaining tortillas and filling.
- Pour the remaining enchilada sauce evenly over the rolled enchiladas, making sure they are well-covered, especially the ends. This layer of sauce helps protect them.
- Sprinkle the rest of the shredded cheese over the top.
- Bake for 20-25 minutes, or until the sauce is bubbly and the cheese is melted and slightly golden.
- Carefully remove from oven. Let stand for a few minutes before serving.
- Top with diced tomatoes and fresh chopped cilantro before serving.