Oh, friends, let’s talk trifle! There’s something truly magical about a towering, glass dish filled with distinct layers of cake, creamy pudding, and fluffy whipped cream. It’s a showstopper dessert, perfect for gatherings, holidays, or just when you need a serious dose of chocolate happiness. But if you’ve ever eagerly scooped into a beautiful chocolate trifle only to find the cake layers have dissolved into a sad, soggy mush, you know the disappointment is real.
For years, I wrestled with this exact problem. My trifles tasted great, but they lacked that clean layered look and distinct texture that makes a trifle, well, a trifle! After much experimenting (and maybe a few less-than-perfect bowls of chocolate soup), I finally cracked the code on how to keep those delicate cake layers tender yet structurally sound against creamy components. This Chocolate Layered Trifle recipe is my absolute favorite because it delivers on flavor, presentation, and that crucial “no soggy cake” promise. Get ready to build a dessert masterpiece that looks and tastes incredible from the first spoonful to the last!
Why You’ll Love This Chocolate Layered Trifle
This isn’t just any chocolate trifle; it’s the chocolate trifle you’ve been searching for. Here’s why it deserves a spot on your dessert table:
- No Soggy Cake Guarantee: My secret techniques ensure your cake cubes stay distinct and delightfully moist without turning to mush.
- Effortlessly Impressive: Trifle dishes are naturally dramatic! Layering these components creates a visually stunning dessert with minimal effort compared to frosting a layer cake.
- Rich Chocolate Flavor: Packed with chocolate pudding, chocolate cake, and chocolatey mix-ins, this is a dream come true for any chocolate lover.
- Speedy Assembly: Using prepared cake and instant pudding means you can whip this up surprisingly quickly, making it perfect for last-minute entertaining.
- Customizable Fun: While chocolate is the star, the concept is easily adapted to your favorite flavors and add-ins.
Gathering Your Ingredients for the Ultimate Chocolate Layered Trifle
Creating a showstopping chocolate layered trifle starts with selecting the right components. Each ingredient plays a vital role in building flavor, texture, and ensuring those beautiful layers hold up.
We’re aiming for a balance of rich chocolate, creamy sweetness, and delightful little surprises tucked within the layers. Here’s a breakdown of what you’ll need, with a few notes on choosing wisely:
- Chocolate Cake: You’ll need one prepared chocolate cake, ideally baked in a 9×13 inch pan and fully cooled. This is where our first “no soggy cake” secret comes in! Using a cake that’s slightly firm or even a day old works better than a super-fresh, soft cake, which tends to absorb liquids too quickly. Feel free to use your favorite boxed mix (it makes this recipe incredibly quick!) or a sturdy homemade chocolate cake recipe. If you’re a baking enthusiast looking for a from-scratch option, you might explore something like a dense brownie recipe or even our deep dark chocolate layer cake, just skip the frosting for the trifle layers.
- Instant Chocolate Pudding Mix: One large (5.1 oz) package. Instant pudding is crucial here because of how it sets. We’ll be preparing it slightly differently than the box directions to achieve maximum thickness, which is key number two in the anti-soggy battle.
- Cold Milk: Three cups. Using cold milk is essential for instant pudding to set properly and quickly. Dairy or non-dairy milk will work, just ensure it’s cold!
- Heavy Whipping Cream: Two cups. This will be whipped into a light and airy topping. Look for heavy cream or whipping cream with a high fat content for the best results.
- Powdered Sugar: Half a cup. Also known as confectioners’ sugar, this sweetens the whipped cream and helps stabilize it.
- Vanilla Extract: One teaspoon. A touch of vanilla enhances the sweetness of the whipped cream and balances the rich chocolate flavors.
- Chocolate Chips or Shavings: One cup. These add little bursts of chocolate flavor and a slight textural contrast. Use your favorite kind – semi-sweet, milk, or dark chocolate chips all work beautifully. Chocolate shavings look particularly elegant scattered on top.
- Chocolate Candies: One cup (like malt balls). This is where the fun comes in! Malt balls add a delightful crunch and malty flavor that pairs wonderfully with chocolate. Other options could include chopped chocolate bars, chocolate-covered pretzels, or even small chocolate cookies.
- Graham Crackers or Biscotti: One cup, broken into 1-inch pieces. This is secret number three! Adding a layer of something crunchy that isn’t cake provides an extra textural element and also helps absorb some moisture from the pudding before it reaches the cake. Graham crackers offer a classic sweet crumb; biscotti provides a firmer crunch.
- Optional: Orange Zest: For garnish. A little citrus zest brightens everything up and adds a sophisticated flavor pairing with chocolate.
Gathering these simple ingredients is the first step towards your impressive, layered dessert. Ensure your cake is cooled and ready, and your milk is chilled. Once everything is prepped, assembly is a breeze!
Crafting Your Chocolate Layered Trifle: Step-by-Step
Now for the fun part: bringing all these delicious components together in that gorgeous trifle dish! The key to distinct, beautiful layers (and avoiding the dreaded mush) lies in technique and patience during assembly and chilling. Follow these steps carefully, and you’ll be rewarded with a truly spectacular dessert.
Thicken the Pudding: Start by preparing the instant chocolate pudding. In a bowl, whisk the instant pudding mix with the 3 cups of cold milk. Whisk vigorously for a full 2 minutes. Don’t skimp on this time – adequate whisking is needed to activate the thickeners properly. Immediately transfer the pudding to the refrigerator. Here’s a crucial step: let it chill for at least 10-15 minutes, or even a little longer, until it’s noticeably very thick and set. This extra thickness is paramount! A runny pudding will soak into the cake cubes like a sponge. You want pudding that holds its shape relatively well.
Prepare the Cake: While the pudding chills, cut your cooled chocolate cake into approximate 1-inch cubes. Aim for fairly uniform sizes so they create an even layer. Remember the earlier tip – if your cake is slightly firm or day-old, that’s actually a bonus here! A very moist, fresh cake is more prone to getting soggy. Using cooled cake is also important; warm cake will melt the pudding and cream.
Whip the Cream: In a separate large bowl, combine the heavy whipping cream, powdered sugar, and vanilla extract. Use an electric mixer on high speed to beat the mixture. Start slow to avoid splashing, then increase the speed. Beat until stiff peaks form. Stiff peaks mean that when you lift the beaters, the whipped cream stands up straight and holds its shape without drooping. Be vigilant during the final moments of whipping; it can go from perfectly whipped to overbeaten (which looks curdled) very quickly.
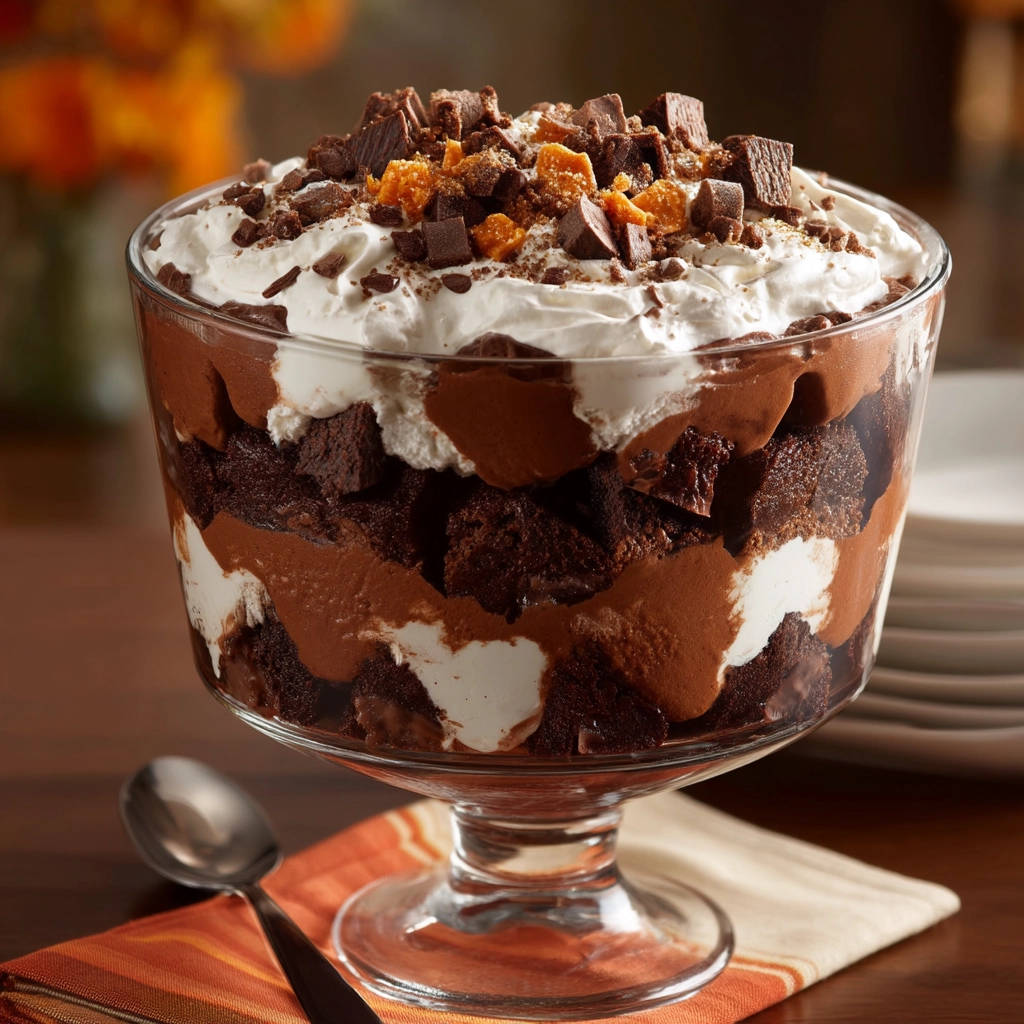
Begin the First Layer (Cake): Find your beautiful, large trifle dish (a 4-quart capacity is ideal to showcase the layers). Carefully place about half of your cubed chocolate cake evenly across the bottom. Try to distribute them without packing them down tightly. You want some air pockets to allow the pudding and cream to settle around the cake, not just instantly absorb into it.
Add the First Pudding Layer: Now, gently spoon about half of your thickened chocolate pudding over the cake layer. The pudding should be thick enough that you can spoon it on top rather than it immediately seeping through every gap. Use the back of a spoon or a spatula to gently spread it into a relatively even layer over the cake cubes. Avoid pressing down hard, as you don’t want to force the pudding into the cake.
Add the First Whipped Cream Layer: Spoon about half of the freshly whipped cream over the pudding layer. Again, gently spread it to form an even layer. The lightness of the whipped cream contrasts beautifully with the denser pudding and cake.
Repeat the Layers: Now, repeat the layering process. Add the remaining chocolate cake cubes evenly over the whipped cream. Follow this with the remaining thickened chocolate pudding, spooning and spreading it gently over the second cake layer.
Top with Remaining Whipped Cream: The final layer is the remaining whipped cream. Spoon it onto the top pudding layer. You can spread it smoothly or, for a more visually appealing finish, use a spoon or spatula to create decorative swirls and peaks.
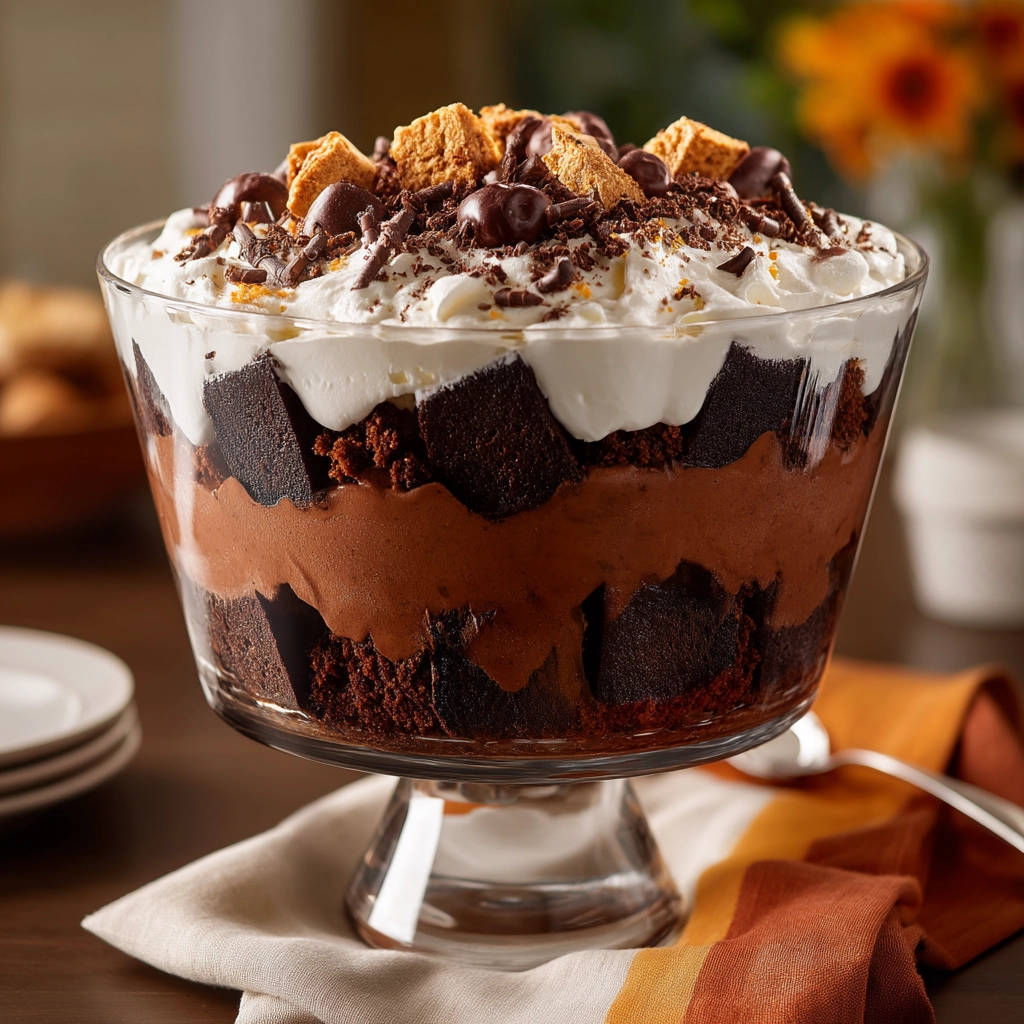
Garnish and Adorn: This is where you add the final touches! Scatter the chocolate chips or shavings, the crunchy chocolate candies (like those yummy malt balls), and the broken graham cracker or biscotti pieces over the top whipped cream layer. If using, sprinkle the optional orange zest for a pop of color and bright aroma. The mix of textures on top adds interest and lets everyone know what delights await inside!
Chill and Set: Cover the trifle loosely. Plastic wrap works well, but try to tent it slightly or ensure it doesn’t press directly onto the whipped cream swirls. Refrigerate the trifle for at least 2 to 4 hours before serving. This chilling time is essential. It allows all the layers to firm up and meld together slightly while maintaining their definition thanks to the techniques we used. The longer it chills (up to 24 hours is fine), the better the flavors develop, and the less likely you are to encounter sogginess right away.
Present your gorgeous chocolate layered trifle with pride! It’s ready to be admired and, most importantly, devoured.
Tips for Perfect Chocolate Layered Trifle Every Time
Even with the “no soggy cake” secrets, a few extra tips can elevate your chocolate layered trifle from great to absolutely unforgettable. Keep these in mind as you prepare and serve:
- Pudding Power: Don’t underestimate the thickness requirement for the pudding. If you prepare it and it still seems a bit too loose after 15-20 minutes in the fridge, give it another 5-10 minutes. It makes a world of difference.
- Cake Choice Matters: As mentioned, a slightly drier or day-old cake is your friend here. If you’re using a very moist, freshly baked cake, consider cutting it into cubes and letting it sit out uncovered for an hour or two to dry out slightly before assembling.
- Layering Strategy: Be gentle when spreading the pudding and whipped cream. Avoid pressing down heavily on the cake cubes. Think of it as lightly coating the layer beneath, not smashing it into submission.
- Chilling is Non-Negotiable: The refrigeration time isn’t just for chilling; it’s for setting. Giving the trifle ample time in the fridge allows the pudding and whipped cream to stabilize further and helps the flavors meld.
- Topping Texture: Save some of your crunchier toppings (like the chocolate candies and biscotti/graham crackers) for just before serving if you want maximum crispness. While some initial topping layer adds charm during chilling, adding a fresh scatter right before presenting ensures that satisfying crunch.
- Serving Scoop: When serving, use a large spoon or scoop that goes all the way to the bottom of the dish to ensure everyone gets a bit of each delicious layer in their bowl.
- Dairy-Free Option: This recipe is easily adaptable! Use a dairy-free chocolate cake mix, dairy-free instant chocolate pudding mix (check packaging, some require specific non-dairy milks to set correctly), cold non-dairy milk (like almond, soy, or oat), and a dairy-free whipped topping (there are many excellent options made from coconut cream or other bases).
- Get Creative with Mix-ins: Beyond the chocolate chips and candies, consider other chocolate-friendly additions like chopped nuts (pecans or walnuts), mini marshmallows, or even a sprinkle of flaky sea salt on top for a sweet and salty contrast.
What to Serve With Your Chocolate Layered Trifle
This stunning dessert is often the star of the show all on its own! However, if you’re serving it as part of a larger spread or want to offer complements, consider:
- Fresh berries like strawberries or raspberries. Their tartness is a lovely contrast to the rich chocolate. You could even make our strawberry crumble parfaits for a fruity alternative!
- A simple cup of coffee or tea.
- A scoop of vanilla or coffee ice cream alongside (though the trifle is plenty rich!).
- A sprinkle of cocoa powder or more orange zest just before serving for extra flair.
Your Chocolate Layered Trifle Questions Answered (FAQ)
Got questions about making the perfect chocolate layered trifle? You’re not alone! Here are some common queries and their answers to help you confidently create this delicious dessert.
Can I use homemade cake instead of boxed mix?
Absolutely! You can use your favorite homemade chocolate cake recipe. Just ensure it’s fully cooled and preferably a day old or slightly on the denser side to help it stand up to the pudding. A very light or moist cake might still become soggy despite the pudding technique.
Can I use cooked pudding instead of instant?
While instant pudding is recommended here specifically for its ability to set very firmly and quickly, you could try using a homemade cooked pudding or a cooked pudding mix. The key is to make sure it is cooked until it is very thick and then chilled completely until it’s quite firm before layering. A thin cooked pudding will definitely lead to soggy cake.
How far in advance can I make this trifle?
You can assemble this chocolate layered trifle up to 24 hours in advance. The techniques used are designed to prevent immediate sogginess, and the flavors actually meld and deepen as it chills. Add any crisp garnishes (like graham crackers or candies) right before serving for the best texture.
How long does chocolate trifle last in the refrigerator?
Properly stored (loosely covered) in the refrigerator, the trifle is best enjoyed within 2-3 days. After that, the cake layers will eventually start to soften significantly, even with the anti-soggy measures.
Can I make individual trifles?
Yes! This recipe can easily be scaled down or assembled in individual cups or jars for single servings. Adjust layering quantities accordingly. Individual portions are fantastic for parties!
What if my pudding isn’t thickening?
Ensure you used cold milk and whisked for the full 2 minutes. The most common culprit for runny instant pudding is not whisking long enough or using milk that isn’t cold enough. Pop it back in the fridge for extra time. If it still seems too thin after significant chilling, you might need to make another batch, ensuring milk is ice cold and whisking is thorough, then layer carefully.
What other toppings can I add?
The possibilities are nearly endless! Consider chopped candy bars, mini chocolate chips, toasted coconut flakes, chopped nuts, a drizzle of chocolate syrup or caramel sauce (like you might find in our caramel swirl cookie bars), or even fresh berries. Just avoid anything excessively watery being directly on the cake layer.
Enjoy Your Homemade Chocolate Layered Trifle!
There you have it – the secret to a stunning, layered chocolate trifle that doesn’t turn into a bowl of mush! This recipe is proof that you don’t need complicated techniques to create an impressive dessert. With the right pudding consistency, cake prep, and assembly method, you can enjoy distinct, delicious layers every single time.
Whether you’re making it for a special occasion or just because you deserve a treat, this chocolate layered trifle is sure to become a favorite. Give it a try and let me know how it turns out! Happy layering!
Chocolate Layered Trifle

Ingredients
- 1 prepared chocolate cake (such as a boxed mix baked in a 9×13 pan), cooled
- 1 package (5.1 oz) instant chocolate pudding mix
- 3 cups cold milk (dairy or non-dairy)
- 2 cups heavy whipping cream
- 1/2 cup powdered sugar
- 1 teaspoon vanilla extract
- 1 cup chocolate chips or shavings
- 1 cup chocolate candies (like malt balls)
- 1 cup graham crackers or biscotti, broken into 1-inch pieces
- Optional: Orange zest for garnish
Directions
- Prepare chocolate pudding according to package directions using the cold milk. Whisk for 2 minutes, then refrigerate for at least 10-15 minutes or until very thick and set. This thickness is crucial for preventing soggy cake layers.
- Cut the cooled chocolate cake into approximately 1-inch cubes. For best results against sogginess, it helps if the cake is slightly firm or day-old rather than very fresh and soft.
- In a large bowl, beat the heavy whipping cream with the powdered sugar and vanilla extract using an electric mixer on high speed until stiff peaks form. Be careful not to overbeat.
- Begin assembling the trifle in a large trifle dish (about 4-quart capacity). Place about half of the cake cubes evenly across the bottom of the dish. Try not to pack them down too tightly.
- Spoon about half of the thickened chocolate pudding evenly over the cake layer. Spread gently with a spoon or spatula. The pudding should be thick enough to sit on top of the cake rather than soaking immediately into it.
- Add about half of the whipped cream over the pudding layer, spreading gently to create an even layer.
- Repeat the layers: add the remaining cake cubes, followed by the remaining thickened chocolate pudding.
- Top the second pudding layer with the remaining whipped cream, swirling it decoratively across the top.
- Scatter the chocolate chips or shavings, chocolate candies, broken graham cracker or biscotti pieces, and optional orange zest over the whipped cream as garnish.
- Cover the trifle loosely and refrigerate for at least 2 to 4 hours before serving. This chilling time helps the layers set and allows the flavors to meld slightly, while the techniques used prevent the cake from becoming excessively soggy too quickly.