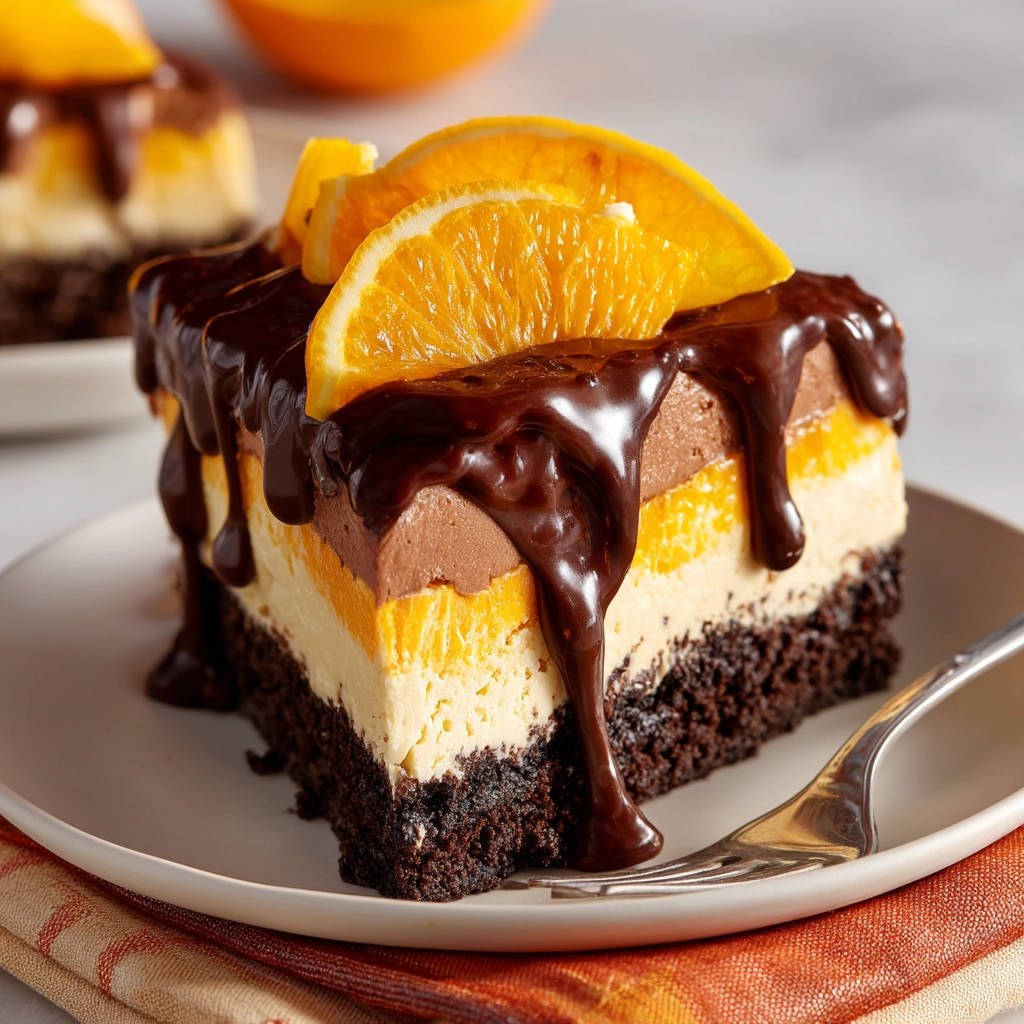
Imagine biting into a dessert where every layer stands proudly, a symphony of chocolate and orange that doesn’t collapse into a muddled mess. These Chocolate Orange Layer Bars aren’t just delicious; they’re a visual treat, and the secret to those perfect, clean slices is easier than you think! Say goodbye to layered dessert frustration and hello to picture-perfect indulgence with every bite.
Why You’ll Love These Chocolate Orange Layer Bars
These bars are destined to become a family favorite. Here’s why:
- Effortless Elegance: They look impressive but are surprisingly simple to make.
- Perfectly Set Layers: No more mushy desserts! The layers stay distinct and beautiful.
- The Chocolate Orange Dream Team: The combination of rich chocolate and zesty orange is simply irresistible.
- Make-Ahead Marvel: Perfect for parties and gatherings because they can be made a day in advance.
- Customizable: Easily adaptable to your preferences with different cookie types or chocolate variations.
Gathering Your Ingredients for Chocolate Orange Layer Bars
Let’s talk ingredients! The magic of these Chocolate Orange Layer Bars lies not just in the method but also in the quality of components we use. We’re building layers of flavor and texture, so each ingredient plays a vital role in creating the ultimate dessert experience. Here’s a breakdown of what you’ll need:
- For the Decadent Chocolate Cookie Crust: Two cups of finely crushed chocolate cookies form the base of our bars. Think of your favorite chocolate sandwich cookies – those work perfectly! The buttery chocolate notes create the perfect foundation for the layers to come. You’ll also need a half cup of melted unsalted butter, which binds the crushed cookies together.
- The Creamy Dream Layer: This layer needs eight ounces of softened cream cheese. Ensure it is properly softened for a smooth, lump-free texture. We’ll also use one cup of powdered sugar to sweeten the cream cheese, and a teaspoon of vanilla extract for a touch of warm flavor. Sixteen ounces of thawed whipped topping are crucial for a light and airy texture in both the cream cheese, orange, and chocolate layers.
- The Orange Burst: The vibrant orange flavor comes from one 3.4-ounce box of instant orange pudding mix. This provides that bright citrusy zing that complements the chocolate so well.
- The Chocolate Indulgence: For the rich chocolate layer, you’ll need one 3.4-ounce box of instant chocolate pudding mix.
- Liquid Gold: Four cups of cold milk, divided, are essential for thickening both the orange and chocolate pudding layers.
- Optional Chocolate Drizzle: For that final touch of decadence, you can drizzle a melted chocolate topping using a half cup of chocolate chips and two tablespoons of milk or cream to melt it into a smooth sauce. Consider using high-quality chocolate chips for the best flavor.
Crafting Your Chocolate Orange Layer Bars: Step-by-Step
Ready to create some layered dessert magic? Don’t be intimidated – these bars are all about taking it one layer at a time. The key to success is patience and chilling, so let’s get started!
- Creating the Cookie Base: In a medium bowl, thoroughly combine the two cups of crushed chocolate cookies and the half cup of melted unsalted butter. Ensure the butter is evenly distributed throughout the cookie crumbs for a solid base. Press this mixture firmly and evenly into the bottom of a 9×13 inch pan. A flat-bottomed measuring cup or the back of a spoon works well for this. Now, chill the crust in the refrigerator for at least 15 minutes. This chilling time allows the butter to solidify, creating a firm foundation for the next layer.
- Building the Cream Cheese Layer: While the crust is chilling, grab a large bowl and beat together the eight ounces of softened cream cheese and the one cup of powdered sugar until smooth and creamy. Make sure your cream cheese is at room temperature to avoid lumps. Stir in the teaspoon of vanilla extract. Gently fold in 8 ounces of the thawed whipped topping. Be gentle so you don’t deflate the whipped topping. Spread this mixture evenly over the chilled crust. Now, here’s a crucial step: chill this layer in the refrigerator for at least 30 minutes, or until the layer is firm to the touch. This ensures the cream cheese layer sets properly and prevents the orange layer from sinking in.
- Layering the Orange Dream: In a separate bowl, whisk together the instant orange pudding mix and 2 cups of the cold milk for 2 minutes, or until thickened. Don’t skip the full two minutes; this ensures the pudding sets correctly. Gently fold in another 8 ounces of thawed whipped topping. Spread this orange layer evenly over the now-firm cream cheese layer. Spread it carefully to avoid disturbing the cream cheese layer. Chill in the refrigerator for at least 1 hour, or until the orange layer is completely set. Patience is key!
- The Chocolate Finale: In another bowl, whisk together the instant chocolate pudding mix and the remaining 2 cups of cold milk for 2 minutes, or until thickened. As with the orange layer, whisk thoroughly. Gently fold in the remaining 8 ounces of thawed whipped topping. Spread this chocolate layer evenly over the set orange layer. Now, for the most important step of all: chill the entire dessert in the refrigerator for at least 4 hours, or preferably overnight, until all layers are very firm. This extended chilling time is absolutely crucial for preventing the layers from merging when you cut the bars. Trust me, it’s worth the wait!
- The Optional Chocolate Drizzle: If you’re feeling extra fancy, melt the half cup of chocolate chips with 2 tablespoons of milk or cream in a microwave-safe bowl in 30-second intervals, stirring until smooth. Let it cool slightly before drizzling it over the chilled dessert before cutting. If you want to elevate the presentation even further, garnish with orange slices.
Tips for Perfect Chocolate Orange Layer Bars Every Time
Want to ensure your Chocolate Orange Layer Bars are a resounding success? Here are a few pro tips to keep in mind:
- Softened Cream Cheese is Key: Seriously, don’t skip this. Cold cream cheese will result in a lumpy layer, and nobody wants that!
- Don’t Overmix: When folding in the whipped topping, be gentle. Overmixing will deflate it, resulting in a denser layer.
- Chill Time is Crucial: Resist the urge to rush the chilling process. Each layer needs to set properly to prevent a mushy dessert.
- Clean Cuts: For the cleanest slices, use a sharp knife and wipe it clean between each cut. You can even dip the knife in warm water for extra-smooth slices.
- Cookie Crumbles: Get even crumbles by using a food processor or placing the cookies in a zip-top bag and crushing them with a rolling pin.
Variations for Your Layered Bars
Want to put your own spin on these delicious bars? Here are a few ideas:
- Different Crust: Try using graham crackers or vanilla wafers for a different flavor profile.
- Citrus Zest: Add orange or lemon zest to the cream cheese layer for an extra burst of citrus flavor.
- Nutty Delight: Sprinkle chopped nuts (like pecans or walnuts) on top of the chocolate layer.
If you are looking for another chocolate dessert, try our easy and delicious chocolate sheet cake recipe. It’s a great alternative to these bars, and both are sure to be crowd-pleasers.
Your Chocolate Orange Layer Bars Questions Answered (FAQ)
Got questions about making these irresistible bars? Here are some common queries answered:
Can I use regular pudding mix instead of instant?
Unfortunately, no. Regular pudding mix requires cooking, which would alter the texture and consistency of the layers. Instant pudding is essential for this recipe.
Can I make these bars gluten-free?
Yes! Simply use gluten-free chocolate cookies for the crust. There are many delicious gluten-free options available these days. And ensure the pudding mixes are also certified gluten-free.
How long will these bars last in the refrigerator?
These bars will stay fresh in the refrigerator for up to 3-4 days. Be sure to store them in an airtight container to prevent them from drying out. For a similar dessert that lasts, check out our easy caramel nut dessert jars recipe.
Can I freeze these bars?
While you can freeze them, the texture of the whipped topping may change slightly upon thawing. If you do freeze them, wrap them tightly in plastic wrap and then in foil. Thaw in the refrigerator overnight before serving.
My layers are still mushy. What did I do wrong?
Most likely, you didn’t chill the layers for long enough. The chilling time is crucial for allowing the layers to set properly. Make sure to follow the recommended chilling times for each layer, and even longer if needed.
If you enjoy making desserts that require some patience, consider trying our decadent chocolate-topped cream cake recipe. It’s another dessert that benefits from careful layering and chilling for optimal flavor and texture.
Enjoy Your Homemade Chocolate Orange Layer Bars!
There you have it – picture-perfect Chocolate Orange Layer Bars that are sure to impress! The key to success is patience and chilling, but the reward is well worth the effort. Now, go ahead and bake up a batch of these delightful bars, and don’t forget to leave a comment below to let me know how they turned out!
Chocolate Orange Layer Bars (Layers Stay Set!)

Ingredients
- 2 cups finely crushed chocolate cookies
- 1/2 cup melted unsalted butter
- 8 ounces cream cheese softened
- 1 cup powdered sugar
- 1 teaspoon vanilla extract
- 16 ounces frozen whipped topping thawed divided
- 1 box 3.4 ounce instant orange pudding mix
- 1 box 3.4 ounce instant chocolate pudding mix
- 4 cups cold milk divided
- 1/2 cup chocolate chips
- 2 tablespoons milk or cream for melting chocolate
Directions
- In a medium bowl, combine crushed chocolate cookies and melted butter. Press mixture firmly into the bottom of a 9×13 inch pan. Chill in the refrigerator for at least 15 minutes while you prepare the next layer.
- In a large bowl, beat softened cream cheese and powdered sugar until smooth. Stir in vanilla extract. Gently fold in 8 ounces of the thawed whipped topping. Spread this mixture evenly over the chilled crust. **Chill in the refrigerator for at least 30 minutes, or until the layer is firm to the touch.**
- In a separate bowl, whisk together the instant orange pudding mix and 2 cups of the cold milk for 2 minutes, or until thickened. Gently fold in another 8 ounces of thawed whipped topping. Spread this orange layer evenly over the cream cheese layer. **Chill in the refrigerator for at least 1 hour, or until the orange layer is completely set.**
- In another bowl, whisk together the instant chocolate pudding mix and the remaining 2 cups of cold milk for 2 minutes, or until thickened. Gently fold in the remaining 8 ounces of thawed whipped topping. Spread this chocolate layer evenly over the set orange layer. **Chill the entire dessert in the refrigerator for at least 4 hours, or preferably overnight, until all layers are very firm.** This crucial chilling time is what ensures your layers set perfectly and won’t mush when cut.
- For the chocolate drizzle (optional, as seen in image), melt chocolate chips with 2 tablespoons milk or cream in a microwave-safe bowl in 30-second intervals, stirring until smooth. Let cool slightly, then drizzle over the chilled dessert before cutting. Garnish with orange slices if desired.