There’s nothing quite like the satisfaction of pulling a cheesecake from the oven, anticipating that perfect slice, only to be met with the heartbreak of a cracked top. I’ve been there countless times, but after years of perfecting my technique, I finally cracked the code to a truly flawless and crack-free Classic Caramel Cheesecake. This recipe isn’t just about delicious flavor; it’s about mastering the art of a perfectly smooth, impressive finish every single time.
Why This Classic Caramel Cheesecake Wins Every Time
This recipe stands out because it systematically addresses the common pitfalls of cheesecake baking, ensuring a dessert that’s as beautiful as it is delicious.
From the first bite of creamy, tangy filling to the luscious caramel drizzle, every element of this Classic Caramel Cheesecake is designed for maximum enjoyment and minimal stress.
The Secret to a Seamless Surface: No More Cracks!
The core innovation here lies in our meticulous approach to temperature management and mixing. By ensuring ingredients are at room temperature, mixing gently on low speed to avoid introducing excess air, and crucially, utilizing a water bath, we create the ideal baking environment.
The slow, gradual cooling process directly in the oven, a step often overlooked, is the final safeguard against sudden temperature shocks that lead to those dreaded cracks. This method ensures your cheesecake boasts a perfectly smooth, unblemished surface.
More Than Just Dessert: The Joy of Baking Success
Serving a homemade cheesecake, especially one this stunning, brings immense satisfaction. It’s more than just a sweet treat; it’s a testament to your baking prowess.

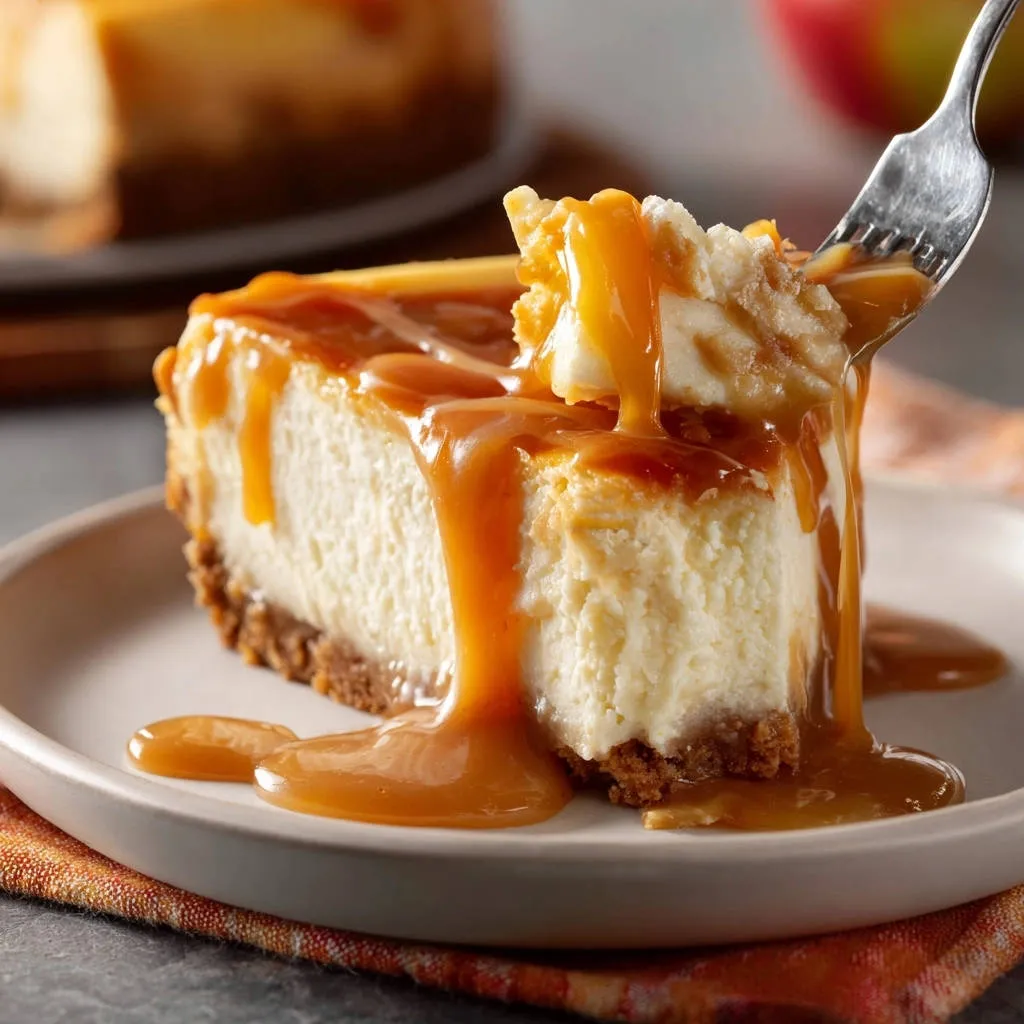
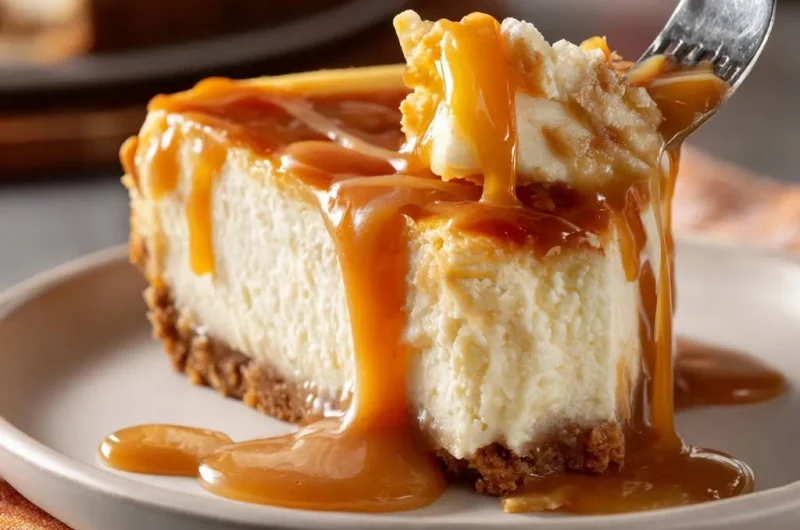
Imagine the compliments as you present a perfectly pristine slice of this Classic Caramel Cheesecake, crowned with glistening caramel. It’s a moment of culinary triumph.
Essential Gear for Your Classic Caramel Cheesecake Journey
Having the right tools makes all the difference in achieving a perfectly baked and beautifully presented cheesecake.
Must-Have Bakeware
9-inch Springform Pan: This specialized pan is crucial for easily releasing the cheesecake without damaging its delicate sides. Choose one with a good seal to prevent leaks.
Large Roasting Pan: Essential for the water bath, it needs to be large enough to comfortably hold your springform pan with plenty of space around it.
Wire Rack: Necessary for cooling the cheesecake evenly after it comes out of the oven, allowing air circulation underneath.
Small Wonders: Utensils and Extras
Electric Mixer (Stand or Handheld): Vital for achieving that smooth, lump-free cream cheese filling. Using a low speed setting is key.
Mixing Bowls: You’ll need at least one large and one medium bowl for preparing the crust and filling.
Measuring Cups and Spoons: Accuracy in baking ensures consistent results every time.
Heavy-Duty Aluminum Foil: Absolutely critical for wrapping the springform pan to prevent water seepage during the water bath.
Building Blocks of Bliss: Ingredients for Your Classic Caramel Cheesecake
Quality ingredients are the foundation of any exceptional dessert. Choosing the right components for your Classic Caramel Cheesecake ensures superior taste and texture.
For the Irresistible Graham Cracker Crust
Graham Cracker Crumbs: These provide a classic, slightly sweet, and sturdy base. You can crush your own graham crackers or use pre-made crumbs for convenience.
Granulated Sugar: A touch of sugar sweetens the crust just enough to balance the crackers.
Unsalted Butter, Melted: Butter binds the crumbs together, creating a perfectly crisp and flavorful foundation.
The Heart of the Matter: Creamy Cheesecake Filling Essentials
Cream Cheese, Softened: Use full-fat block cream cheese for the best texture and flavor. It must be fully softened to room temperature for a lump-free, smooth batter.
Granulated Sugar: Sweetens the rich cream cheese and helps achieve that classic cheesecake consistency.
Vanilla Extract: A crucial flavor enhancer, adding warmth and depth to the filling.
Sour Cream: This ingredient adds a subtle tang and contributes to the cheesecake’s incredible creaminess and moisture.
Large Eggs, Room Temperature: Like the cream cheese, eggs must be at room temperature to incorporate smoothly into the batter without overmixing, preventing a lumpy texture or cracks.
That Luscious Caramel Topping
Prepared Caramel Sauce: Opt for a high-quality store-bought caramel for convenience, or elevate your dessert further by crafting your own luscious caramel from scratch. The quality of your caramel directly impacts the final taste experience.
Ingredient Insights: Achieving Perfect Consistency
Always use full-fat cream cheese, as low-fat versions contain more water and can affect the cheesecake’s texture and setting. Room temperature ingredients are non-negotiable for a truly smooth batter.
Cold ingredients resist blending, leading to lumps and requiring overmixing, which introduces air and can cause cracks. For an extra rich flavor, you might enjoy exploring other decadent desserts like these creamy caramel crumble cheesecake bars.
Crafting Perfection: Step-by-Step Classic Caramel Cheesecake Guide
- The Foundation: Perfecting Your Crust
Preheat your oven to 350°F (175°C).
In a medium bowl, combine graham cracker crumbs, 1/4 cup granulated sugar, and melted butter until well mixed.
Press this mixture firmly and evenly into the bottom of a 9-inch springform pan. Use the bottom of a glass or your hand to ensure a compact and sturdy base.
Bake for 8-10 minutes, then remove from oven and let cool slightly while you prepare the filling. This pre-bake prevents a soggy crust and helps it hold its shape.
- Prepping for Success: The Water Bath Method Explained
Prepare your springform pan for a water bath by tightly wrapping the outside bottom and sides with several layers of heavy-duty aluminum foil. Ensure there are no gaps for water to seep in; this is crucial.
This critical step creates a moist, consistent baking environment, preventing rapid temperature fluctuations that lead to cracks and ensuring an incredibly creamy cheesecake.
- Adjusting Oven Temperature
Reduce oven temperature to 325°F (160°C). A lower, more gentle heat is essential for even baking and preventing cracks in delicate cheesecakes.
- Whipping Up the Velvety Filling
In a large bowl, beat the softened cream cheese and 1 1/2 cups granulated sugar together on low speed until just smooth and no lumps remain. Do not incorporate too much air.
It is very important not to overmix at this stage; overmixing can incorporate excess air, which expands during baking and then collapses, leading to cracks.
Scrape down the sides of the bowl often to ensure all ingredients are well combined without overworking the batter.
Add the vanilla extract and sour cream to the cream cheese mixture and beat on low speed until just combined. The mixture should be smooth and cohesive.
- Incorporating Eggs Gently
Add the eggs one at a time, mixing on low speed until just incorporated after each addition. Mix only until the yellow streak disappears; do not beat excessively.
The goal is a smooth, homogenous batter without introducing excess air bubbles. Too much air is a primary culprit for cheesecake cracking.
- Filling and Setting Up the Water Bath
Pour the cheesecake filling over the cooled graham cracker crust in the prepared, foil-wrapped springform pan.
Place the foil-wrapped springform pan inside a larger roasting pan.
Carefully pour hot water into the roasting pan until it comes about halfway up the sides of the springform pan. This moist, even baking environment is crucial for preventing cracks and promoting a silky texture.
- Baking Brilliance: The Gentle Heat Process
Carefully transfer the roasting pan with the cheesecake to the preheated oven.
Bake for 60-75 minutes, or until the edges are set but the center still has a slight wobble when gently shaken. This slight wobble indicates perfect doneness; it will firm up as it cools, resulting in a creamy center.
- The Patience Game: Cooling for a Flawless Finish
Once baked, turn off the oven but do not remove the cheesecake. This gradual cooling is essential.
Prop the oven door open slightly with a wooden spoon and leave the cheesecake in the water bath inside the cooling oven for 1 hour. This prevents sudden temperature changes.
This slow, gradual cooling process is absolutely critical for preventing cracks caused by sudden temperature drops, ensuring a beautifully smooth top.
- Final Cooling and Refrigeration
After 1 hour, carefully remove the cheesecake from the oven and the water bath. Remove the foil from the pan.
Let the cheesecake cool completely on a wire rack at room temperature. This step allows the internal structure to fully set.
Once cooled, cover the cheesecake loosely and refrigerate for at least 6 hours, or preferably overnight, to allow it to fully set and achieve its perfect firm yet creamy texture.
- The Grand Reveal: Chilling and Serving Your Masterpiece
When ready to serve, carefully run a thin knife around the edge of the pan before releasing the springform side. This prevents the cheesecake from sticking and tearing.
Slice and top generously with prepared caramel sauce. Revel in your perfectly smooth, crack-free Classic Caramel Cheesecake!
Chef’s Secrets: Elevate Your Classic Caramel Cheesecake Game
Achieving a truly exceptional Classic Caramel Cheesecake goes beyond just following steps. These expert tips will help you master every aspect.
Mastering the Mix: Avoiding Over-Aeration. The primary cause of cheesecake cracks is too much air in the batter. Beat cream cheese and sugar on low speed only until smooth, and add eggs one at a time, mixing minimally until just combined. Less air equals fewer cracks and a denser, creamier texture.
Temperature is Key: Why Room Temp Ingredients Matter. Ensure your cream cheese and eggs are at true room temperature. This allows them to blend smoothly and evenly, preventing lumps and ensuring a homogeneous batter that bakes consistently without cracking. Plan ahead for this crucial step.
The Water Bath Wisdom: Preventing Cracks Like a Pro. Don’t skip the water bath! It creates a moist, even baking environment that prevents the cheesecake from drying out and cracking around the edges. Wrap your springform pan meticulously with multiple layers of heavy-duty foil to avoid any water seepage.
The Art of Slow Cooling: Your Crack-Free Guarantee. Leaving the cheesecake in the cooling oven with the door ajar allows it to cool down gradually, preventing a sudden temperature shock that almost always leads to cracks. This patience truly pays off with a pristine surface.
Caramel Perfection: Choosing and Using Your Topping. While prepared caramel sauce is convenient, ensure it’s a good quality one for the best flavor. For best results, warm it slightly before serving so it drizzles beautifully. Consider making your own for an extra gourmet touch and control over sweetness.
Troubleshooting Your Classic Caramel Cheesecake: Common Queries Solved
Why Did My Cheesecake Crack?
Cheesecake cracks are often caused by overmixing the batter (introducing too much air), overbaking (drying out the cake), or sudden temperature changes during cooling (from oven to cold counter). Our recipe’s water bath and slow-cooling methods are designed to counteract these issues.
My Cheesecake is Too Soft/Runny
This typically indicates underbaking or not chilling the cheesecake long enough. Ensure the center has a slight wobble, not a liquid jiggle, and always chill for at least 6 hours, preferably overnight, for proper setting. Using low-fat ingredients can also result in a softer texture.
Crust Came Out Soggy
A soggy crust is usually due to not pre-baking it, or water seeping into the pan during the water bath. Ensure your foil wrapping is incredibly tight and leak-proof around the springform pan.
Caramel Topping Concerns
If your caramel is too thick, gently warm it over low heat or in a microwave for 15-30 seconds until it reaches a pourable consistency. If it’s too thin, a quick chill in the fridge might help it firm up slightly. For ultimate confidence in a perfect outcome, master the techniques for other reliable desserts like this decadent chocolate chip cheesecake that guarantees no cracks.
Beyond the Bake: Serving, Storing, and Enjoying Your Cheesecake
Your beautiful Classic Caramel Cheesecake deserves to be enjoyed to its fullest, from presentation to preservation.
Elegant Serving Suggestions
While caramel sauce is perfect, consider adding a sprinkle of sea salt flakes for a sophisticated sweet-and-salty balance. Fresh berries or a dollop of whipped cream can also provide a lovely contrast in flavor and texture, enhancing the overall experience.
Storing Your Classic Caramel Cheesecake for Freshness
Once completely cooled and set, store your cheesecake tightly covered in the refrigerator. An airtight container or plastic wrap pressed directly against the surface helps prevent it from drying out or absorbing refrigerator odors. It will stay fresh for up to 5 days.
Can You Make It Ahead? Tips for Prep
Absolutely! Cheesecake is an ideal make-ahead dessert. It needs significant chilling time anyway, so preparing it a day or two in advance is perfect. This allows the flavors to meld and the texture to fully develop, making it even more delicious.
Freezing for Future Indulgence
Yes, cheesecake freezes beautifully. For a whole cheesecake, cool and chill it completely, then wrap it tightly in several layers of plastic wrap and then foil. For slices, place them on a baking sheet to freeze until solid, then wrap individually. Thaw overnight in the refrigerator before serving.
Your Classic Caramel Cheesecake Questions Answered
Can I Use Store-Bought Graham Cracker Crust?
While this recipe’s crust is designed for optimum flavor and stability, a good quality pre-made graham cracker crust can be used for convenience. However, you might skip the pre-bake step, as many pre-made crusts are already baked. Ensure it’s a 9-inch crust.
What if I Don’t Have a Springform Pan?
You can use a regular 9-inch round cake pan. Line it completely with parchment paper, leaving an overhang on two sides to create a “sling” for easy removal. You will still need to wrap the outside with foil for the water bath, and removal will require careful lifting by the parchment sling once chilled.
Can I Make My Own Caramel Sauce?
Definitely! Making your own caramel sauce offers a deeper, more nuanced flavor and allows you to control the sweetness and consistency. It requires a bit more time and care but is incredibly rewarding and elevates the cheesecake to gourmet status.
How Do I Know When It’s Fully Baked?
Look for edges that are set and slightly puffed, while the very center (about 2-3 inches in diameter) still has a slight jiggle or wobble when the pan is gently shaken. An instant-read thermometer inserted into the center should read 150-155°F (65-68°C) for perfect doneness.
Is this Classic Caramel Cheesecake Gluten-Free? Dairy-Free?
As written, this recipe is not gluten-free or dairy-free. To make it gluten-free, substitute gluten-free graham crackers for the crust. For a dairy-free version, you would need specialized dairy-free cream cheese and sour cream alternatives, which can significantly alter the texture and require recipe adjustments.
Share Your Classic Caramel Cheesecake Triumph!
You’ve mastered the art of the crack-free Classic Caramel Cheesecake! We hope this comprehensive guide empowers you to bake with confidence and delight your loved ones with a truly spectacular dessert.
We’d love to see your beautiful creations! Share your photos and experiences in the comments below or tag us on social media. Your success inspires our community!
Join Our Community of Cheesecake Lovers
For more baking tips, dessert recipes, and culinary inspiration, be sure to explore our other guides and join our newsletter. Happy baking!
Classic Caramel Cheesecake
Course: DessertCuisine: American CuisineDifficulty: easy10
servings30
minutes2
hours480
minutesAmerican Cuisine
Ingredients
For the Crust:
1 1/2 cups graham cracker crumbs
1/4 cup granulated sugar
6 tablespoons unsalted butter, melted
For the Cheesecake Filling:
32 ounces (4 blocks) cream cheese, softened
1 1/2 cups granulated sugar
1 teaspoon vanilla extract
1/4 cup sour cream
4 large eggs, room temperature
For the Caramel Topping:
1 cup prepared caramel sauce
Directions
- Preheat your oven to 350°F (175°C). For the crust, combine graham cracker crumbs, 1/4 cup granulated sugar, and melted butter in a medium bowl until well mixed. Press this mixture firmly into the bottom of a 9-inch springform pan. Bake for 8-10 minutes, then remove from oven and let cool slightly while you prepare the filling.
- Prepare your springform pan for a water bath. Tightly wrap the outside bottom and sides of the springform pan with several layers of heavy-duty aluminum foil. This prevents water from seeping into the pan. Set aside.
- Reduce oven temperature to 325°F (160°C).
- For the cheesecake filling, in a large bowl, beat the softened cream cheese and 1 1/2 cups granulated sugar together on low speed until just smooth. It is very important not to overmix at this stage; overmixing can incorporate too much air, leading to cracks. Scrape down the sides of the bowl often.
- Add the vanilla extract and sour cream to the cream cheese mixture and beat on low speed until just combined.
- Add the eggs one at a time, mixing on low speed until just incorporated after each addition. Again, avoid overmixing. The goal is a smooth, homogenous batter without excess air bubbles.
- Pour the cheesecake filling over the cooled graham cracker crust in the prepared springform pan.
- Place the foil-wrapped springform pan inside a larger roasting pan. Carefully pour hot water into the roasting pan until it comes about halfway up the sides of the springform pan. This creates a moist, even baking environment, which is key to preventing cracks.
- Carefully transfer the roasting pan with the cheesecake to the preheated oven. Bake for 60-75 minutes, or until the edges are set but the center still has a slight wobble when gently shaken.
- Once baked, turn off the oven but do not remove the cheesecake. Prop the oven door open slightly with a wooden spoon and leave the cheesecake in the water bath inside the cooling oven for 1 hour. This slow cooling process is critical for preventing cracks caused by sudden temperature changes.
- After 1 hour, carefully remove the cheesecake from the oven and the water bath. Remove the foil from the pan. Let the cheesecake cool completely on a wire rack at room temperature.
- Once cooled, cover the cheesecake loosely and refrigerate for at least 6 hours, or preferably overnight, to allow it to fully set.
- When ready to serve, carefully run a thin knife around the edge of the pan before releasing the springform side. Slice and top generously with prepared caramel sauce. Enjoy your perfectly smooth, crack-free cheesecake!
Notes
- The water bath and slow cooling process are crucial for preventing cracks.