
I vividly recall the disappointment of perfectly piped cookie dough transforming into flat, formless disks in the oven. It was a common baking heartbreak, but I’ve since mastered the art of creating truly stunning Classic Piped Butter Cookies that consistently hold their intricate shapes, boasting a crisp edge and tender crumb.
This recipe isn’t just about beautiful presentation; it delivers that rich, buttery flavor we all adore, making these delicate treats perfect for any occasion, from afternoon tea to elegant holiday platters. The secret lies in a simple, yet critical, technique that guarantees success.
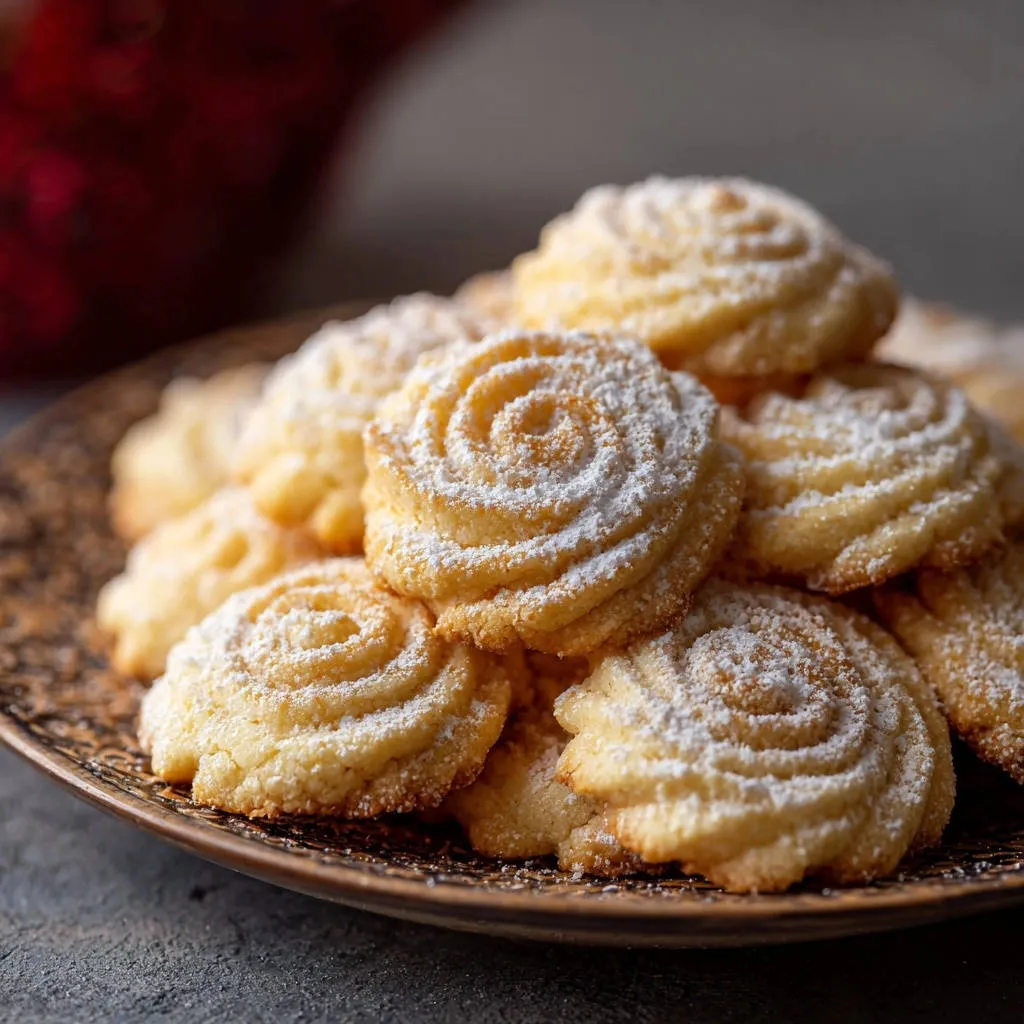
Say Goodbye to Flat Cookies: The Secret to Perfect Piped Shapes
The universal frustration of butter cookies spreading in the oven can deter even seasoned bakers. This common issue robs your delicate designs of their charm, leaving you with a less-than-impressive result.
Our recipe tackles this head-on, providing a reliable method that ensures your piped creations emerge from the oven exactly as intended: defined, elegant, and utterly delicious.
What Makes Our Classic Piped Butter Cookie Recipe Different?
The core difference in this Classic Piped Butter Cookie recipe, and the key to its success, is the strategic chilling of the piped dough before baking.
This crucial step solidifies the butter within the dough, preventing it from melting too quickly in the oven and causing the cookies to spread. It’s a simple technique that yields beautifully crisp, perfectly shaped cookies every single time.
Gathering Your Essentials: The Building Blocks of Irresistible Butter Cookies
Great cookies start with great ingredients. Understanding the role of each component ensures your Classic Piped Butter Cookies achieve their signature texture and flavor.
Butter’s Role: Softened but Cool is Key
Unsalted butter is the star, providing richness and tenderness. It’s crucial for your butter to be softened but still cool to the touch, not greasy or melted.
This allows for proper aeration during creaming, creating a light, fluffy base that contributes to the cookie’s delicate texture and helps it hold its shape.
The Right Flour: All-Purpose for a Perfect Crumb
All-purpose flour provides the structure for these piped butter cookies. Measure it precisely by spooning it into your measuring cup and leveling it off, rather than scooping directly from the bag, to avoid adding too much.
Excess flour can lead to dry, tough cookies that are difficult to pipe smoothly.
Sweetness & Scent: Powdered Sugar and Vanilla
Powdered sugar (confectioners’ sugar) is preferred over granulated sugar for its fine texture, which ensures a smoother dough that pipes beautifully and melts delicately in your mouth.
Pure vanilla extract adds a warm, classic aroma and flavor that is essential to the appeal of these simple yet sophisticated cookies. Use a good quality extract for the best taste.
Essential Salt: Balancing Flavors
A small amount of salt might seem counterintuitive in a sweet recipe, but it’s indispensable. Salt enhances the overall flavor of the butter and vanilla, balancing the sweetness and preventing the cookies from tasting one-dimensional.
Tools of the Trade: Equipping Your Butter Cookie Baking Journey
Having the right tools makes the piping process seamless and enjoyable, contributing significantly to the final elegant appearance of your Classic Piped Butter Cookies.
The Star of the Show: Your Piping Bag and Tip
A sturdy piping bag, either reusable silicone or good quality disposable, is essential for exerting even pressure. The most important tool for achieving those classic shapes is a large star tip, such as Wilton 1M or Ateco 826.
A larger tip makes piping easier and produces more defined shapes compared to smaller ones.
Baking Essentials: Mixer, Sheets, and Parchment
An electric mixer (stand or hand-held) simplifies the creaming process, ensuring the butter and sugar are perfectly light and fluffy. Heavy-duty baking sheets provide even heat distribution, preventing hot spots and uneven browning.
Parchment paper is crucial for easy release and prevents sticking, allowing you to transfer your delicate Classic Piped Butter Cookies without breakage after baking.
Mastering the Method: Your Path to Flawless Classic Piped Butter Cookies
Step 1: Creaming to Perfection – The Foundation
In a large bowl, combine the softened butter and 1/2 cup powdered sugar. Using an electric mixer, cream these together on medium speed until the mixture is visibly lightened in color and fluffy, typically taking 2 to 3 minutes.
This aeration is key for a tender cookie, so ensure your butter is pliable but still cool to the touch, not melted or oily. Beat in the vanilla extract until just combined, scraping down the sides of the bowl as needed.
Step 2: Gentle Folding – Incorporating Dry Ingredients
Gradually add the all-purpose flour and salt to the creamed mixture, mixing on low speed until just combined. It’s crucial not to overmix the dough, as excessive mixing develops gluten, which can lead to tough, chewy cookies.
Mix only until no streaks of dry flour remain. The resulting dough should be soft, pliable, and not sticky to the touch.
Step 3: The Chilling Secret – Piping and Firming the Dough
Transfer the dough into a piping bag fitted with your chosen large star tip. Pipe your desired intricate shapes, such as spirals, rosettes, or S-shapes, onto a baking sheet lined with parchment paper, leaving a little space between each.
This is the most critical step for perfectly shaped Classic Piped Butter Cookies: Immediately place the entire baking sheet with the piped dough into the refrigerator for at least 30 minutes, and ideally up to an hour. This chilling time solidifies the butter, making the cookies resistant to spreading when they hit the heat of the oven, thus preserving their beautiful piped definition.
Step 4: Preheat and Bake – Achieving Golden Edges
While your piped cookies are chilling, preheat your oven to 375°F (190°C). This ensures the oven is at the correct temperature for even baking once the cookies are ready.
Bake the chilled cookies for 10 to 12 minutes, or until their edges are lightly golden. The centers of the cookies should remain pale; they will firm up as they cool. Overbaking can lead to dry or overly crisp cookies.
Step 5: Cooling and Finishing Touches
Allow the baked cookies to cool on the baking sheet for 5 minutes. This brief resting period helps them set and become less fragile before you handle them.
Carefully transfer the partially cooled Classic Piped Butter Cookies to a wire rack to cool completely. Once fully cooled, dust them generously with additional powdered sugar for a traditional, elegant presentation and an extra touch of sweetness.
Chef’s Secrets: Elevating Your Classic Piped Butter Cookies to Bakery Quality
The Magic of Chilling: Why It’s Non-Negotiable. Skipping the chilling step is the most common reason for flat, shapeless cookies. Proper chilling firms up the butter, ensuring your intricate piped designs hold beautifully and the cookies bake up crisp and tender.
Don’t Overmix! Understanding Gluten Development. Overmixing the dough develops gluten, which is desirable in bread but detrimental to tender cookies. Mix only until the flour is just incorporated to keep your cookies delicately crumbly.
Perfectly Baked: Visual Cues for Doneness. Look for subtly golden edges as your primary indicator of doneness. The centers should remain pale. Remember, cookies continue to cook slightly from residual heat after being removed from the oven, so pulling them out just as the edges tint is perfect.
Achieving Consistency in Piping. For uniform baking and a professional appearance, strive for even pressure and consistent size when piping. If you’re new to piping, practice a few shapes on a spare piece of parchment paper before working with the main batch.
Quality Ingredients Matter. With a simple recipe like Classic Piped Butter Cookies, the quality of your ingredients shines through. Using high-quality butter and pure vanilla extract makes a noticeable difference in the richness and depth of flavor.
Common Cookie Conundrums: Troubleshooting Your Piped Butter Cookies
My Cookies Are Spreading Too Much!
Excessive spreading is typically a sign that your butter was too warm when mixed, or the piped dough wasn’t sufficiently chilled. Ensure your butter is softened but still cool before you begin creaming.
Always adhere to the chilling time of at least 30 minutes, as this step is crucial for solidifying the butter and maintaining the cookie’s structure in the oven. Overmixing can also lead to spreading by creating a less stable dough.
Why Are My Cookies Tough or Dry?
Tough cookies are almost always a result of overmixing the dough, which overdevelops gluten. Mix only until the dry ingredients are just incorporated.
Dryness can occur if too much flour was added (always measure precisely) or if the cookies were overbaked. Watch for those lightly golden edges and pale centers, then remove them from the oven promptly.
My Piping Isn’t Clean or Sharp!
If your piped designs aren’t crisp and well-defined, the dough might be too warm and soft, making it difficult to hold a precise shape. If this happens, chill the dough in the piping bag for 10-15 minutes before attempting to pipe.
Ensure you are applying firm, consistent pressure as you pipe, letting the dough form the shape rather than trying to draw it with the tip.
Enjoying and Preserving Your Classic Piped Butter Cookies
These elegant cookies are wonderful for countless occasions, both simple and celebratory.
Elegant Serving Suggestions
Classic Piped Butter Cookies are beautiful on their own, especially with a dusting of powdered sugar. For an extra touch of decadence, drizzle them with melted dark or white chocolate, or dip half the cookie in chocolate and adorn with sprinkles.
They are also a perfect accompaniment to a warm cup of tea or coffee, ideal for holiday platters, or thoughtful homemade gifts. For another delightful treat that pairs wonderfully with tea, consider our classic shortbread fingers.
Storage Solutions for Freshness
To keep your Classic Piped Butter Cookies fresh and crisp, store them in an airtight container at room temperature. Layer them between sheets of parchment paper to protect their delicate shapes.
They will maintain their optimal freshness and buttery flavor for up to 5-7 days.
Make-Ahead Tips for Easy Entertaining
These cookies are fantastic for making ahead. You can prepare the dough and refrigerate it in the piping bag for up to 2-3 days before piping and baking.
Alternatively, pipe the shapes onto a parchment-lined baking sheet, freeze until solid, then transfer the frozen shapes to an airtight freezer bag. Bake from frozen, adding a few extra minutes to the baking time. Baked cookies can also be frozen for up to 3 months; thaw at room temperature before serving.
Your Classic Piped Butter Cookie Questions Answered
Can I add other flavors to this recipe?
Absolutely! This recipe is a fantastic base for flavor variations. You can swap vanilla extract for almond extract, or add a teaspoon of citrus zest (lemon, orange, or lime) to the dough for a bright, fragrant twist. For a chocolate version, replace 1/4 cup of the flour with unsweetened cocoa powder.
Can I make these cookies gluten-free?
Yes, you can generally substitute an equal amount of a good quality 1:1 gluten-free baking flour blend for the all-purpose flour. Look for a blend that contains xanthan gum for better texture and binding. The texture may be slightly more crumbly, but the flavor will still be delightful and they should hold their shape well.
How long do piped butter cookies last?
When stored properly in an airtight container at room temperature, Classic Piped Butter Cookies will retain their freshness, flavor, and texture for 5 to 7 days. Ensure they are completely cool before storing to prevent condensation, which can make them soft.
Can I freeze the dough or baked cookies?
Yes, both the dough and baked cookies freeze beautifully. To freeze the dough, pipe your shapes onto a parchment-lined baking sheet, then freeze until firm. Once frozen, transfer the solid cookie shapes to an airtight freezer bag or container for up to 2-3 months. You can bake them directly from frozen, adding a few extra minutes to the baking time.
Baked and cooled cookies can also be frozen in an airtight container, layered with parchment paper, for up to 3 months. Thaw them at room temperature before enjoying.
Share Your Classic Piped Butter Cookie Masterpiece!
With this reliable recipe and the secret to perfect shapes in your baking arsenal, you’re ready to create stunning Classic Piped Butter Cookies that will delight everyone who tries them. They are truly a testament to the elegance of simplicity in baking.
We’d love to see your beautiful cookie creations! Share your photos and experiences in the comments below, or tag us on social media. Happy baking, and enjoy every buttery bite!

Classic Piped Butter Cookies
Course: BakingCuisine: American CuisineDifficulty: easy60
minutes10
minutes1
hourAmerican Cuisine
N/A
Ingredients
1 cup (2 sticks) unsalted butter, softened but still cool
1/2 cup powdered sugar, plus more for dusting
2 cups all-purpose flour
1/2 teaspoon vanilla extract
1/4 teaspoon salt
Directions
- In a large bowl, cream together the softened butter and 1/2 cup powdered sugar until light and fluffy. This should take about 2 to 3 minutes with an electric mixer. Ensure the butter isn’t too warm or melted; it should be pliable but still hold its shape.
- Beat in the vanilla extract.
- Gradually add the flour and salt, mixing on low speed until just combined. Do not overmix. The dough should be soft but not sticky.
- This is the key step to prevent spreading and ensure your shapes hold beautifully: Transfer the dough to a piping bag fitted with a large star tip. Pipe your desired shapes (like spirals or rosettes) onto a baking sheet lined with parchment paper. Once piped, place the entire baking sheet into the refrigerator for at least 30 minutes, or even up to an hour, before baking. This chilling process is essential for solidifying the butter and preventing the cookies from spreading too much in the oven.
- While the cookies chill, preheat your oven to 375°F (190°C).
- Bake the chilled cookies for 10 to 12 minutes, or until the edges are lightly golden. The centers should remain pale.
- Let the cookies cool on the baking sheet for 5 minutes before transferring them to a wire rack to cool completely.
- Once cool, dust generously with additional powdered sugar.
Notes
- The chilling process (Step 4) is crucial for preventing spread and ensuring cookies hold their piped shape.