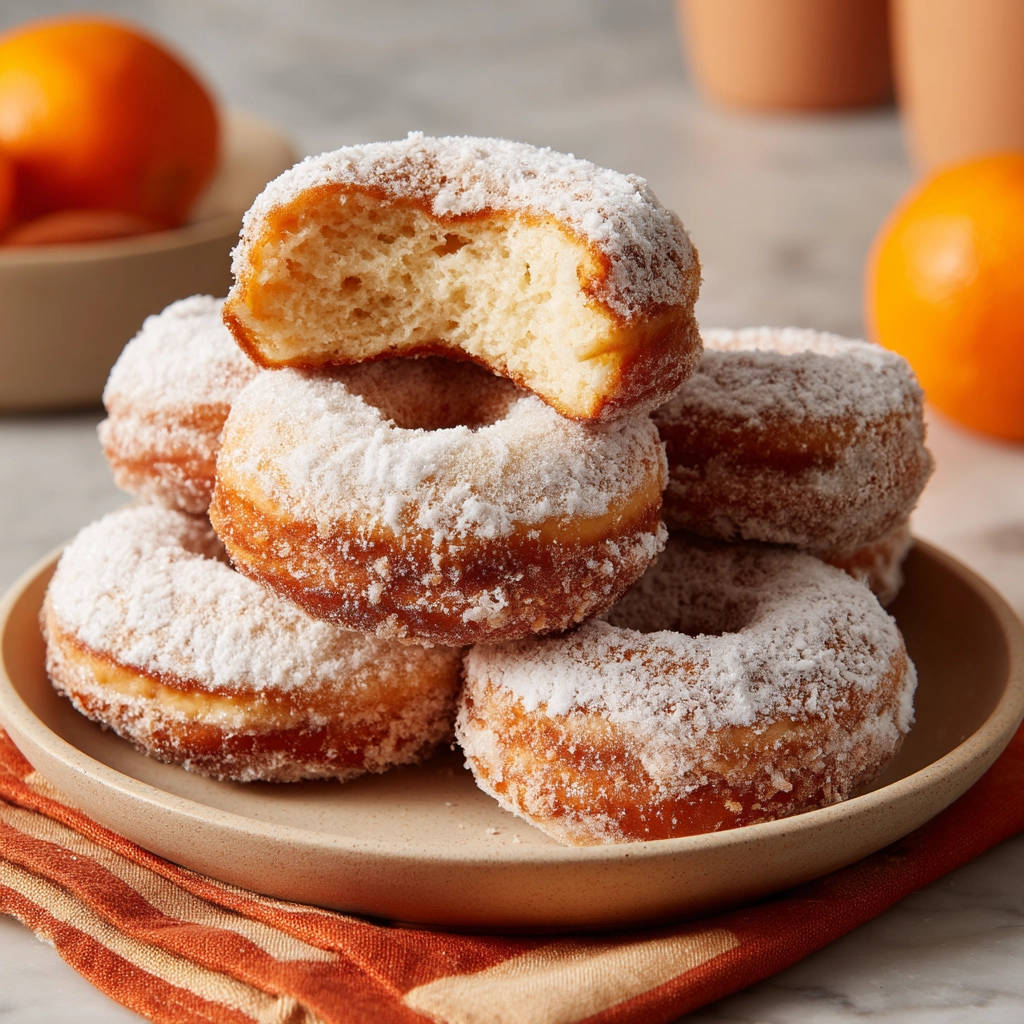
There’s nothing quite like biting into a perfectly fresh, warm donut. That soft, fluffy interior coated in sweet, delicate powdered sugar just melts in your mouth. If you’ve ever tried making donuts at home only to end up with heavy, greasy discs, you’re not alone! It used to happen to me too, and it was so frustrating. All that effort for something less than dreamy.
But guess what? I discovered a simple secret that changed everything. This recipe for Classic Powdered Sugar Donuts guarantees a light, airy texture every single time, without that unpleasant oily residue. It’s all about paying attention to one crucial step, and I’m going to share it with you.
Forget store-bought! Making these at home is incredibly rewarding, and the taste of a truly fresh, non-greasy donut is simply unmatched. Ready to master the art of the perfect fried donut?
Why You’ll Absolutely Love This Recipe
Beyond just being delicious, there are so many reasons these homemade powdered sugar donuts will become your go-to:
- Guaranteed Non-Greasy: The primary benefit! We tackle the greasiness problem head-on with a key technique.
- Incredibly Fluffy Texture: Thanks to proper yeast activation and rising times, you get that signature soft, pillowy bite.
- Classic & Comforting: Powdered sugar donuts are a timeless favorite for a reason. Simple, sweet, and utterly satisfying.
- Rewarding to Make: There’s a special sense of accomplishment that comes with frying up a batch of perfect donuts from scratch.
- Freshness You Can’t Beat: Enjoy them warm, straight from your kitchen, for the ultimate donut experience.
Gathering Your Ingredients for Fluffy Donuts
Making delicious, non-greasy donuts starts with a few simple ingredients, much like many classic baked goods. The magic happens when these basic components come together in the right way. Here’s what you’ll need, with a little insight into their roles:
Our dough begins with the foundation of many wonderful pastries and breads: flour. All-purpose flour works beautifully here, providing the necessary structure while still allowing for tenderness. We’ll start with a measured amount and add a little extra as needed during kneading to achieve the perfect slightly-sticky-but-not-tacky consistency.

The lift comes from active dry yeast. Activated with warm milk and a touch of granulated sugar, the yeast will work its magic, creating carbon dioxide bubbles that give the donuts their light and airy structure as they rise and fry. The milk also contributes to the dough’s richness and softness. Ensure your milk is just warm, not hot, to keep that yeast happy!
Granulated sugar isn’t just for activating the yeast; it also sweetens the dough itself, adds tenderness, and helps with browning. A large egg provides richness, helps bind the ingredients, and contributes to a beautiful golden color during frying. Melted unsalted butter adds essential fat for tenderness and flavor, making the donuts truly decadent. Vanilla extract is included for that classic, warm bakery flavor that pairs so well with fried dough and powdered sugar. And don’t forget the salt – it balances the sweetness and enhances all the other flavors.
For the frying itself, you’ll need several inches of vegetable oil. Choosing a neutral oil like vegetable, canola, or peanut oil is best as it won’t impart unwanted flavors. And finally, the generous coating of powdered sugar provides the iconic finish, transforming simple fried dough into a dreamy, sweet treat. Make sure you have plenty on hand!
Here is a breakdown of the specific measurements:
- 2 and 1/4 teaspoons active dry yeast
- 1/2 cup warm milk (105-115 degrees F)
- 1/4 cup granulated sugar, plus a pinch for yeast
- 1 large egg
- 2 tablespoons unsalted butter, melted
- 1 teaspoon vanilla extract
- 1/2 teaspoon salt
- 2 and 1/2 cups all purpose flour, plus more for dusting
- Vegetable oil, for frying
- 2 cups powdered sugar, for coating
Crafting Your Classic Powdered Sugar Donuts: Step-by-Step
Alright, let’s get our hands doughy! Making these fluffy, non-greasy donuts involves a few distinct stages, from activating the yeast to that final sugary coating. Follow these steps carefully, paying special attention to the frying temperature, and you’ll be rewarded with donut perfection.
First things first, we need to wake up our yeast! In a large mixing bowl, gently combine the warm milk with a small pinch of granulated sugar. The sugar gives the yeast something to snack on, helping it become active. Sprinkle the active dry yeast evenly over the surface of the milk mixture. Now, just let it sit quietly for about 5 to 10 minutes. You’re looking for it to get nice and foamy on top; this is a sign that your yeast is alive and ready to work. If it doesn’t foam, your milk might not have been warm enough, or your yeast might be old, and you should start this step over.
Once your yeast is bubbly and active, it’s time to incorporate the rest of the wet and sweet ingredients. Add the remaining granulated sugar, the large egg, the melted unsalted butter, the vanilla extract for flavor, and the salt into the bowl with the foamy yeast mixture. Give everything a good whisk until it’s well combined and looks smooth and homogenous. This creates the rich, flavorful base for our dough.
Now, let’s start building our dough structure. Measure out 2 cups of the all-purpose flour and add it directly to the wet ingredients in the bowl. Use a sturdy wooden spoon or a dough whisk to start stirring everything together. At this stage, the mixture will look rough and uneven, coming together in clumps – what we call a ‘shaggy dough’. Don’t worry if it doesn’t look like smooth dough yet; this is exactly how it should appear before kneading.
Turn the shaggy dough out onto a clean, lightly floured surface. Begin adding the remaining 1/2 cup of flour gradually, about a quarter cup at a time. Start kneading the dough. Push it away from you with the heels of your hands, then fold it back over, turn slightly, and repeat. Continue this kneading process for about 5 to 7 minutes. As you knead, the dough will transform from a sticky mess into a smooth, elastic ball. It might still feel slightly sticky to the touch, but it should pull away cleanly from your hands and the work surface. Proper kneading develops the gluten, which is key to that fluffy texture. To check if it’s ready, stretch a small piece; if it can stretch thinly without tearing easily (the windowpane test), it’s likely done.
Place the beautifully kneaded dough into a clean bowl that you’ve lightly coated with oil. Turn the dough ball over in the bowl so it gets a thin layer of oil all around; this prevents it from sticking as it rises. Cover the bowl snugly with plastic wrap or a clean kitchen towel. Find a warm spot in your kitchen – near a sunny window, on top of the refrigerator, or in a slightly warm (but turned off!) oven are good options. Let the dough rise undisturbed until it has visibly doubled in size. This usually takes about 1 to 1.5 hours, but rising time can vary depending on the temperature of your room. Be patient! This first rise builds flavor and tenderness.
Once the dough has doubled, gently ‘punch’ it down with your fist in the center. This deflates the dough, redistributes the yeast, and makes it easier to handle. Turn the dough out onto a lightly floured surface again.
Use a rolling pin to roll the dough out to a uniform thickness of about 1/2 inch. This thickness is important for achieving classic donut shape and texture. Use a donut cutter (the kind with a hole in the center) to cut out your donuts. If you don’t have a donut cutter, you can use two different sized round cutters – a larger one for the donut and a smaller one for the hole in the center. Carefully collect the donut holes too – they’re just as delicious! Gather any dough scraps, gently knead them together, let them rest for 5-10 minutes to relax the gluten, and then reroll and cut more donuts until you’ve used up all the dough.
Arrange the cut donuts and holes on baking sheets lined with parchment paper. This prevents sticking and makes them easy to transfer later. Cover the trays lightly with plastic wrap or a towel. Now, let them rise for a second time. This ‘proofing’ stage is shorter, typically 30 to 45 minutes, but it’s crucial. The donuts should look visibly puffed up and airy. This second rise is vital for a light texture after frying.
Here is the absolute key to never greasy donuts: OIL TEMPERATURE. While your donuts are doing their second rise, heat several inches of vegetable oil in a large heavy pot or Dutch oven over medium heat. You need enough oil so the donuts can float without touching the bottom. Use a thermometer, like a deep-fry thermometer or an instant-read thermometer clipped to the side of the pot, to monitor the oil temperature carefully. You want the oil to reach and stay right around 350 degrees F (175 degrees C). Keep a close eye on it, adjusting the heat as needed to maintain a temperature between 340 and 360 degrees F (170-180 degrees C). If the oil is too cool, the donuts will absorb excess oil and become greasy. If it’s too hot, they’ll brown too quickly on the outside and be raw in the middle.
Now it’s time to fry! Carefully slide 2 to 3 puffed donuts into the hot oil using a slotted spoon or spider tool. DO NOT OVERCROWD THE POT. This is the second part of the non-greasy secret. Putting too many donuts in at once drops the oil temperature too much, leading back to our greasy donut problem. Fry for 1 to 2 minutes per side, or until they are beautifully golden brown all over. They will puff up even more in the hot oil.
Use a slotted spoon or spider to lift the fried donuts carefully out of the hot oil. Hold them over the pot for a second to let any excess oil drip off. Transfer the hot donuts to a wire rack that you’ve placed over a baking sheet lined with paper towels. The wire rack allows air circulation, and the paper towels catch any remaining drips, helping the donuts stay light and not oily.
While the donuts are still warm, but not so hot they’ll melt the sugar instantly and disappear, place the powdered sugar in a wide, shallow dish or pie plate. Working with one or two donuts at a time, gently toss them in the powdered sugar, turning to coat every surface thoroughly. The warmth helps the sugar adhere perfectly. This step gives them their classic, delightful finish.
Serve your Classic Powdered Sugar Donuts warm and immediately. The texture is at its absolute peak when they’re fresh out of the kitchen. Enjoy every light, fluffy, and perfectly coated bite!
Tips for Perfect Non-Greasy Donuts Every Time
Mastering homemade donuts is incredibly rewarding, and these tips will help you nail that fluffy, non-greasy texture:
- Invest in a Thermometer: This cannot be stressed enough! The oil temperature is the single most critical factor in preventing greasy donuts. An inexpensive candy or deep-fry thermometer is essential. Don’t guess!
- Use Fresh Oil: Old or reused oil can break down and lead to heavier, less pleasant-tasting donuts. Start with fresh vegetable oil for the best results.
- Don’t Rush the Rise: Allow the dough ample time for both rises. Properly risen dough is lighter and less dense, which helps it cook quickly without soaking up too much oil. The second rise (proofing) is particularly important for achieving that airy interior.
- Monitor Oil Temperature While Frying: The temperature will drop when you add donuts. Adjust your heat source (up or down) between batches to keep the oil in the target range (340-360°F). Be patient and work in small batches.
- Rest Rerolled Scraps: If you reroll the dough scraps, let them rest for 5-10 minutes before cutting. This allows the gluten to relax, making the dough easier to roll and preventing tough donuts.
- Have Your Coating Ready: Get your powdered sugar dish ready before you start frying so you can coat the donuts while they are still warm. This ensures the sugar sticks well.
Variations on a Classic
While powdered sugar is timeless, you can easily change things up! Instead of powdered sugar, try tossing warm donuts in cinnamon sugar for a cozy flavor. You could also make a simple glaze using powdered sugar and a little milk or water, maybe with a touch of vanilla or almond extract. For a chocolatey twist, a simple chocolate glaze is always a hit. Thinking about trying other breakfast treats? You might enjoy making a batch of easy homemade cinnamon rolls or perfecting classic fluffy waffles.
Your Homemade Donut Questions Answered (FAQ)
Got questions about making these fluffy delights? Here are some common queries and their answers:
My yeast didn’t get foamy. What went wrong?
Most likely, your milk wasn’t the correct temperature. If the milk is too cold, the yeast won’t activate. If it’s too hot (above 120°F), it can kill the yeast. Ensure your milk is between 105-115°F (40-46°C). Also, check the expiration date on your yeast; old yeast might not be active anymore. Starting this step over with fresh yeast and correctly warmed milk is your best bet.
Can I bake these donuts instead of frying?
This particular recipe is designed for frying to achieve that specific light, airy, non-greasy texture. Baking would result in a different texture, more cake-like or bread-like. If you’re looking for a baked donut, I’d recommend finding a recipe specifically formulated for baking.
How do I know when the oil is at the right temperature without a thermometer?
While a thermometer is strongly recommended for accuracy, you can test the oil using a small piece of dough or even the tip of a wooden spoon. Drop a tiny bit of dough into the hot oil; if it immediately sizzles and floats to the surface, the oil is likely ready. If it sinks or barely bubbles, the oil is too cool. If it sizzles aggressively and browns instantly, it’s too hot. However, this method is less precise and increases the risk of greasy or burnt donuts.
Can I make the dough ahead of time?
Yes! You can make the dough up to the end of the first rise. After the dough has doubled, punch it down gently, cover the bowl tightly with plastic wrap, and place it in the refrigerator overnight (up to 24 hours). The cold temperature slows down the yeast activity. The next day, take the dough out, let it sit at room temperature for about 30-60 minutes to warm up slightly, then proceed with rolling, cutting, and the second rise (proofing) as directed in the recipe.
How do I store leftover donuts?
Fresh is always best! Powdered sugar donuts are best enjoyed the day they are made. Leftovers can be stored in an airtight container at room temperature for a day or two, but the powdered sugar may absorb moisture and disappear slightly, and the texture won’t be quite as soft. A quick dusting of fresh powdered sugar before serving can help revitalize them.
Enjoy Your Homemade Donuts!
There you have it – the simple secret to making classic powdered sugar donuts that are delightfully fluffy and wonderfully non-greasy, every single time. It truly comes down to managing that oil temperature like a pro! The effort is minimal compared to the incredible payoff: warm, tender, sweet donuts created right in your own kitchen.
Gather your ingredients, follow these steps, pay close attention to the frying stage, and prepare to be amazed. These are perfect for a weekend breakfast treat, a special occasion, or just because you deserve a little sweet indulgence. Don’t be intimidated by frying; with the right technique, it’s completely achievable.
Give this recipe a try and let me know how your perfectly non-greasy donuts turn out! Share your success in the comments below!
Classic Powdered Sugar Donuts

Ingredients
- 2 and 1/4 teaspoons active dry yeast
- 1/2 cup warm milk (105-115 degrees F)
- 1/4 cup granulated sugar, plus more for yeast
- 1 large egg
- 2 tablespoons unsalted butter, melted
- 1 teaspoon vanilla extract
- 1/2 teaspoon salt
- 2 and 1/2 cups all purpose flour, plus more for dusting
- Vegetable oil, for frying
- 2 cups powdered sugar, for coating
Directions
- In a large bowl, combine warm milk and a pinch of sugar. Sprinkle yeast over the top. Let stand 5-10 minutes until foamy.
- Whisk in the remaining granulated sugar, egg, melted butter, vanilla, and salt into the yeast mixture.
- Add 2 cups of the flour and stir with a wooden spoon until a shaggy dough forms.
- Turn the dough out onto a lightly floured surface. Add the remaining flour 1/4 cup at a time, kneading until the dough is smooth and elastic, about 5-7 minutes. It should be slightly sticky but pull away from your hands.
- Place the dough in a lightly oiled bowl, turning to coat. Cover and let rise in a warm place until doubled in size, about 1-1.5 hours.
- Gently punch down the dough. Turn out onto a lightly floured surface. Roll the dough to about 1/2 inch thickness.
- Use a donut cutter or two different sized round cutters to cut out donuts and holes. Reroll scraps as needed.
- Place the cut donuts and holes on parchment-lined baking sheets. Cover lightly and let rise again until puffed, about 30-45 minutes.
- This step is key to avoiding greasy donuts: Heat several inches of vegetable oil in a large heavy pot or Dutch oven over medium heat to 350 degrees F. Use a thermometer to monitor the temperature carefully, keeping it between 340 and 360 degrees F.
- To ensure even cooking without excessive oil absorption: Carefully slide 2-3 donuts into the hot oil at a time. Do not overcrowd the pot, as this lowers the oil temperature and leads to greasy donuts. Fry for 1-2 minutes per side, or until golden brown.
- Use a slotted spoon to remove donuts from the oil, letting excess oil drain off. Place on a wire rack set over paper towels to cool slightly.
- Place powdered sugar in a shallow dish. While still warm (but not hot), toss donuts gently in the powdered sugar to coat thoroughly.
- Serve warm and enjoy their non-greasy, fluffy texture!