Oh, rice pudding. Just saying the words conjures up feelings of cozy evenings, comforting spoonfuls, and simple, old-fashioned goodness. It’s a dessert that feels like a warm hug in a bowl, a timeless classic enjoyed by generations.
But let’s be honest, haven’t we all had a less-than-perfect encounter with rice pudding? The kind that turns into a thick, gluey, starchy mess? Or maybe it sticks stubbornly to the bottom of the pan, requiring Herculean scraping efforts? For years, achieving that elusive, perfectly creamy texture without standing over the stove, stirring endlessly to prevent disaster, felt like a culinary Mount Everest.
I tried all the tricks – rinsing the rice (sometimes), different ratios of milk to rice, various cooking times. Yet, that gummy texture or scorched bottom would still appear more often than I cared to admit. It was frustrating! Rice pudding is supposed to be easy comfort food, not a high-stress kitchen project.
Then, I stumbled upon a simple, game-changing method that transformed my rice pudding journey forever: baking it low and slow in the oven. This revelation unlocked the secret to consistently creamy, dreamy, perfectly cooked grains swimming in a luscious dairy base, all with minimal effort and absolutely no gummy texture in sight. This Creamy Baked Rice Pudding is now my go-to for instant comfort.
If you’ve been hesitant to make homemade rice pudding because of past failures, or if you’re simply looking for the easiest, most foolproof way to achieve dessert perfection, this recipe is for you. Prepare to fall in love with a rice pudding that’s smooth, rich, and utterly delightful every single time.
Why You’ll Adore This Baked Rice Pudding
This isn’t just another rice pudding recipe; it’s the rice pudding recipe you’ve been searching for. Here are just a few reasons why this method will become your new favorite:

- Effortlessly Creamy: The gentle, consistent heat of the oven prevents the rapid boiling that often breaks down starch too quickly, resulting in that undesirable gummy texture. Instead, the rice absorbs the milk slowly and evenly, leading to a supremely creamy pudding.
- No More Constant Stirring: Forget being tethered to the stovetop! While you do give it a gentle stir every half hour, it’s worlds away from the non-stop stirring required for stovetop versions. This frees you up to do other things (like prep your toppings!).
- Say Goodbye to Sticking: Baking significantly reduces the risk of the rice sticking and burning to the bottom of the pan, a common pitfall of direct-heat cooking.
- Hands-Off Convenience: Once it’s in the oven, the magic largely happens on its own. It’s the perfect recipe for a relaxed weekend afternoon or even a weeknight treat if you’re doing other things around the house.
- Pure Comfort Food: Warm or cold, this baked rice pudding hits all the right notes. It’s sweet, milky, and deeply satisfying.
- Versatile Canvas: While delicious on its own, this basic recipe is a fantastic base for all sorts of flavor additions and toppings, making it endlessly adaptable.
Gathering Your Ingredients for Creamy Baked Rice Pudding
One of the beauties of rice pudding is its simplicity. You need just a handful of pantry staples to create something truly special. The magic happens when these humble ingredients come together with the right technique. Let’s walk through what you’ll need and why each component is important.
Think of these ingredients as building blocks. The milk provides the luxurious, creamy base. The rice is the star, providing structure and absorbing all that lovely liquid. Sugar adds sweetness, salt balances it, and vanilla injects that classic comforting aroma and flavor. The toppings? They’re the vibrant flourish that adds texture and pops of fresh taste.
- 4 cups Whole Milk: This is non-negotiable for truly creamy results. The fat content in whole milk is crucial for achieving that rich, velvety texture we’re after. Skimping on the fat here will give you a thinner, less satisfying pudding. Trust me, go for the good stuff!
- 1/2 cup Short-Grain Rice: The type of rice matters! Short-grain rice varieties (like Arborio, sushi rice, or even standard short-grain white rice) work best for rice pudding. They have a higher starch content compared to long-grain rice, and when cooked gently, this starch releases slowly, creating a wonderfully thick and creamy consistency without becoming gluey. Avoid parboiled or converted rice, as they won’t release enough starch.
- 1/3 cup Granulated Sugar: This provides the essential sweetness. The amount here yields a pudding that is sweet but not overly so, allowing the other flavors to shine. You can adjust this slightly to your personal preference.
- 1/4 teaspoon Salt: A little bit of salt might seem surprising in a dessert, but it’s absolutely key! It doesn’t make the pudding salty; instead, it enhances and balances the sweetness, bringing out the full flavor of the milk and vanilla. Don’t skip it!
- 1 teaspoon Vanilla Extract: Add this fragrant extract towards the end of cooking. Vanilla is the classic rice pudding flavor for a reason – it adds warmth and depth. Using pure vanilla extract will give you the best flavor.
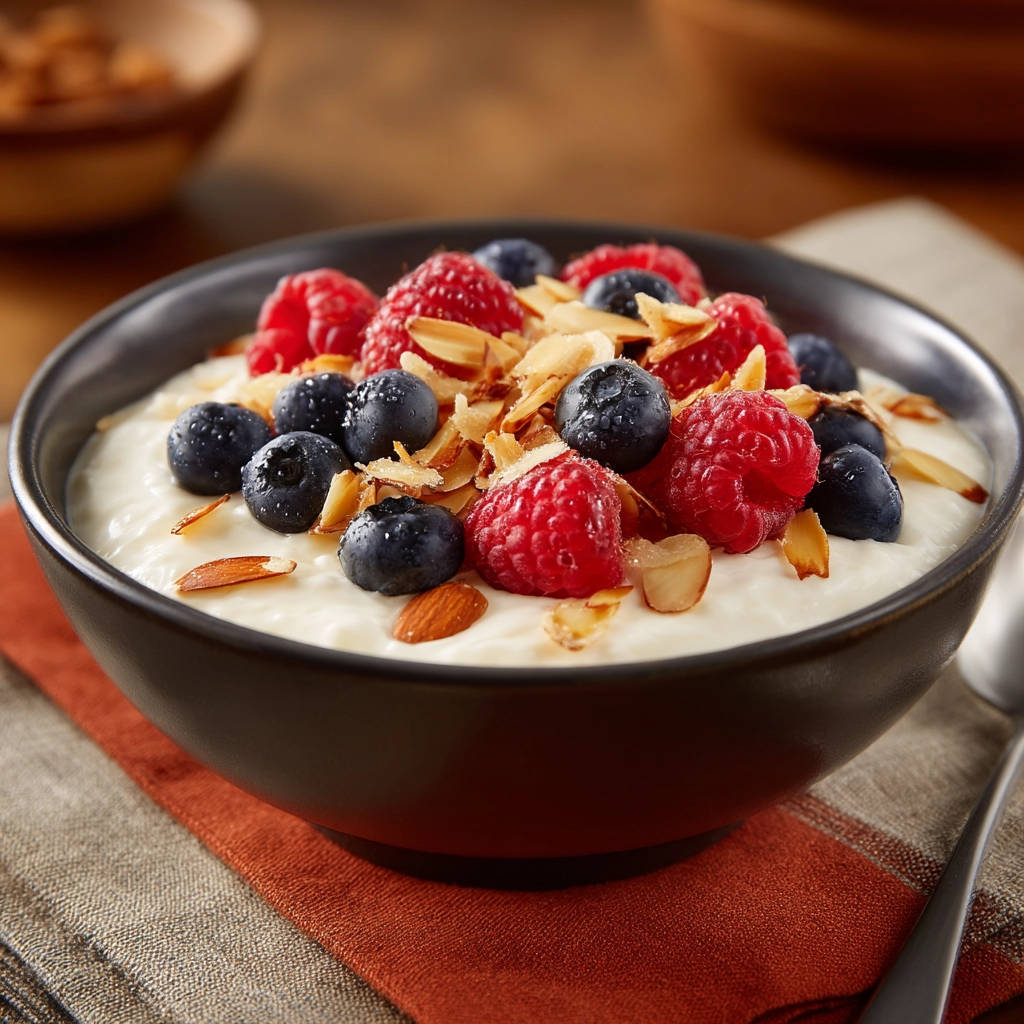
- 1 cup Fresh Raspberries: Bright, slightly tart, and bursting with juice, raspberries offer a beautiful contrast to the rich, sweet pudding. Their vibrant color is a bonus!
- 1 cup Fresh Blueberries: Sweet, earthy blueberries add another layer of fresh fruit goodness. Together, the berries provide a lovely counterpoint to the creamy base.
- 1/4 cup Slivered Almonds, toasted: Toasting nuts is a simple step that adds incredible flavor and crunch. The toasted slivered almonds provide a necessary textural contrast to the soft pudding and berries, along with a warm, nutty aroma.
Having these simple ingredients ready is the first step towards baked rice pudding bliss. The quality of your milk and the type of rice you choose will make the biggest difference in the final texture.
Crafting Your Creamy Baked Rice Pudding: Step-by-Step
Now for the fun part – bringing these ingredients together and letting the oven do most of the work! This method is incredibly forgiving and truly takes the stress out of making rice pudding. Just follow these steps, and you’ll be rewarded with a perfect bowl of comfort.
The key here is patience and understanding the ‘low and slow’ approach. Unlike stovetop methods that rely on constant agitation, baking allows the ingredients to meld gently, encouraging the rice to swell and the milk to thicken gradually without scorching.
-
Get Your Oven Ready: Preheat your oven to a gentle 300°F (150°C). This low temperature is critical to the baked method’s success. It ensures the milk doesn’t boil too vigorously, which would break down the rice starch too quickly and lead to gumminess or overflow. Give your oven plenty of time to come up to temperature before placing the dish inside for even cooking.
-
Combine the Base Ingredients: Choose a medium oven-safe baking dish. A 2-quart size is ideal, providing enough surface area for the pudding to cook evenly without being too shallow. Pour in the 4 cups of whole milk. Add the 1/2 cup of short-grain rice, 1/3 cup of granulated sugar, and 1/4 teaspoon of salt. Grab a spoon or whisk and stir everything together thoroughly. You want to make sure the rice is evenly distributed and the sugar and salt are dissolved into the milk. This initial stir ensures everything starts cooking together harmoniously.
-
The Gentle Bake Begins: This is where the magic happens and the “no gummy” trick comes to life! Carefully place your baking dish into the preheated 300°F (150°C) oven. Leave the dish uncovered. The gentle, dry heat circulating in the oven facilitates slow, even cooking. Unlike boiling on the stovetop, this controlled environment prevents excessive starch release from the rice, which is the primary culprit behind gummy rice pudding. Bake the pudding for approximately 2 hours. Now, while it’s mostly hands-off, you will need to give it a gentle stir about every 30 minutes. Why stir? This helps redistribute the rice grains that may settle at the bottom and ensures consistent thickening and cooking throughout the dish. A gentle stir is all that’s needed – no vigorous whisking! As it bakes, you’ll notice a skin may form on top; this is normal and part of the baked pudding’s charm. Stir it back in or remove it if you prefer before stirring the pudding itself.
-
Adding the Final Touch: After the 2 hours of baking, the pudding should have thickened considerably, and the rice grains should be wonderfully tender when you test them. Carefully remove the hot dish from the oven. Now it’s time to add that essential teaspoon of vanilla extract. Stir it in gently but thoroughly. Adding the vanilla after baking helps preserve its delicate aroma and flavor, which can dissipate under prolonged high heat. The pudding might still look a bit looser than you expect right out of the oven, but don’t worry – it will continue to thicken significantly as it cools.
-
Cooling to Perfection: Patience is a virtue, especially with baked rice pudding. While tempting, diving in immediately means you might miss out on the ultimate creamy texture. Let the pudding cool slightly in the baking dish before serving warm. For a thicker, more set consistency, similar to what you might remember from school lunches or classic diner desserts, chill it completely in the refrigerator. As it cools, the starches continue to gel and the pudding firms up beautifully. If chilling, cover the surface directly with plastic wrap to prevent a skin from forming.
-
Serve and Enjoy: Once cooled to your desired temperature, portion the glorious rice pudding into bowls. This baked version is absolutely divine on its own, but the toppings really elevate it. Top generously with fresh raspberries, blueberries, and that lovely crunch from the toasted slivered almonds. The combination of creamy pudding, juicy berries, and nutty almonds is simply perfection. Get ready for contented sighs from everyone lucky enough to get a bowl!
Tips for Perfectly Creamy Baked Rice Pudding Every Time
While this baked method is incredibly forgiving, a few extra tips can help ensure your rice pudding turns out absolutely perfect, smooth, and creamy every single time:
- Choose Your Dish Wisely: A ceramic or glass baking dish works wonderfully for this recipe, as they distribute heat evenly. Ensure it’s deep enough (around 2-quarts) to prevent overflow as the milk heats and the rice expands.
- Don’t Rush the Bake: That low temperature (300°F/150°C) for the full 2 hours is key. Resisting the urge to crank up the heat to speed things along is crucial for preventing gumminess. Patience pays off!
- Gentle Stirring is Key: When you stir every 30 minutes, be gentle. You’re just helping the rice circulate and prevent settling, not agitating it vigorously, which could release too much starch too quickly.
- Rice Type Matters: Stick to short-grain rice. Long-grain rice won’t give you the same creamy, slightly chewy texture that defines classic rice pudding. The starch composition is different.
- Adjust Sweetness: 1/3 cup sugar is a starting point. Taste a tiny bit of the milk mixture before baking and adjust if you prefer it sweeter or less sweet. Remember the vanilla and toppings will also add sweetness and flavor.
- Consider Variations: Want to change things up? Add a pinch of ground cinnamon or nutmeg along with the sugar and salt for warm spice. For a different twist, try adding some orange zest to the milk, similar to how you might infuse flavors in a creamy baked cheesecake. You could even swirl in some caramel after baking! Speaking of caramel, if you love that flavor combo, you might also enjoy our Caramel Banana Bread Pudding!
- Storage: Store any leftover rice pudding in an airtight container in the refrigerator for 3-4 days. It will thicken considerably when chilled.
- Reheating: If you want to enjoy chilled leftovers warm, reheat gently on the stovetop or in the microwave, adding a splash more milk if needed to loosen it back up to your desired consistency.
Serving Suggestions for Your Delicious Pudding
This Creamy Baked Rice Pudding is truly a standalone dessert, perfect after any meal or even as a comforting breakfast. However, these fresh and vibrant toppings are highly recommended and really make the dish sing:
- Fresh Raspberries and Blueberries (as called for in the recipe!)
- Toasted Slivered Almonds (for crunch!)
- A dollop of whipped cream or a drizzle of heavy cream
- A sprinkle of cinnamon or nutmeg
- Other fresh fruits like sliced strawberries, peaches, or a compote
- A drizzle of honey or maple syrup
- Chopped toasted pecans or walnuts instead of almonds
It’s also a fantastic dessert to serve alongside other comforting bakes, like a warm slice of Classic Peach Crumble or a batch of Easy Homemade Cinnamon Rolls for a truly decadent spread.
Your Creamy Baked Rice Pudding Questions Answered (FAQ)
Let’s tackle some common questions you might have about making perfect baked rice pudding:
What type of rice is best for rice pudding?
Short-grain white rice is generally considered the best for rice pudding. Varieties like Arborio (commonly used for risotto), sushi rice, or Spanish short-grain rice work wonderfully. Their high starch content, specifically amylopectin, is released during the slow cooking process, creating that desirable creamy, thick texture. Long-grain rice has less of this type of starch and won’t result in as creamy a pudding.
Can I use non-dairy milk?
While whole dairy milk provides the richest and creamiest result due to its fat content, you can experiment with non-dairy alternatives. Full-fat canned coconut milk or cashew milk tend to yield creamier results than almond or oat milk. Be aware that the texture might be slightly different, and the flavor profile will change depending on the milk used. You may also need to adjust baking time slightly as some non-dairy milks evaporate differently.
Why is my baked rice pudding still thin?
A few factors could cause this. Ensure you used the correct ratio of rice to milk. Using a dish that is too wide or shallow can cause the liquid to evaporate too quickly, leaving the rice less cooked and the pudding less thick. Also, confirm your oven temperature is accurate – if it’s running cooler than 300°F, the pudding may not thicken properly. The pudding also thickens considerably as it cools; if you’re evaluating it hot out of the oven, give it time to set up.
Why did my rice pudding turn out gummy?
The baked method is specifically designed to prevent gumminess! If yours turned out gummy using this method, it might be due to using long-grain rice instead of short-grain, or perhaps stirring too vigorously during the baking process, which can break down the rice grains and release starch too quickly. Also, ensuring the oven temperature isn’t too high is crucial – high heat can cause the milk to boil rapidly, again leading to excess starch release.
How long does baked rice pudding last?
Properly stored in an airtight container in the refrigerator, homemade baked rice pudding is typically good for 3 to 4 days. The texture will become thicker and more set upon chilling.
Can I add dried fruit instead of fresh?
Yes, you can! If using dried fruit like raisins, currants, or dried cranberries, I recommend soaking them in hot water for about 10-15 minutes before adding them to the pudding during the last 30 minutes of baking. This helps plump them up so they don’t dry out the pudding. You could also stir them in after baking, allowing the heat of the pudding to soften them.
Enjoy Your Homemade Creamy Baked Rice Pudding!
There you have it! The secret to the creamiest, most comforting rice pudding that never suffers from that dreaded gummy fate or sticky bottom. This baked method is a true game-changer, offering a nearly hands-off approach to a beloved dessert.
Whether you enjoy it warm from the oven, perhaps with a scoop of vanilla ice cream melting into it, or chilled and firm from the fridge with a generous topping of fresh berries and crunchy almonds, this Creamy Baked Rice Pudding is guaranteed to bring a smile to your face. It’s simple, it’s satisfying, and it’s utterly delicious.
Give this recipe a try this week! I promise it will become a favorite in your home. What are your favorite rice pudding toppings? Let me know in the comments below!
Creamy Baked Rice Pudding

Ingredients
- 4 cups whole milk
- 1/2 cup short-grain rice
- 1/3 cup granulated sugar
- 1/4 teaspoon salt
- 1 teaspoon vanilla extract
- 1 cup fresh raspberries
- 1 cup fresh blueberries
- 1/4 cup slivered almonds, toasted
Directions
- Preheat your oven to 300°F (150°C).
- In a medium oven-safe baking dish (around 2-quart size), combine the milk, short-grain rice, sugar, and salt. Stir well to combine.
- This is the key step for preventing gumminess and sticking: Place the baking dish in the preheated oven. Bake uncovered for about 2 hours, stirring gently every 30 minutes. Baking it low and slow in the oven allows the rice to cook evenly without rapid boiling, preventing excessive starch release that causes gumminess and virtually eliminates the risk of burning on the bottom.
- After 2 hours, the rice should be tender and the pudding thickened. Stir in the vanilla extract. The pudding will continue to thicken as it cools.
- Let the pudding cool slightly before serving, or chill it completely if you prefer cold rice pudding.
- Serve in bowls, topped generously with fresh raspberries, blueberries, and toasted slivered almonds.