
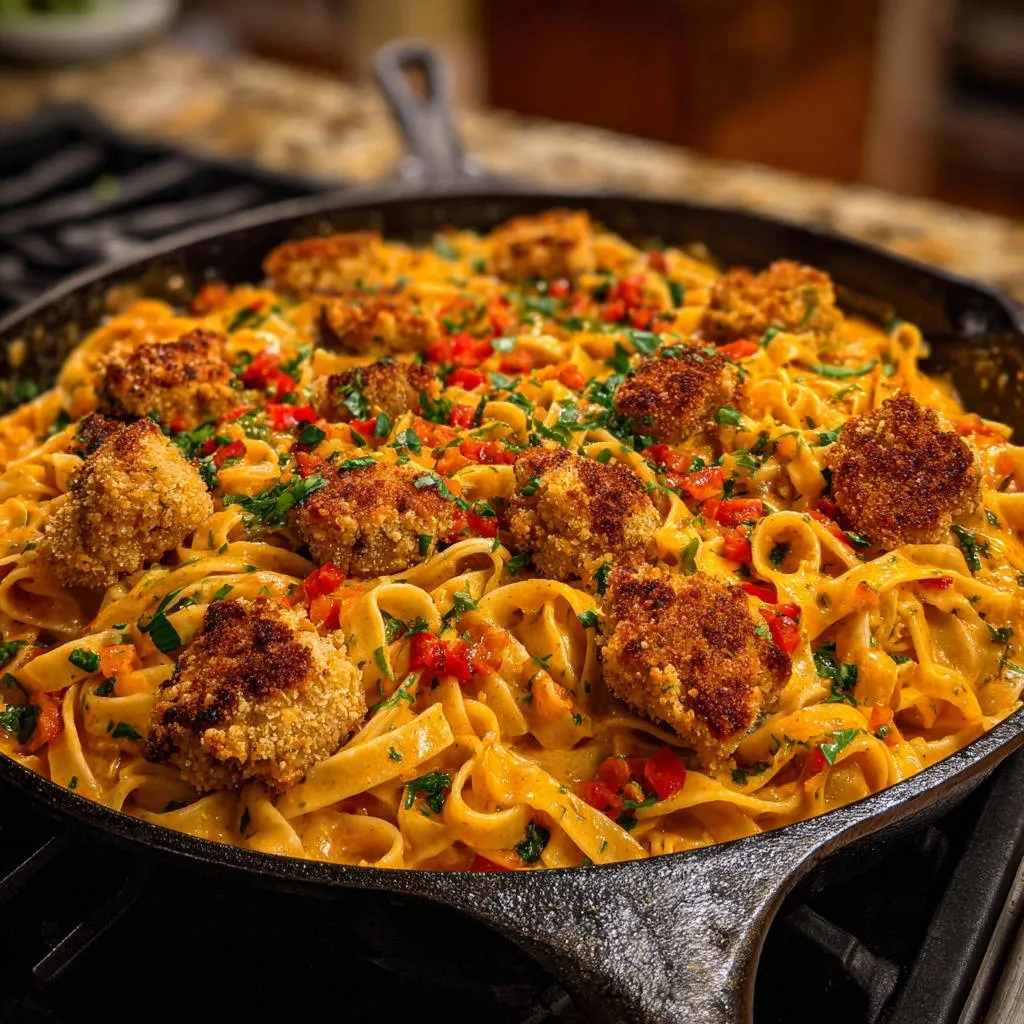
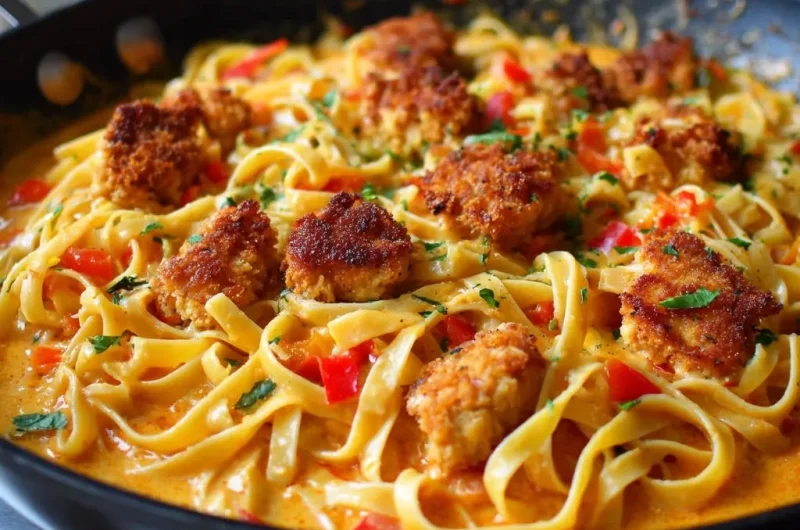
There’s nothing more frustrating than envisioning a perfectly crispy breaded chicken nestled in a creamy pasta, only for it to turn soggy the moment it hits the sauce. I’ve faced that exact dilemma countless times, but after much experimentation, I finally cracked the code to creating the ultimate creamy skillet pasta where every bite of chicken maintains its glorious crunch. This recipe for Creamy Skillet Pasta with Crispy Chicken Bites delivers that satisfying texture contrast alongside a rich, flavorful sauce, making it an absolute weeknight winner that truly impresses.
Beyond Soggy: Why This Creamy Skillet Pasta with Crispy Chicken Bites Belongs in Your Recipe Box
This isn’t just another pasta dish; it’s a game-changer designed to solve a common culinary frustration. It’s perfect for those evenings when you crave comfort food but refuse to compromise on texture or flavor.
No More Soggy Chicken: The Crispy Solution You’ve Been Waiting For
The core genius of this recipe lies in its method for keeping the chicken incredibly crispy. Through careful preparation like patting dry, strategic shallow frying, and a smart serving technique, we ensure each golden-brown bite stays delightfully crunchy, even amidst a luscious sauce.
A Weeknight Winner: Quick, Satisfying, and Stress-Free
This dish comes together remarkably fast, making it ideal for busy weeknights. Most of the cooking happens in one skillet, simplifying cleanup and minimizing fuss without sacrificing an ounce of flavor or satisfaction.
Flavorful & Family-Friendly: A Dish Everyone Will Love
The rich, savory sauce, tender pasta, and perfectly seasoned crispy chicken create a harmonious flavor profile. It’s a hearty, comforting meal that appeals to all ages, guaranteed to become a family favorite.
Gather Your Culinary Crew: Essential Ingredients for Flavorful Pasta Perfection
Starting with quality ingredients is the first step toward a truly exceptional dish. Each component plays a vital role in building flavor and ensuring that coveted crispy texture.
The Crispy Chicken Foundation: Key Components for Crunch
For truly exceptional crispness, focus on these:
Boneless, Skinless Chicken Breast: Cut into uniform 1-inch pieces, this ensures even cooking and quick crisping.
All-Purpose Flour: Provides the initial dredge, giving the egg something to cling to and helping create a solid base for the breadcrumbs.
Large Eggs: Act as the binder, essential for adhering the panko to the chicken.
Panko Breadcrumbs: The star of the show for crispness! Panko’s larger, flakier texture absorbs less oil and delivers a superior crunch compared to traditional breadcrumbs.
Building the Creamy Dream: Sauce Essentials
The sauce is where the magic happens, transforming simple ingredients into a luxurious coating for the pasta.
Heavy Cream: Provides the undeniable richness and velvety texture that defines a creamy pasta sauce. Don’t substitute with lighter creams if you want that decadent mouthfeel.
Chicken Broth: Adds depth of flavor and helps achieve the right sauce consistency without making it too heavy. A low-sodium option allows for better control of seasoning.
Red Bell Pepper: Contributes a subtle sweetness, vibrant color, and slight texture, balancing the richness of the cream.
Garlic & Paprika: Minced garlic provides aromatic warmth, while paprika adds a beautiful golden hue and a touch of smoky-sweet flavor that complements the chicken and cream.
Pasta & Seasoning Staples: Completing the Dish
These foundational ingredients tie everything together.
Fettuccine Pasta: Its wide, flat shape is perfect for holding onto rich, creamy sauces. Other robust pasta shapes like linguine or even penne work well too.
Olive Oil: Used for both frying the chicken and sautéing the vegetables, adding a subtle fruity note.
Salt & Black Pepper: Essential for seasoning every component, from the chicken breading to the pasta water and the finished sauce. Adjust to your preference.
Fresh Parsley: A final flourish that adds bright, herbaceous freshness and a pop of color, cutting through the richness of the dish.
Equip Your Kitchen: Tools for Skillet Pasta Success
Having the right tools at hand ensures a smooth and enjoyable cooking process, leading to the best possible results.
Must-Have Utensils for Seamless Cooking
Large Skillet: A cast iron or heavy-bottomed skillet is indispensable. It’s used for frying the chicken to perfect crispness and then building the rich, creamy sauce, making it a true workhorse for this recipe.
Wire Rack: Crucial for draining excess oil from the fried chicken and preventing it from steaming on the bottom, thus preserving its crispiness.
Shallow Dishes: Three wide, shallow dishes are needed for an organized and efficient breading station.
Large Pot: Necessary for boiling the pasta, ensuring it has enough space to cook evenly to al dente perfection.
Tongs: Essential for handling the chicken safely in hot oil and for tossing the pasta in the sauce.
Crafting Your Masterpiece: Step-by-Step Guide to Irresistible Skillet Pasta
-
Mastering Crispy Chicken Prep:
Pat the chicken pieces thoroughly dry with paper towels. This crucial step removes surface moisture, which is the enemy of crispiness, allowing the breading to adhere and crisp up beautifully.
Set up your breading station with three separate shallow dishes: one for flour, one for lightly beaten eggs, and one for panko breadcrumbs seasoned with a pinch of salt and pepper. This organized approach ensures efficiency and cleanliness during the breading process.
-
Perfect Breading Technique:
Dredge each chicken piece first in flour, shaking off any excess to ensure a thin, even coating. This provides a dry surface for the egg to cling to.
Next, dip the floured chicken into the beaten egg, allowing any excess to drip back into the dish. The egg acts as a vital binder for the panko.
Finally, coat thoroughly in the seasoned panko breadcrumbs, gently pressing to ensure they adhere well and create a substantial, crunchy crust. Panko provides superior crunch compared to regular breadcrumbs.
Place the breaded chicken pieces on a clean plate, ready for frying. Avoid stacking them, which can make them stick together.
-
Achieving Golden Crispy Chicken:
Heat about 1/4 inch of olive oil in a large skillet over medium-high heat. The oil is hot enough when a small piece of breading sizzles immediately upon contact, indicating the right temperature for crisping.
Carefully add the breaded chicken pieces to the hot oil in a single layer, making sure not to overcrowd the skillet. Overcrowding significantly lowers the oil temperature, leading to steaming instead of proper frying and a less crispy result.
Fry for 3 to 4 minutes per side, or until deeply golden brown and thoroughly cooked through. The combination of high heat and shallow oil is vital for maximum crispness, creating that irresistible outer crunch.
Once cooked, transfer the crispy chicken to a wire rack set over a plate to drain any excess oil. This prevents the bottom from getting soggy and maintains overall crispness.
-
Cooking Pasta to Al Dente:
While the chicken is cooking, bring a large pot of generously salted water to a rolling boil. Salting the water seasons the pasta from within, enhancing its flavor.
Add the fettuccine and cook according to the package directions until it is al dente, meaning firm to the bite. Avoid overcooking, as it will continue to cook slightly when combined with the hot sauce.
Before draining, reserve about 1/2 cup of the starchy pasta cooking water. This liquid is a secret weapon for adjusting sauce consistency later, helping it emulsify and cling beautifully to the pasta.
-
Building the Velvety Skillet Sauce:
In the same skillet used for the chicken (or a clean one if preferred for aesthetic reasons), add 1 tablespoon of fresh olive oil over medium heat. This builds a flavor base for the sauce.
Add the diced red bell pepper and cook for 3-5 minutes until it begins to soften. This adds a subtle sweetness and vibrant color to the dish.
Stir in the minced garlic and paprika, cooking for just another minute until fragrant. Be careful not to burn the garlic, as burnt garlic can taste bitter.
-
Simmering to Perfection:
Pour in the chicken broth and heavy cream. Bring the mixture to a gentle simmer, stirring occasionally, and allow the sauce to reduce and thicken slightly for 5-7 minutes. This process concentrates the flavors and achieves a luscious texture.
If the sauce becomes too thick, gradually add a splash of the reserved pasta water until your desired consistency is reached. The starch in the pasta water helps emulsify the sauce and makes it cling beautifully to the noodles.
Season the sauce generously with salt and black pepper to taste. Always taste and adjust seasoning as needed before combining with the pasta.
-
Combining for Creamy Bliss:
Add the cooked and well-drained pasta directly to the skillet with the sauce. Toss everything well to ensure the pasta is evenly coated with the rich sauce, infusing every strand with creamy flavor.
-
The Crispy Serving Secret:
To preserve the chicken’s crispness, gently add the crispy chicken bites to the pasta right before serving. Toss lightly just to combine, or for maximum crunch, spoon the pasta onto individual plates and then arrange the crispy chicken on top.
Garnish generously with fresh chopped parsley for a pop of color and herbaceous freshness. Serve immediately to enjoy the chicken at its absolute crispiest!
Chef’s Secrets: Elevate Your Creamy Skillet Pasta Game (and Keep That Crunch!)
Achieving restaurant-quality results at home is all about understanding a few key techniques. These tips will ensure your Creamy Skillet Pasta with Crispy Chicken Bites is always a triumph.
Unlocking Unbeatable Chicken Crispness
The Power of the Pat: Never skip patting the chicken dry with paper towels. Any residual moisture will create steam, preventing a truly crisp crust.
Hot Oil, Not Too Much: Ensure your oil is hot enough before adding chicken (around 350-375°F or when a pinch of panko sizzles). Shallow frying, not deep frying, is key for a golden, crispy exterior without greasiness. Too much oil can lead to a less crisp coating.
Give Them Space: Fry chicken in batches to avoid overcrowding the pan. This prevents the oil temperature from dropping too much, which leads to steaming instead of frying, resulting in a soggy coating.
The Wire Rack Advantage: Always transfer fried chicken to a wire rack set over a plate. This allows air to circulate around the chicken, preventing steam from making the bottom soggy as it cools.
Sauce Savvy: Tips for Perfect Consistency and Flavor
Reserved Pasta Water is Gold: Don’t toss it! That starchy water is perfect for adjusting sauce consistency if it gets too thick, and it helps the sauce emulsify and cling beautifully to the pasta.
Taste as You Go: Seasoning the sauce incrementally ensures a perfectly balanced flavor profile. Start with less and add more as needed, tasting after each addition.
A Touch of Spice: For those who appreciate a hint of heat, a tiny pinch of red pepper flakes added with the garlic can introduce a subtle, pleasing kick without overpowering the dish.
Flavor Boosters & Presentation Pointers
Cheese Please: A sprinkle of freshly grated Parmesan or Pecorino Romano cheese adds an extra layer of salty, savory depth to the finished dish, making it even more indulgent.
Vary Your Veggies: Feel free to add complementary vegetables like sautéed mushrooms, fresh spinach (stir in at the very end until just wilted), or even frozen peas (added with the pasta) for extra nutrients and color.
Fresh Herbs Finish: Don’t underestimate the power of fresh parsley or a few fresh basil leaves. They add bright, fresh flavor and visual appeal, making the dish look as good as it tastes.
Problem Solved: Common Issues & Quick Fixes for Your Pasta Dish
Even seasoned home cooks encounter hiccups. Here are solutions to common challenges you might face with this creamy skillet pasta recipe.
“Why Did My Crispy Chicken Turn Soggy?”
This is usually due to residual moisture on the chicken before breading, overcrowding the pan during frying, which lowers oil temperature, or letting the chicken sit in the sauce for too long before serving. Ensure chicken is very dry before dredging, fry in small batches, and combine the chicken with the pasta sauce only right before eating.
“My Sauce is Too Thin/Thick!”
If your sauce is too thin, let it simmer gently for a few more minutes to reduce and thicken naturally. Adding a tablespoon of grated Parmesan cheese can also help. If it’s too thick, slowly stir in some of the reserved starchy pasta cooking water, a tablespoon at a time, until the desired creamy consistency is reached.
“The Pasta is Sticky or Clumped”
This often happens if there wasn’t enough water in the pot, or if the water wasn’t sufficiently salted, leading to starch buildup. Ensure you use a large pot with plenty of water for the pasta and salt it generously. Tossing the pasta immediately with the sauce after draining also helps prevent clumping.
Serving Suggestions & Maximizing Freshness
This Creamy Skillet Pasta with Crispy Chicken Bites is a hearty meal on its own, but thoughtful pairings and proper storage can enhance the experience.
Perfect Pairings: What to Serve Alongside
While substantial, this rich Creamy Skillet Pasta with Crispy Chicken Bites pairs wonderfully with a simple green salad. A light vinaigrette dressing helps to cut through the richness. Crusty garlic bread or cheesy garlic bombs are also excellent accompaniments, perfect for soaking up every last drop of the delicious sauce.
Storage Solutions: Enjoying Leftovers
To best preserve the chicken’s crispness, store any leftover pasta and chicken separately in airtight containers in the refrigerator. The pasta will keep for up to 3 days, while the chicken is best enjoyed within 1-2 days.
Reheating Tips for Best Results
For reheating the pasta, gently warm it in a skillet over low heat, adding a splash of chicken broth or milk to loosen the sauce as it heats. Reheat the chicken separately in a dry skillet or an air fryer to help regain some of its crispness before combining with the warmed pasta.
Can I Make This Ahead? (And Keep the Crunch!)
While the creamy pasta sauce can be made a day in advance and stored in the fridge, the chicken should ideally be fried just before serving for maximum crispness. You can bread the chicken ahead of time and store it raw on a plate covered with plastic wrap in the fridge for up to a day, ready to fry when you are.
Your Top Questions Answered: Creamy Skillet Pasta FAQs
Can I Use Different Pasta Shapes?
Absolutely! While fettuccine is classic for creamy sauces, you can easily use other long pastas like linguine or spaghetti. Shorter pasta shapes such as penne, rigatoni, or farfalle would also work beautifully, as long as they have nooks and crannies to hold the creamy sauce well.
What About Gluten-Free Options?
Yes, this recipe can be adapted for gluten-free diets. Use your favorite high-quality gluten-free pasta, and substitute the all-purpose flour with a gluten-free all-purpose flour blend (ensure it’s suitable for dredging). Always check panko breadcrumb labels for gluten-free versions, or make your own from gluten-free bread.
Can I Add More Vegetables?
Definitely! This recipe is incredibly versatile for adding more vegetables. Consider adding sautéed mushrooms, fresh spinach (stir in at the very end until wilted), frozen peas (add with the pasta during the last minute of cooking), or even finely chopped carrots or zucchini with the bell pepper for extra nutrients and flavor.
Is There a Dairy-Free Alternative for the Sauce?
While heavy cream provides a unique richness, you could experiment with full-fat coconut milk (it will impart a slight coconut flavor) or a good quality dairy-free cream substitute. You might also need to adjust thickening with a cornstarch slurry if the consistency is too thin. For more ideas on dietary adjustments and ingredient swaps, see our Healthy Substitutions Guide.
Time to Savor: Your Culinary Journey Culminates Here!
You’ve successfully created a truly satisfying and impressive meal that solves the age-old problem of soggy chicken in pasta. This Creamy Skillet Pasta with Crispy Chicken Bites is more than just a dinner; it’s a testament to simple techniques elevating everyday ingredients into something extraordinary. We hope this dish becomes a cherished staple in your home, bringing joy to your table with every perfectly crunchy, creamy bite.
Don’t forget to share your culinary triumphs with us! Snap a photo and tag us on social media, or leave a comment below with your experience. We love seeing your delicious creations!
Looking for more easy, family-friendly dinner ideas that deliver on flavor and fun? Explore our collection of Quick & Delicious Weeknight Meals!
Creamy Skillet Pasta with Crispy Chicken Bites
Course: Main CourseCuisine: Italian-American cuisineDifficulty: easy4
servings20
minutes40
minutes60
minutesItalian-American cuisine
Ingredients
12 ounces fettuccine pasta
1 pound boneless, skinless chicken breast, cut into 1-inch bite-sized pieces
1/2 cup all-purpose flour
2 large eggs, lightly beaten
1 cup panko breadcrumbs
1/4 cup olive oil, plus more for frying
1 red bell pepper, diced
3 cloves garlic, minced
1/2 teaspoon paprika (for color and subtle flavor)
1/2 cup chicken broth
1 1/2 cups heavy cream
Salt to taste
Black pepper to taste
Fresh parsley, chopped, for garnish
Directions
- Prepare the crispy chicken: Pat the chicken pieces very dry with paper towels. This is key for a crisp coating. Set up a breading station with three shallow dishes: one with flour, one with beaten eggs, and one with panko breadcrumbs seasoned with a pinch of salt and pepper.
- Dredge each chicken piece first in flour, shaking off excess. Then dip in egg, letting excess drip off. Finally, coat thoroughly in panko breadcrumbs, pressing gently to adhere. Place breaded chicken on a clean plate.
- Heat 1/4 inch of olive oil in a large skillet over medium-high heat. Once hot (a small piece of breading sizzles immediately), carefully add chicken pieces in a single layer, without overcrowding. Fry for 3 to 4 minutes per side, or until deeply golden brown and cooked through. The high heat and shallow oil will ensure maximum crispness. Transfer the crispy chicken to a wire rack set over a plate to drain excess oil.
- Cook the pasta: While the chicken cooks, bring a large pot of salted water to a boil. Add fettuccine and cook according to package directions until al dente. Reserve 1/2 cup of pasta cooking water before draining.
- Prepare the sauce: In the same skillet used for the chicken (or a clean one if preferred), add 1 tablespoon of fresh olive oil over medium heat. Add diced red bell pepper and cook for 3-5 minutes until slightly softened. Add minced garlic and paprika, cooking for another minute until fragrant.
- Pour in the chicken broth and heavy cream. Bring to a gentle simmer, stirring occasionally, and let the sauce reduce and thicken slightly for 5-7 minutes. If the sauce becomes too thick, add a splash of the reserved pasta water. Season the sauce with salt and black pepper to taste.
- Add the cooked and drained pasta to the skillet with the sauce. Toss well to coat the pasta evenly.
- To serve and maintain crispness: Gently add the crispy chicken bites to the pasta right before serving. Toss lightly just to combine, or even spoon the pasta onto plates and then arrange the crispy chicken on top. Garnish generously with fresh chopped parsley. Serve immediately to enjoy the chicken at its crispiest!
Notes
- Key to crispness: pat chicken very dry, use high heat for frying, and add chicken right before serving.