Simple Modern Summit Water Bottle with Straw Lid | Minecraft 18oz Stainless Steel Cup Insulated Tumbler for Girls, Boys, School | Minecraft Mashup
$26.99 (as of November 3, 2025 15:13 GMT +00:00 - More infoProduct prices and availability are accurate as of the date/time indicated and are subject to change. Any price and availability information displayed on [relevant Amazon Site(s), as applicable] at the time of purchase will apply to the purchase of this product.)
YETI Rambler 10 oz Ceramic Lined Stackable Mug, Vacuum Insulated, Stainless Steel with MagSlider Lid, Navy
$30.00 (as of November 3, 2025 15:13 GMT +00:00 - More infoProduct prices and availability are accurate as of the date/time indicated and are subject to change. Any price and availability information displayed on [relevant Amazon Site(s), as applicable] at the time of purchase will apply to the purchase of this product.)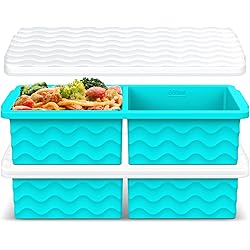
Aopigavi Silicone Freezer Tray with Lid – 2-Cup Soup Freezer Container Molds, Large Ice Cube Trays for Freezing Soup, Sauce & Broth, Meal Prep & Food Storage – Oven & Dishwasher Safe, 2-Pack
$17.99 (as of November 3, 2025 15:13 GMT +00:00 - More infoProduct prices and availability are accurate as of the date/time indicated and are subject to change. Any price and availability information displayed on [relevant Amazon Site(s), as applicable] at the time of purchase will apply to the purchase of this product.)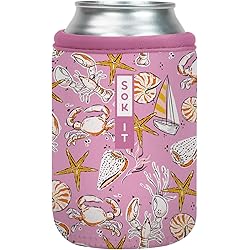
Sok It CanSok Sleeve for Beer & Soda Insulated Neoprene Cover (Tidal Treasures, 12oz Can Sleeve)
$3.50 (as of November 3, 2025 15:13 GMT +00:00 - More infoProduct prices and availability are accurate as of the date/time indicated and are subject to change. Any price and availability information displayed on [relevant Amazon Site(s), as applicable] at the time of purchase will apply to the purchase of this product.)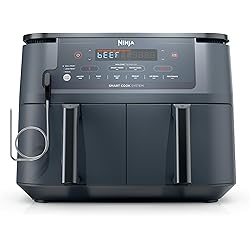
Ninja Air Fryer, Thermometer, Roast, Bake, Air Fry, Crisps, Broil, Reheats, Keep Warm, 10-in-1, Fries, Frozen Food, Veggies, and Meat, Quick Meals, Healthy Meals, Less Oil, 10 QT, Cyberspace, DZ550GY
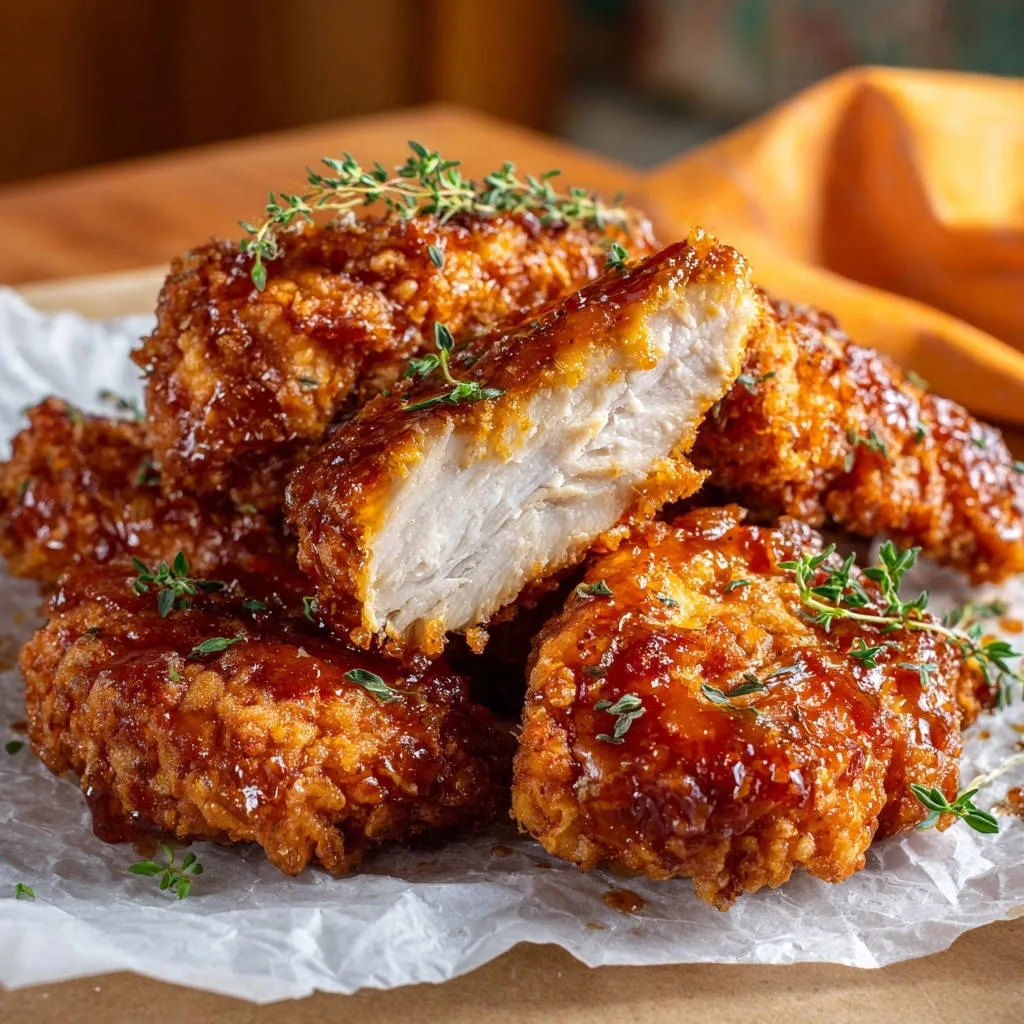
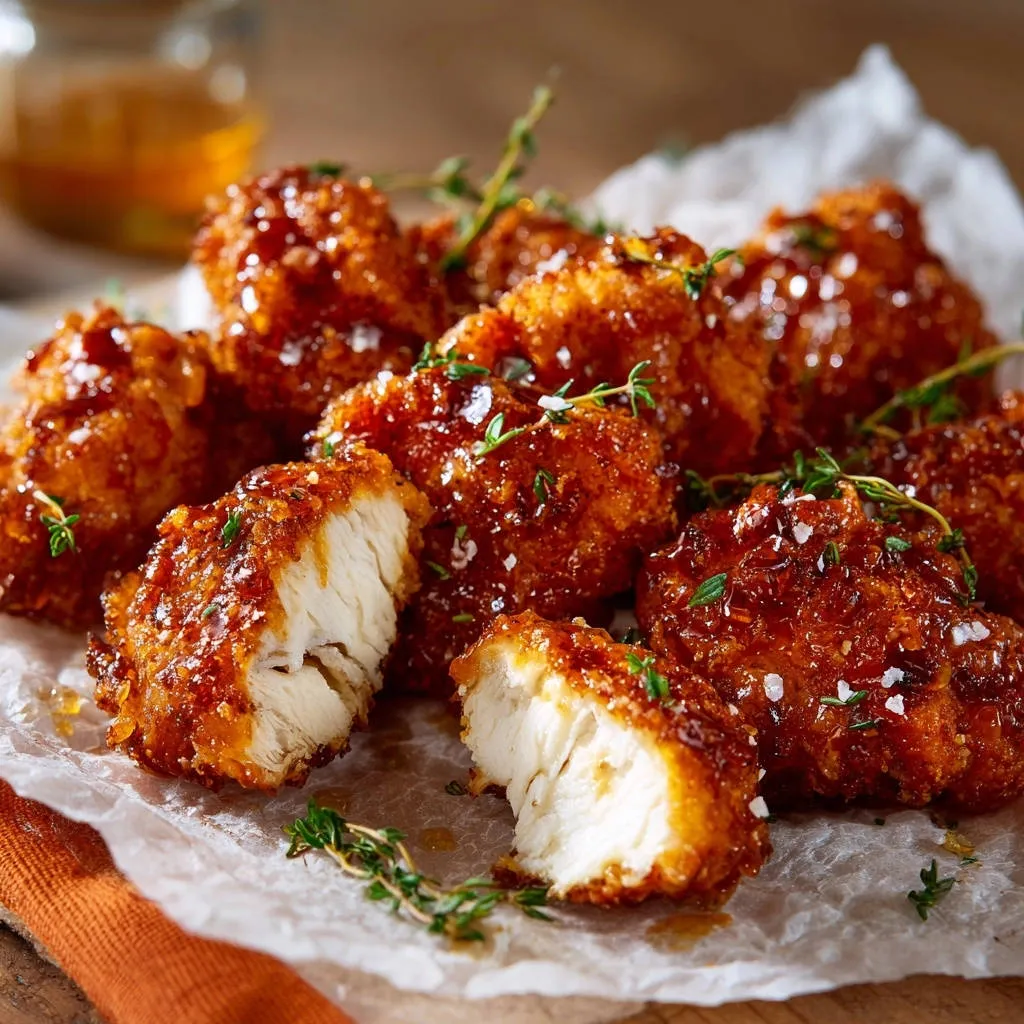
$129.99 (as of November 3, 2025 15:13 GMT +00:00 - More infoProduct prices and availability are accurate as of the date/time indicated and are subject to change. Any price and availability information displayed on [relevant Amazon Site(s), as applicable] at the time of purchase will apply to the purchase of this product.)There’s nothing more disheartening than looking forward to a crispy fried chicken dinner, only to find it disappointingly dry inside. I’ve been there, and it’s truly a kitchen heartbreak! But through years of perfecting the art of frying, I’ve discovered the simple secret to truly juicy chicken, and it transforms these Crispy Glazed Chicken Cutlets into an absolute triumph every single time.
Beyond the Crunch: Why Our Crispy Glazed Chicken Cutlets Shine
This isn’t just another chicken recipe; it’s a testament to simple techniques delivering extraordinary results. We’re marrying an unbeatable crunch with unparalleled juiciness and a glaze that hits every flavor note, making these the ultimate Crispy Glazed Chicken Cutlets.
The “Never Dry” Promise: A Game-Changing Technique
The secret weapon in this recipe is a simple yet often overlooked step: uniform pounding. By gently flattening our chicken cutlets to an even thickness, we guarantee they cook quickly and uniformly, locking in moisture and ensuring every bite is incredibly tender and never, ever dry.
Flavor Fusion: Sweet, Savory, and a Hint of Heat
Our irresistible glaze is a masterclass in balance. It marries the golden sweetness of honey with the deep umami of soy sauce, brightened by apple cider vinegar, and rounded out with aromatic garlic and onion. An optional touch of red pepper flakes adds a delightful, subtle kick that elevates the entire dish.
Weeknight Winner: Quick, Impressive, and Satisfying
This recipe for Crispy Glazed Chicken Cutlets proves that gourmet doesn’t have to mean complicated or time-consuming. It’s designed for efficiency, delivering an impressive, flavorful, and incredibly satisfying meal that comes together quickly, making it a perfect solution for busy weeknights.
Essential Tools for Your Crispy Chicken Journey
Having the right equipment makes all the difference for a smooth cooking experience and perfect results. Here are the kitchen staples and optional enhancements you’ll need.
Kitchen Staples for Success
Meat Mallet or Rolling Pin: Crucial for achieving even thickness and juiciness in your chicken cutlets, preventing dry spots.
Three Shallow Dishes: Essential for setting up an organized and efficient breading station, minimizing mess.
Large, Heavy-Bottomed Skillet or Dutch Oven: Provides stable and consistent frying temperature, which is key for truly crispy chicken.
Wire Rack & Paper Towels: Absolutely essential for draining excess oil after frying, ensuring your cutlets remain perfectly crisp and not greasy.
Optional Enhancements
Deep-Fry Thermometer: For precise oil temperature control, ensuring perfect frying every time without guesswork.
Tongs: For safely handling chicken in hot oil, allowing you to flip and remove pieces with ease.
Small Saucepan: For effortlessly simmering and thickening the delicious glaze to the perfect coating consistency.
The Foundation of Flavor: Ingredients for Perfectly Glazed Chicken
Each ingredient plays a vital role in building the incredible texture and flavor of these Crispy Glazed Chicken Cutlets.
For the Chicken: Achieving Tender Perfection
Boneless, Skinless Chicken Breast Cutlets (1.5 pounds, about 4-5 pieces): Our lean canvas, easily pounded for tender, quick-cooking results.
All-Purpose Flour (1 cup): Forms the initial, thin coating that helps the egg adhere evenly to the chicken.
Large Eggs, Beaten (2): The essential binder, creating a sticky surface for the breadcrumbs to cling to.
Panko Breadcrumbs (2 cups): The secret to that extra-crispy, light, and airy crunch that traditional breadcrumbs can’t replicate.
Salt (1 teaspoon) & Black Pepper (0.5 teaspoon): Fundamental seasoning for the chicken itself, ensuring flavor from the inside out.
Neutral Oil (4 cups, like Vegetable or Canola Oil): For frying without imparting any unwanted flavors, allowing the chicken and glaze to shine.
Crafting the Irresistible Glaze
Honey or Maple Syrup (0.5 cup): Provides the essential sweetness and contributes to the beautiful glossy texture of the glaze.
Soy Sauce (2 tablespoons): Adds umami depth, savory balance, and a rich, dark hue to the glaze.
Apple Cider Vinegar (1 tablespoon): A touch of acidity that brightens the overall flavor profile, cutting through the sweetness and richness.
Garlic Powder (1 teaspoon) & Onion Powder (0.5 teaspoon): Aromatic staples that build a robust and savory base for the glaze.
Red Pepper Flakes (Pinch, optional): Included for a subtle, delightful kick of heat that perfectly complements the sweet and savory notes.
The Fresh Finishing Touch
Fresh Thyme Sprigs: For a beautiful, aromatic garnish that adds a touch of freshness and visual appeal to the finished dish.
Your Step-by-Step Guide to Crispy Glazed Chicken Cutlets Perfection
Follow these detailed steps to achieve perfectly juicy and wonderfully crispy chicken every time.
Prepare Your Chicken for Ultimate Juiciness
Lay chicken cutlets on a cutting board, cover with plastic wrap, and gently pound each piece to an even 0.5-inch thickness using a meat mallet or rolling pin. This ensures even cooking and prevents drying out, the core secret to juicy chicken.
Season both sides evenly with salt and black pepper to build flavor from within, allowing it to penetrate the meat.
Building Your Breading Station
Set up three shallow dishes. Place all-purpose flour in the first, pour beaten eggs in the second, and place Panko breadcrumbs in the third. This organized station makes the breading process smooth, clean, and efficient, preventing cross-contamination and mess.
Heating the Oil Just Right
Pour 4 cups of neutral oil into a large, heavy-bottomed skillet or Dutch oven. Heat over medium-high heat until it reaches 350°F (175°C), which is the ideal temperature for crisping without burning.
If you don’t have a thermometer, test the oil by dropping a small piece of breading; it should sizzle vigorously and immediately float to the surface, indicating it’s ready.
The Art of Breading for Max Crunch
Working with one piece at a time, dredge the chicken in flour, shaking off any excess. Then, dip it into the beaten eggs, allowing any extra to drip off to prevent a thick, gummy layer.
Finally, press the chicken firmly into the Panko breadcrumbs, ensuring it is fully coated on all sides for maximum crunch. Set aside on a clean plate or wire rack while you prepare the others.
Frying to Golden-Brown Excellence
Carefully place 2 to 3 breaded chicken cutlets into the hot oil, ensuring not to overcrowd the pan. Overcrowding can lower the oil temperature, leading to soggy, oily chicken.
Fry for 3 to 4 minutes per side, or until golden brown and cooked through. Thanks to the even thickness from pounding, they cook faster and stay incredibly juicy – avoid overcooking, which is the main cause of dry chicken!
Use tongs to remove the chicken from the oil and transfer it to a wire rack set over a paper towel-lined baking sheet to drain excess oil. Repeat with remaining chicken, allowing the oil to come back to temperature between batches.
Simmering the Sweet & Savory Glaze
While the chicken drains, combine honey (or maple syrup), soy sauce, apple cider vinegar, garlic powder, onion powder, and red pepper flakes (if using) in a small saucepan.
Bring the mixture to a simmer over medium heat, stirring occasionally, until the glaze thickens slightly, typically about 3 to 5 minutes. It should be able to coat the back of a spoon.
Coating, Garnish, and Serving
Once all chicken is fried, gently toss the warm crispy chicken cutlets in the prepared glaze until they are evenly coated and glistening. Do this while they are still warm so the glaze adheres beautifully.
Transfer to a serving platter and garnish generously with fresh thyme sprigs for an aromatic and beautiful finish. Serve immediately and savor the perfectly juicy, crispy goodness!
Secrets to Success: Mastering Your Crispy Glazed Chicken Cutlets
Achieving truly perfect Crispy Glazed Chicken Cutlets is easy with a few expert tips. These insights will help you avoid common pitfalls and elevate your dish.
The Pounding Perfection Principle
Don’t skip pounding the chicken! This isn’t just about reducing cooking time; it primarily ensures even cooking from edge to edge, guaranteeing every bite is perfectly moist and tender, preventing tougher, drier spots.
Temperature Matters: Oil Control for Crispy Results
Maintain an oil temperature of 350°F (175°C) for the best crispness without burning. Too low, and the chicken absorbs excess oil, becoming greasy; too high, and it burns on the outside before cooking through.
Glaze Control: Achieving the Perfect Coating
Ensure your glaze simmers until it slightly thickens – it should be able to coat the back of a spoon. This ideal consistency will beautifully cling to the crispy chicken without making it soggy, delivering maximum flavor with every bite.
Batch Frying Best Practices
Avoid overcrowding the pan during frying. Frying in small batches helps maintain the oil’s temperature, allowing each cutlet ample space to crisp up properly and cook evenly.
Alternative Breading Options
For an extra layer of flavor, consider seasoning your Panko breadcrumbs with a pinch of paprika, dried Italian herbs, or a dash of garlic powder before coating the chicken. This adds another dimension to the crispy exterior.
Elevate Your Meal: Serving Suggestions & Pairings
These Crispy Glazed Chicken Cutlets are versatile and pair wonderfully with a variety of sides, transforming a simple meal into a delightful dining experience.
Classic Sides That Complement
Fluffy Rice: A perfect absorbent base that soaks up every drop of the delicious, savory-sweet glaze.
Steamed Green Beans or Asparagus: Adds a fresh, vibrant contrast and a healthy crunch to balance the richness of the chicken.
Simple Salad: A light, refreshing side with a vinaigrette dressing provides a clean counterpoint to the glazed chicken.
Creative Serving Ideas
Chicken Cutlet Sandwiches: Serve on a toasted brioche bun with a dollop of creamy coleslaw and a slice of tomato for an elevated lunch.
Glazed Chicken Bowls: Arrange sliced cutlets over a bed of quinoa or farro with roasted vegetables like broccoli or bell peppers for a wholesome meal.
Appetizer Bites: Cut the fried chicken into strips or smaller pieces before glazing for a party-friendly snack or elegant appetizer.
Planning Ahead: Storage & Make-Ahead Tips
While best enjoyed fresh, these Crispy Glazed Chicken Cutlets can be managed with some forethought for maximum convenience.
Storing Leftovers Safely
Store any leftover Crispy Glazed Chicken Cutlets in an airtight container in the refrigerator for up to 3-4 days. Ensure they are completely cooled before storing to prevent condensation, which can make them soggy.
Can You Make Them Ahead?
While best served fresh, you can bread the chicken cutlets up to a few hours in advance. Place them on a wire rack set over a baking sheet, cover loosely with plastic wrap, and keep them refrigerated. Fry just before serving for optimal crispness.
Reheating for Optimal Crispness
To reheat, place cutlets on a baking sheet and warm them in a preheated oven or air fryer at 350°F (175°C) until heated through and re-crisped, about 10-15 minutes. Avoid the microwave, which will steam the breading and make them soggy.
Common Questions & Quick Fixes
Even with the best recipes, sometimes things go awry. Here are solutions to common issues you might encounter.
Problem: My chicken isn’t crispy.
Solution: Ensure your oil temperature is consistently at 350°F (175°C) and avoid overcrowding the pan, which drops the oil temperature. Always use Panko breadcrumbs for that superior light crunch, and drain on a wire rack immediately after frying.
Problem: My chicken is dry inside.
Solution: The most common culprit is overcooking. Always pound the chicken to an even 0.5-inch thickness to promote quick, even cooking and remove it from the oil as soon as it’s golden brown and cooked through. Use a meat thermometer to check for 165°F (74°C) internal temperature if unsure.
Problem: The glaze is too thin/thick.
Solution: If the glaze is too thin, simmer it for a few more minutes to reduce and thicken. If it’s too thick, add a tiny splash of water or chicken broth, one teaspoon at a time, until the desired pourable but coatable consistency is reached.
Problem: How do I get an even coating?
Solution: Ensure you shake off excess flour after the first dredge and allow excess egg to drip off after the second. This creates a thin, even layer for the Panko to adhere to properly, preventing clumpy breading and ensuring a uniform crispness.
FAQs: Your Crispy Glazed Chicken Cutlets Questions Answered
Let’s address some frequent inquiries to help you master this delightful dish.
Can I use chicken thighs instead of breasts for Crispy Glazed Chicken Cutlets?
Yes, absolutely! Chicken thighs can be used, offering a richer, moister result. They might require a slightly longer cooking time due to their fat content. Ensure they are pounded to an even thickness as well for best results and adjust frying time accordingly.
What’s the best oil for frying these cutlets?
A neutral oil with a high smoke point, such as vegetable oil, canola oil, or grapeseed oil, is highly recommended. These oils won’t impart strong flavors to your chicken and can safely withstand the necessary high frying temperatures for crispness.
Is there a gluten-free option for this recipe?
To make these Crispy Glazed Chicken Cutlets gluten-free, substitute all-purpose flour with a certified gluten-free all-purpose flour blend and use gluten-free Panko breadcrumbs. The rest of the glaze ingredients are naturally gluten-free.
How spicy are the red pepper flakes in the glaze?
The pinch of red pepper flakes specified in the recipe is optional and offers a very subtle warmth rather than intense heat, adding just a hint of complexity. If you prefer more spice, you can increase the amount, or omit them entirely if you prefer no heat at all.
Ready to Impress? Share Your Crispy Glazed Chicken Masterpiece!
Armed with these techniques and our irresistible recipe, you’re ready to create the most incredible Crispy Glazed Chicken Cutlets your family and friends have ever tasted. Say goodbye to dry, bland chicken and hello to a dish that’s bursting with flavor and boasts that perfect crunch.
Don’t wait! Gather your ingredients and prepare for a culinary triumph. Once you’ve mastered this dish, we’d love to see your creations! Share your photos and tag us on social media – happy cooking!

Crispy Glazed Chicken Cutlets
Course: Main CourseCuisine: American CuisineDifficulty: easy4
to 5 servings20
minutes30
minutes50
minutesAmerican Cuisine
Ingredients
1.5 pounds boneless, skinless chicken breast cutlets (about 4 to 5 pieces)
1 cup all-purpose flour
2 large eggs, beaten
2 cups Panko breadcrumbs
1 teaspoon salt
0.5 teaspoon black pepper
4 cups neutral oil for frying (like vegetable or canola oil)
For the Glaze:
0.5 cup honey or maple syrup
2 tablespoons soy sauce
1 tablespoon apple cider vinegar
1 teaspoon garlic powder
0.5 teaspoon onion powder
Pinch of red pepper flakes (optional, for a touch of heat)
Fresh thyme sprigs for garnish
Directions
- Prepare Your Chicken for Juiciness: Lay chicken cutlets on a cutting board. Cover them with plastic wrap and, using a meat mallet or rolling pin, gently pound each piece to an even 0.5-inch thickness. This critical step ensures even cooking and prevents the chicken from drying out. Season both sides evenly with salt and black pepper.
- Set Up Your Breading Station: Prepare three shallow dishes. In the first, add the all-purpose flour. In the second, pour the beaten eggs. In the third, place the Panko breadcrumbs.
- Heat the Oil: In a large, heavy-bottomed skillet or Dutch oven, pour the neutral oil. Heat over medium-high heat until it reaches 350 degrees Fahrenheit. If you don’t have a thermometer, a small piece of breading should sizzle vigorously when dropped in.
- Bread the Chicken: Working with one piece at a time, dredge the chicken in flour, shaking off any excess. Then dip it into the beaten eggs, letting any extra drip off. Finally, press the chicken into the Panko breadcrumbs, ensuring it’s fully coated. Set aside on a clean plate or wire rack.
- Fry to Perfection: Carefully place 2 to 3 breaded chicken cutlets into the hot oil, ensuring not to overcrowd the pan. Fry for 3 to 4 minutes per side, or until golden brown and cooked through. Do not overcook! The even thickness from pounding means they cook faster and stay incredibly juicy. Use tongs to remove the chicken from the oil and place on a wire rack set over a paper towel-lined baking sheet to drain excess oil. Repeat with remaining chicken.
- Make the Glaze: While the chicken drains, combine honey (or maple syrup), soy sauce, apple cider vinegar, garlic powder, onion powder, and red pepper flakes (if using) in a small saucepan. Bring to a simmer over medium heat, stirring occasionally, until the glaze thickens slightly, about 3 to 5 minutes.
- Coat and Garnish: Once all chicken is fried, gently toss the warm crispy chicken cutlets in the prepared glaze until evenly coated. Transfer to a serving platter and garnish generously with fresh thyme sprigs. Serve immediately and enjoy that perfectly juicy, crispy goodness!
YETI Rambler 10 oz Ceramic Lined Stackable Mug, Vacuum Insulated, Stainless Steel with MagSlider Lid, Navy
$30.00 (as of November 3, 2025 15:13 GMT +00:00 - More infoProduct prices and availability are accurate as of the date/time indicated and are subject to change. Any price and availability information displayed on [relevant Amazon Site(s), as applicable] at the time of purchase will apply to the purchase of this product.)
Our Place Wonder Oven | 6-in-1 Air Fryer & Toaster Oven with Steam Infusion | Compact, Countertop Friendly, Fast Preheat, Multifunctional | Air Fry, Toast, Roast, Bake, Reheat & Broil | Char
$185.00 (as of November 3, 2025 15:13 GMT +00:00 - More infoProduct prices and availability are accurate as of the date/time indicated and are subject to change. Any price and availability information displayed on [relevant Amazon Site(s), as applicable] at the time of purchase will apply to the purchase of this product.)
NECAUX Custom Multisize 1.5mm Thick Clear PVC Table Cover Protector - 24 x 48 Inch Water Resistant Plastic Rectangular Vinyl Non-Slip Desk Pad for Coffee Table/Writing Desk
$26.88 (as of November 3, 2025 15:13 GMT +00:00 - More infoProduct prices and availability are accurate as of the date/time indicated and are subject to change. Any price and availability information displayed on [relevant Amazon Site(s), as applicable] at the time of purchase will apply to the purchase of this product.)
Astercook Deep-Carbonized Bamboo Cutting Boards for Kitchen with Wood Storage Stand, Reversible Charcuterie & Chopping Boards with Juice Grooves and Easy-Grip Handles, Knife-Friendly, Kitchen Gift
$44.99 (as of November 3, 2025 15:13 GMT +00:00 - More infoProduct prices and availability are accurate as of the date/time indicated and are subject to change. Any price and availability information displayed on [relevant Amazon Site(s), as applicable] at the time of purchase will apply to the purchase of this product.)