
You know that familiar disappointment when your eagerly anticipated takeout chicken, once perfectly crispy, turns into a sad, soggy mess by the time it reaches your table? I’ve certainly experienced it too many times. This recipe for Crispy Sticky Glazed Chicken is my ultimate solution, meticulously developed to deliver that irresistible crunch and luscious glaze that genuinely lasts.
It’s more than just a meal; it’s a game-changer for homemade Asian-inspired dishes, ensuring every bite is a triumph of texture and flavor.
Why This Crispy Sticky Glazed Chicken Recipe Reigns Supreme
The “Never Soggy” Secret Unveiled
The magic behind truly crispy chicken that stands up to a rich glaze lies in the double-fry method. This technique ensures a shatteringly crisp exterior, creating a protective barrier against the sauce’s moisture. It’s the key to enjoying your sticky glazed chicken without any textural compromise.
A Game-Changer for Weeknight Dinners
Despite its impressive results, this recipe is surprisingly straightforward, making it perfect for weeknight meals. The steps are intuitive, and the payoff is a homemade dish that rivals your favorite takeout, all cooked in your own kitchen.
Irresistible Flavor, Simplified
The glaze strikes a perfect balance of sweet, savory, and tangy notes, enhancing the chicken without overpowering it. Fresh ginger and garlic infuse the sauce with vibrant aroma, creating a truly harmonious flavor profile that everyone will love.
Gathering Your Essentials: Ingredients for Glazed Chicken Perfection
For the Irresistibly Crispy Chicken
Chicken: Use 1.5 pounds of boneless, skinless chicken breast or thighs, cut into 1-inch pieces. Thighs offer more moisture and flavor, while breast meat is leaner.
Egg: A large egg acts as the crucial binder, helping the flour and cornstarch adhere perfectly to the chicken pieces. This creates a uniform coating for optimal crispness.
All-Purpose Flour & Cornstarch: The combination of these two flours (1/2 cup each) in the coating is key to the chicken’s incredible crunch. Cornstarch contributes to a lighter, crispier texture than flour alone.
Salt & Black Pepper: Essential seasoning for the chicken itself, ensuring every bite is flavorful, not just the glaze. A half teaspoon of salt and a quarter teaspoon of pepper will suffice.
Vegetable Oil: You’ll need about 4 cups for frying. Choose a neutral oil with a high smoke point, such as vegetable, canola, or peanut oil, to achieve that golden crispness without imparting unwanted flavors.
Crafting the Signature Sticky Glaze
Water, Soy Sauce, Rice Vinegar, Brown Sugar: This quartet (1/2 cup water, 1/4 cup each of soy sauce, rice vinegar, brown sugar) forms the balanced base of the glaze. Opt for low-sodium soy sauce to control salinity, and rice vinegar for a mild tang.
Fresh Ginger & Garlic: Grated ginger (1 tablespoon) and minced garlic (2 cloves) are non-negotiable for their aromatic depth. Use fresh ingredients for the best, brightest flavor.
Cornstarch (for sauce): A final tablespoon of cornstarch, whisked into a slurry, is what transforms the liquid base into a glossy, thick sauce that perfectly coats the chicken. This ensures a luxurious, sticky texture.
The Perfect Accompaniments
Cooked White Rice: 3 cups of hot, fluffy white rice provide the ideal canvas for soaking up the delicious glaze. It’s the traditional and most satisfying pairing.
Sesame Seeds & Green Onions: These garnishes add a touch of elegance, extra flavor, and vibrant color. Generously sprinkle sesame seeds and sliced green onions for a restaurant-quality finish.
Essential Kitchen Tools for Crispy Sticky Glazed Chicken
Must-Have Equipment for Frying Success
For safe and effective frying, a large, heavy-bottomed pot or Dutch oven is essential. This helps maintain a consistent oil temperature. You’ll also need a reliable deep-fry thermometer to accurately monitor the oil, ensuring optimal crispness.
A slotted spoon is crucial for safely adding and removing chicken from the hot oil. Always have a wire rack set over a baking sheet ready for draining the fried chicken; this allows air circulation, preventing sogginess.
Saucepan & Mixing Bowls
A medium saucepan is needed for simmering and thickening the glaze. You’ll also use two medium bowls for the egg wash and the flour-cornstarch dredge. A small bowl for the cornstarch slurry is also helpful.
Serving Essentials
A large mixing bowl is perfect for the final toss of chicken and sauce, ensuring every piece is evenly coated. Prepare your serving bowls and utensils for immediate serving, as this dish is best enjoyed hot and fresh.
Your Step-by-Step Guide to Crispy Sticky Glazed Chicken
Prepping the Chicken for Maximum Crispness
Begin by whisking the large egg in one medium bowl until smooth. In a second bowl, combine the 1/2 cup all-purpose flour, 1/2 cup cornstarch, salt, and pepper. This dry mixture creates the crispy coating.
Dip the chicken pieces into the whisked egg, ensuring they are thoroughly coated. Then, dredge them, a few at a time, in the flour mixture, pressing gently to ensure full coverage. Place the coated chicken on a wire rack to allow any excess coating to dry slightly, which aids in crisping.
The Initial Fry: Setting the Foundation
Pour 4 cups of vegetable oil into your large heavy-bottomed pot or Dutch oven. Heat the oil over medium-high heat until it reaches 350 degrees F (175 degrees C). Maintaining this temperature is crucial for evenly cooked chicken.
Carefully add about half of the chicken pieces to the hot oil. Avoid overcrowding the pot, as this will drop the oil temperature and result in soggy chicken. Fry for 3 to 4 minutes, or until the chicken is lightly golden and cooked through. Remove the chicken with a slotted spoon and place it on a wire rack set over a baking sheet to drain.
Repeat this process with the remaining chicken batch. This initial fry cooks the chicken through and begins to set the coating.
The Double-Fry Method: Your Secret to Lasting Crunch
Once all the chicken has had its first fry, increase the oil temperature to 375 degrees F (190 degrees C). This higher temperature is the absolute secret to achieving that ultimate, lasting crispness. It rapidly cooks out any remaining moisture from the coating.
Return all the chicken to the hotter oil for the second fry. Fry for another 2 to 3 minutes, stirring occasionally, until the chicken turns a deep golden brown and feels very crispy when you tap it. Remove the chicken once more to the wire rack for final draining.
Whipping Up the Luscious Glaze
While the chicken is undergoing its second fry, begin preparing the sauce. In a medium saucepan, whisk together the water, soy sauce, rice vinegar, brown sugar, grated fresh ginger, and minced garlic. This mixture forms the flavorful base of your glaze.
In a small separate bowl, whisk the remaining 1 tablespoon of cornstarch with 2 tablespoons of cold water until a smooth slurry forms. This slurry is what will thicken your sauce to perfection.
The Final Toss: Melding Flavors While Preserving Crispness
Bring the sauce mixture in the saucepan to a gentle simmer over medium heat, stirring constantly to dissolve the sugar. Once simmering, slowly whisk in the cornstarch slurry. Continue to cook and stir for 1 to 2 minutes; the sauce will rapidly thicken to a glossy consistency that beautifully coats the back of a spoon. Remove it from the heat immediately.
Just before you’re ready to serve, transfer the deeply golden, crispy chicken pieces into a large bowl. Pour the warm, thickened sauce over the chicken and gently toss until every piece is evenly coated. This final quick toss right before serving is crucial for maintaining the chicken’s crispness while ensuring it’s wonderfully sauced.
Serve Immediately for Ultimate Enjoyment
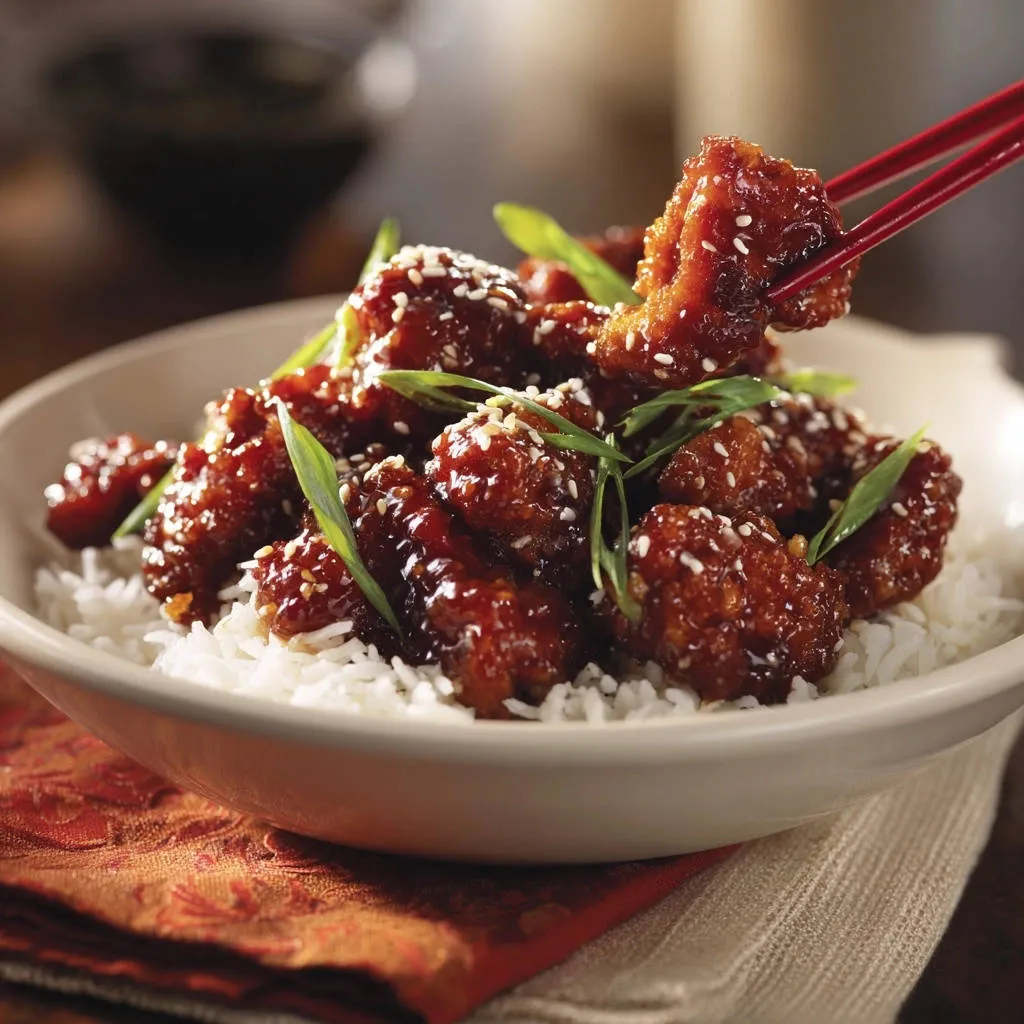
Plate your glorious crispy sticky glazed chicken immediately over hot white rice. Garnish generously with toasted sesame seeds and freshly sliced green onions for added flavor and visual appeal.
Enjoy your perfectly crispy, never soggy, and utterly delicious homemade crispy sticky glazed chicken!
Mastering Your Crispy Sticky Glazed Chicken: Expert Tips & Tricks
Achieving Unbeatable Crispness Every Time
The double-fry method is truly non-negotiable for lasting crispness. Ensure your oil temperatures are accurate (350°F then 375°F) and do not overcrowd the pot during either fry. Frying in batches is key to maintaining consistent oil temperature and achieving a superior texture.
Always drain your chicken on a wire rack after frying, not on paper towels. This allows air to circulate around the chicken, preventing steam buildup that can lead to sogginess.
Perfecting the Glaze Consistency
When adding the cornstarch slurry to the simmering sauce, whisk it in slowly and continuously. This prevents lumps and ensures a smooth, glossy texture.
Cook the sauce only until it reaches your desired thickness; it will continue to thicken slightly as it cools. If it becomes too thick, a splash of hot water can thin it out, or a bit more cornstarch slurry can be added if it’s too thin.
Keeping Your Chicken Crisp (Even After Saucing!)
The most important tip: do not sauce the chicken until you are literally moments away from serving. Tossing the hot, crispy chicken with the warm sauce at the last minute minimizes the time the coating is exposed to moisture, thus preserving its crunch.
Flavor Boosts & Creative Variations
For an extra kick, add a pinch of red pepper flakes to the sauce along with the ginger and garlic. A squeeze of fresh lime juice at the end can brighten the entire dish.
Consider adding a touch of toasted sesame oil to the sauce for a deeper, nutty aroma. For a more complex flavor profile, try incorporating a teaspoon of hoisin sauce or a dash of hot sauce to the glaze ingredients.
Troubleshooting Common Crispy Sticky Glazed Chicken Challenges
Why Is My Chicken Not Crispy Enough?
This is almost always due to incorrect oil temperature or overcrowding the pot. Ensure your oil thermometer is accurate and that the oil returns to the correct temperature between batches. Frying too many pieces at once drastically lowers the oil’s heat, leading to steaming instead of crisping.
My Sauce is Too Thin/Too Thick!
If your sauce is too thin, it likely needs more time to simmer and thicken after adding the cornstarch slurry, or you may need to add a touch more slurry. If it’s too thick, simply whisk in a tablespoon of hot water or chicken broth at a time until it reaches your desired consistency.
The Chicken is Soggy After Saucing!
The cardinal rule for this recipe: only toss the chicken with the glaze just before serving. If you sauce it too early, the moisture from the glaze will inevitably soften the crispy coating. Serve it immediately after tossing for optimal results.
My Chicken is Sticking Together While Frying!
This can happen if the chicken pieces are too close together in the fryer or if their coating is still too wet. Ensure you are frying in small batches and that the chicken has rested on the wire rack for a few minutes after being coated, allowing the dredge to adhere better.
Serving Suggestions & Pairing Perfection
Classic Pairings for a Complete Meal
The timeless pairing for Crispy Sticky Glazed Chicken is steamed white rice, which perfectly absorbs the luscious glaze. Complement this with a side of lightly steamed or sautéed green vegetables like broccoli, asparagus, or green beans for a balanced meal.
For something with a bit more texture, consider a side of stir-fried baby bok choy or crispy roasted cauliflower, both of which offer a delightful contrast to the chicken’s rich flavor.
Beyond Rice: Creative Serving Ideas
While rice is classic, this versatile glazed chicken can be served in many exciting ways. Try it with noodles, such as lo mein or ramen, for a heartier dish. It also makes a fantastic filling for lettuce wraps, offering a fresh, crisp counterpoint to the sticky chicken.
Consider serving it as part of a homemade “bowl” with quinoa, roasted vegetables, and a sprinkle of chopped peanuts for an added crunch. It’s also delicious in a soft roll as a unique sandwich.
Storing & Reheating Your Crispy Sticky Glazed Chicken
Best Practices for Storing Leftovers
To best preserve the chicken’s texture, it’s ideal to store the leftover crispy chicken and any remaining sauce separately. Place the chicken in an airtight container or zip-top bag in the refrigerator for up to 3-4 days. Store the sauce in a separate airtight container.
Reheating to Maintain Crispy Texture
When reheating, avoid the microwave for the chicken if you want to retain its crispness. The best methods are in a preheated oven at 375°F (190°C) for 10-15 minutes, or in an air fryer at 350°F (175°C) for 5-8 minutes, until heated through and re-crisped.
Reheat the sauce gently on the stovetop over low heat, stirring occasionally, or in the microwave. Once both are hot, toss the chicken with the warmed sauce right before serving, following the original preparation method.
Frequently Asked Questions About Crispy Sticky Glazed Chicken
Can I use chicken thighs instead of breast?
Absolutely! Boneless, skinless chicken thighs are an excellent choice. Many prefer them for their inherent juiciness and richer flavor, which holds up beautifully to frying and glazing. The cooking times will remain similar.
Is there a gluten-free option for the coating?
Yes, to make this recipe gluten-free, simply substitute the all-purpose flour with a 1:1 gluten-free flour blend that contains xanthan gum. Cornstarch is naturally gluten-free. Ensure you use Tamari (gluten-free soy sauce) instead of regular soy sauce for the glaze.
Can I prepare the sauce ahead of time?
Yes, the sauce can be prepared up to 2-3 days in advance and stored in an airtight container in the refrigerator. Reheat it gently on the stovetop or in the microwave before tossing with the freshly fried chicken.
What if I don’t have a thermometer for the oil?
While a thermometer is highly recommended for best results, you can test the oil’s readiness by inserting the handle of a wooden spoon or a chopstick into the oil. If small, steady bubbles form around the wood, the oil is ready for frying. For the second, hotter fry, the bubbles will be more vigorous.
How can I make this spicier?
To add heat, you have several options. Incorporate 1/2 to 1 teaspoon of red pepper flakes into the sauce mixture. You can also add a finely minced serrano or jalapeño pepper along with the garlic and ginger. Drizzling with sriracha or a homemade sweet chili sauce at the end also adds a wonderful kick.
Your Crispy Sticky Glazed Chicken Masterpiece Awaits!
You now have all the tools and knowledge to create a truly exceptional Crispy Sticky Glazed Chicken at home. Say goodbye to soggy takeout and hello to a dish that consistently delivers on its promise of incredible texture and unforgettable flavor.
Gather your ingredients, follow these proven techniques, and prepare to impress yourself and your loved ones. This recipe isn’t just a meal; it’s an experience in culinary success. Enjoy every perfectly crispy, wonderfully glazed bite!

Crispy Sticky Glazed Chicken
Course: Main CourseCuisine: Asian cuisineDifficulty: easy4
servings20
minutes25
minutes45
minutesAsian cuisine
Ingredients
For the Chicken:
1.5 pounds boneless, skinless chicken breast or thighs, cut into 1-inch pieces
1 large egg
1/2 cup all-purpose flour
1/2 cup cornstarch, plus 1 tablespoon for sauce
1/2 teaspoon salt
1/4 teaspoon black pepper
4 cups vegetable oil, for frying
For the Sauce:
1/2 cup water
1/4 cup soy sauce (low sodium preferred)
1/4 cup rice vinegar
1/4 cup brown sugar
1 tablespoon fresh ginger, grated
2 cloves garlic, minced
1 tablespoon cornstarch
For Serving:
3 cups cooked white rice
2 tablespoons sesame seeds
2 green onions, sliced
Directions
- Prepare the chicken: In a medium bowl, whisk the egg. In another bowl, combine the 1/2 cup flour, 1/2 cup cornstarch, salt, and pepper. Add the chicken pieces to the egg, coating thoroughly. Then, dredge the chicken pieces, a few at a time, in the flour mixture, ensuring they are fully coated. Set aside on a wire rack.
- Heat the oil: Pour the vegetable oil into a large heavy-bottomed pot or Dutch oven. Heat over medium-high heat until it reaches 350 degrees F (175 degrees C).
- First fry: Carefully add half of the chicken pieces to the hot oil. Fry for 3 to 4 minutes, until lightly golden and cooked through. Do not overcrowd the pot. Remove the chicken with a slotted spoon and place it on a wire rack set over a baking sheet to drain. Repeat with the remaining chicken.
- Increase heat for second fry: Increase the oil temperature to 375 degrees F (190 degrees C). This higher temperature is crucial for the ultimate crispness.
- Second fry (the crispness secret): Return all the chicken to the hot oil. Fry for another 2 to 3 minutes, stirring occasionally, until deeply golden brown and very crispy. Remove the chicken again to the wire rack.
- Prepare the sauce: While the chicken is frying, whisk together the water, soy sauce, rice vinegar, brown sugar, grated ginger, and minced garlic in a medium saucepan. In a small bowl, whisk the remaining 1 tablespoon of cornstarch with 2 tablespoons of cold water to create a slurry.
- Thicken the sauce: Bring the sauce mixture to a simmer over medium heat, stirring constantly. Once simmering, slowly whisk in the cornstarch slurry. Continue to cook and stir for 1 to 2 minutes, until the sauce has thickened to a glossy consistency that coats the back of a spoon. Remove from heat.
- Combine and serve: Just before serving, gently toss the crispy chicken pieces with the warm, thickened sauce in a large bowl until all pieces are evenly coated. This is key to keeping the chicken crisp while sauced!
- Serve immediately over hot white rice, garnished generously with sesame seeds and sliced green onions. Enjoy your perfectly crispy, never soggy, delicious chicken!
Notes
- The double-frying technique ensures ultimate crispness. Toss with sauce just before serving to maintain crispness.