Few desserts rival the sheer bliss of a warm chocolate lava cake, where a rich, dark shell gives way to an irresistible molten core. For years, I chased that elusive perfect ‘jiggle’ and gooey center, often ending up with overbaked disappointments or raw puddles. But through countless trials, I finally cracked the code to a truly foolproof, consistently perfect Decadent Chocolate Lava Cake.
This recipe isn’t just another chocolate cake; it’s a reliable method that guarantees restaurant-quality results in your own kitchen every single time. Prepare to amaze yourself and your guests with this simple yet spectacular molten chocolate dessert.
The Secret to Flawless Molten Chocolate Lava Cake: Our Foolproof Method
The beauty of this Decadent Chocolate Lava Cake recipe lies in its precision and specific baking technique. We’ve eliminated the guesswork, ensuring that magical molten chocolate center with every bake.
Our method focuses on exact timing and visual cues, transforming a sometimes finicky dessert into an easy chocolate cake success story. You’ll gain the confidence to create consistently gooey treats without the stress, setting this recipe apart from others.
Gather Your Ingredients: Crafting the Perfect Lava Cake Base
Quality ingredients are the foundation of any exceptional dessert, and our Decadent Chocolate Lava Cake is no exception. Selecting the right components ensures rich flavor and the ideal texture.
The Essential Chocolate & Butter Blend
Dark Chocolate: Opt for a high-quality dark chocolate with 60-75% cocoa solids for a deep, complex flavor that isn’t overly bitter. Good chocolate makes all the difference in this molten chocolate dessert.
Unsalted Butter: Using unsalted butter allows you to control the overall saltiness of the cake. It provides richness and moisture, contributing to the cake’s tender crumb.
Sweetness and Structure: Eggs, Sugar, and Flour
Powdered Sugar: This fine sugar dissolves quickly and smoothly into the batter, contributing to a silky texture without grittiness. It’s key for the cake’s delicate structure.
Large Eggs & Egg Yolks: The combination of whole eggs and extra yolks adds richness, binds the ingredients, and helps create the cake’s custardy, gooey center. Yolks contribute significantly to the decadent texture.
All-Purpose Flour: Just a small amount of flour provides structure to the cake, preventing it from collapsing while still allowing the center to remain wonderfully molten. Avoid over-measuring.
Flavor Boosters: Vanilla and Salt
Vanilla Extract: A touch of pure vanilla extract enhances the chocolate’s natural flavors, adding warmth and depth to the overall profile. It brightens the rich chocolate notes.
Pinch of Salt: Salt is crucial for balancing the sweetness and intensifying the chocolate flavor, making every bite more vibrant and delicious. It’s a vital flavor enhancer.
Garnishes & Ramekin Prep: Beyond the Cake Itself
Vanilla Ice Cream: The classic pairing! The cool, creamy ice cream provides a delightful contrast to the warm, rich lava cake. It melts beautifully into the molten chocolate.
Caramel Sauce: A drizzle of caramel adds another layer of sweetness and a luxurious counterpoint to the deep chocolate. It elevates the dessert presentation.
Fresh Sliced Strawberries: The acidity and freshness of strawberries cut through the richness, offering a bright, fruity element. They add color and a refreshing taste.
Butter and Cocoa Powder (for Ramekins): Generously buttering and dusting your ramekins with cocoa powder is non-negotiable. This ensures your individual chocolate cakes release cleanly and adds a delicate chocolate crust.
Essential Tools for Your Decadent Chocolate Lava Cake Adventure
Having the right kitchen tools makes the process of creating this molten chocolate dessert smooth and enjoyable. These are the essentials you’ll need.
Ramekins: Individual 6-ounce ramekins are perfect for these cakes, ensuring each guest receives their own beautifully portioned molten treat. They promote even baking for that ideal gooey center.
Mixing Bowls & Whisk: You’ll need at least two medium-sized bowls for separating ingredients and a sturdy whisk for combining them thoroughly. These are fundamental for consistent batter.
Double Boiler or Microwave: Essential for gently melting the chocolate and butter without scorching, preserving their delicate flavors. A double boiler offers more control over the melting process.
Baking Sheet: A rimmed baking sheet provides a stable surface for transferring your filled ramekins to and from the oven. It catches any potential spills, keeping your oven clean.
Oven Mitts: For safe handling of the hot ramekins and baking sheet, protecting your hands from burns. Always prioritize safety in the kitchen.
Your Step-by-Step Guide to a Flawlessly Molten Lava Cake
Follow these instructions precisely to achieve a consistently perfect Decadent Chocolate Lava Cake with a sumptuously gooey center.
- 1. Prep for Perfection: Ramekins & Oven
Preheat your oven to a precise 425°F (220°C) to ensure rapid, even baking. A hot oven is crucial for achieving that distinct lava cake texture.
Generously butter four 6-ounce ramekins, ensuring every crevice is coated. Then, dust them thoroughly with cocoa powder, tapping out any excess to create a non-stick, subtly chocolate-flavored crust.
- 2. The Chocolate Heart: Gentle Melting Method
Combine the unsalted butter and chopped dark chocolate in a heatproof bowl. Melt them slowly and gently using a double boiler or 30-second intervals in the microwave, stirring until perfectly smooth.
Remove the melted chocolate mixture from the heat and allow it to cool slightly. It’s important that it’s not too hot when you incorporate it into the egg mixture.
- 3. Building the Batter Base: Eggs, Sugar & Whisking
In a separate large bowl, whisk together the powdered sugar, whole eggs, and additional egg yolks. Continue whisking until the mixture is well combined and has lightened slightly in color and texture.
This aeration step helps create a smooth batter and contributes to the overall delicate structure of your individual chocolate cakes.
- 4. Incorporating the Chocolate & Flavor Boosters
Gradually whisk the slightly cooled chocolate and butter mixture into the egg and sugar mixture until everything is thoroughly incorporated and uniform in color. Avoid adding it all at once to prevent shocking the eggs.
Stir in the vanilla extract and a pinch of salt. These enhancers deepen the chocolate flavor, adding a warm, balanced complexity to your Decadent Chocolate Lava Cake.
- 5. The Gentle Fold: Flour Integration (Don’t Overmix!)
Add the all-purpose flour to the batter and gently fold it in using a spatula. Mix only until the flour is just combined and no dry streaks remain.
Overmixing the flour will develop the gluten, resulting in a tough, rubbery cake rather than the desired delicate texture, so be very gentle.
- 6. Filling the Ramekins Evenly
Carefully divide the rich batter evenly among your four prepared ramekins. Fill them about two-thirds to three-quarters full, leaving a little room for expansion.
- 7. The Critical Bake: Achieving that Guaranteed Molten Core (12-14 Minutes)
Place the filled ramekins onto a baking sheet, then transfer them to your preheated 425°F (220°C) oven. This precise temperature promotes rapid setting of the edges while maintaining a liquid center.
Bake for exactly 12-14 minutes. This timing is the absolute key to achieving that perfect molten center; slight variations in ovens may require minor adjustments.
You’re looking for the edges to be set and firm, but the very center should still be noticeably jiggly when you gently shake the ramekin. This distinct ‘jiggle’ confirms your Decadent Chocolate Lava Cake is perfectly underbaked in the middle, guaranteeing a gooey explosion.
- 8. The Brief Cool Down
Carefully remove the ramekins from the oven using oven mitts. Let them cool on the baking sheet for just 1 minute.
This brief cooling period allows the cake to slightly firm up around the edges, making inversion easier without losing the molten core.
- 9. The Grand Reveal: Flawless Inversion
Place a serving plate upside down over each ramekin. Wearing oven mitts, confidently and carefully invert the ramekin and cake onto the plate.
The cake should slide out easily, revealing a beautifully formed molten chocolate dessert ready for garnishing.
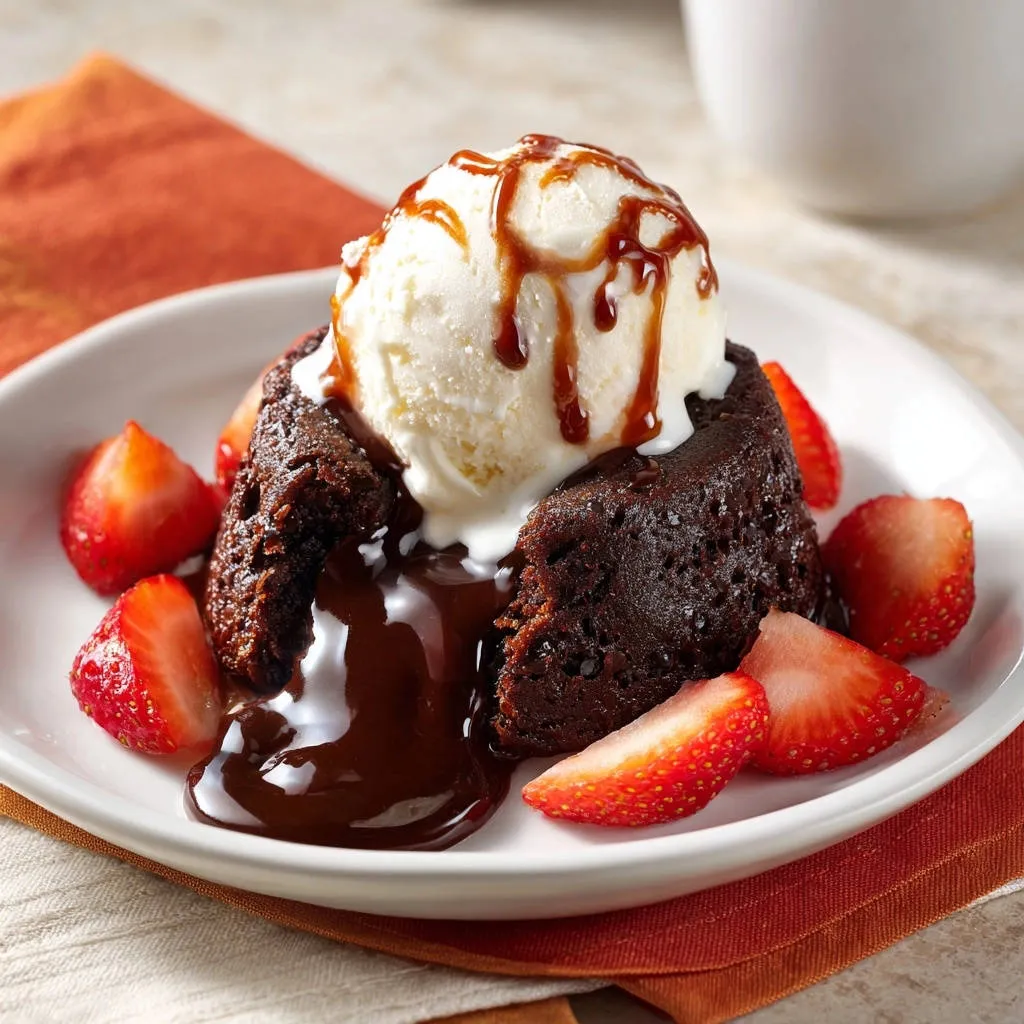
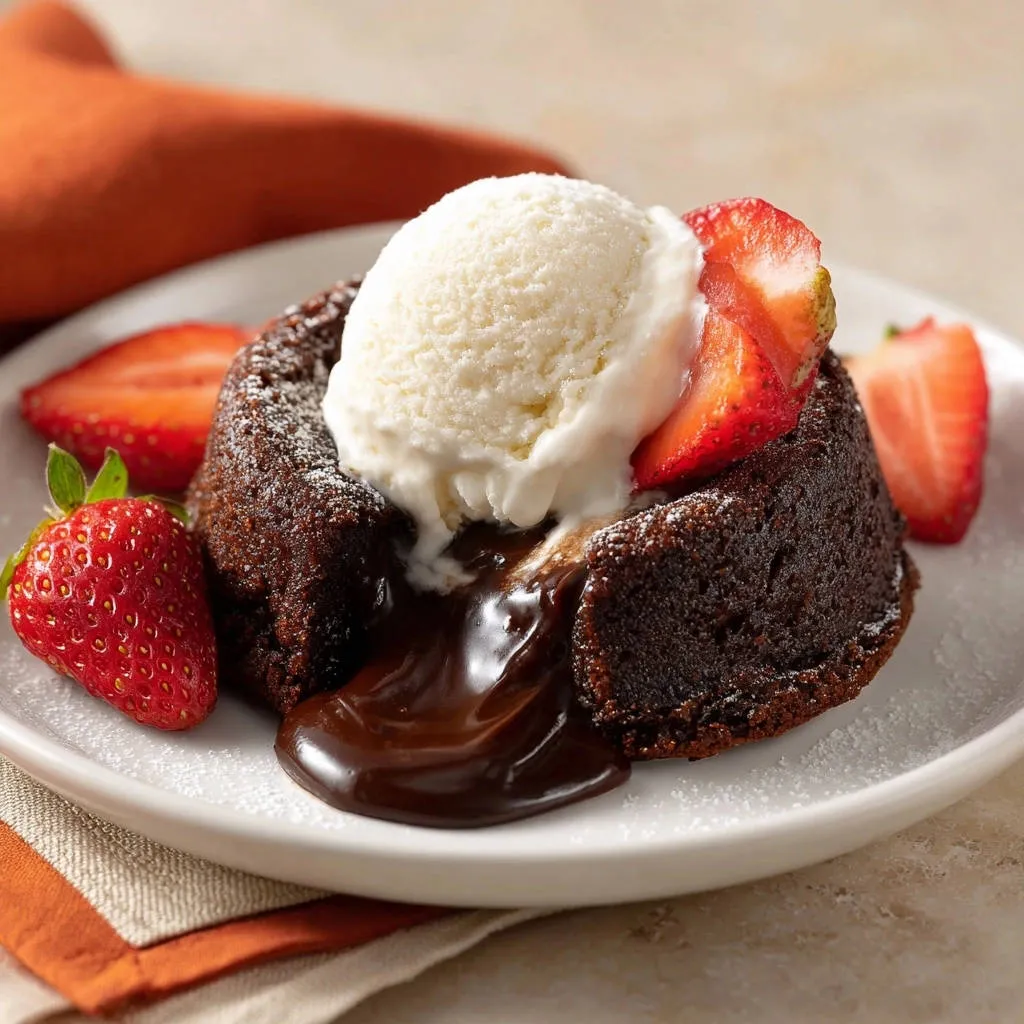
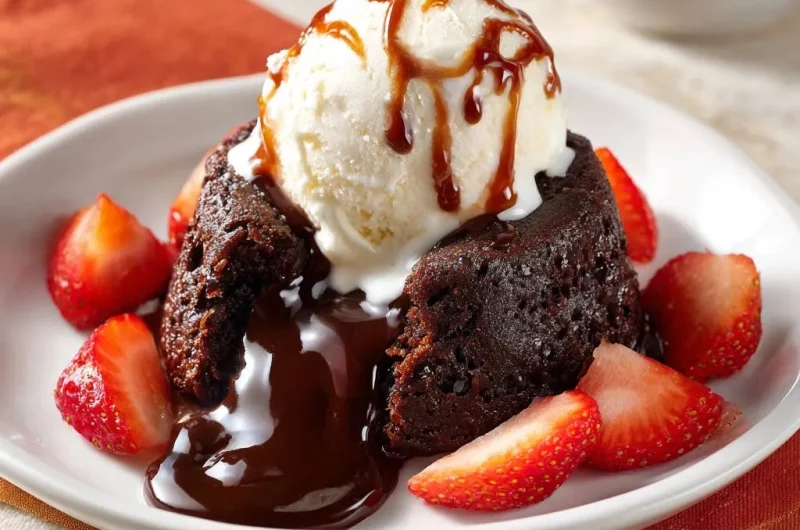
- 10. Serve Immediately: Garnish & Savor!
Serve your warm Decadent Chocolate Lava Cake immediately to ensure the molten center is at its best. A scoop of cold vanilla ice cream is essential for contrast.
Drizzle with caramel sauce and add fresh sliced strawberries for a vibrant, refreshing finish. Enjoy that truly perfect molten chocolate experience!
Chef’s Secrets: Elevate Your Chocolate Lava Cake Experience
Beyond the basic steps, these expert tips will help you perfect every aspect of your restaurant-quality lava cake.
Mastering the Melt: Chocolate & Butter Tips
Always use a good quality dark chocolate (60-75% cocoa solids) for the best flavor and melting properties. Inferior chocolate can result in a grainy texture.
When melting, ensure no water gets into your chocolate, as this can cause it to seize. Stir frequently to prevent burning, especially when using a microwave.
Allow the chocolate-butter mixture to cool slightly before adding it to the eggs. Hot chocolate can scramble the eggs, leading to a lumpy batter.
Mixing Matters: Avoiding a Tough Texture
For a truly tender cake, incorporate the flour with a gentle folding motion using a spatula, not a whisk. This minimizes gluten development.
Stop mixing as soon as the flour disappears. Any additional agitation can make your Decadent Chocolate Lava Cake dense and less enjoyable.
Ramekin Readiness: The Key to a Smooth Release
Butter your ramekins thoroughly, ensuring every inch is coated. Cold butter works best for this, as it allows for a thicker, more even coating.
When dusting with cocoa powder, rotate and tap the ramekin to ensure full coverage. The cocoa creates a non-stick barrier and adds a subtle chocolate flavor to the cake’s exterior.
Spotting the Perfect ‘Jiggle’: Oven Watch Tips
Get to know your oven; baking times can vary slightly. Start checking at 12 minutes, then every 30 seconds thereafter.
The perfect molten chocolate dessert will have firm edges and a center that gently ripples or ‘jiggles’ like soft-set jelly when lightly tapped or nudged. This is your cue to remove them.
Temperature is Your Friend: Ingredient Prep
Ensure your eggs and butter are at room temperature before you begin. This allows them to emulsify better, creating a smoother, more uniform batter.
Room temperature ingredients contribute to a more consistent and predictable outcome, crucial for a truly Decadent Chocolate Lava Cake.
Troubleshooting Your Lava Cake: Common Hurdles & Easy Fixes
Even with the best intentions, sometimes things don’t go as planned. Here are solutions to common lava cake problems.
Problem: My Lava Cake is Dry and Not Gooey!
This is almost always a sign of overbaking. The crucial “jiggle” step was missed, and the cake cooked too long. Next time, pull them from the oven promptly at the 12-minute mark or as soon as the edges are set and the center is visibly jiggly.
Ensure your oven temperature is accurate; an oven thermometer can confirm if your oven runs hot or cold, impacting precise baking times.
Problem: My Lava Cake Stuck to the Ramekin!
Inadequate ramekin preparation is the culprit here. You need to generously butter and dust every inch of the ramekin with cocoa powder.
Don’t skimp on the butter, and ensure a complete cocoa coating. This creates the essential non-stick barrier for a clean release.
Problem: My Batter is Lumpy!
Lumps can occur if your chocolate wasn’t fully melted and smooth, or if your powdered sugar wasn’t whisked thoroughly with the eggs. Ensure your chocolate-butter mixture is silky before combining.
Sifting your powdered sugar can also help prevent lumps from the start, contributing to a smoother batter texture.
Problem: My Cakes Didn’t Rise Well!
If your cakes are flat, it’s often due to overmixing the flour, which develops gluten and results in a dense texture. Ensure you fold the flour in gently and only until just combined.
Too much butter in the recipe can also sometimes inhibit rise, so precise measurement is important for the right balance.
Beyond the Bake: Serving, Storing, and Customizing Your Treat
Enhance your Decadent Chocolate Lava Cake experience with these versatile tips.
Perfect Pairings: Serving Suggestions for Maximum Delight
Beyond vanilla ice cream, caramel, and strawberries, consider a sprinkle of fresh raspberries for tartness, a dollop of freshly whipped cream, or a dusting of cocoa powder. A drizzle of espresso glaze or a tiny shot of an orange liqueur can also elevate the flavors.
The contrast of hot and cold, rich and fresh, is what truly makes this molten chocolate dessert shine.
Make-Ahead Magic: Can You Prep Lava Cakes in Advance?
Yes, you can! Prepare the batter as directed, pour it into the buttered and cocoa-dusted ramekins, and then cover them tightly with plastic wrap.
Refrigerate for up to 24 hours. When ready to bake, add a couple of extra minutes to the baking time, as the batter will be colder.
Storing Leftovers (If There Are Any!)
If you happen to have any leftover baked lava cakes, cover them and refrigerate for up to 2-3 days. To reheat, warm gently in the microwave for 20-30 seconds or in a preheated oven at 300°F (150°C) for 5-7 minutes, until the center is warm and gooey again.
Be careful not to overheat, or you’ll lose the molten effect and end up with a solid chocolate cake.
Customizing Your Decadent Chocolate Lava Cake Flavor
Experiment with flavor additions to personalize your lava cakes. Try adding a teaspoon of instant espresso powder to the chocolate mixture to intensify the chocolate flavor without a coffee taste.
For a citrusy note, grate a little orange zest into the batter. A pinch of cayenne pepper can add a subtle, sophisticated warmth, transforming your individual chocolate cakes into a spiced delight.
Your Chocolate Lava Cake Questions Answered
Here are answers to common questions about making this exquisite dessert.
What Kind of Dark Chocolate Should I Use?
For the best flavor and texture in your molten chocolate dessert, I recommend using a high-quality dark chocolate bar or baking chocolate with a cocoa percentage between 60% and 75%. Brands like Ghirardelli, Lindt, or Valrhona work beautifully.
Avoid chocolate chips, as they often contain stabilizers that prevent them from melting as smoothly, which is crucial for a truly Decadent Chocolate Lava Cake.
Can I Make This Recipe Gluten-Free?
Yes, absolutely! You can easily adapt this recipe to be gluten-free by substituting the all-purpose flour with a 1:1 gluten-free baking flour blend. Ensure your blend contains xanthan gum for proper structure.
No other significant adjustments are typically needed, as the amount of flour is small. Just fold gently as instructed.
What If I Don’t Have Ramekins?
While ramekins are ideal, you can use other oven-safe dishes. Muffin tins can work if buttered and floured very well, but baking time will be significantly shorter (around 8-10 minutes) due to their smaller size.
Alternatively, small oven-safe teacups or even ceramic coffee mugs can be used, ensuring they are well-greased. Adjust baking time based on size.
Can I Make Larger or Smaller Lava Cakes?
You can scale the recipe, but precise timing adjustments will be necessary. For larger cakes (e.g., in bigger ramekins), expect longer baking times (15-18 minutes).
For smaller individual chocolate cakes (like in mini ramekins or muffin tins), the baking time will decrease. Always rely on the “jiggle” test for doneness, regardless of size.
Why is Powdered Sugar Used Instead of Granulated?
Powdered sugar, also known as confectioners’ sugar, is finely ground sugar mixed with a small amount of cornstarch. Its fine texture helps it dissolve instantly into the egg mixture, creating a smoother, more uniform batter.
This contributes to the delicate, almost custardy texture of the molten center, unlike granulated sugar which can sometimes leave a slight grittiness or take longer to incorporate fully.
Ready to Indulge? Share Your Decadent Chocolate Lava Cake!
You now possess the secrets to creating a truly unforgettable Decadent Chocolate Lava Cake – consistently molten, deeply flavorful, and always impressive. This recipe eliminates the guesswork, empowering you to bake with confidence.
Don’t wait to experience the magic of cracking open that warm chocolate shell to reveal a river of gooey, luscious chocolate. Try this foolproof molten chocolate dessert recipe today, and share your glorious creations with us!
Decadent Chocolate Lava Cake
Course: DessertCuisine: American CuisineDifficulty: easy4
servings20
minutes14
minutes34
minutesAmerican Cuisine
Ingredients
1/2 cup (1 stick) unsalted butter
4 ounces dark chocolate, chopped
1 cup powdered sugar
2 large eggs
2 large egg yolks
1/4 cup all-purpose flour
1 teaspoon vanilla extract
Pinch of salt
Vanilla ice cream, for serving
Caramel sauce, for drizzling
Fresh strawberries, sliced, for serving
Butter and cocoa powder, for ramekins
Directions
- Preheat your oven to 425°F (220°C). Generously butter four 6-ounce ramekins and dust them with cocoa powder, tapping out any excess. This helps prevent sticking and adds a chocolate flavor.
- Melt the butter and chopped dark chocolate together in a heatproof bowl set over a saucepan of simmering water (a double boiler method), or in a microwave-safe bowl in 30-second intervals, stirring until smooth. Remove from heat and let it cool slightly.
- In a separate large bowl, whisk together the powdered sugar, whole eggs, and egg yolks until well combined and slightly lightened in color.
- Gradually whisk the cooled chocolate mixture into the egg mixture until fully incorporated. Stir in the vanilla extract and a pinch of salt.
- Gently fold in the flour until just combined. Be careful not to overmix, as this can make the cakes tough.
- Divide the batter evenly among the prepared ramekins.
- Place the ramekins on a baking sheet. This is the crucial step for a guaranteed molten center: Bake for precisely 12-14 minutes. You’re looking for the edges to be set, but the center should still be noticeably jiggly when you gently shake the ramekin. This ensures the middle remains beautifully gooey.
- Carefully remove the ramekins from the oven. Let them cool for just 1 minute.
- Place a serving plate upside down over each ramekin and, wearing oven mitts, carefully invert the ramekin and cake onto the plate. The cake should slide out easily.
- Serve immediately with a scoop of vanilla ice cream, a drizzle of caramel sauce, and fresh sliced strawberries. Enjoy that perfect molten center!
Notes
- Baking precisely for 12-14 minutes ensures a perfectly molten center; edges set, but middle jiggly.