Alright fellow sweet treat lovers, let’s talk about one of the most classic and beloved flavor combinations out there: chocolate and peanut butter! It’s a match made in dessert heaven, isn’t it? And while there are countless ways to enjoy this dynamic duo, there’s something truly special about homemade chocolate peanut butter treats. You know, those perfect little bite-sized confections dipped in a smooth, glossy chocolate coating?
Maybe you’ve tried making them before, rolling up a simple peanut butter filling and attempting to dip them in melted chocolate, only to end up with a frustrating mess. Clumpy chocolate, uneven coatings, treats that fall apart… trust me, I’ve been there! It can feel like the chocolate has a mind of its own. But after years of experimenting, I finally unlocked the secret to achieving that flawless, picture-perfect coating every single time. It’s surprisingly simple and makes all the difference. These easy chocolate peanut butter treats are about to become your new go-to indulgence!
Why You’ll Absolutely Adore Making These
Beyond the sheer deliciousness of pairing rich chocolate with creamy peanut butter, there are so many reasons why this recipe deserves a spot in your baking (or rather, no-baking!) repertoire:
- They’re No-Bake Wonders: Perfect for hot days or when you just don’t feel like turning on the oven. All you need is a little fridge space.
- Simple Ingredients: You likely have most of these staples in your pantry right now.
- That Perfect Texture: A smooth, slightly-firm peanut butter center enrobed in a satisfyingly snappy chocolate shell.
- Customizable: While the classic crushed peanut topping is fantastic, you can easily switch things up (more on that later!).
- Crowd-Pleaser: Seriously, who can resist the magic of chocolate and peanut butter? They disappear fast at parties, potlucks, and family gatherings.
- Great for Gifting: Homemade treats wrapped up nicely are always a welcome present.
These easy chocolate peanut butter treats are more than just candy; they’re little bites of nostalgic bliss that are surprisingly simple to master once you know the trick.
Gathering Your Ingredients for Perfect Peanut Butter Bliss
Making these delectable treats requires just a handful of common ingredients. But understanding the role each one plays helps ensure your success and gives you a little more flexibility. Think of it as building the perfect foundation for flavor and texture.
For the classic peanut butter base, we start with smooth peanut butter. While crunchy peanut butter can work if you like a little texture inside, smooth gives you that consistent, melt-in-your-mouth center that pairs beautifully with the chocolate shell. Unsalted butter, softened to room temperature, is crucial for binding the peanut butter and powdered sugar into a pliable dough. Make sure it’s truly soft, not melted, for the best results. Powdered sugar is what sweetens and thickens the mixture, giving it that classic candy-like consistency. And a touch of vanilla extract, though optional, adds a lovely layer of aromatic flavor that rounds out the peanut butter perfectly.
The real star of the show, besides the peanut butter, is the chocolate coating. You have a couple of options here. Chocolate chips are readily available and work well, especially when you employ our secret for a smooth coating. Melting chocolate, often found as wafers or blocks specifically designed for dipping and coating, is often the easiest route as it melts smoothly without needing any additions. To achieve that glossy, thin, perfectly set chocolate shell, especially when using standard chocolate chips, a little vegetable shortening or coconut oil is your best friend. It helps the chocolate melt thinner, making it easier to dip the balls evenly, and promotes a smoother set.
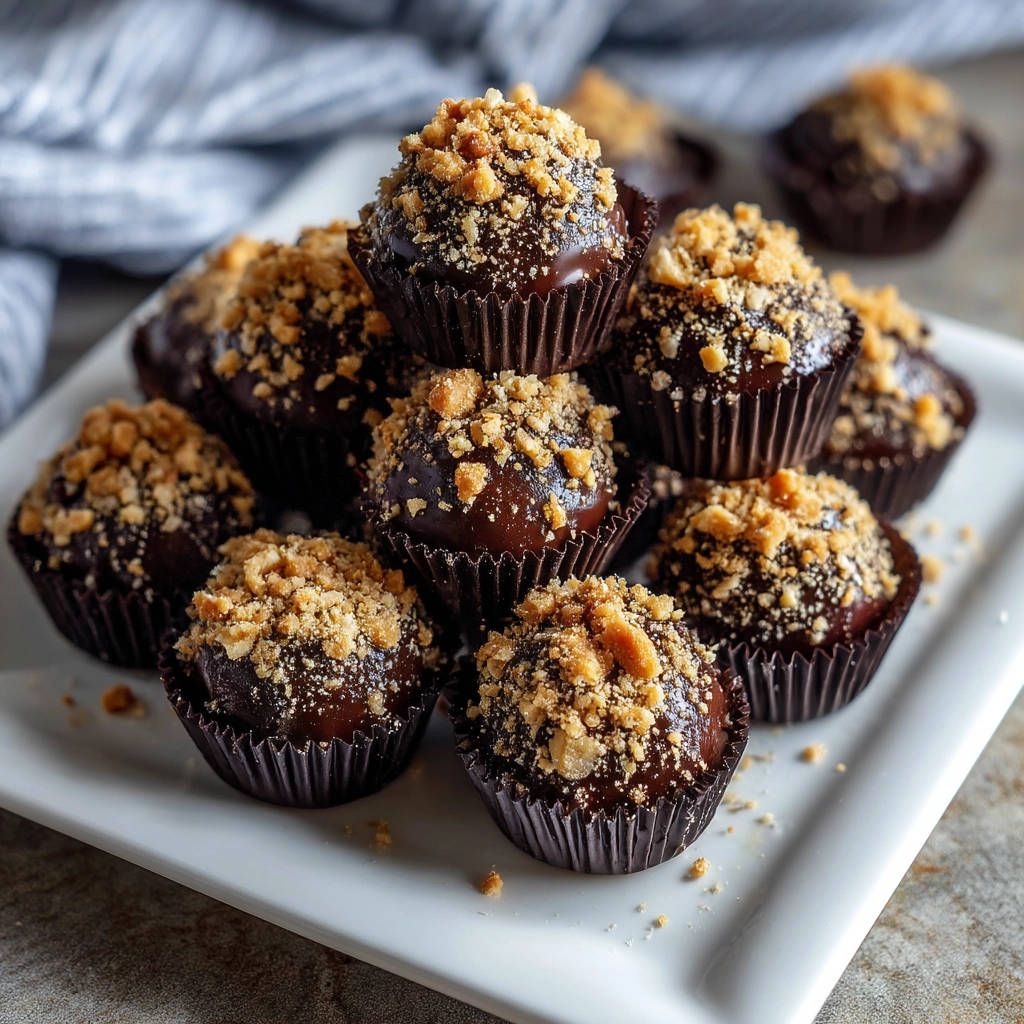
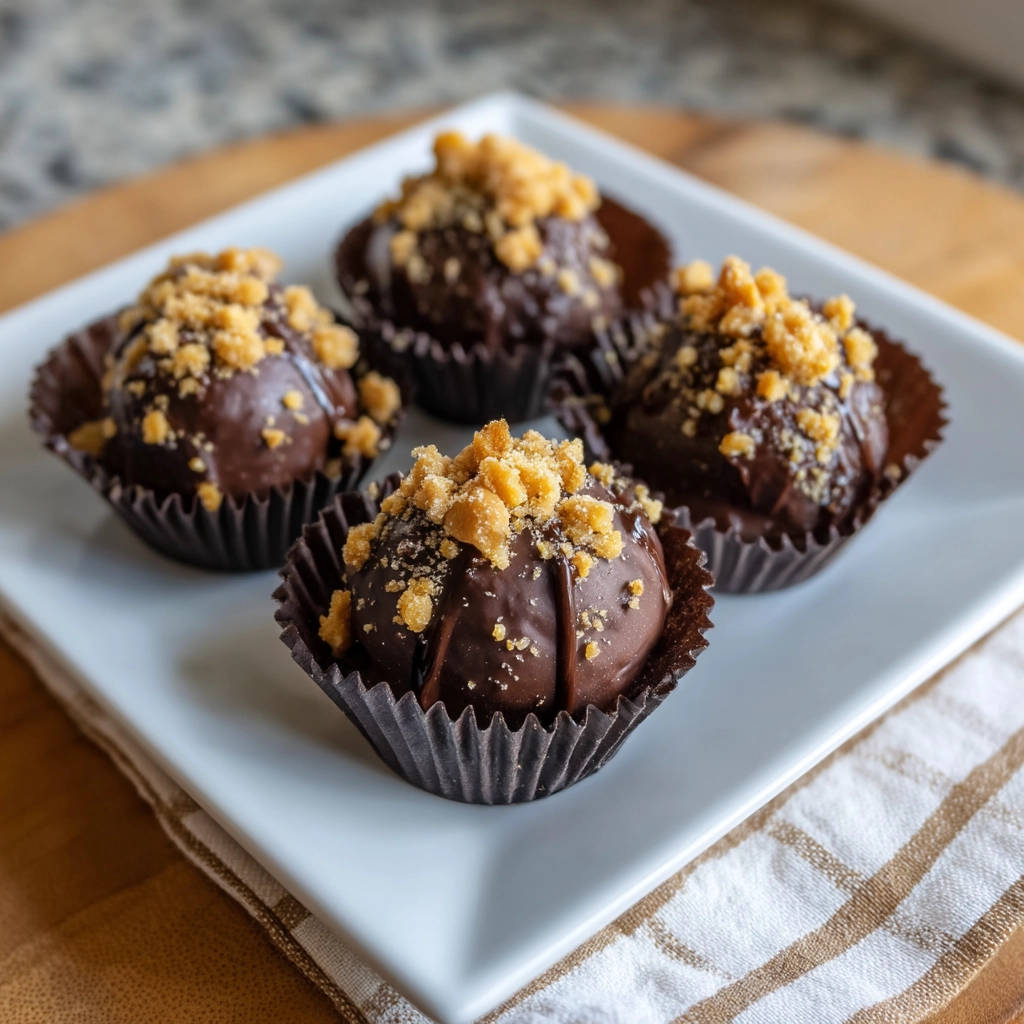
Finally, finely crushed peanuts provide that signature look and a welcome nutty crunch on top. You can crush them yourself or look for pre-crushed peanuts.
Here’s a list of everything you’ll need:
- 1 cup smooth peanut butter
- 1/4 cup unsalted butter, softened
- 2 cups powdered sugar
- 1 teaspoon vanilla extract (optional)
- 12 ounces chocolate chips or melting chocolate
- 1 tablespoon vegetable shortening or coconut oil (optional, for chocolate chips)
- 1/2 cup finely crushed peanuts
Crafting Your Easy Chocolate Peanut Butter Treats: Step-by-Step
Now for the fun part! Follow these steps carefully, paying special attention to the chilling and dipping techniques, and you’ll be rewarded with perfect chocolate peanut butter treats.
Start the Peanut Butter Base: Grab a large mixing bowl. Add the smooth peanut butter, your softened unsalted butter, and the powdered sugar. If you’re using the vanilla extract, add that now too. Using a sturdy spoon or a stand mixer fitted with a paddle attachment, mix everything together. At first, it might seem a little dry, but keep going. The mixture will come together into a cohesive, slightly crumbly but pressable dough. You want it thoroughly combined with no streaks of unmixed powdered sugar.
Shape the Treats: Now it’s time to roll! Take small portions of the peanut butter dough and roll them gently between your palms into 1-inch balls. Aim for relative uniformity in size so they look nice and dip evenly. As you roll them, place the finished balls onto a baking sheet that you’ve lined with parchment paper. The parchment paper is key – it prevents sticking and makes them easy to lift off later.
The Crucial Chill Time: This step is the secret sauce for a flawless coating! Once all your peanut butter balls are rolled and on the baking sheet, pop the entire tray into the refrigerator. You need to chill them for at least 30 minutes, and up to an hour or even longer is fine. Why is this so important? Chilling the peanut butter balls makes them firm. When you dip a cold ball into warm melted chocolate, the chocolate sets much faster and more smoothly on the surface, preventing the peanut butter from getting too soft and falling apart, and helping the chocolate adhere beautifully.
Prepare the Chocolate Coating: While your peanut butter centers are getting perfectly chilled, prepare your chocolate. If you’re using chocolate chips, place them in a microwave-safe bowl. Melt the chocolate gently in 30-second intervals in the microwave, stirring thoroughly after each interval. Chocolate can seize easily if overheated, so low and slow is the way to go! You can also use a double boiler on the stovetop for even gentler melting. Once the chocolate chips are mostly melted, stir in the vegetable shortening or coconut oil if you’re using it. Continue stirring until the mixture is completely smooth and glossy. This addition is specifically for chocolate chips and helps create a thinner, more fluid coating. If you’re using melting chocolate wafers or blocks, simply follow the package instructions – these are formulated to melt smoothly without additives.
The Dipping Magic: This is the fun part! Get your chilled peanut butter balls and the melted chocolate ready. Use a fork or, even better, a candy dipping tool (they have loops that cradle the ball perfectly and allow excess chocolate to drain). Carefully drop one chilled peanut butter ball into the melted chocolate. Ensure it is fully submerged – use the fork or tool to gently push it under if needed, making sure it’s completely coated on all sides.
Lift and Drain: Lift the chocolate-covered ball out of the bowl using your fork or dipping tool. Pause over the bowl for a moment, allowing the excess chocolate to drip back in. This helps avoid thick, heavy coatings. Then, gently scrape the bottom of the fork or tool against the rim of the bowl. This removes the final drip and helps create a cleaner edge on the bottom of the treat.
Place and Garnish: Carefully transfer the coated ball back onto the parchment-lined baking sheet. Do this gently to avoid smudging the coating. Work relatively quickly now! Immediately after placing the coated treat, sprinkle the top generously with the finely crushed peanuts. The chocolate needs to be wet enough for the peanuts to stick, so don’t wait too long between dipping and sprinkling.
Repeat and Chill Again: Continue the dipping and garnishing process with the remaining peanut butter balls. Once all the treats are coated and topped, return the baking sheet to the refrigerator. Let them chill for another 15-20 minutes, or until the chocolate coating is completely set and feels firm to the touch. This final chill ensures the chocolate hardens properly, giving you that satisfying snap.
Serving and Storing: Once the chocolate is fully set, your delicious treats are ready to be enjoyed! For a neat presentation, you can place them in mini cupcake liners. Store any leftover treats in an airtight container in the refrigerator. They stack well once the chocolate is firm.
Tips for Making Your Peanut Butter Treats Extraordinary
While the recipe itself is straightforward, a few insider tips can elevate your easy chocolate peanut butter treats from great to absolutely perfect. These little tweaks can make a big difference in both the process and the final result.
Mastering the Chocolate: The quality of your chocolate matters! Use a good quality chocolate chip or melting chocolate for the best flavor and melting consistency. If using chocolate chips and the mixture still seems too thick after adding shortening/oil, you can add just a tiny bit more shortening or oil (like a half teaspoon at a time), stirring until you get a smooth, dip-able consistency. Avoid adding milk or water, as this will cause the chocolate to seize.
If you’re looking for other delightful desserts that use chocolate, you might enjoy our Deep Dark Chocolate Layer Cake or perhaps the incredibly smooth Silky Smooth Chocolate Mousse.
The Importance of Temperature: We stressed chilling the peanut butter balls, but the temperature of your melted chocolate is also key. It should be warm and fluid enough for easy dipping, but not so hot that it melts the peanut butter centers instantly. If the chocolate starts to thicken as you dip, give it a quick 15-second reheat in the microwave and stir well.
Size Consistency: Aim for uniform ball size when rolling the peanut butter mixture. This ensures they all require roughly the same amount of chocolate coating and set at a similar rate.
Get Creative with Toppings: Crushed peanuts are classic, but don’t stop there! While the chocolate is still wet, try sprinkling with flaky sea salt, chopped sprinkles, mini chocolate chips, a drizzle of white chocolate, or even crushed pretzels for a salty crunch. The possibilities are endless!
Batch Dipping: Work in batches. Don’t take all the chilled peanut butter balls out of the fridge at once. Keep the unused ones chilled while you dip a few at a time. This maintains their firmness, which is crucial for successful coating.
Troubleshooting Common Dipping Problems
Even with the best intentions, chocolate can sometimes be tricky. Here are solutions to common issues:
- Chocolate too thick: If using chips, stir in a little more shortening or coconut oil (1/2 tsp increments) until smooth. If using melting wafers, they may have been overheated or are not designed for thin coating.
- Chocolate seizing (turning clumpy/hard): This usually happens from overheating or getting even a tiny drop of water in the chocolate. Unfortunately, seized chocolate is hard to recover for dipping. Start over with fresh chocolate, melting it more gently.
- Coating is uneven/streaky: This could be because the peanut butter balls weren’t cold enough, the chocolate was too hot, or the chocolate wasn’t thin enough (if using chips without oil). Ensure your balls are well chilled and your chocolate is melted smoothly to the right consistency.
Your Easy Chocolate Peanut Butter Treats Questions Answered (FAQ)
Got questions about making these simple yet sensational treats? Here are some common queries people have:
Can I use crunchy peanut butter?
Yes, you absolutely can! Using crunchy peanut butter will give the center of your treats a lovely textural contrast. The process for making the peanut butter base and rolling the balls remains the same. It’s really down to personal preference!
How long do these peanut butter treats last?
When stored in an airtight container in the refrigerator, these chocolate peanut butter treats will typically last for 2-3 weeks. The high sugar content helps preserve them. While they last a while, I bet they’ll be devoured long before that!
Can I freeze these treats?
Yes, they freeze beautifully! Once the chocolate coating is completely set, place the treats in a single layer on a baking sheet and freeze for about an hour until solid. Then, transfer them to a freezer-safe airtight container or a resealable freezer bag, separating layers with parchment paper to prevent sticking. They can be frozen for up to 2-3 months. Thaw them in the refrigerator for a few hours or at room temperature for about 30 minutes before serving.
Is the vegetable shortening or coconut oil necessary?
If you are using melting chocolate wafers or blocks designed specifically for candy making, the shortening or oil is usually not needed. These chocolates contain ingredients that help them melt and set smoothly. However, if you are using standard chocolate chips, adding the shortening or coconut oil is highly recommended. It lowers the viscosity of the melted chocolate, making it thinner and much easier to dip evenly, resulting in a smoother, more professional-looking coating that isn’t too thick or clumpy.
What other toppings could I use instead of peanuts?
There are so many fun options! Try finely chopped pretzels for a salty crunch, mini M&M’s or sprinkles for color, shredded coconut, a sprinkle of sea salt, or a drizzle of white chocolate or caramel sauce. Just make sure to add them immediately after dipping while the chocolate is still wet so they stick!
Speaking of using delicious ingredients like chocolate and caramel together, you might also enjoy our Salted Caramel Chocolate Crispy Treats or the delightful Chocolate Caramel Pecan Cookies.
Enjoy Your Homemade Easy Chocolate Peanut Butter Treats!
There you have it! The secret to perfectly coated, absolutely irresistible easy chocolate peanut butter treats. No more wrestling with stubborn chocolate or ending up with messy, uneven coatings. With just a little chilling magic and a few simple ingredients, you can create these delightful confections that are sure to impress anyone lucky enough to try them.
Whether you’re making them for a holiday platter, a special occasion, or just because you’re craving that classic flavor combination, these treats are a winner. Give this recipe a try, and I promise you’ll be amazed at how easy it is to get that flawless finish.
Did you make these peanut butter treats? What was your favorite part? Leave a comment below and let me know how they turned out! And if you customized them with a different topping, I’d love to hear about it!
Easy Chocolate Peanut Butter Treats

Ingredients
- 1 cup smooth peanut butter
- 1/4 cup unsalted butter softened
- 2 cups powdered sugar
- 1 teaspoon vanilla extract (optional, not visible but common)
- 12 ounces chocolate chips or melting chocolate
- 1 tablespoon vegetable shortening or coconut oil (optional, helps with smoothness)
- 1/2 cup finely crushed peanuts
Directions
- In a large bowl, combine the peanut butter, softened butter, powdered sugar, and vanilla extract if using. Mix until everything is well combined and a dough forms.
- Roll the mixture into 1 inch balls. Place them on a baking sheet lined with parchment paper.
- Chill the balls in the refrigerator for at least 30 minutes. This is key to getting a nice, even coating.
- While the balls are chilling, prepare the chocolate coating. If using chocolate chips, melt them gently in a microwave safe bowl in 30 second intervals, stirring between each, until smooth. You can also use a double boiler. If using, stir in the shortening or coconut oil until melted and smooth with the chocolate. If using melting chocolate, follow package instructions.
- This is where the magic happens for the perfect coating: Use a fork or a candy dipping tool to dip each chilled ball into the melted chocolate. Ensure it is completely submerged and coated.
- Lift the ball out with the fork, allowing excess chocolate to drip back into the bowl. Scrape the bottom lightly against the rim of the bowl to remove the last drip.
- Carefully place the coated ball back onto the parchment lined baking sheet. Immediately sprinkle the top with the crushed peanuts before the chocolate sets.
- Repeat with the remaining balls. Return the baking sheet to the refrigerator for another 15-20 minutes, or until the chocolate coating is completely set and firm.
- Place the finished treats in mini cupcake liners for serving, if desired. Store in an airtight container in the refrigerator.