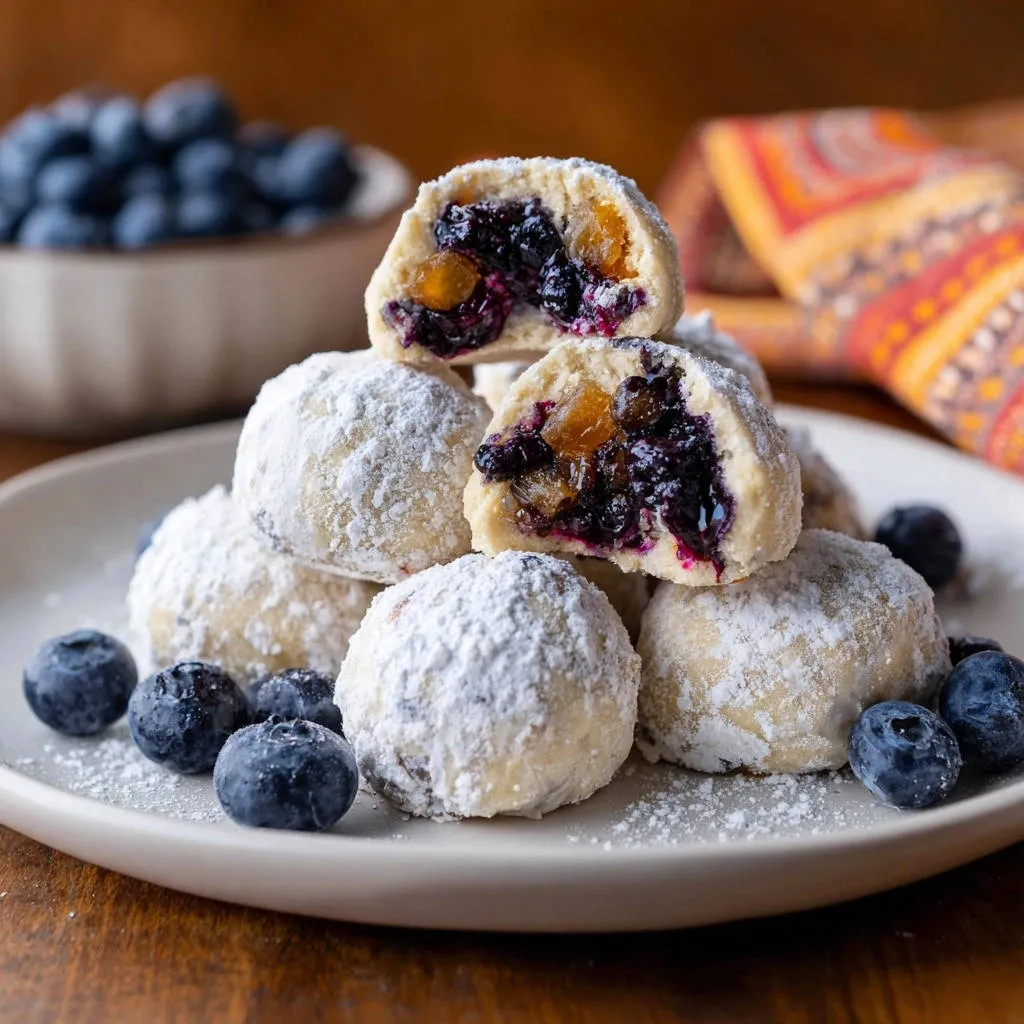
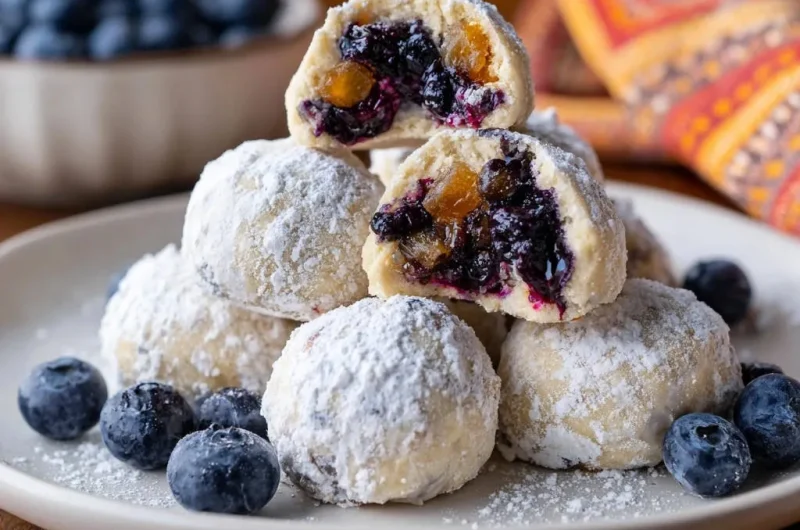
I’ve always cherished the nostalgic charm of a tender, powdered-sugar cookie, especially when it holds a hidden burst of fruit. However, the common frustration of jam bubbling out during baking has plagued many bakers, including myself, when attempting to create perfect Fruit-Filled Snowball Cookies. Today, I’m thrilled to share the game-changing secret to keeping that sweet, fruity goodness perfectly tucked away inside every single bite.
This recipe transforms a potentially messy endeavor into a guaranteed success, delivering delightful, leak-free snowball cookies every time. Get ready for a truly impressive and irresistibly delicious homemade treat!
Why Our Fruit-Filled Snowball Cookies Won’t Leak (The Game-Changer!)
The beauty of this recipe for Fruit-Filled Snowball Cookies lies in its foolproof approach to preventing dreaded jam leaks. We focus on critical steps that ensure the fruit filling remains securely encased, creating a delightful surprise with every bite.
Our method emphasizes proper dough chilling and a meticulous sealing technique, which are the cornerstone of success. This results in an incredibly tender cookie exterior that perfectly complements the vibrant, juicy fruit interior, without any sticky mishaps.
You’ll enjoy a reliably perfect texture and flavor, showcasing your baking expertise and eliminating common frustrations.
Crafting the Perfect Bite: Essential Ingredients
The Dough’s Foundation: Butter, Flour & Sweetness
Unsalted Butter, softened: Using softened unsalted butter is crucial for achieving a tender, rich, and melt-in-your-mouth cookie texture. It creams beautifully with sugar, incorporating air for a delicate crumb.
Powdered Sugar: Beyond sweetness, powdered sugar contributes to the delicate, almost crumbly texture of these cookies, making them truly melt in your mouth. It also blends seamlessly into the dough.
All-Purpose Flour: This provides the necessary structure for the cookie dough, allowing it to hold its shape and encase the filling. Measuring correctly is key to avoiding a tough cookie.
Salt: A small amount of salt is vital for balancing the sweetness and enhancing all the flavors in the cookie. It brings out the best in both the butter and the fruit.
The Heart of the Cookie: Jam Selection Matters
Blueberry Jam or Preserves (thick consistency preferred): The quality and, most importantly, the consistency of your jam are paramount. A thick blueberry jam offers a vibrant, sweet-tart filling without excessive moisture.
Apricot Jam or Preserves (thick consistency preferred): Similarly, a robust and thick apricot jam provides a wonderfully contrasting sweetness and tang. Its natural pectin content often lends itself well to thickening.
If your chosen jams appear too thin, a gentle simmer over low heat can thicken them, which is essential to prevent leaks during baking. Always ensure they are completely cooled before use.
Aromatic Touches: Vanilla Extract
Vanilla Extract: This classic baking staple adds a warm, inviting aroma and a subtle depth of flavor that complements both the buttery cookie and the fruit fillings beautifully. Choose a good quality extract for the best results.
Your Baking Arsenal: Essential Equipment for Success
Mixing Bowls (various sizes): Essential for combining ingredients and preparing your jams.
Electric Mixer (stand or hand-held): Necessary for creaming the butter and sugar thoroughly, ensuring an airy and tender dough.
Rolling Pin (optional): While hand-flattening works, a rolling pin can help achieve more uniform dough discs if preferred.
Baking Sheets & Parchment Paper: Parchment paper prevents sticking, ensures even heat distribution, and makes cleanup a breeze.
Wire Rack: Crucial for allowing your cookies to cool completely and evenly, preventing them from becoming soggy on the bottom.
Measuring Cups & Spoons: Accurate measurement is fundamental in baking to ensure the correct ingredient ratios for perfect results.
Your Step-by-Step Guide to Leak-Proof Snowball Cookies
Dough Preparation: Creaming, Mixing, and Chilling
- Cream Butter and Sugar:
In a large bowl, combine softened butter and 1/2 cup powdered sugar. Cream them together using an electric mixer until the mixture is light and fluffy, usually about 2-3 minutes.
Proper creaming incorporates air into the butter, which is key for a tender, melt-in-your-mouth cookie texture and ensures even distribution of sweetness.
- Add Dry Ingredients & Vanilla:
Gradually incorporate the all-purpose flour, salt, and vanilla extract into the creamed butter mixture. Mix on low speed, just until the dough comes together and no dry streaks of flour remain.
It is crucial not to overmix the dough, as excessive mixing can develop gluten, resulting in a tough, rather than tender, cookie.
- Chill the Dough:
Divide the cohesive dough into two equal portions. Flatten each slightly into a disc, wrap tightly in plastic wrap, and refrigerate for at least 30 minutes, or up to an hour.
Chilling the dough is essential; it firms up the butter, making the dough much easier to handle, less sticky, and more pliable for effectively sealing around the filling later.
Filling Perfection: Thickening and Cooling Jams
- Prepare Your Jams:
While the cookie dough chills, verify the consistency of your blueberry and apricot jams. They must be thick, not runny, to prevent leakage during baking.
If your jams seem thin, gently simmer them in a small saucepan over low heat for 5-10 minutes, stirring occasionally, until they reduce slightly and thicken to a more preserve-like consistency.
Allow the thickened jams to cool completely to room temperature before using them for filling. Warm jam will soften the dough, making it harder to seal.
Assembly Mastery: Sealing for Success
- Preheat Oven & Prep Sheet:
Preheat your oven to 350°F (175°C). Line a baking sheet with parchment paper; this prevents sticking, aids in even baking, and simplifies cleanup.
- Form Dough Discs:
Take one portion of chilled dough from the refrigerator at a time to keep the other portion cold. Roll small, approximately 1-inch balls of dough, then gently flatten each ball between your palms or with a rolling pin into a disc about 2 inches wide.
- Fill with Jam:
Place about 1/2 teaspoon of blueberry jam in the center of half of your flattened dough discs. Place about 1/2 teaspoon of apricot jam in the center of the other half. Avoid overfilling, as this makes sealing more difficult.
- The Critical Seal:
Carefully bring the edges of the dough up and around the jam filling, pinching them together firmly and completely at the top to seal the sphere. This is the absolute key step to prevent leaks; take your time here.
Ensure there are absolutely no visible seams or cracks where the jam could escape during baking. If needed, gently roll the sealed ball between your palms to smooth out the surface and reinforce the seal.
- Arrange on Baking Sheet:
Place the sealed dough balls onto the prepared baking sheet, leaving about 1 inch between each cookie to allow for slight spreading during baking and ensure even browning.
Baking and Finishing Touches
- Bake to Perfection:
Bake the Fruit-Filled Snowball Cookies for 12-15 minutes, or until the edges are lightly golden and the cookies appear set. The bottom should be golden, and the tops a very pale cream.
Be careful not to overbake, as they will continue to firm up as they cool, and overbaking can lead to a dry, crumbly texture rather than a tender one.
- Cooling Process:
Let the cookies cool on the baking sheet for a few minutes after removing from the oven; they are fragile when hot. Then, carefully transfer them to a wire rack to cool completely. Cooling thoroughly is important for the final coating.
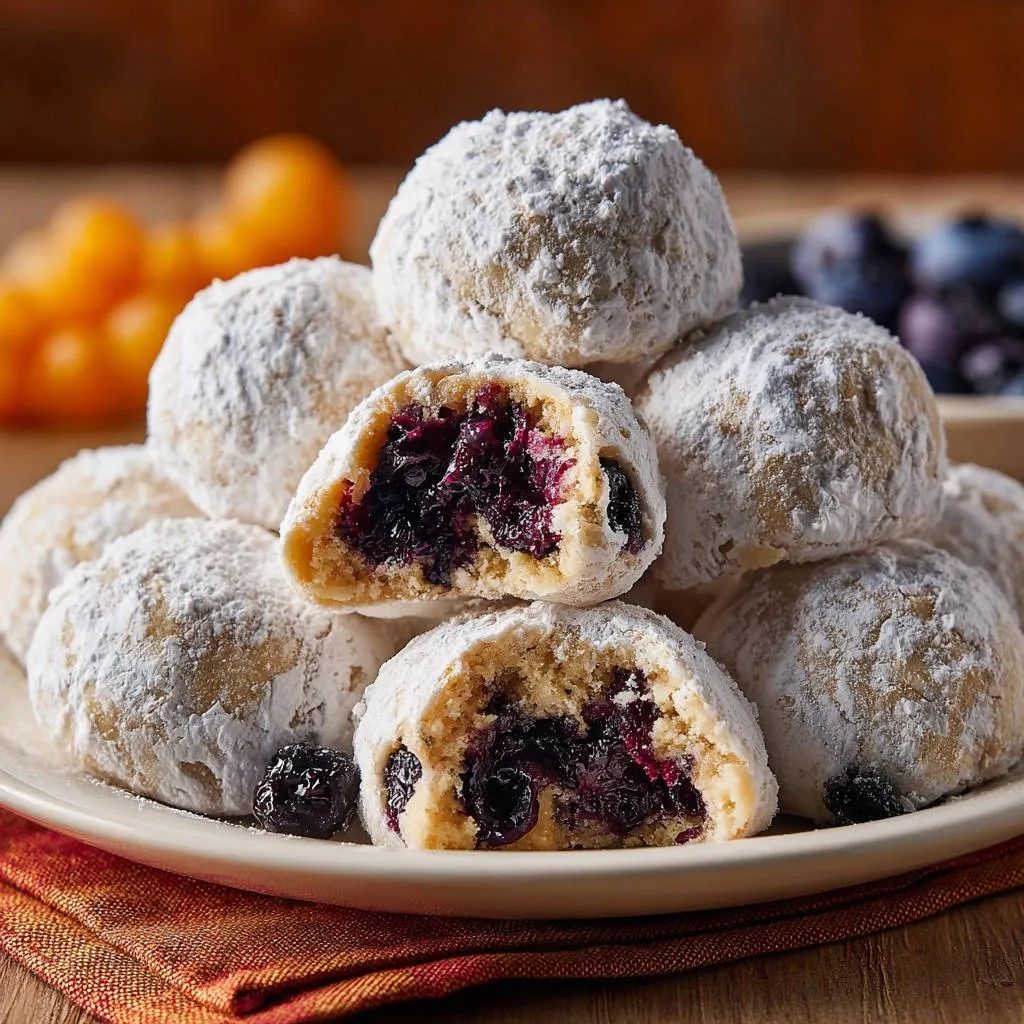
- Double Powdered Sugar Coating:
While the cookies are still slightly warm (but no longer hot), roll them generously in powdered sugar. This initial coating will lightly adhere to the warm surface.
Once completely cool, roll them in powdered sugar a second time for a thicker, more beautiful, and classic “snowball” coating that truly embodies their name.
- Serve and Garnish:
Serve your perfectly filled, leak-free Fruit-Filled Snowball Cookies, optionally garnished with fresh blueberries or apricot slices for an appealing presentation and a burst of fresh flavor, and enjoy!
Chef’s Secrets: Elevate Your Fruit-Filled Snowball Cookies Game
Embrace the Chill: Never underestimate the power of chilled dough. A well-chilled dough is firmer, less sticky, and significantly easier to work with, making the critical sealing step much more effective and preventing premature spreading in the oven.
Jam Consistency is King: This cannot be stressed enough. If your jam is too thin, it will inevitably leak. Always ensure it’s thick, simmering it gently if necessary, and cool it completely before use to maintain its viscosity inside the cookie.
The Art of the Seal: Take your time during the sealing phase. Pinch the dough firmly and meticulously around the jam, ensuring no visible seams or cracks remain. This is the primary defense against leakage and ensures a clean, round shape.
Gentle Handling Post-Seal: Once your cookies are sealed, handle them gently. Excessive squeezing or rolling can re-open seams and compromise your hard work, potentially leading to leaks during baking.
Double the Powdered Sugar, Double the Charm: The two-step coating process is not just for looks. The first warm roll helps a thin layer adhere, while the second roll on fully cooled cookies builds that iconic, pristine snowball finish and helps absorb any surface moisture, ensuring a dry, beautiful coating.
Sift for Silky Smoothness: For the most elegant finish, consider sifting your powdered sugar before rolling the cookies. This prevents lumps and ensures an ultra-smooth, uniform coating that truly looks like fresh snow.
For more cookie-making wisdom that guarantees soft, perfect results every time, explore our tips on guaranteed soft spiced glazed cookies.
Common Challenges Solved: Troubleshooting Your Snowball Cookies
Why Did My Jam Leak Out?
Jam leakage is almost always due to one of three factors: the dough was not chilled enough, the jam used was too thin, or the seal around the filling was incomplete. Ensure your dough is firm, your jam is thick and cooled, and every seam is firmly pinched and smoothed shut before baking.
My Cookies Are Crumbly or Dry.
This issue often points to overmixing the dough, which develops too much gluten, leading to a tough texture. It can also be a sign of overbaking. Mix the dough only until just combined, and watch your oven carefully, removing cookies when the edges are just lightly golden to preserve their tenderness.
My Snowball Cookies Are Spreading Too Much.
Excessive spreading typically occurs if the dough was too warm when it went into the oven, or if the butter was too soft/melted during the creaming stage. Always start with properly softened (not melted) butter, and ensure the dough is adequately chilled before baking. Placing the baking sheet in the fridge for 10 minutes before baking can also help.
Beyond Blueberries: Creative Variations for Your Snowball Cookies
Explore New Jam Flavors
Don’t limit yourself to blueberry and apricot! Experiment with other thick, fruit-filled jams like raspberry, cherry, fig, or even a tangy lemon curd for delightful new flavor experiences. Just remember to always check their consistency and thicken if necessary, just as we did for our chewy apricot granola bars.
Nutty Additions for Extra Crunch
For an added layer of flavor and a subtle crunch, you can finely grind a small amount of toasted pecans, walnuts, or almonds and gently fold them into the cookie dough before chilling. This provides a delightful textural contrast.
Spiced Winter Warmth
Infuse your Fruit-Filled Snowball Cookies with seasonal warmth by adding a pinch of ground cinnamon, nutmeg, or cardamom to the dough along with the flour. These warm spices pair beautifully with almost any fruit filling, especially berries and stone fruits.
Enjoying and Preserving Your Sweet Creations
Ideal Serving Suggestions
These tender, fruit-filled cookies are a versatile treat perfect for any occasion. They are delightful alongside a warm cup of coffee or tea, make a beautiful and intriguing addition to any holiday cookie platter, or simply serve as a delightful, unexpected bite of sweetness for an everyday indulgence.
Proper Storage for Freshness
To maintain their tender texture and freshness, store your cooled Fruit-Filled Snowball Cookies in an airtight container at room temperature for up to 5-7 days. For longer preservation, they freeze beautifully for up to 2-3 months. Thaw them at room temperature before serving for optimal enjoyment.
Burning Questions Answered: Fruit-Filled Snowball Cookies FAQs
Can I use fresh fruit instead of jam for the filling?
Using fresh fruit is generally not recommended for this recipe. Fresh fruit releases a significant amount of moisture during baking, which can lead to soggy cookies and, more critically, cause the filling to leak out. The thick consistency of jam is key to preventing this issue.
Can I make the dough ahead of time?
Yes, absolutely! The dough for these Fruit-Filled Snowball Cookies can be made up to 2-3 days in advance. Store it tightly wrapped in plastic wrap in the refrigerator until you’re ready to proceed with shaping and baking. This is a fantastic time-saver, especially useful for busy holiday baking schedules.
Are these cookies gluten-free?
As written, this recipe uses all-purpose flour. While it is possible to experiment with gluten-free flour blends, the texture and especially the sealing properties of the dough might vary significantly. For the best results with a gluten-free version, look for a high-quality gluten-free all-purpose flour blend specifically designed for baking cookies and be prepared for potential adjustments.
Why is the double powdered sugar coating necessary?
The double coating of powdered sugar serves two important purposes. The first roll, while the cookies are slightly warm, allows a thin, foundational layer to adhere. The second roll, applied once the cookies are completely cool, builds up that iconic, thick, pristine “snowball” appearance and helps to absorb any residual surface moisture, ensuring a beautiful, non-sticky finish that looks picture-perfect, much like the delicate coating on our classic shortbread fingers.
Ready to Impress? Share Your Fruit-Filled Snowball Cookies Masterpiece!
You now possess the insider knowledge and expert techniques to create tender, perfectly filled Fruit-Filled Snowball Cookies, free from the common frustration of leaking jam. Say goodbye to sticky baking mishaps and hello to the delightful surprise of a perfectly tucked-away fruity center!
We encourage you to embark on this delicious baking adventure and truly master these charming treats. Don’t forget to share your beautifully crafted snowball cookies with us on social media, or leave a comment below detailing your favorite jam filling variation. Happy baking!
Fruit-Filled Snowball Cookies
Course: DessertCuisine: American CuisineDifficulty: easy4
about 24-30 cookies1
hour15
minutes60
minutesAmerican Cuisine
Ingredients
1 cup (2 sticks) unsalted butter, softened
1/2 cup powdered sugar, plus more for coating
2 cups all-purpose flour
1/4 teaspoon salt
1 teaspoon vanilla extract
1/2 cup blueberry jam or preserves (thick consistency preferred)
1/4 cup apricot jam or preserves (thick consistency preferred)
Fresh blueberries, for garnish (optional)
Directions
- In a large bowl, cream together the softened butter and 1/2 cup powdered sugar until light and fluffy.
- Add the flour, salt, and vanilla extract to the butter mixture. Mix on low speed until the dough just comes together. Be careful not to overmix.
- Divide the dough into two equal portions, flatten slightly, wrap in plastic wrap, and refrigerate for at least 30 minutes. Chilling the dough makes it much easier to handle and seal effectively around the filling.
- While the dough chills, prepare your jam fillings. It’s crucial that your jams are thick, not runny. If your jams seem a bit thin, you can gently simmer them in a small saucepan over low heat for 5-10 minutes, stirring occasionally, until they thicken slightly. Let them cool completely before using.
- Preheat your oven to 350 degrees Fahrenheit. Line a baking sheet with parchment paper.
- Take one portion of chilled dough from the refrigerator. Roll small, approximately 1-inch balls of dough. Flatten each ball into a disc about 2 inches wide.
- Place about 1/2 teaspoon of blueberry jam in the center of half of your flattened dough discs. Place about 1/2 teaspoon of apricot jam in the center of the other half.
- Carefully bring the edges of the dough up and around the filling, pinching them together firmly to completely seal the sphere. This is the key step to prevent leaks. Ensure there are absolutely no visible seams or cracks where the jam could escape during baking. Roll gently between your palms to smooth out the surface if needed.
- Place the sealed dough balls onto the prepared baking sheet, leaving about 1 inch between each cookie.
- Bake for 12-15 minutes, or until the edges are lightly golden and the cookies are set. Do not overbake.
- Let the cookies cool on the baking sheet for a few minutes before transferring them to a wire rack to cool completely.
- While the cookies are still slightly warm but not hot, roll them generously in powdered sugar. Once completely cool, roll them in powdered sugar a second time for a thicker, more beautiful coating.
- Serve with fresh blueberries, if desired, and enjoy your perfectly filled, leak-free cookies!
Notes
- Ensure jams are thick and cookies are completely sealed to prevent leaks. Double roll in powdered sugar for best coating.