Oh, hello there, fellow dessert lover! Are you ready to dive headfirst into a chocolatey, creamy, fruity dream? Because today, we are making Fudgy Cherry Cheesecake Brownies. Now, I know what you might be thinking. Brownies are tricky enough to get perfectly fudgy on their own, right? Adding a swirl of rich cheesecake and bursts of sweet-tart cherries seems like a recipe for disaster – maybe a cakey bottom or a soggy mess.
Trust me, I’ve been there! I’ve baked countless batches, trying every trick in the book, only to be met with disappointment. But after much trial and error (and a lot of tasty “failures”), I finally cracked the code. There is one simple secret to ensuring that the brownie layer beneath that luscious cheesecake swirl and vibrant cherries remains gloriously, unequivocally fudgy. And I’m about to share it with you.
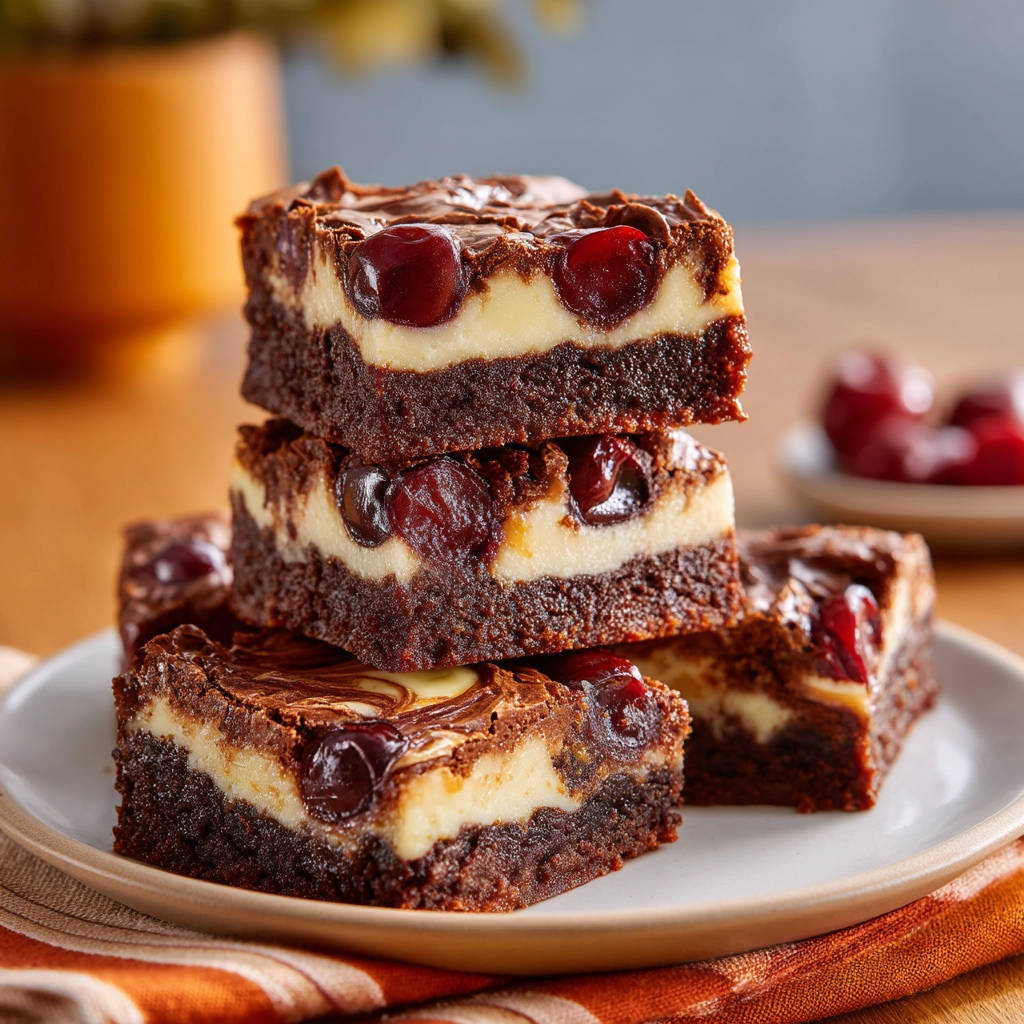
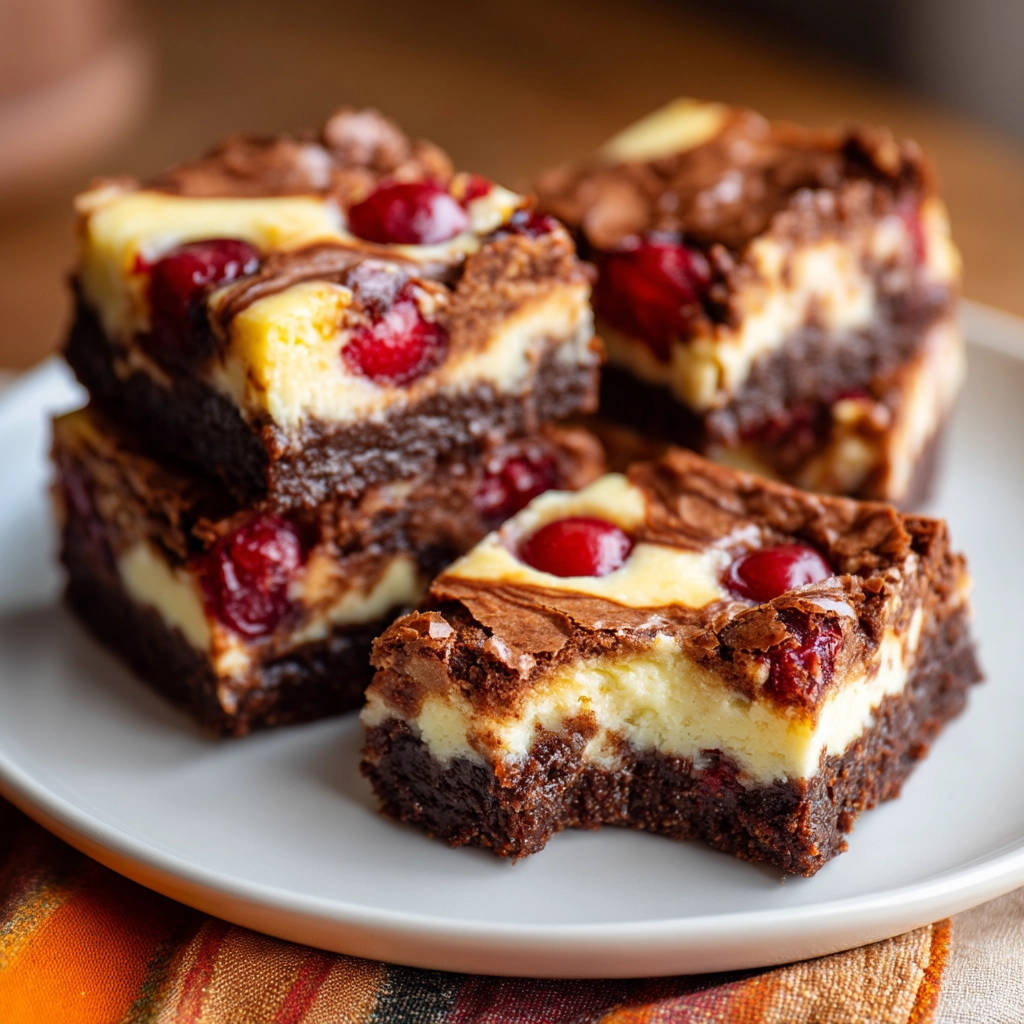
These aren’t just any brownies; they’re a symphony of textures and flavors. The intense chocolate of the brownie, the smooth tang of the cheesecake, and the juicy pop of the cherries come together in a harmonious bite that’s absolutely irresistible. Get ready to bake a batch that will have everyone asking for the recipe!
Why You’ll Fall Head Over Heels for These Swirled Cherry Brownies
What makes these Fudgy Cherry Cheesecake Brownies stand out from the crowd? It’s more than just a simple combination; it’s the perfect marriage of classic desserts.
- The Unbeatable Fudgy Factor: As promised, this recipe delivers on the fudginess. We’re talking dense, rich, almost molten chocolate goodness that is the hallmark of a truly great brownie.
- Creamy Cheesecake Swirls: The smooth, slightly tangy cheesecake layer cuts through the richness of the brownie, adding a beautiful contrast in both flavor and texture. It’s like getting two desserts in one!
- Juicy Cherry Bursts: Cherries add a bright, slightly tart pop that complements the chocolate and cream cheese beautifully. They bring a lovely freshness to each bite.
- Stunning Presentation: The swirled layers and scattered cherries make these brownies look absolutely gorgeous, perfect for sharing (if you can bear to!).
- Easier Than You Think: With my simple technique, achieving that perfect fudgy brownie base with the cheesecake and cherries on top is completely achievable for bakers of all levels.
Gathering Your Ingredients for Fudgy Cherry Cheesecake Brownies
Alright, let’s talk about what you’ll need. Each ingredient plays a crucial role in building the perfect flavor and texture profile for these indulgent bars. Having everything measured out and ready before you start will make the process smooth and enjoyable.
For the base, we’re building a classic, incredibly rich brownie batter. Melted butter provides a moist, dense texture that oil can’t quite replicate, contributing significantly to that desired fudginess. Granulated sugar adds sweetness and helps create that slightly crisp top edge, while eggs bind everything together and add richness. A touch of vanilla extract enhances the chocolate flavor beautifully. Unsweetened cocoa powder is where the chocolate magic happens; choosing a good quality cocoa will really make the chocolate flavor pop. We use just a little all-purpose flour for structure and a small amount of salt to balance the sweetness and deepen the chocolate notes.
For the creamy, dreamy cheesecake swirl, you’ll need softened cream cheese. Make sure it’s at room temperature; this is absolutely key to getting a smooth, lump-free batter. More granulated sugar provides sweetness to the tangy cream cheese, another egg adds structure and richness, and vanilla extract rounds out the flavor.
Finally, the star fruit: cherries! You’ll need about 1 and a half cups. Fresh pitted cherries are wonderful when in season, but well-drained canned or jarred cherries (like pie cherries or dark sweet cherries) work perfectly too. Just make sure they are thoroughly drained to prevent adding excess moisture to the brownies.
Here’s a full rundown of what you’ll need:
- 1/2 cup (1 stick) unsalted butter, melted
- 1 cup granulated sugar (for the brownie base)
- 2 large eggs (for the brownie base)
- 1 teaspoon vanilla extract (for the brownie base)
- 1/3 cup unsweetened cocoa powder
- 1/2 cup all purpose flour
- 1/4 teaspoon baking powder (optional, for just a hint of lift)
- 1/4 teaspoon salt
- 8 ounces cream cheese, softened
- 1/4 cup granulated sugar (for the cheesecake layer)
- 1 large egg (for the cheesecake layer)
- 1 teaspoon vanilla extract (for the cheesecake layer)
- 1 and 1/2 cups pitted cherries (fresh or well-drained canned/jarred)
Crafting Your Fudgy Cherry Cheesecake Brownies: Step-by-Step
Now for the fun part – bringing these layers together! Follow these steps carefully, and you’ll be rewarded with incredibly rich and beautiful Fudgy Cherry Cheesecake Brownies.
- Get Ready to Bake: Start by preheating your oven to 350 degrees F (175 degrees C). Prepare an 8×8 inch baking pan. You can grease and flour it, or, my preferred method for easy removal and clean-up, line it with parchment paper, leaving an overhang on the sides. This little overhang acts as handles later!
- Start the Brownie Base Wet Ingredients: In a medium bowl, whisk together the melted butter and the 1 cup of granulated sugar until they are well combined. The melted butter helps create that dense, fudgy texture we’re aiming for.
- Build the Brownie Base: Add the two large eggs to the butter/sugar mixture, beating them in one at a time. This ensures they are fully incorporated. Stir in the 1 teaspoon of vanilla extract. Vanilla brings out the best in chocolate, adding depth to the flavor.
- Combine Dry and Wet (Brownie): Add the dry ingredients for the brownie: the unsweetened cocoa powder, the 1/2 cup of all-purpose flour, the optional 1/4 teaspoon of baking powder (remember, just a touch if you want minimal lift; omit for maximum density), and the 1/4 teaspoon of salt. Stir everything together using a spoon or spatula just until there are no streaks of dry ingredients left. This step is absolutely critical for fudgy brownies – overmixing develops the gluten in the flour, leading to a tougher, more cake-like texture. Stop stirring the moment it comes together!
- Layer the First Batch of Brownie Batter: Pour about two-thirds of the glorious, thick brownie batter into your prepared 8×8 pan. Use an offset spatula or the back of a spoon to spread it evenly across the bottom. This forms the primary fudgy layer.
- Prepare the Cream Cheese Layer: In a separate bowl, beat the softened cream cheese with the 1/4 cup of sugar until the mixture is smooth and creamy. Make sure there are no lumps of cream cheese. Then, beat in the remaining 1 large egg and the 1 teaspoon of vanilla extract until everything is fully combined and the mixture is smooth and glossy.
- Add the Cream Cheese Layer: Carefully spoon dollops of the smooth cream cheese mixture over the top of the brownie batter in the pan. Try to distribute it somewhat evenly, but don’t worry about spreading it perfectly smooth just yet.
- Add the Remaining Brownie Batter and Cherries: Take spoonfuls of the remaining brownie batter and dollop them gently over the cream cheese layer. It’s okay if some areas are cream cheese and some are brownie. Scatter the pitted cherries evenly over the top of everything. Don’t clump the cherries together; spread them out so you get cherry in lots of bites!
- Swirl for Beauty: Now for the artistic part! Take a knife or a skewer and gently swirl through the layers. You’re aiming for beautiful ribbons of chocolate and cream cheese, not a completely uniform, muddy color. Go through the batter a few times, being careful not to overdo it. Less is more here to maintain distinct layers.
- The Secret Baking Step: Place the pan in the preheated oven. Bake for 35 to 45 minutes. Here is the secret to the guaranteed fudgy base: you are looking for the edges of the brownies to appear set, but the center should still look slightly soft and just barely moist. The cheesecake layer might have a slight jiggle in the very center, but the edges should look more set. Do NOT wait until a toothpick inserted into the brownie layer (avoiding the cherries and cheesecake as much as possible) comes out completely clean. A clean toothpick means it’s likely overbaked and will be cakey. A few moist crumbs attached to the toothpick, or a slight smear of batter, is the perfect sign of fudginess. Erring on the side of slightly underbaked is key for that decadent, fudgy texture.
- Cooling is Crucial: Once baked, remove the pan from the oven and place it on a wire rack to cool completely. This isn’t just about being patient; the residual heat continues to cook the brownies slightly, and cooling allows the structure to set properly. For the cleanest cuts and best texture, I highly recommend chilling the brownies in the pan in the refrigerator for at least a couple of hours, or ideally longer, before attempting to slice them. Chilling firms up both the brownie and cheesecake layers.
Tips for Perfect Fudgy Cherry Cheesecake Brownies Every Time
Making these brownies is straightforward, but a few extra tips can help ensure your success and take them from great to absolutely spectacular!
- Room Temperature Cream Cheese: I cannot stress this enough! If your cream cheese isn’t soft, you’ll end up with little lumps in your cheesecake swirl. Let it sit out on the counter for at least an hour before you start, or gently soften it in the microwave in short bursts (like 10-15 seconds) until pliable but not melted.
- Don’t Overmix: We covered this in the steps, but it’s worth repeating for the brownie batter. Stop mixing as soon as the dry ingredients are incorporated. Overmixing leads to a cakey texture, which is the opposite of what we want for fudgy brownies.
- Trust the Jiggle Test: It feels counterintuitive to pull something from the oven when the center still looks a bit soft, but for fudgy brownies, this is exactly what you need to do. The brownies continue to set as they cool.
- Cherries Matter: If using canned or jarred cherries, drain them really, really well. Pat them dry with paper towels if they seem excessively wet. Excess moisture can make the surrounding brownie or cheesecake soggy. If using fresh cherries, make sure they are ripe and sweet-tart.
- Parchment Paper is Your Friend: Lining the pan with parchment paper makes lifting the cooled, firm brownies out of the pan incredibly easy, allowing for clean, straight cuts.
- Clean Cuts: For neat slices, chill the cooled brownies thoroughly. Use a sharp knife and wipe it clean between each cut. This prevents dragging the cheesecake and brownie layers and gives you beautiful, distinct squares.
- Experiment with Fruit: Not a cherry fan? While I adore the cherry-chocolate-cheesecake combination, you could experiment with other fruits. Just be mindful of their moisture content. Blueberries or raspberries could be interesting, but ensure they are well-drained or patted dry if needed.
- Adding Chocolate Chips: Want even more chocolate? Feel free to stir a handful of chocolate chips into the brownie batter before layering, or sprinkle some over the top with the cherries.
- Storage: Store cooled and cut brownies in an airtight container in the refrigerator for up to 4-5 days. The cheesecake layer necessitates refrigeration.
What to Serve With Your Fudgy Cherry Cheesecake Brownies
These brownies are utterly decadent on their own, but they are even better served with a little something extra!
A scoop of vanilla bean ice cream is a classic pairing, offering a delightful contrast in temperature and texture. A dollop of freshly whipped cream is also a light and airy accompaniment. For a beverage, these rich brownies pair wonderfully with a glass of cold milk or a steaming mug of coffee or tea. If you’re looking for other delightful desserts to round out a spread, consider making some Simple Sugar Cookie Bars or trying your hand at a Classic Cherry Cheesecake.
Your Fudgy Cherry Cheesecake Brownie Questions Answered (FAQ)
Got questions? I’ve got answers! Here are some common things people ask about making these delicious swirled brownies.
How do I ensure my brownie layer is truly fudgy and not cakey?
The secret, as highlighted in step 10, is all in the baking time. You must pull the brownies from the oven when the center is still slightly soft and looks just barely moist, even if the cheesecake layer has a slight jiggle. Avoid baking until a toothpick comes out completely clean from the brownie section. A few moist crumbs or a light smear is exactly what you want for that dense, fudgy texture.
My cheesecake layer cracked while baking. What went wrong?
Cracks in cheesecake layers (even thin ones like this) are often caused by overbaking or sudden temperature changes. Ensure your oven temperature is accurate. The baking time window allows for variance, so rely on the visual cues of the brownie edges and cheesecake center being mostly set but still slightly soft in the middle. Also, cooling gradually helps; let them cool completely on the wire rack before chilling in the refrigerator. While minor cracks in a swirl aren’t as noticeable as on a whole cheesecake, techniques for avoiding them are similar to those for a Creamy Baked Cheesecake.
Can I use frozen cherries?
Yes, you can use frozen cherries, but they must be completely thawed and drained very well before adding them to the batter. Frozen fruit releases a lot of moisture as it thaws, and you don’t want that excess liquid making your brownies soggy. Pat them dry with paper towels after draining.
My swirl doesn’t look very distinct. How can I get better swirls?
The key to distinct swirls is gentle handling and not over-swirling. Dollop the batters and then make just a few passes with a knife or skewer, creating ribbons. Don’t stir or blend them together completely. The goal is to marble, not fully combine.
How long do these brownies last?
Because of the cream cheese layer, these brownies should be stored in an airtight container in the refrigerator. They will last for about 4 to 5 days. They are actually quite delicious cold!
Can I freeze Fudgy Cherry Cheesecake Brownies?
Yes, you can! Once completely cooled and chilled, cut the brownies into squares. Wrap individual squares tightly in plastic wrap, then place them in a freezer-safe container or bag. They can be frozen for up to 2-3 months. Thaw them in the refrigerator before serving.
Enjoy Your Homemade Fudgy Cherry Cheesecake Brownies!
There you have it – the secret to achieving perfectly fudgy, rich, and incredibly delicious Fudgy Cherry Cheesecake Brownies, complete with that bright pop of fruit. They are the perfect treat for a special occasion, a bake sale, or just because you deserve something utterly wonderful.
Give this recipe a try and taste the difference that the right baking technique makes! I’d love to hear how yours turn out. Leave a comment below and let me know what you think. Happy baking!
Fudgy Cherry Cheesecake Brownies

Ingredients
- 1/2 cup unsalted butter, melted
- 1 cup granulated sugar
- 2 large eggs
- 1 teaspoon vanilla extract
- 1/3 cup unsweetened cocoa powder
- 1/2 cup all purpose flour
- 1/4 teaspoon baking powder (optional, for slight lift)
- 1/4 teaspoon salt
- 8 ounces cream cheese, softened
- 1/4 cup granulated sugar (for cheesecake)
- 1 large egg (for cheesecake)
- 1 teaspoon vanilla extract (for cheesecake)
- 1 and 1/2 cups pitted cherries (fresh or well drained canned/jarred)
Directions
- Preheat oven to 350 degrees F (175 degrees C). Grease and flour or line an 8×8 inch baking pan with parchment paper, leaving an overhang on the sides.
- In a medium bowl, whisk together the melted butter and 1 cup sugar.
- Beat in the 2 eggs one at a time, then stir in 1 teaspoon vanilla extract.
- Add the cocoa powder, flour, baking powder (if using), and salt. Stir just until combined. Do not overmix. This is key for a fudgy texture.
- Pour about two thirds of the brownie batter into the prepared pan and spread evenly.
- In a separate bowl, beat the softened cream cheese with the 1/4 cup sugar until smooth. Beat in the remaining 1 egg and 1 teaspoon vanilla extract until fully combined and smooth.
- Spoon the cream cheese mixture over the brownie batter in the pan.
- Dollop spoonfuls of the remaining brownie batter over the cream cheese layer. Scatter the pitted cherries evenly over the top.
- Swirl the batters gently with a knife or skewer, being careful not to over-swirl into a muddy mess.
- The trick to the fudgy base: Bake for 35 to 45 minutes, or until the edges are set and the center is still slightly soft and looks just barely moist. The cheesecake layer should look mostly set with possibly a slight jiggle in the very center. Do not wait until a toothpick inserted into the brownie comes out completely clean; this will result in a cakey brownie. A few moist crumbs or a slight smear is perfect for fudginess.
- Let cool completely in the pan on a wire rack before cutting. Chilling helps firm up the layers and makes slicing easier.