Few things bring people together like a warm, savory loaf of bread fresh from the oven. I’ve often enjoyed making cheesy pull-apart bread, but a common frustration was the occasional bland bite.
This recipe for Garlic Herb Pull-Apart Bread solves that problem, guaranteeing every single piece is wonderfully moist and bursting with flavor. It’s a simple, reliable method that will elevate your next meal or gathering.
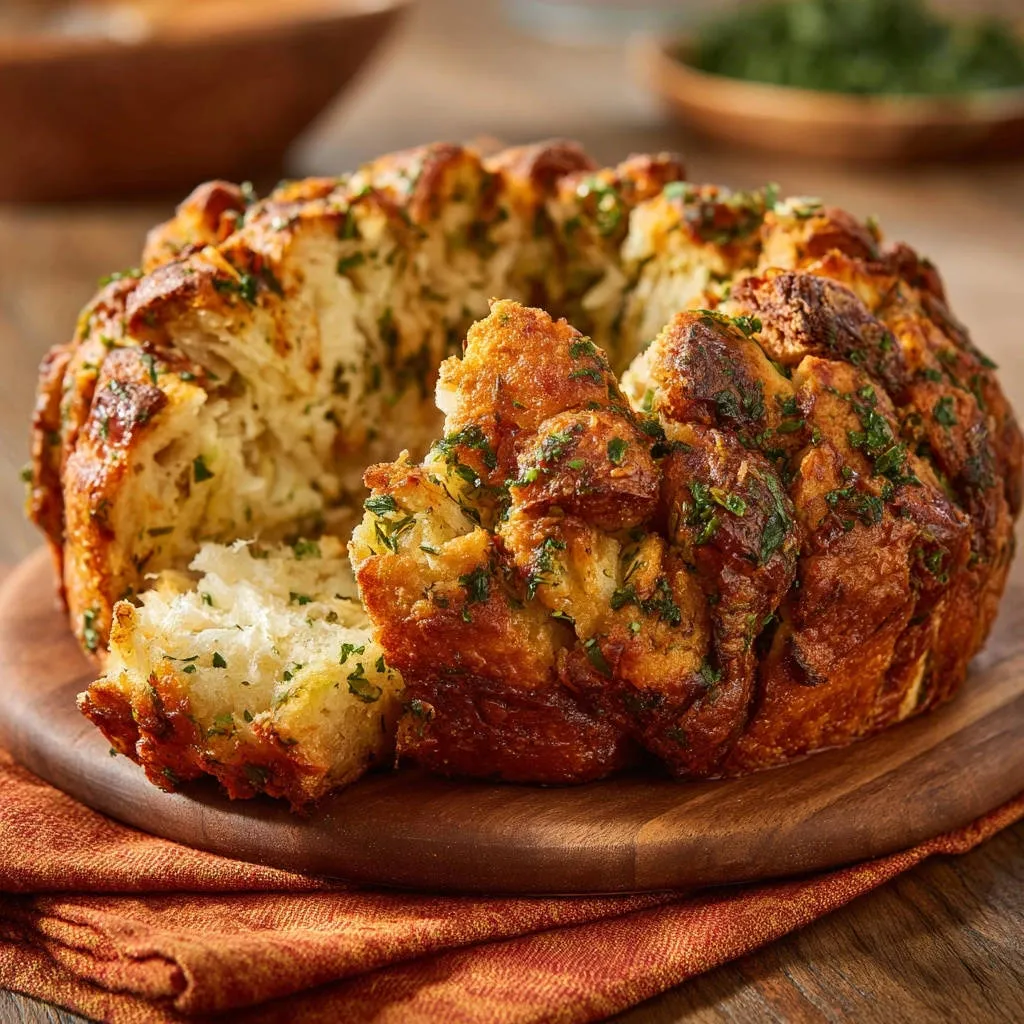
Why This Pull-Apart Bread Guarantees Flavor in Every Bite
What sets this Garlic Herb Pull-Apart Bread apart is a clever, yet simple, technique that ensures unparalleled flavor in every single bite. The secret lies in how the dough is prepared and coated, eliminating those disappointing plain spots.
Each piece of dough is thoroughly enveloped in the aromatic garlic and herb butter mixture. This meticulous coating creates a delicious experience from edge to center, making this an easy yet truly irresistible savory bread.
The Simple Ingredients for Irresistible Garlic Herb Pull-Apart Bread
Crafting this flavorful pull-apart bread starts with a few accessible ingredients. High-quality components are key to a truly delightful result, so choose wisely.
Pantry Staples & Dough Base
Refrigerated Biscuit Dough (2 cans, 16.3 ounces each, like Grands): This is your shortcut to a fluffy, tender bread base without the fuss of homemade dough. Look for the larger, flaky-style biscuits for best texture.
The Aromatic Herb-Butter Blend
Unsalted Butter (1/2 cup, melted): Butter carries all the incredible flavors. Using unsalted butter gives you control over the overall saltiness of the dish.
Garlic (4 cloves, minced): Freshly minced garlic is non-negotiable for that pungent, aromatic punch. Avoid pre-minced garlic in a jar; the fresh cloves offer superior flavor.
Fresh Parsley (1/4 cup, finely chopped): Fresh herbs provide vibrant flavor and color that dried herbs simply can’t match. Parsley offers a bright, peppery note that balances the rich garlic and butter.
Salt (1/2 teaspoon) & Black Pepper (1/4 teaspoon): These fundamental seasonings enhance and balance all the other flavors. Adjust to your personal preference, but start with these amounts.
Optional Flavor Boosters
Grated Parmesan Cheese (1/4 cup): For an extra layer of savory depth and a slightly crispy crust, Parmesan cheese is a fantastic addition. Freshly grated is always superior to pre-shredded for melting and flavor.
Essential Tools for Your Pull-Apart Bread Success
Having the right tools ready makes the process smooth and enjoyable. You likely have most of these in your kitchen already.

10-Cup Bundt Pan or 9×13 Inch Baking Dish: A Bundt pan creates the classic pull-apart shape, making it easy to serve. A 9×13 inch baking dish works just as well for a flatter, more casserole-like presentation.
Large Mixing Bowl: Essential for combining all your ingredients and, critically, for thoroughly coating the biscuit pieces.
Rubber Spatula or Clean Hands: For gently but effectively tossing the biscuit pieces with the herb-butter mixture. Using your hands ensures every nook and cranny is coated.
Aluminum Foil: Useful for tenting the bread during the final stages of baking, preventing the top from browning too quickly while the inside finishes cooking.
Your Step-by-Step Guide to Flavorful Pull-Apart Bread
Follow these steps closely to achieve a perfectly seasoned and incredibly delicious Garlic Herb Pull-Apart Bread.
- Prep the Pan & Oven:
Start by preheating your oven to 375°F (190°C). This ensures the oven is at the correct temperature before the bread goes in, promoting even baking.
Lightly grease your chosen 10-cup Bundt pan or 9×13 inch baking dish. Greasing prevents sticking and ensures your bread slides out beautifully after baking.
- Transform the Dough:
Open both cans of biscuit dough. Separate each biscuit and then cut each individual biscuit into 4 equal pieces.
Aim for roughly uniform pieces; this helps them bake evenly and ensures a consistent pull-apart experience.
- Craft the Flavorful Coating:
In a large mixing bowl, combine the melted unsalted butter, freshly minced garlic, finely chopped fresh parsley, salt, and black pepper.
If you’re using it, stir in the grated Parmesan cheese now. This creates the aromatic blend that will infuse your bread with incredible flavor.
- The Secret to Flavorful Bites: Coating the Dough:
This is the most critical step for ensuring every bite of your Garlic Herb Pull-Apart Bread is full of flavor. Add all the cut biscuit pieces to the bowl with the butter mixture.
Toss the dough pieces gently but very thoroughly with your hands or a rubber spatula until every single piece is completely coated in the herb-butter mixture. Take your time here; this ensures no piece is left untouched, directly preventing bland spots in the finished bread.
- Arrange for Baking:
Carefully arrange the coated dough pieces evenly in your prepared Bundt pan or baking dish. Don’t press them down too firmly; you want enough space for them to expand and become fluffy.
- Bake to Golden Perfection:
Bake for 30-35 minutes, or until the bread is golden brown on top and cooked through in the center. The baking time can vary depending on your oven.
If you notice the top browning too quickly before the center is done, lightly tent the pan with aluminum foil for the last 10-15 minutes of baking. This protects the crust while allowing the interior to finish cooking.
- Cool & Serve:
Once baked, let the bread cool in the pan for 5 minutes. This cooling period allows the bread to set slightly, making it easier to invert.
After 5 minutes, carefully invert the bread onto a serving plate. Serve warm and watch it disappear; it’s best enjoyed fresh!
Pro Tips & Troubleshooting for Perfect Pull-Apart Bread
Even with a straightforward recipe like this, a few expert tips can make all the difference. Knowing how to handle common issues ensures a consistently impressive result.
Achieving the Ideal Texture and Flavor
Fresh is Best: Always use fresh garlic and parsley. Their vibrant flavors are truly essential for this herb bread.
Don’t Skimp on Coating: The “secret” step is key. Take the extra minute to ensure every single biscuit piece is thoroughly coated in the herb-butter mixture. This prevents any dry or bland bites.
Avoid Over-Packing: When arranging the dough in the pan, resist the urge to press it down too firmly. Allow some space for expansion, which results in a lighter, fluffier texture.
Salt to Taste: While 1/2 teaspoon is a good starting point, taste your butter mixture before adding the dough. You can always add a pinch more salt if desired.
Common Hiccups & Quick Fixes
Dry Spots or Bland Bites:
This usually happens if the biscuit pieces weren’t fully coated. Ensure you take your time in step 4, thoroughly tossing the dough until every piece glistens with the butter mixture.
Uneven Browning:
If one side is browning faster, rotate the pan halfway through baking. If the top gets too dark, tent it with foil.
Dough Sticking to the Pan:
Ensure you generously grease your pan before adding the dough. For Bundt pans, pay special attention to the crevices.
Bread Appears Undercooked in the Middle:
This can happen if the pieces were packed too tightly, hindering heat circulation. If the top is golden but the center feels soft, tent with foil and bake for another 5-10 minutes. A toothpick inserted into the center should come out clean.
Enjoying Your Garlic Herb Pull-Apart Bread: Serving, Storing & Variations
This Garlic Herb Pull-Apart Bread is incredibly versatile, perfect for various occasions and easy to adapt to your taste.
Serving Suggestions That Delight
This savory bread is a fantastic side dish for almost any meal. It pairs beautifully with hearty soups, stews like a comforting hearty beef stew, or roasted meats.
Serve it alongside a classic pasta dish, or as a flavorful appetizer with a side of warm marinara sauce or extra melted garlic butter for dipping.
It’s also a crowd-pleaser at potlucks, brunches, or holiday gatherings, offering a delightful alternative to plain breadsticks or rolls.
Storage & Make-Ahead Wisdom
To keep any leftover Garlic Herb Pull-Apart Bread fresh, store it in an airtight container at room temperature for up to 2-3 days. While best enjoyed warm and fresh, it reheats surprisingly well.
You can prepare the butter and herb mixture a day in advance and store it in the refrigerator. Simply melt it gently before tossing with the biscuit dough when you’re ready to bake.
Creative Flavor Twists & Substitutions
Feel free to experiment with this versatile recipe!
Cheese Please: Beyond Parmesan, try adding shredded mozzarella, provolone, or a sharp cheddar for a different cheesy experience. A mix of cheeses can be delicious.
Herb Garden Remix: Substitute or add other fresh herbs like finely chopped rosemary, thyme, or oregano for varied aromatic profiles.
A Touch of Heat: For a subtle kick, sprinkle in a pinch of red pepper flakes with the herb-butter mixture.
Smoky Notes: Fold in some crispy bacon bits for a salty, smoky addition that complements the garlic and herbs perfectly.
Dairy-Free Option: Use a plant-based butter substitute to make this recipe dairy-free. Ensure your biscuit dough is also dairy-free if needed.
Frequently Asked Questions About Garlic Herb Pull-Apart Bread
Can I use fresh herbs other than parsley?
Absolutely! Fresh herbs like rosemary, thyme, oregano, or chives would all be delicious additions or substitutions. Use a single herb or a combination that you enjoy.
What if I don’t have a Bundt pan?
A 9×13 inch baking dish works perfectly as an alternative. The bread will still pull apart easily and be just as delicious, just in a different shape.
Can I make this bread gluten-free?
Yes, if you can find refrigerated gluten-free biscuit dough, this recipe can be adapted. Ensure all other ingredients are also certified gluten-free.
How do I prevent the bottom from getting soggy?
Ensuring the bread is fully cooked through and immediately removing it from the pan after the 5-minute cooling period helps prevent sogginess. An undercooked center can also contribute to a damp bottom.
Can I prepare the dough ahead of time?
While the butter mixture can be made ahead, it’s best to coat and bake the biscuit dough immediately. The dough can absorb too much liquid and become soggy if left to sit coated for too long before baking.
Is it possible to reheat this bread?
Yes! To reheat, cover loosely with foil and warm in a 300°F (150°C) oven for about 10-15 minutes, or until heated through. You can also briefly microwave individual pieces, though the oven maintains a better texture.
Ready to Impress? Share Your Garlic Herb Pull-Apart Bread Masterpiece!
This Garlic Herb Pull-Apart Bread is more than just a side dish; it’s an experience. Its guaranteed flavor in every bite means you can serve it with confidence, knowing everyone will savor each delicious pull.
Whether for a family dinner, a casual get-together, or a holiday feast, this easy bread recipe is sure to become a favorite. I encourage you to try it and discover the joy of perfectly seasoned bread for yourself!

Garlic Herb Pull-Apart Bread
Course: BreadCuisine: American CuisineDifficulty: easy4
6-820
minutes35
minutes60
minutesAmerican Cuisine
Ingredients
2 cans (16.3 ounces each) refrigerated biscuit dough (like Grands)
1/2 cup unsalted butter, melted
4 cloves garlic, minced
1/4 cup fresh parsley, finely chopped
1/2 teaspoon salt
1/4 teaspoon black pepper
Optional: 1/4 cup grated Parmesan cheese
Directions
- Preheat your oven to 375°F (190°C). Lightly grease a 10-cup Bundt pan or a 9×13 inch baking dish.
- Open the biscuit dough cans and separate each biscuit. Cut each biscuit into 4 equal pieces.
- In a large mixing bowl, combine the melted butter, minced garlic, chopped fresh parsley, salt, and black pepper. If using, stir in the grated Parmesan cheese.
- This is the secret for full flavor: Add all the cut biscuit pieces to the bowl with the butter mixture. Toss the dough pieces gently but very thoroughly with your hands or a rubber spatula until every single piece is completely coated in the butter and herb mixture. Take your time with this step to ensure no piece is left untouched; this is what prevents those bland bites later.
- Carefully arrange the coated dough pieces evenly in the prepared Bundt pan or baking dish. Don’t press them down too firmly.
- Bake for 30-35 minutes, or until the bread is golden brown on top and cooked through in the center. If you notice the top browning too quickly, you can lightly tent it with aluminum foil for the last 10-15 minutes of baking.
- Let the bread cool in the pan for 5 minutes before inverting it onto a serving plate. Serve warm and watch it disappear!
Notes
- Cool in pan for 5 minutes before inverting onto a serving plate.