There’s nothing quite as disappointing as expecting beautifully shaped cookies, only to pull misshapen blobs from the oven. I’ve been there, especially with delicate designs like our beloved Heart-Shaped Cream Sandwich Cookies. But once I uncovered the secrets to maintaining those crisp, defined edges, my baking journey changed forever. This recipe ensures every cookie is as picture-perfect as it is delicious.
Why These Heart-Shaped Cream Sandwich Cookies Are Your New Go-To
These aren’t just any Heart-Shaped Cream Sandwich Cookies; they’re your reliable secret weapon for tender, beautiful treats. The careful chilling process is the true hero here, virtually eliminating the common issue of spreading during baking.
Each bite delivers a delicate, tender cookie that melts in your mouth, perfectly balanced by the luscious, creamy filling. This recipe is designed to be straightforward, giving you consistently stunning results that look professionally made, without the stress.
Gathering Your Sweet Ingredients: The Building Blocks
For the Tender Heart Cookies
All-purpose flour: This provides the essential structure for our cookies, ensuring they hold their shape without being overly dense.
Baking powder & salt: Baking powder gives a slight lift for tenderness, while salt balances the sweetness and enhances all the flavors.
Unsalted butter, softened: Quality butter is key for rich flavor and a tender crumb. Softened butter creams beautifully, incorporating air for a light texture.

Granulated sugar: Beyond sweetness, sugar contributes to the cookies’ golden color and delicate crispness at the edges.
Large egg: The egg binds the ingredients, adds richness, and helps create a smooth, workable dough.
Vanilla extract: Pure vanilla extract deepens the overall flavor profile, complementing the buttery notes.
Crafting the Dreamy Cream Filling
Unsalted butter, softened: Just like for the cookies, softened unsalted butter forms the creamy, rich base for our irresistible filling.
Powdered sugar, sifted: Sifting is crucial here! It ensures a smooth, lump-free filling with a melt-in-your-mouth texture.
Vanilla extract: A touch of vanilla enhances the sweetness and rounds out the filling’s flavor, making it truly dreamy.
Milk or cream: A tablespoon at a time, this liquid allows you to achieve the perfect spreadable consistency for your cream filling.
Essential Finishing Touches
Powdered sugar for dusting: A final dusting of powdered sugar adds an elegant, professional look and a delicate hint of extra sweetness.
Essential Tools for Your Cookie Creation Journey
Having the right tools makes all the difference in cookie baking. An electric mixer, either hand-held or stand mixer, is essential for creaming butter and sugar properly, creating a light and fluffy cookie dough and filling.
You’ll need a reliable heart-shaped cookie cutter to achieve those iconic shapes. Parchment paper is a must for lining baking sheets; it prevents sticking and ensures even baking.
Additionally, baking sheets, a wire cooling rack, and mixing bowls of various sizes will round out your essential equipment.
Baking Bliss: Your Step-by-Step Guide to Perfect Heart Cookies
Preparing the Cookie Dough
- Step 1: Whisk Dry Ingredients.
In a medium bowl, whisk together the flour, baking powder, and salt. Setting them aside ensures readiness and proper dry ingredient distribution throughout the dough.
- Step 2: Cream Butter and Sugar.
In a large bowl, use an electric mixer to cream softened butter and granulated sugar until light and fluffy. Aim for 2-3 minutes for optimal texture, but avoid overbeating, which can introduce too much air, leading to excessive spreading later.
- Step 3: Incorporate Wet Ingredients.
Beat in the egg and vanilla extract until they are fully combined with the creamed mixture, ensuring a homogenous and flavorful base for your Heart-Shaped Cream Sandwich Cookies.
- Step 4: Combine Wet and Dry.
Gradually add the whisked dry ingredients to the wet mixture, mixing on low speed until just combined and a soft dough forms. Overmixing at this stage can develop too much gluten, leading to tough, rather than tender, cookies.
- Step 5: Chill the Dough.
Divide the dough in half, flatten each into a disc, wrap tightly in plastic wrap, and chill in the refrigerator for at least 1-2 hours. This critical step prevents spreading during baking by solidifying the butter, preserving your beautiful heart shapes.
Baking to Golden Perfection
- Step 6: Preheat Oven and Prepare Sheets.
Preheat your oven to 350 degrees F (175 degrees C). Line baking sheets with parchment paper for easy release and to ensure consistent baking and browning.
- Step 7: Roll and Cut Cookies.
On a lightly floured surface, roll out one disc of chilled dough to about 1/4 inch thickness. Use your heart-shaped cookie cutter to neatly cut out the shapes, working quickly to keep the dough cool.
- Step 8: Arrange on Baking Sheets.
Carefully transfer the cut-out cookies to the prepared baking sheets, ensuring they are spaced about 1 inch apart to allow for proper air circulation and even baking.
- Step 9: Second Chill for Shape Security.
Place the baking sheets with the cut-out cookies back into the refrigerator for an additional 10-15 minutes before baking. This secondary chill further sets the butter, ensuring crisper, more defined edges and preventing any last-minute spreading.
- Step 10: Bake Until Lightly Golden.
Bake for 8-10 minutes, or until the edges appear lightly golden. The centers should still look pale; they will firm up as they cool, so resist the urge to overbake these delicate cookies.
- Step 11: Cool Completely.
Let the cookies cool on the baking sheets for 5 minutes before carefully transferring them to a wire rack to cool completely. This prevents breakage and allows them to fully set, making them ready for their creamy filling.
Assembling Your Creamy Masterpieces
- Step 12: Prepare the Cream Filling.
While cookies cool, beat softened butter in a medium bowl until creamy. Gradually add sifted powdered sugar, mixing until well combined, then beat in the vanilla extract for a delightful aroma.
- Step 13: Achieve Perfect Filling Consistency.
Slowly add milk or cream, one tablespoon at a time, until the frosting reaches a smooth, spreadable, yet firm consistency that holds its shape. This ensures your Heart-Shaped Cream Sandwich Cookies won’t have a runny filling.
- Step 14: Assemble the Sandwich Cookies.
Once the cookies are completely cool, spread or pipe a generous amount of cream filling onto the flat side of one cookie. Gently top with another cookie to create a charming sandwich. For perfect piping, you might find inspiration from our dreamy vanilla cupcakes with frosting that pipes perfectly.
- Step 15: Dust and Serve.
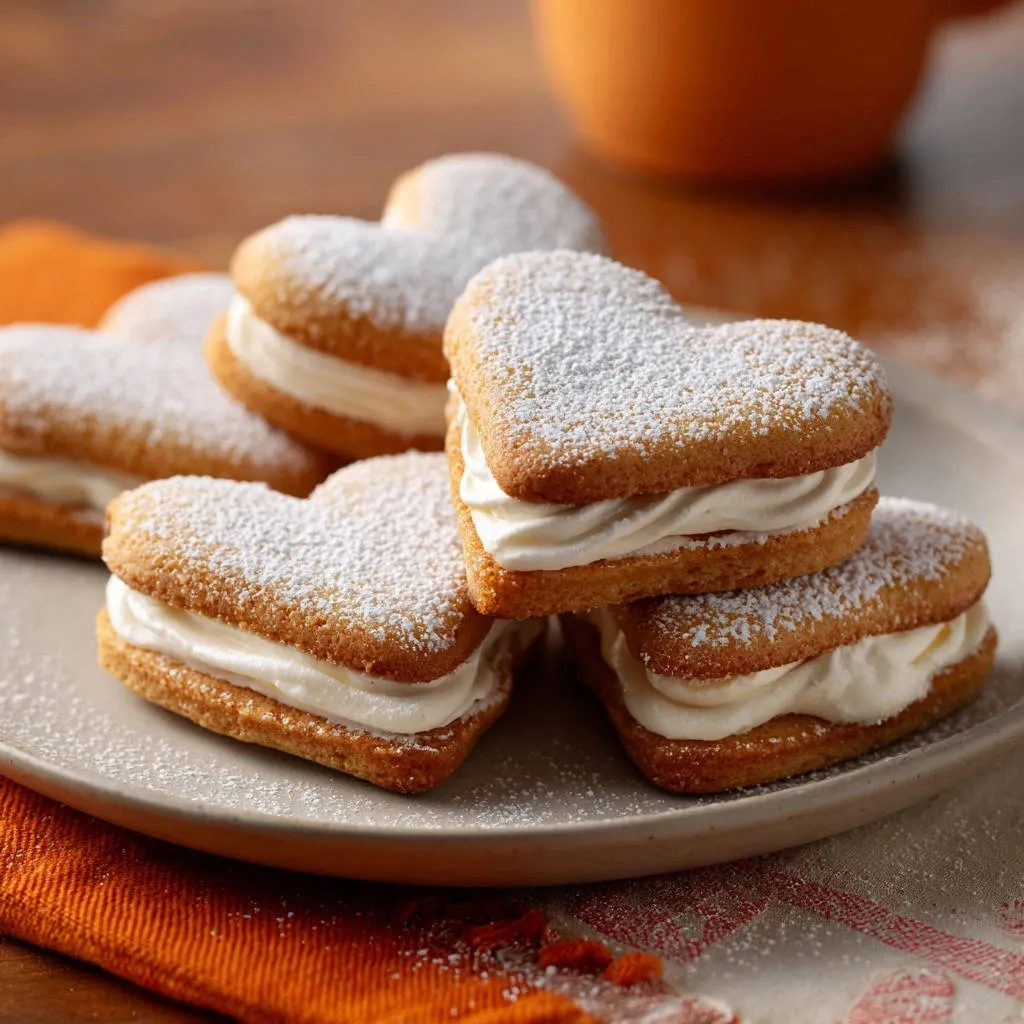
Lightly dust the assembled Heart-Shaped Cream Sandwich Cookies with powdered sugar just before serving for an elegant finish. This final touch adds visual appeal and a subtle extra sweetness.
Chef’s Secrets for Flawless Heart-Shaped Cookies
Mastering the Chill Factor: Your Key to Perfect Shapes
Chilling your dough is non-negotiable for these delicate cookies. The first chill allows the butter to solidify, preventing the dough from spreading excessively in the oven, maintaining those sharp heart edges.
The second, shorter chill right before baking further firms up the cut-out shapes. This crucial step ensures your Heart-Shaped Cream Sandwich Cookies retain their beautiful form.
Texture Talk: Achieving Tender Cookies, Not Tough Ones
Overmixing is the enemy of tender cookies. Once you add the flour, mix just until combined. Overbeating develops gluten, resulting in a tough, chewy cookie instead of a delicate, melt-in-your-mouth one.
Properly creaming the butter and sugar for the recommended time also incorporates air, contributing to that desired tender texture. Remember, don’t overbake; these cookies should remain pale with only lightly golden edges.
Filling Finesse: The Art of Creamy Perfection
For the smoothest filling, ensure your butter is truly softened, but not melted. Sifting powdered sugar is also a must to avoid any lumps.
Add milk or cream slowly, one tablespoon at a time, until you reach a consistency that is easy to spread or pipe but still firm enough to hold its shape when sandwiched. If you’re looking for another classic recipe with a perfect texture, consider our classic shortbread fingers.
Storage Savvy: Keeping Them Fresh
Store your Heart-Shaped Cream Sandwich Cookies in an airtight container at room temperature for up to 3 days, or in the refrigerator for up to 5 days. Layering them between sheets of parchment paper can help prevent sticking.
Cookie Conundrums? Quick Fixes for Common Challenges
“My Cookies Spread Too Much!”
Ensure your dough is thoroughly chilled for at least 1-2 hours, and don’t skip the second 10-15 minute chill right before baking. Also, accurately measure your flour; too little flour can lead to excessive spreading. Confirm your oven temperature with an oven thermometer to ensure it’s accurate.
“My Cookies Are Hard/Dry!”
The most common culprit is overbaking. These cookies should be pale in the center with just lightly golden edges. Remove them from the oven promptly. Also, avoid overmixing the dough once flour is added, as this can develop too much gluten and result in a tough texture.
“My Filling Is Too Runny/Stiff!”
If your filling is too runny, gradually beat in more sifted powdered sugar, one tablespoon at a time, until it thickens. If it’s too stiff, add milk or cream, a tiny bit at a time, until it reaches a spreadable consistency. Ensure your butter for the filling is softened, not melted, for the best result.
Serving Suggestions & Storage Tips
Presentation Perfection: How to Serve
Heart-Shaped Cream Sandwich Cookies are inherently charming. Arrange them on a pretty platter for a dessert display, or stack them in clear cello bags tied with a ribbon for delightful homemade gifts. They’re perfect for Valentine’s Day, anniversaries, bridal showers, or simply to brighten someone’s day.
Keeping Them Fresh: Storage Guidelines
Store the assembled cookies in an airtight container at room temperature for up to 3 days. For longer freshness, refrigerate them for up to 5 days. Bring them to room temperature for about 15-20 minutes before serving for optimal flavor and texture.
Can You Make Them Ahead?
Absolutely! The cookie dough can be made up to 2-3 days in advance and stored tightly wrapped in the refrigerator, or frozen for up to 1 month. Baked, un-filled cookies can be stored in an airtight container at room temperature for up to 5 days. Assemble the Heart-Shaped Cream Sandwich Cookies a few hours before serving for the freshest taste.
Your Heart-Shaped Cream Sandwich Cookie Questions, Answered!
Can I make these gluten-free?
Yes, you can substitute a 1:1 gluten-free all-purpose flour blend (one that contains xanthan gum) for the wheat flour in this recipe. Be mindful that chilling times might vary slightly, and the dough might feel a bit more delicate.
What if I don’t have a heart-shaped cutter?
No problem! You can use any cookie cutter shape you have on hand, such as circles, squares, or even stars. Alternatively, you can use a knife to cut the rolled-out dough into small squares or rectangles for simple sandwich cookies.
Can I freeze the dough or baked cookies?
Yes, both the dough and baked cookies freeze well. Wrap the dough discs tightly in plastic wrap, then foil, and freeze for up to 1 month. Thaw in the refrigerator overnight before rolling. Baked, unfrosted cookies can be frozen in an airtight container for up to 2 months. Thaw at room temperature before filling.
How long do these cookies last?
Assembled Heart-Shaped Cream Sandwich Cookies are best enjoyed within 3 days at room temperature or up to 5 days if refrigerated. The cream filling is best when fresh, so try to assemble them within a day or two of baking for peak deliciousness.
Can I use different flavorings for the filling?
Absolutely! Get creative with your cream filling. Try almond extract instead of vanilla, or add a teaspoon of lemon zest for a bright citrus note. A touch of cocoa powder can transform it into a chocolate cream filling. Just remember to adjust consistency as needed.
Ready to Spread the Love? Share Your Heart-Shaped Cookie Creation!
There’s immense satisfaction in baking beautiful, delicious treats from scratch, and these Heart-Shaped Cream Sandwich Cookies are truly a labor of love. They’re sure to bring smiles and warm hearts wherever they go.
Give this foolproof recipe a try, and don’t forget to share your delightful creations! We’d love to see your perfect heart cookies gracing your tables.

Heart-Shaped Cream Sandwich Cookies
Course: DessertCuisine: American CuisineDifficulty: easy4
(several sandwich cookies)1
hour10
minutes60
minutesAmerican Cuisine
Ingredients
For the Cookies:
2 and 1/4 cups all-purpose flour
1/2 teaspoon baking powder
1/4 teaspoon salt
1 cup unsalted butter, softened
3/4 cup granulated sugar
1 large egg
1 teaspoon vanilla extract
For the Cream Filling:
1/2 cup unsalted butter, softened
2 cups powdered sugar, sifted
1 teaspoon vanilla extract
2-3 tablespoons milk or cream
For Dusting:
Powdered sugar
Directions
- In a medium bowl, whisk together the flour, baking powder, and salt. Set aside.
- In a large bowl, using an electric mixer, cream together the softened butter and granulated sugar until light and fluffy. This should take about 2-3 minutes. Avoid overbeating.
- Beat in the egg and vanilla extract until well combined.
- Gradually add the dry ingredients to the wet ingredients, mixing on low speed until just combined and a soft dough forms. Do not overmix.
- Divide the dough in half and flatten each half into a disc. Wrap each disc tightly in plastic wrap and chill in the refrigerator for at least 1 hour, or up to 2 hours. This is a crucial step to prevent spreading.
- Preheat your oven to 350 degrees F (175 degrees C). Line baking sheets with parchment paper.
- On a lightly floured surface, roll out one disc of chilled dough to about 1/4 inch thickness. Use a heart-shaped cookie cutter to cut out shapes.
- Carefully transfer the cut-out cookies to the prepared baking sheets. Place them about 1 inch apart.
- Place the baking sheets with the cut-out cookies into the refrigerator for 10-15 minutes before baking. This second chill helps set the shapes even more firmly.
- Bake for 8-10 minutes, or until the edges are lightly golden. The cookies should still be pale in the center.
- Let the cookies cool on the baking sheets for 5 minutes before transferring them to a wire rack to cool completely.
- While cookies cool, prepare the filling: In a medium bowl, beat the softened butter until creamy. Gradually add the sifted powdered sugar, mixing until well combined. Beat in the vanilla extract.
- Slowly add milk or cream, one tablespoon at a time, until the frosting reaches a smooth, spreadable, yet firm consistency.
- Once the cookies are completely cool, spread or pipe a generous amount of cream filling onto the flat side of one cookie. Top with another cookie to create a sandwich.
- Lightly dust the assembled sandwich cookies with powdered sugar before serving.
Notes
- Crucial chilling steps prevent spreading and help maintain delicate shapes.