Is there anything more disappointing than anticipating a perfectly roasted piece of meat, only to slice into it and find it dry and tough? It’s a common kitchen woe, but fear not! I’ve cracked the code to a foolproof, mouthwatering oven roast that’s consistently juicy and tender. Get ready to impress your family and friends with this incredibly flavorful and simple Juicy Oven Roast recipe, complete with caramelized vegetables and sweet apples.
Why You’ll Love This Juicy Oven Roast
This isn’t just another roast recipe; it’s a game-changer! Here’s why you’ll be making this your go-to method:
- Incredibly Juicy: The key technique ensures a tender and succulent roast every single time.
- Effortless: Minimal hands-on time, perfect for busy weeknights or special occasions.
- Flavorful: The combination of savory beef, sweet apples, and aromatic herbs creates a symphony of flavors.
- One-Pan Wonder: Everything cooks together in one pan, making cleanup a breeze.
- Impressive Presentation: The caramelized vegetables and apples add a beautiful touch to your dinner table.
Gathering Your Ingredients for Juicy Oven Roast
Before we begin, let’s talk about the stars of our show – the ingredients! This Juicy Oven Roast relies on a beautiful balance of savory and sweet notes, all working together to create a truly unforgettable meal. We’re building layers of flavor, starting with a great cut of beef and complementing it with aromatic vegetables and a touch of sweetness.
- Boneless Beef Chuck Roast (about 3 pounds): The foundation of our roast. Chuck roast is ideal because it’s a relatively inexpensive cut that becomes incredibly tender when cooked low and slow. Look for a well-marbled roast, as the fat will render during cooking, adding flavor and moisture.
- Large Yellow Onions (2, quartered): Onions add a savory depth and sweetness as they caramelize alongside the roast. The quartered pieces hold their shape nicely during the long cooking time.
- Medium Apples (3, such as Honeycrisp or Gala, cored and cut into large chunks): Apples provide a touch of sweetness and acidity that balances the richness of the beef. Honeycrisp or Gala varieties hold their shape well and offer a delightful flavor contrast. If you like, check out our recipe for chocolate-covered apple dessert cups for another delightful way to enjoy apples.
- Fresh Thyme Sprigs (4): Thyme adds an earthy, aromatic note that complements both the beef and the apples. Fresh thyme is preferred for its superior flavor.
- Beef Broth or Water (1 cup): The liquid in the bottom of the pan creates steam, which helps to keep the roast moist. Beef broth will add more flavor, but water works just fine.
- Olive Oil (2 tablespoons): Used for searing the roast, olive oil adds flavor and helps to create a beautiful crust.
- Brown Sugar (1 tablespoon): A touch of brown sugar adds a subtle sweetness and helps to caramelize the roast and vegetables. The molasses in brown sugar also contributes to a richer flavor.
- Soy Sauce (or tamari for gluten-free) (1 tablespoon): Soy sauce adds a savory umami flavor and helps to tenderize the meat. Tamari is a great gluten-free alternative.
- Garlic Powder (1 teaspoon): For a subtle garlic flavor that permeates the entire roast.
- Salt and Black Pepper: To taste. Don’t be shy with the salt and pepper! They are essential for bringing out the flavors of all the other ingredients.
Crafting Your Juicy Oven Roast: Step-by-Step
Now for the fun part! Don’t be intimidated; this recipe is surprisingly simple. The key is to follow the steps carefully and allow the oven to do its magic. Remember, patience is your friend when it comes to roasting. The low and slow cooking process is what makes this roast so incredibly tender and juicy. So, preheat that oven, put on some music, and let’s get started!
- Preheat your oven to 325 degrees F (160 degrees C). Getting the oven to the right temperature is the first step to ensuring even cooking.
- Prepare the roast: Pat the chuck roast completely dry with paper towels. This is a crucial step! A dry surface allows for better searing and browning. Season generously all over with salt, black pepper, and garlic powder. Don’t be afraid to use a good amount of seasoning; it will create a delicious crust.
- Sear the roast: Heat the olive oil in a large, oven-safe pot or a heavy skillet over medium-high heat. Searing the roast on all sides until deeply browned (about 3-4 minutes per side) is essential for developing rich flavor. This process, known as the Maillard reaction, creates complex flavors that you just can’t get without searing.
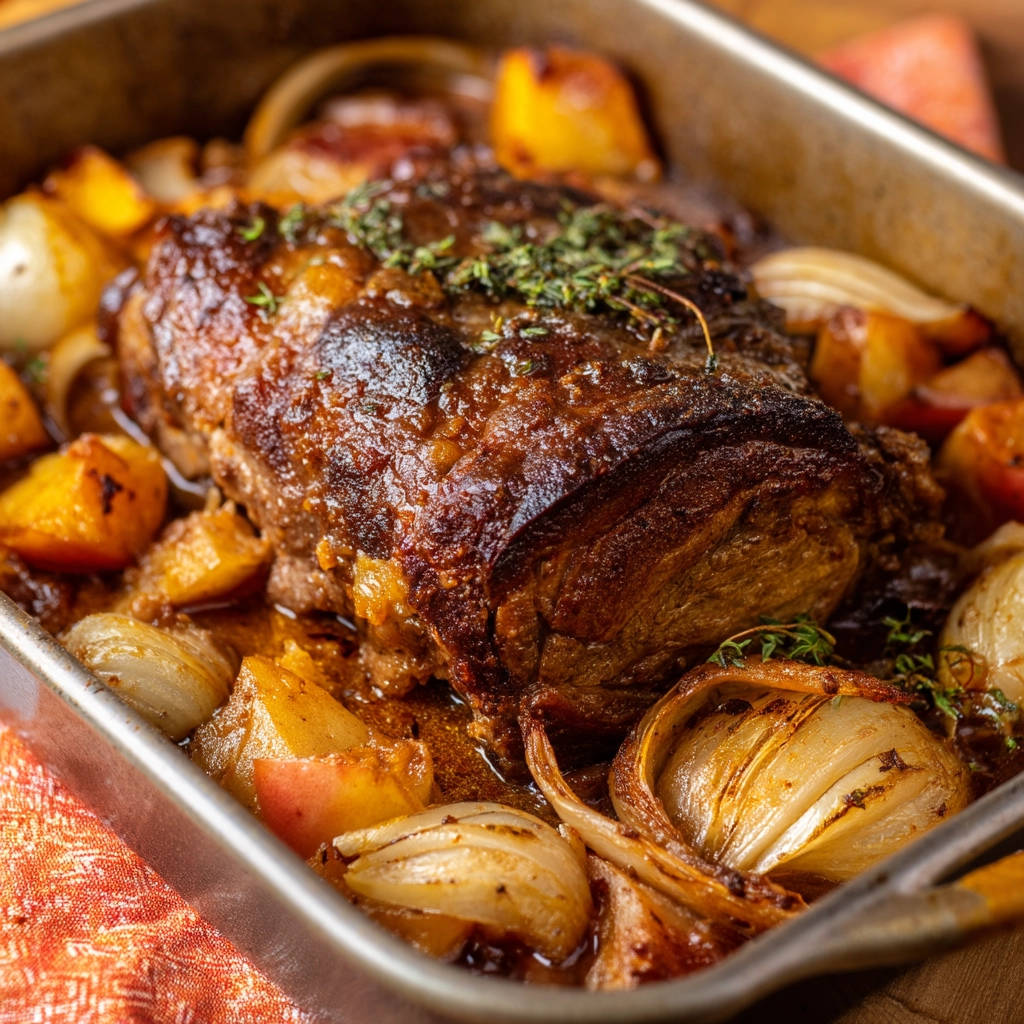
- Assemble the roast: Place the seared roast into a roasting pan large enough to hold it and the vegetables/apples. Scatter the quartered onions, apple chunks, and fresh thyme sprigs around the roast in the pan. The onions and apples will roast alongside the beef, infusing it with their flavors and creating a delicious side dish.
- Add the flavor boost: In a small bowl, whisk together the brown sugar and soy sauce (or tamari). Pour this mixture over the roast. This glaze will caramelize during cooking, adding a touch of sweetness and umami that complements the beef perfectly.
- Add moisture and cover: Pour the beef broth or water into the bottom of the roasting pan. This is the secret to juicy results! Tightly cover the roasting pan with heavy-duty aluminum foil or a lid. The liquid will create steam, and the foil will trap it, creating a moist environment that prevents the roast from drying out.
- Bake low and slow: Place the covered pan in the preheated oven. Bake for 2 and a half to 3 hours, or until the roast is very tender when pierced with a fork. The low temperature and moist environment created by covering the pan will break down the connective tissue slowly, resulting in an incredibly tender and juicy roast.
- Caramelize (optional): Remove the foil or lid. Increase the oven temperature to 400 degrees F (200 degrees C), if desired, for the last 15-20 minutes to get more caramelization on the roast and vegetables. Watch carefully to prevent burning. This step is optional but highly recommended for adding a beautiful color and enhanced flavor to the roast and vegetables.
- Rest the roast: Carefully remove the pan from the oven. Crucially, let the roast rest in the pan for at least 15-20 minutes before slicing. This is a critical step that allows the juices to redistribute throughout the meat, ensuring maximum tenderness and moisture. Skipping this step will result in a drier roast.
- Slice and serve: Slice the roast against the grain and serve with the roasted onions, apples, and pan juices. The pan juices are packed with flavor, so be sure to drizzle them over the sliced roast. Consider serving this juicy oven roast with a side of golden rice pilaf for a complete and satisfying meal.
Tips for Perfect Juicy Oven Roast Every Time
Want to take your Juicy Oven Roast to the next level? Here are a few pro tips to ensure success:
- Don’t skip the sear: Searing the roast is essential for developing deep, rich flavor.
- Use a meat thermometer: While the fork test is a good indicator, a meat thermometer will ensure that the roast is cooked to your desired doneness. For a medium-rare roast, aim for an internal temperature of 130-135 degrees F. For medium, aim for 140-145 degrees F.
- Resting is key: Don’t be tempted to slice the roast immediately after removing it from the oven. Resting allows the juices to redistribute, resulting in a more tender and juicy roast.
- Get creative with vegetables: Feel free to add other vegetables to the roasting pan, such as carrots, potatoes, or sweet potatoes. Just be sure to cut them into large chunks so they don’t overcook.
- Gluten-Free option: Use tamari instead of soy sauce to keep this recipe gluten-free.
- Storage: Store leftover roast in an airtight container in the refrigerator for up to 3-4 days.
What to Serve With Juicy Oven Roast
This Juicy Oven Roast is a complete meal on its own, but it’s also delicious served with a variety of side dishes. Creamy mashed potatoes are always a classic choice, and a simple green salad provides a refreshing contrast to the richness of the roast. For a more substantial side, consider roasted vegetables or a hearty grain salad.
Your Juicy Oven Roast Questions Answered (FAQ)
Can I use a different cut of beef?
While chuck roast is the recommended cut for this recipe, you can also use a brisket or a round roast. Keep in mind that different cuts may require slightly different cooking times.
Can I make this recipe in a slow cooker?
Yes! To make this recipe in a slow cooker, sear the roast as directed, then place it in the slow cooker with the vegetables, apples, and sauce. Cook on low for 6-8 hours, or until the roast is very tender.
Can I freeze leftover roast?
Yes! To freeze leftover roast, slice it and place it in an airtight container or freezer bag. Freeze for up to 2-3 months. Thaw overnight in the refrigerator before reheating.
What if I don’t have fresh thyme?
Dried thyme can be used in a pinch. Use about 1 teaspoon of dried thyme for every 4 sprigs of fresh thyme.
Enjoy Your Homemade Juicy Oven Roast!
There you have it – a foolproof recipe for a juicy, tender oven roast that will impress your family and friends. With its simple ingredients and easy-to-follow instructions, this recipe is perfect for busy weeknights or special occasions. So, gather your ingredients, preheat that oven, and get ready to enjoy the most delicious roast you’ve ever made! Don’t forget to leave a comment below and let me know how your roast turned out. And if you loved this recipe, be sure to share it with your friends!
Juicy Oven Roast (No More Dry Meat!)

Ingredients
- 1 boneless beef chuck roast (about 3 pounds)
- 2 large yellow onions, quartered
- 3 medium apples (such as Honeycrisp or Gala), cored and cut into large chunks
- 4 sprigs fresh thyme
- 1 cup beef broth or water
- 2 tablespoons olive oil
- 1 tablespoon brown sugar
- 1 tablespoon soy sauce (or tamari for gluten-free)
- 1 teaspoon garlic powder
- Salt and black pepper to taste
Directions
- Preheat oven to 325 degrees F (160 degrees C).
- Pat the chuck roast completely dry with paper towels. Season generously all over with salt, black pepper, and garlic powder.
- Heat the olive oil in a large, oven-safe pot or a heavy skillet over medium-high heat. Sear the roast on all sides until deeply browned, about 3-4 minutes per side. This step adds tremendous flavor.
- Place the seared roast into a roasting pan large enough to hold it and the vegetables/apples. Scatter the onion quarters, apple chunks, and fresh thyme sprigs around the roast in the pan.
- In a small bowl, whisk together the brown sugar and soy sauce. Pour this mixture over the roast.
- Pour the beef broth or water into the bottom of the roasting pan. **Here’s the secret to juicy results:** Tightly cover the roasting pan with heavy-duty aluminum foil or a lid.
- Place the covered pan in the preheated oven. Bake for 2 and a half to 3 hours, or until the roast is very tender when pierced with a fork. The low temperature and moist environment created by covering the pan will break down the connective tissue slowly and prevent dryness.
- Remove the foil or lid. Increase the oven temperature to 400 degrees F (200 degrees C), if desired, for the last 15-20 minutes to get more caramelization on the roast and vegetables. Watch carefully to prevent burning.
- Carefully remove the pan from the oven. **Crucially, let the roast rest in the pan for at least 15-20 minutes before slicing.** This allows the juices to redistribute throughout the meat, ensuring maximum tenderness and moisture.
- Slice the roast against the grain and serve with the roasted onions, apples, and pan juices.