There’s something absolutely magical about a vibrant, layered frozen drink on a scorching hot day. Those distinct, colorful stripes promising icy refreshment are just so appealing! You see them on menus and think, “I can totally make that at home!” But then, you try, and instead of beautiful layers, you end up with a swirled, muddy mess that, while still tasty, lacks that visual “wow” factor. Sound familiar?
Well, fellow frozen drink enthusiasts, I’ve been there! I’ve experimented, blended, poured, and watched disheartened as my carefully separated colors bled into each other. But after a bit of trial and error, I finally cracked the code. The secret to achieving truly stunning, distinct layers in a homemade Layered Tropical Slushy isn’t complicated at all. In fact, it boils down to one simple, crucial technique. And once you know it, you’ll be whipping up these picture-perfect frozen treats all summer long!
This recipe uses just a handful of simple ingredients to create a refreshing pineapple and strawberry delight. It’s kid-friendly, naturally dairy-free, and incredibly satisfying when you need to cool down. Forget disappointing, blended slushies – let’s make some layered magic!
Why You’ll Absolutely Love This Layered Tropical Slushy
Beyond just being a delicious way to beat the heat, this Layered Tropical Slushy offers a few key benefits that make it a total winner in my book:
- Visually Stunning: Let’s be honest, presentation matters! The vibrant, separate layers make this drink look like something you’d order at a fancy resort, instantly boosting its appeal for both kids and adults.
- Pure Refreshment: The combination of tropical pineapple and sweet strawberries is incredibly cooling and satisfying on a hot day.
- Simple & Quick: With minimal ingredients and just a few steps, you can have this beautiful drink ready in minutes. It’s perfect for impromptu summer gatherings or just a quick personal treat.
- Naturally Wholesome: Made primarily from frozen fruit, it’s a healthier alternative to many sugary store-bought frozen drinks.
- Highly Customizable: Once you master the layering technique, you can easily swap in other fruits and flavors to create your own unique layered creations.
Gathering Your Ingredients for a Stunning Layered Slushy
One of the best things about this recipe is its simplicity. You really only need two main ingredients, plus a tiny bit of liquid to get the magic happening. The key here is the state of your fruit and the minimal amount of liquid you’ll add.
We start with frozen fruit – specifically, 2 cups of frozen pineapple chunks and 2 cups of frozen strawberries. Using fruit that is already frozen solid is absolutely critical. Why? Because it provides the necessary body and thickness for the slushy mixture. If you were to use fresh fruit and add ice, the ice would melt quickly, leading to a thinner, more liquid consistency that would cause your layers to blend together faster. Frozen fruit eliminates the need for excess ice, resulting in a denser, scoopable mixture that holds its shape beautifully.
For the liquid component, you’ll need just a 1/4 cup of cold water or juice, divided. This small amount is just enough to help the blender blades catch and process the frozen fruit into a smooth consistency. Using too much liquid is the primary culprit behind failed layered drinks! Water keeps the flavors pure, while a splash of juice (like apple, orange, or even pineapple juice for the pineapple layer and cranberry or strawberry juice for the strawberry layer) can boost the fruit flavor and add a touch more sweetness. We’ll divide this small amount between the two fruit layers.
Finally, for that extra touch of tropical flair, you can include an optional pineapple wedge and fresh strawberry for garnish. These simple additions really elevate the presentation.
So, to summarize, here’s what you’ll need:
- 2 cups frozen pineapple chunks (essential for that thick, layer-worthy texture)
- 2 cups frozen strawberries (providing vibrant color and sweet contrast)
- 1/4 cup cold water or juice, divided (just enough to encourage blending, the less the better!)
- Optional: Pineapple wedge and fresh strawberry for garnish (for that perfect finishing touch)
Having these few items ready is the first step to creating your impressive Layered Tropical Slushy!
Crafting Your Beautiful Layered Slushy: A Step-by-Step Guide
Now for the fun part – bringing those beautiful layers to life! The process is straightforward, but paying attention to the consistency of each fruit layer is paramount. Think of it like building a delicious, icy sandcastle – you need firm, slightly wet sand for structure!
Prepare the First Layer (Pineapple): Start with your frozen pineapple chunks. Toss them into your blender. Add just 2 tablespoons (which is half of your total liquid) of your cold water or juice. Secure the lid. Now, blend on high speed. You’ll likely need to stop and scrape down the sides of the blender frequently using a spatula. The goal is to achieve a consistency that is thick and smooth, very similar to soft-serve ice cream or frozen yogurt. It should be scoopable, not pourable. If the blender is really struggling and the fruit isn’t moving, add only another tiny splash (maybe a teaspoon at most) of liquid, just enough to help it along. Resist the urge to add more!
Build the First Layer in the Glass: Once your pineapple slushy is the perfect thick consistency, it’s time to spoon it into your serving glass. Do this carefully. Spoon the pineapple mixture into the bottom half of the glass. You can gently tap the bottom of the glass on the counter a couple of times to help it settle evenly, but avoid pressing it down too firmly, as this can make it harder for the second layer to sit nicely on top.
Clean Up & Prepare for Layer Two: Give your blender a quick rinse. You don’t need to get it perfectly spotless, but rinsing out the bulk of the pineapple slushy prevents the yellow from mixing with the red strawberry layer prematurely. Now, add your frozen strawberries and the remaining 2 tablespoons of cold water or juice to the rinsed blender.
Blend the Second Layer (Strawberry): Just like with the pineapple, blend the frozen strawberries and liquid on high speed. Stop and scrape down the sides as needed. Again, you are aiming for that same thick, smooth, soft-serve-like consistency. If it’s too thin, your layers will merge. Blend until it reaches that scoopable, almost fluffy texture.
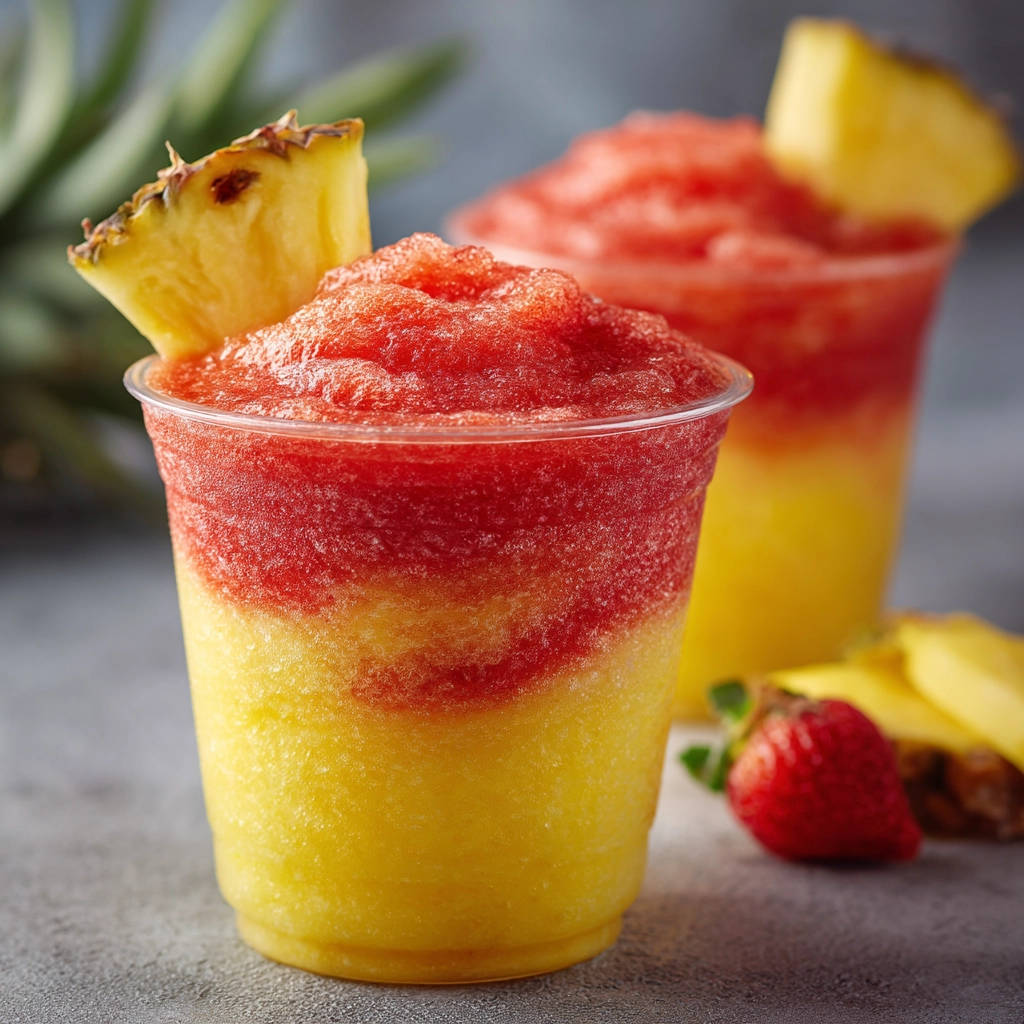
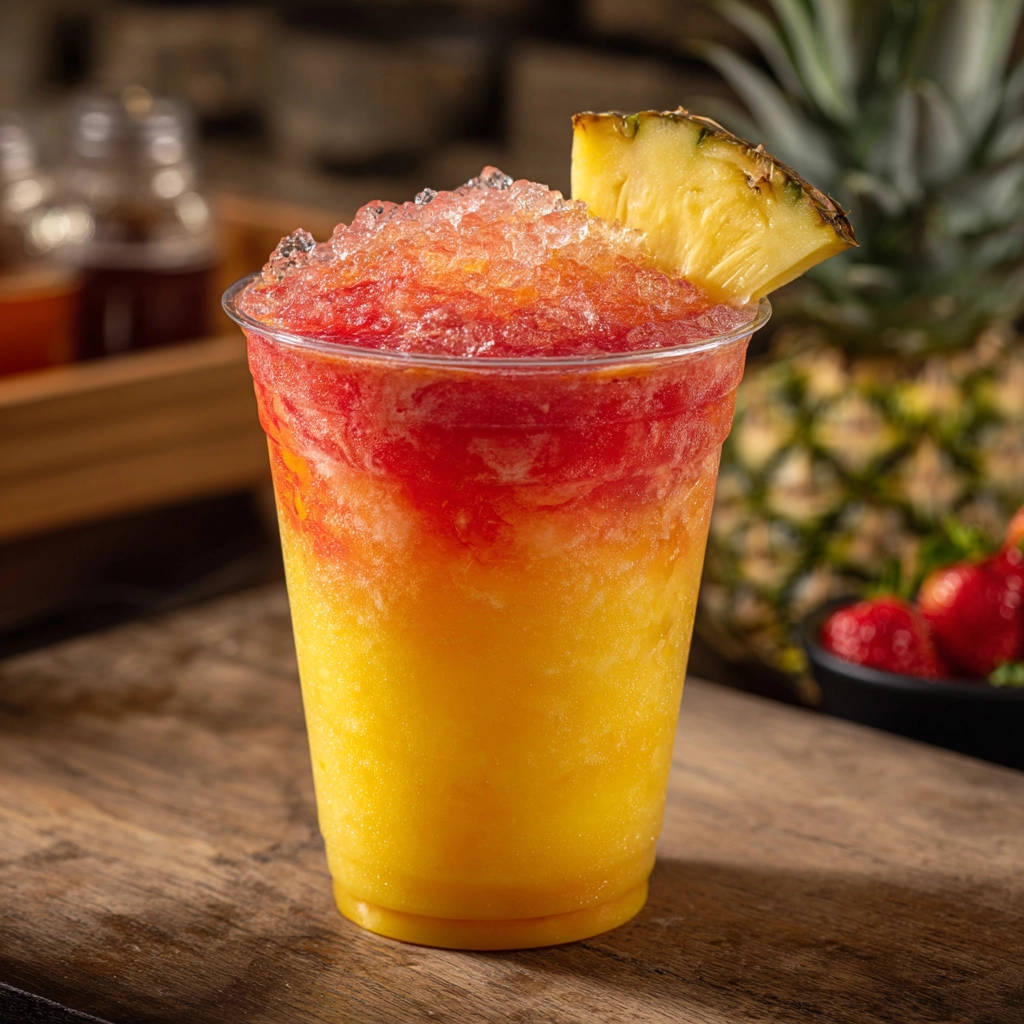
Carefully Add the Second Layer: With your strawberry slushy ready, gently spoon it on top of the pineapple layer in your glass. Take your time and try to spoon it evenly over the surface. Because both layers are thick from using minimal liquid and starting with frozen fruit, they are dense enough to stack beautifully and stay distinct. This thick consistency is the crucial trick!
Garnish and Serve Immediately: For the final flourish, add an optional pineapple wedge on the rim of the glass or a fresh strawberry perched on top. Your stunning Layered Tropical Slushy is complete! It’s best enjoyed right away while the layers are perfectly separated and the slushy is at its ideal frozen consistency.
And there you have it! Follow these steps, paying special attention to achieving that thick, spoonable consistency for both layers, and you’ll have a perfectly layered tropical masterpiece every single time. It’s such a simple technique, but it makes all the difference in creating those eye-catching stripes.
Tips & Variations for Your Tropical Slushy
Once you’ve mastered the basic Layered Tropical Slushy, you might want to experiment! Here are a few ideas to get you started and some pro tips for the best results:
- Mastering the Blend: The type of blender you have can affect the process. High-powered blenders will make quick work of the frozen fruit. If you have a less powerful blender, you might need to stop and scrape down the sides more frequently, and potentially add that tiny extra splash of liquid, but always add as little as possible.
- Other Fruit Combos: The layering trick works with many frozen fruits! Try frozen mango layered with frozen raspberries, or frozen peaches with frozen blueberries. Just make sure both fruits can blend into a thick, smooth consistency. Lighter colored fruits layered with darker ones will give you the most dramatic visual effect.
- Sweetness Level: Pineapple and strawberries are naturally sweet, but if you prefer a sweeter slushy, you can add a small amount of natural sweetener like honey or maple syrup to the blender with the fruit and liquid. A tablespoon or two should be plenty.
- Creamy Layers: For a slightly creamier texture without dairy, you could use frozen banana chunks for one of the layers (though this changes the color and flavor profile significantly) or add a small splash of coconut milk or almond milk instead of water/juice. Be cautious with the amount of milk, as it can make the mixture thinner.
- Single Color Slushy: If you’re not worried about layers, simply blend one type of frozen fruit with minimal liquid for a delicious and healthy single-color slushy. It’s still incredibly refreshing!
- Garnish Getaway: Get creative with garnishes! Besides fruit wedges, try adding a few fresh mint leaves for a burst of freshness, or even a tiny umbrella for that ultimate tropical vibe.
Serving Suggestions
This Layered Tropical Slushy is fantastic on its own as a refreshing treat or a light dessert. It’s especially perfect for backyard BBQs, pool parties, or just sipping on the porch on a warm afternoon.
Looking for something to pair it with? It goes wonderfully with light summer fare. Imagine enjoying this vibrant slushy alongside some grilled chicken skewers or maybe after a fresh, crisp salad. If you’re looking for other easy-to-make refreshing treats or desserts, you might enjoy our recipe for Classic Peach Crumble or maybe a fun, fruity Strawberry Trifle.
It’s also a fantastic non-alcoholic option for celebrations where you want something festive and beautiful but don’t want traditional sugary sodas. Kids absolutely adore the bright colors and sweet flavor.
Your Layered Slushy Questions Answered (FAQ)
Have a few lingering questions about getting your layered slushy just right? Here are some answers to common queries:
Why did my slushy layers blend together?
The most common reason layers blend is adding too much liquid when blending the fruit. The key is to use the absolute minimum amount of water or juice needed to get the blender to process the frozen fruit. The mixture needs to be thick, like soft-serve ice cream or a very thick sorbet, not liquidy or easily pourable.
Can I use fresh fruit instead of frozen?
You can use fresh fruit, but you will need to add a significant amount of ice to get a slushy consistency. Using ice introduces more water, which melts more quickly than frozen fruit. This will make it much harder, if not impossible, to maintain distinct layers for more than a few seconds. For successful layering, frozen fruit is truly essential.
Do I need to add sugar or sweetener?
Pineapple and strawberries are naturally sweet fruits. The amount of added sweetener needed (if any) will depend entirely on your personal preference and the ripeness of your fruit. I recommend tasting the blended mixture before layering and adding a small amount of honey, maple syrup, or agave only if desired.
What kind of juice works best?
Cold water works perfectly well and lets the pure fruit flavors shine. If you prefer juice, stick to clear or light-colored juices that complement the fruit, like apple, white grape, or even a little bit of orange juice. Using dark-colored juices might affect the color of your layers.
How long will the layers stay separate?
The layers will stay distinct as long as the slushy remains frozen and thick. Once it starts melting significantly, the layers will inevitably begin to soften and potentially mix. This is why it’s important to serve and enjoy this layered slushy immediately after making it.
Can I make this ahead of time?
Because the magic of the layers relies on the thick, freshly blended consistency, this is not a drink that is well-suited for making ahead of time and storing. It’s best made just before serving. However, you can have all your ingredients measured and ready to go to speed up the process.
Sip & Enjoy Your Tropical Masterpiece!
Making a beautiful, layered drink might seem intimidating, but as you’ve seen, the technique is incredibly simple! By focusing on using frozen fruit and minimal liquid, you unlock the secret to those stunning, separate layers that make this Layered Tropical Slushy so special.
Whether you’re hosting a summer party or just craving a vibrant, healthy, and refreshing treat for yourself, this recipe delivers. It’s proof that sometimes, the most impressive results come from the simplest methods. Give it a try, and prepare to be amazed by your own layered creation!
If you make this Layered Tropical Slushy, I’d love to see your photos! Share them in the comments below or tag me on social media. And don’t forget to rate the recipe if you enjoyed it!
Layered Tropical Slushy

Ingredients
- 2 cups frozen pineapple chunks
- 2 cups frozen strawberries
- 1/4 cup cold water or juice (divided)
- Optional: Pineapple wedge and fresh strawberry for garnish
Directions
- For the pineapple layer, combine frozen pineapple chunks and 2 tablespoons of cold water or juice in a blender. Blend on high speed, scraping down the sides as needed, until the mixture is thick and smooth, like a soft-serve consistency. Add another splash of liquid only if absolutely necessary to get it blending.
- Carefully spoon the pineapple slushy into the bottom half of your serving glass.
- Rinse the blender quickly. For the strawberry layer, combine frozen strawberries and the remaining 2 tablespoons of cold water or juice in the blender. Blend until thick and smooth, similar to the pineapple layer.
- Gently spoon the strawberry slushy on top of the pineapple layer. Because both layers are blended to a thick consistency using minimal liquid, they will hold their shape and stay separate.
- Garnish with a pineapple wedge and fresh strawberry if desired. Serve immediately.