
Few things are more disappointing than pulling a potato bake out of the oven only to find a broken, oily mess. You were expecting a velvety, rich sauce, but instead, you’ve got curdled dairy and a pool of liquid at the bottom of the dish. It’s a common frustration that haunts even experienced home cooks because dairy is notoriously finicky under high heat.
The secret to a restaurant-quality finish lies in the marriage of earthy rosemary and a stabilized cream base. By moving away from the traditional “pour and pray” method, you can ensure every bite is decadent and smooth. We’re going to use a professional starch-infusion technique that locks the cream to the potato, creating a cohesive, luxurious texture that never separates.
I’ve found that the real trick isn’t just the ingredients, but how you handle the potato starch itself. Most people rinse their potatoes after slicing, which is a huge mistake here. You actually need that surface starch to act as a natural bridge between the heavy cream and the heat of the oven. Let’s dive into how you can master this classic side dish once and for all.
The Science of Stable Cream Sauces
Understanding why cream curdles is the first step toward preventing it. When dairy is exposed to high temperatures for a long time, the proteins begin to clump together, which forces the fats and liquids to separate. This “curdle point” is often reached in the oven because the edges of the baking dish get much hotter than the center, leading to that dreaded grainy texture.
In this recipe, we use a combination of heavy cream and whole milk to strike a balance between richness and fluidity. Heavy cream has a higher fat content, which actually makes it more stable than milk alone. However, the real hero is the par-cooking step. By simmering the potatoes in the cream on the stovetop first, we’re performing a temperature-tempering maneuver.
As the potatoes simmer, they release their natural starches directly into the liquid. This starch acts as a stabilizer, coating the dairy proteins and preventing them from bonding together and curdling later in the oven. It essentially creates a reinforced sauce that can withstand the 375°F heat without breaking. You’re not just cooking the potatoes; you’re chemically engineering a better sauce.
Essential Components for Creamy Rosemary Scalloped Potatoes
The foundation of this dish is the potato, and not all spuds are created equal. For the best results, you must use Yukon Gold potatoes. They sit perfectly in the middle of the texture spectrum, offering a buttery flavor and a waxy skin that holds its shape. Russets tend to fall apart into mush, while red potatoes can be too firm and won’t absorb the cream properly.
Fresh rosemary is another non-negotiable element. While dried herbs have their place, they can feel woody and sharp in a soft potato bake. Fresh rosemary provides a piney, floral aroma that cuts through the heavy fats of the cream and cheese. You’ll want to mince it very finely so the flavor distributes evenly without leaving large, chewy needles in the sauce.
Precision matters when it comes to slicing. Aim for a consistent 1/8 inch thickness for every round. If your slices vary in size, some will be overcooked and mushy while others remain crunchy. A uniform slice ensures that every layer reaches that perfect fork-tender consistency at exactly the same time, allowing the sauce to thicken uniformly around them.
Selecting the Right Cheese for Melting
Gruyere is the gold standard for scalloped potatoes because of its nutty profile and incredible melting capabilities. If you prefer something sharper, a high-quality white cheddar works beautifully too. Both cheeses have a high fat-to-protein ratio, which helps them melt into the sauce rather than sitting on top like a waxy blanket.
Whatever you do, please avoid the pre-shredded cheese found in plastic bags. Those products are coated in potato starch or cellulose to prevent clumping in the bag. That extra coating will interfere with your cream sauce and can cause the very graininess we’re trying to avoid. Grating your cheese fresh from the block is the only way to ensure a smooth, glossy finish.
The Role of Nutmeg and Aromatics
Nutmeg might seem like a strange addition to a savory potato dish, but it’s a classic French secret. It doesn’t make the dish taste like a dessert; instead, it adds a subtle depth that makes the cream taste “creamier.” It bridges the gap between the earthy potatoes and the sharp cheese, providing a sophisticated back-note that guests can’t quite put their finger on.
Garlic is the other essential aromatic here. By smashing and mincing the cloves before simmering them in the cream, you allow the garlic oils to infuse the entire liquid base. This mellows the garlic’s bite, turning it sweet and fragrant. It ensures that every single potato slice is seasoned from the inside out, rather than just having chunks of garlic stuck in one corner of the dish.
Preparing the Potatoes and Infusion Base
Before you start cooking, get your workstation ready. Using a mandoline is the most efficient way to get those perfect 1/8 inch slices, but please use the safety guard. If you’re using a knife, take your time to keep the thickness consistent. Remember, do not soak these slices in water! We want every bit of that surface starch to stay on the potato.
For the baking dish, ceramic is your best friend. Ceramic heats up more slowly and retains heat more evenly than metal or glass. This prevents the edges from scorching before the middle is cooked through. Generously grease the dish with unsalted butter, making sure to hit the corners. This not only prevents sticking but adds a final layer of toasted butter flavor to the crust.
The Par-Cook Method: A Step-by-Step Guide
This is where the magic happens. Place your sliced potatoes, cream, milk, and aromatics into a large saucepan. Turn the heat to medium and watch it closely. You are looking for a very gentle simmer, not a rolling boil. If the liquid starts to bubble violently, turn the heat down immediately. A harsh boil is the fastest way to break the cream before the starch has a chance to save it.
As the mixture heats up, you’ll notice the liquid changing. It will start to look slightly thicker and glossier. This is the starch-infusion at work. Use a wooden spoon to gently move the potatoes around so they don’t stick to the bottom, but be careful not to snap the slices. After about 8 to 10 minutes, the liquid should coat the back of a spoon beautifully.
You’ll know it’s ready when the potatoes are slightly flexible but still have a bit of a “snap” to them. They shouldn’t be fully cooked yet. The goal here is to jumpstart the softening process and create that stabilized sauce base. The aroma of rosemary and garlic should be filling your kitchen at this point, signaling that the infusion is complete.
Layering for Maximum Flavor Distribution
When you move the potatoes to the baking dish, don’t just dump them in. Use a slotted spoon to layer them in slightly overlapping rows, often called “shingling.” This creates little pockets where the sauce can settle. By adding half the cheese in the middle layer, you create a structural bond that keeps the dish from sliding apart when you slice it later.
Once the potatoes are arranged, pour that warm, infused cream over the top. It should fill the gaps and almost submerge the potatoes. This layering technique ensures that you don’t just have a cheesy crust on top, but a consistent distribution of flavor and fat throughout the entire depth of the dish. It makes every bite as good as the first one.
Oven Phases: From Softening to Golden Crust
The baking process happens in two distinct stages. First, we cover the dish tightly with aluminum foil. This creates a steam chamber that finishes cooking the interior of the potatoes. Without the foil, the top would burn long before the middle slices were tender. This 30-minute “steam phase” is crucial for achieving that melt-in-your-mouth texture.
The second phase is all about the Maillard reaction. Once you remove the foil and add the remaining cheese, the dry heat of the oven begins to brown the proteins and sugars in the dairy. This is where you get those crispy, golden edges and the deep, savory flavor. The sauce will continue to bubble and reduce, becoming even thicker and more concentrated.
Achieving the Perfect Golden-Brown Finish
If your potatoes are tender but the top looks a little pale, don’t be afraid to use the broiler. Set it to high and watch it like a hawk for about 2 minutes. You want to see deep golden spots and a vigorous bubble around the edges. This final blast of heat creates a textural contrast between the crunchy top and the silky interior that is absolutely addictive.
The Critical 15-Minute Rest Period
I know it’s tempting to scoop into the dish the second it comes out of the oven, but you must wait. Thermodynamics are at play here. As the dish sits, the temperature drops slightly, which allows the starches to fully “set.” If you cut into it too early, the sauce will be runny and will pool at the bottom of the plate.
During these 15 minutes, the potatoes actually reabsorb some of the liquid, locking the cream to the surface of each slice. This results in a much cleaner presentation and a more intense flavor. Think of it as the final stage of cooking. The carry-over heat finishes the job while the sauce reaches its peak consistency.
Troubleshooting Your Potato Bake
If you find that your potatoes are still firm after the initial 30 minutes, your slices might have been a bit too thick. Simply put the foil back on and give them another 10 minutes before adding the final cheese. It’s better to overcook a potato slightly than to serve one that has a raw crunch in the center.
If the sauce looks like it’s starting to separate despite your best efforts, don’t panic. Usually, a quick stir of the top layer (before the final cheese goes on) can help re-incorporate the fats. However, if you followed the par-cook method, this is very unlikely to happen. Excess liquid can also occur if the potatoes were particularly high in moisture; in this case, just bake it uncovered for an extra 5 minutes to help evaporation.
Flavor Variations and Ingredient Swaps
While rosemary is a classic, you can easily swap it for fresh thyme or sage for a different herbal profile. If you want to add more complexity, try layering in some caramelized leeks or sautéed onions between the potato rows. The sweetness of the onions pairs beautifully with the salty Gruyere and the rich cream.
For those who need a dairy-free option, you can use a high-quality cashew cream. Cashews have a natural fat content that mimics heavy cream quite well. Combine this with nutritional yeast to get that “cheesy” hit. While the texture won’t be identical to the dairy version, the starch-infusion method still works to keep the cashew cream thick and luscious.
Pairing Suggestions for a Complete Meal
These potatoes are incredibly rich, so they pair best with proteins that have a bit of a sear or a smoky element. A roasted chicken with crispy skin or a seared lamb chop is a match made in heaven. The rosemary in the potatoes will echo the herbs often used in meat preparations, creating a cohesive menu.
To balance the heaviness of the cream and cheese, I always serve a bright, acidic side dish. A simple arugula salad tossed in a sharp lemon vinaigrette is perfect. The bitterness of the greens and the hit of acid from the lemon cut right through the richness of the potatoes, refreshing your palate between every decadent bite.
Make-Ahead Strategies and Storage
You can actually prep this dish up to 24 hours in advance. Follow the steps through the par-cooking and layering, but don’t do the final bake. Cover it tightly and keep it in the fridge. When you’re ready to eat, let it sit on the counter for 30 minutes to take the chill off before popping it into the oven. You may need to add 5-10 minutes to the covered baking time.
Leftovers store well in an airtight container for about 3 days. When reheating, avoid the microwave if possible, as it can cause the sauce to break. Instead, put a portion in a small oven-safe dish with a tiny splash of milk, cover with foil, and heat at 300°F until warmed through. I don’t recommend freezing this dish; the ice crystals damage the potato cells and the cream sauce will almost certainly separate upon thawing.
Expert Tips for Professional Results
If you want to be really precise, use a kitchen scale to weigh your potatoes. Three pounds is the sweet spot for a 9×13 dish. Also, perform the “spoon back” test during your simmer. Draw your finger across the back of the coated spoon; if the line stays clean and doesn’t fill in with liquid, your sauce is perfectly thickened and ready for the oven.
Finally, remember the golden rule: never rinse. That white, cloudy starch on the surface of your sliced potatoes is the “glue” that holds your sauce together. By keeping that starch intact and using the par-cook method, you are guaranteed a creamy, stable, and absolutely delicious rosemary potato bake every single time.
How do I prevent the cream from curdling in the oven?
The most effective way to prevent curdling is to par-cook the potatoes in the cream mixture on the stovetop before baking. This allows the potato starches to release into the liquid, which acts as a stabilizer for the dairy proteins. Additionally, using heavy cream instead of just milk provides a higher fat content that is less likely to break under high heat. Avoid using high temperatures above 375°F for extended periods, as extreme heat is the primary cause of separation.
Can I use a different type of potato if I don’t have Yukon Golds?
While Yukon Golds are the best choice due to their buttery texture and starch content, you can use Russet potatoes in a pinch. However, be aware that Russets are much starchier and more “mealy,” meaning they may break down and become mushy rather than staying in distinct slices. Avoid red-skinned potatoes if possible, as they are very waxy and won’t absorb the cream sauce as effectively, often resulting in a dish where the sauce and potatoes feel separate.
Why is my potato bake watery even after following the recipe?
Watery scalloped potatoes usually happen for two reasons: skipping the resting period or using potatoes with too much internal moisture. The 15-minute rest after baking is mandatory; it allows the starches to finish setting and reabsorb excess liquid. If you cut into the dish immediately, the sauce hasn’t had time to thicken. Also, ensure you aren’t soaking your potatoes in water after slicing, as this removes the starch needed to thicken the sauce.
Can I substitute the Gruyere cheese with something else?
Yes, you can substitute Gruyere with other high-quality melting cheeses. A sharp white cheddar is a fantastic alternative that provides a similar bite. Fontina or Emmental also work well for their melting properties. The key is to use a cheese that you grate yourself from a block. Avoid pre-shredded cheeses, as the anti-clumping agents (like cellulose) can prevent the cheese from fully integrating into the cream sauce, leading to a grainy texture.
How should I store and reheat leftovers?
Store any leftovers in an airtight container in the refrigerator for up to 3 days. To reheat, place the potatoes in an oven-safe dish and add a tablespoon of milk or cream to help loosen the sauce. Cover with foil and bake at 300°F until heated through. This gentle heating method prevents the sauce from breaking. Freezing is not recommended, as the texture of both the potatoes and the cream sauce will degrade significantly once thawed and reheated.
Is it necessary to peel the potatoes?
For the most refined, restaurant-quality texture, peeling is recommended. The skins of Yukon Golds are thin, but they can become tough or papery during the long baking process, which interrupts the silkiness of the dish. If you prefer a more rustic style, you can leave the skins on, but make sure to scrub them very thoroughly to remove any dirt or grit that could ruin the creamy sauce.
Creamy Rosemary Scalloped Potatoes
Course: Side DishCuisine: AmericanDifficulty: easy8
servings20
minutes1
hour5
minutes85
Minutes340
kcalAmerican
Ingredients
3 pounds Yukon Gold potatoes, peeled and sliced into 1/8 inch rounds
2 cups heavy cream
1 cup whole milk
3 cloves garlic, smashed and minced
3 tablespoons fresh rosemary, divided (2 tbsp finely chopped, 1 tbsp whole sprigs for garnish)
1.5 teaspoons kosher salt
1/2 teaspoon black pepper
1.5 cups shredded Gruyere or white cheddar cheese
2 tablespoons unsalted butter
1/4 teaspoon ground nutmeg (optional, for depth)
Directions
- Preheat your oven to 375°F (190°C). Grease a deep 9×13 inch ceramic baking dish with the butter.
- To prevent curdling and ensure a thick sauce, do not pour cold cream over the potatoes. In a large saucepan, combine the heavy cream, milk, minced garlic, chopped rosemary, salt, pepper, and nutmeg.
- Add the sliced potatoes directly into the saucepan with the cream mixture. Bring to a very gentle simmer over medium heat. Cook for 8-10 minutes, stirring carefully so as not to break the slices. This “par-cook” step allows the potato starches to release into the cream, naturally thickening the sauce and stabilizing the dairy proteins before they ever hit the oven.
- Use a slotted spoon to transfer half of the par-cooked potatoes into the prepared baking dish, arranging them in slightly overlapping rows. Sprinkle with half of the shredded cheese.
- Layer the remaining potatoes on top. Pour the remaining warm cream mixture from the saucepan over the potatoes until they are mostly submerged.
- Cover the dish tightly with foil. Bake for 30 minutes.
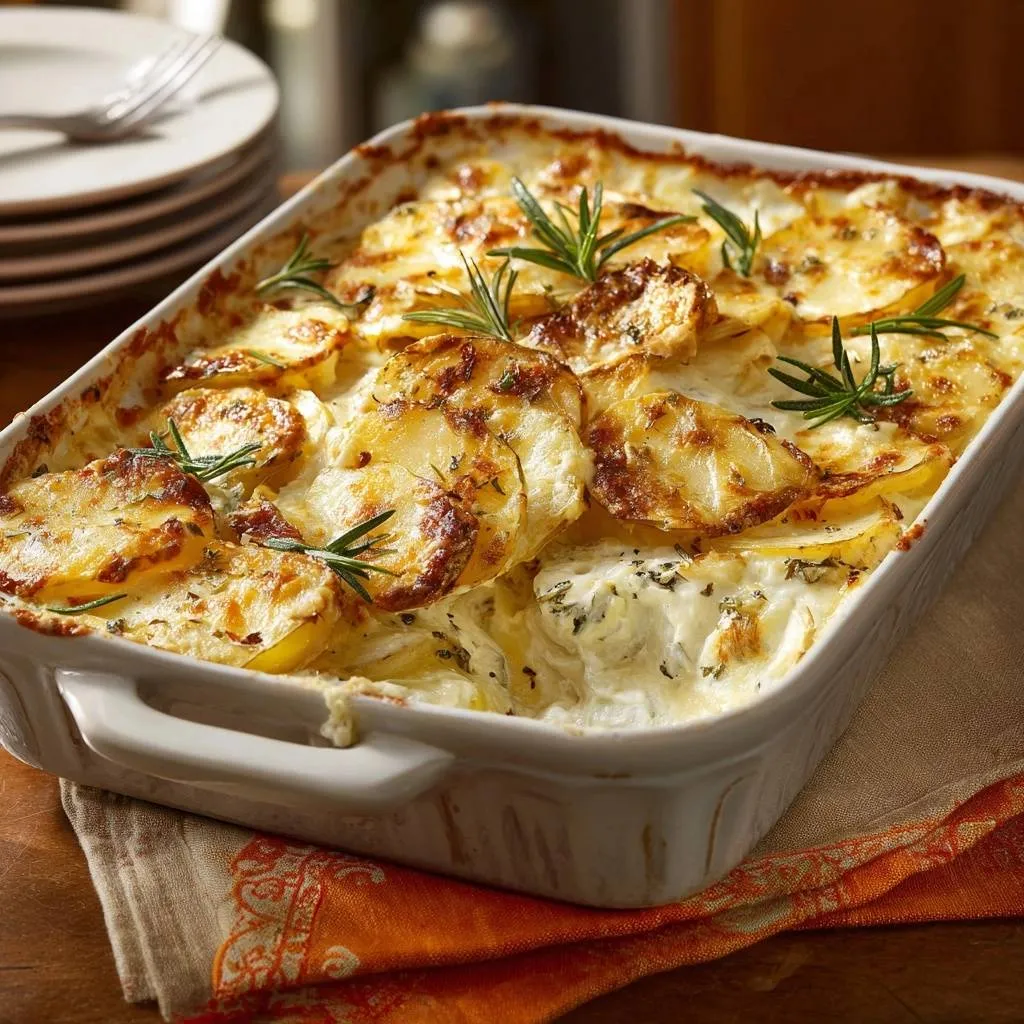
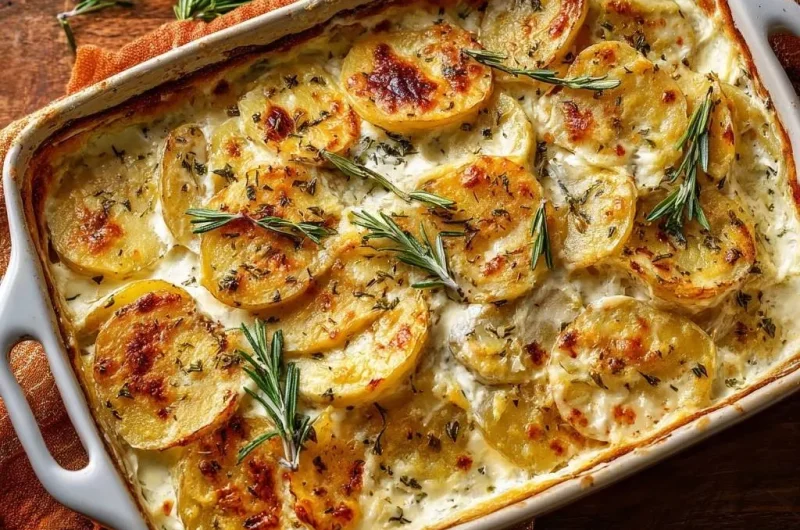
- Remove the foil. The potatoes should be tender when pierced with a knife. Sprinkle the remaining cheese over the top. Arrange the whole rosemary sprigs across the top as seen in the image.
- Bake uncovered for an additional 20-25 minutes, or until the top is deeply golden-brown and the sauce is bubbling and thick. If needed, broil for 2 minutes at the very end for specific browning spots.
- Let the dish rest for 15 minutes before serving. This final rest is crucial; it allows the sauce to fully set and the starches to lock the cream to the potatoes, preventing any liquid from pooling on the plate.
Notes
- The 15-minute resting period after baking is crucial for the sauce to set and prevent liquid from pooling. Using Yukon Gold potatoes is recommended for their natural starch content and buttery texture.