Imagine pulling a bubbling casserole dish from the oven, the edges charred to a perfect golden brown and the center a sea of velvety, ivory sauce. You slide a spoon in, and instead of a watery, broken mess, you find a rich, emulsified glaze that clings to every tender potato slice. That’s the dream of the perfect scalloped potato, but for many home cooks, the reality is often a grainy, curdled disappointment.
The frustration of a “broken” sauce is real, but it’s entirely avoidable once you understand the mechanics of dairy and starch. We aren’t just tossing sliced potatoes into a dish with some cream and hoping for the best. We’re building a structural foundation that stands up to the intense heat of a long bake.
The secret to this foolproof texture lies in the blond roux and the tempering of your dairy. By stabilizing the milk and cream with a flour-and-butter base before it ever touches the potatoes, you create a heat-resistant shield. This ensures your sauce stays silky from the first scoop to the very last bite.
The Science of Stable Dairy Emulsions
When you bake dairy at high temperatures for over an hour, you’re essentially asking for trouble. The proteins in milk and cream are sensitive to heat and the natural acids found in potatoes. Without a stabilizer, these proteins clump together, causing the fat to separate and creating that dreaded “curdled” look that ruins a holiday dinner.
However, introducing a roux changes the entire chemistry of the dish. As the flour and butter cook together, the starch granules swell and create a network that traps fat globules. This prevents them from breaking away when the oven temperature climbs. In addition, the starch from the potatoes themselves acts as a secondary thickener, but only if the initial sauce is stable enough to receive it.
Therefore, the roux acts as an insurance policy. It provides a thick, viscous environment that keeps the heavy cream and whole milk in a state of perfect suspension. Even as the potatoes release their moisture during the 75-minute bake, the sauce remains unified and glossy rather than turning into an oily puddle.
Why Yukon Golds Outperform Russets
Choosing the right potato is just as important as the sauce itself. While Russets are great for mashing, they are often too “mealy” for a layered casserole. They tend to fall apart completely, losing their structural integrity and turning your scalloped potatoes into a chunky mash.
Yukon Golds are the superior choice because they sit right in the middle of the starch spectrum. They have a naturally buttery flavor and a waxier texture that holds its shape beautifully after slicing. In addition, they contribute just enough starch to the sauce to help it thicken without making the entire dish feel heavy or dry.
Essential Components for Creamy Scalloped Potatoes
Quality ingredients are the backbone of this comfort classic. You’ll want to reach for whole milk and heavy cream rather than lower-fat alternatives. The higher fat content isn’t just for flavor; it provides the necessary buffer against the heat. Skim or 2% milk lacks the structural fat needed to maintain a creamy mouthfeel during a long roasting process.
When it comes to the cheese, skip the pre-shredded bags. Those products are coated in potato starch or cellulose to prevent clumping in the bag, which unfortunately prevents them from melting smoothly in your sauce. Hand-grating a block of Gruyere or sharp white cheddar ensures a gooey, stringy texture that integrates perfectly with the cream.
Gruyere is the gold standard here because of its nutty, sophisticated profile and excellent melting point. If you prefer something sharper, a high-quality white cheddar provides a lovely tang. Whichever you choose, make sure it’s freshly grated for the best results.
Aromatics and Herb Selection
Garlic and onion powder provide the savory “bass notes” of this dish. By softening the minced garlic in butter before adding the flour, you mellow out its sharp, raw bite. This infuses the entire fat base with a sweet, roasted garlic aroma that carries through every layer of the potato.
Fresh thyme is another non-negotiable for a professional-tasting result. Dried herbs can sometimes become gritty or overly potent during a long bake. Fresh thyme leaves, however, release a subtle, earthy floral note that cuts through the richness of the heavy cream and cheese without overpowering the delicate flavor of the Yukon Golds.
The Foundation: Building a Blond Roux
To start your sauce, melt the butter over medium heat until it’s foaming but not browning. Once you whisk in the flour, you’re looking for a “blond” roux. This means you only want to cook it for about two minutes—just long enough to cook out the raw flour taste while keeping the color pale.
You’ll know it’s ready when it smells slightly nutty and looks like a thick, bubbling paste. If you let it go too long and it turns brown, the thickening power of the starch decreases, and the flavor will become too toasted for a delicate cream sauce. Keep that whisk moving constantly to ensure a smooth, lump-free start.
Tempering the Sauce for Maximum Silkiness
The most critical moment for your sauce is the addition of the liquid. If you dump the cold milk and cream in all at once, the roux will seize up into small, hard clumps. Instead, pour the liquid in a very thin, slow stream while whisking vigorously with your other hand.
At first, it will look like a thick paste, but as you continue to add liquid, it will transform into a smooth, glossy sauce. Continue cooking until it reaches the “nappe” stage. This is a fancy chef term meaning the sauce is thick enough to coat the back of a spoon so that when you run your finger through it, the line stays clean and doesn’t fill back in.
Precision Slicing and Layering Techniques
Uniformity is your best friend when it comes to the potatoes. If some slices are thick and others are paper-thin, you’ll end up with a mix of crunchy and mushy potatoes. I highly recommend using a mandoline set to 1/8 inch. It’s the fastest way to get those perfect, translucent rounds that stack beautifully.
When layering, think of it like a lasagna. You want three distinct tiers of potatoes, sauce, and cheese. This ensures that no potato is left “dry.” By the time you reach the final layer, the potatoes should be just barely submerged in the sauce. This allows the top layer to crisp up while the bottom layers poach in the seasoned cream.
The Two-Phase Baking Strategy
We use a two-step baking process to achieve the perfect contrast in textures. For the first 45 minutes, the dish must be tightly covered with foil. This traps the steam being released by the potatoes, which softens their cellular structure and ensures they are fork-tender all the way through.
Once the potatoes are soft, we remove the foil and crank the heat to 400 degrees F. This second phase is all about the Maillard reaction. The high heat browns the proteins in the cheese and reduces the sauce slightly, creating those gorgeous, charred edges and a bubbling, golden crust that looks like it came straight from a high-end bistro.
Why the 15-Minute Rest is Mandatory
I know it’s tempting to dive in the second the timer goes off, but you must wait. When the dish first comes out of the oven, the sauce will look a bit thin or even slightly soupy. This is because the starches are still in a fluid state at such high temperatures.
During the 15-minute rest, a process called “carry-over cooking” happens. The potatoes continue to absorb the surrounding liquid, and the sauce begins to set into a thick, velvety glaze. If you cut into it too early, the sauce will simply run to the bottom of the dish, leaving the top layers dry. Patience is the final ingredient for success.
Troubleshooting Common Texture Issues
If you find that your potatoes are still firm after the initial bake, it usually means they were sliced too thick or the dish wasn’t sealed tightly enough with foil. You can fix this by adding a splash of warm milk, re-covering it, and popping it back in for another 10 minutes.
If the sauce looks oily, the oven might have been running too hot, causing the cheese to “break.” To prevent this next time, ensure you’re using high-quality cheese and keeping the temperature at the specified levels. If the top is browning too fast during the second phase, simply tent a piece of foil loosely over the top to protect it while the sauce finishes bubbling.
Flavor Variations and Ingredient Swaps
While the classic version is hard to beat, you can easily customize this dish. For a deeper savory flavor, try adding a layer of caramelized onions between the potato tiers. The sweetness of the onions pairs beautifully with the salty Gruyere.
You could also experiment with different cheeses like Fontina for a milder, creamier melt, or add a tiny pinch of freshly grated nutmeg to the cream sauce. Nutmeg is a classic “secret ingredient” in French cream sauces that enhances the dairy without being identifiable as a spice. Just remember to keep the ratios the same so the sauce remains stable.
Make-Ahead Strategies and Reheating Instructions
You can actually assemble this entire dish up to 24 hours in advance. Simply layer the potatoes, sauce, and cheese, then cover it tightly and keep it in the fridge. When you’re ready to bake, let the dish sit on the counter for 30 minutes to take the chill off, then proceed with the recipe. You may need to add 5-10 minutes to the covered baking time.
For leftovers, the microwave can sometimes cause the sauce to break. The best way to reheat is in a 350-degree oven, covered with foil, until warmed through. This gentle heat preserves the emulsion of the sauce and keeps the potatoes from becoming oily. If you must use a microwave, use 50% power and heat in short bursts.
Optimal Pairings for a Rich Potato Side
Because these potatoes are incredibly rich and decadent, they pair best with proteins that have a bit of acidity or a clean, roasted flavor. A simple roasted chicken or a seared steak works perfectly. The creaminess of the potatoes acts as a built-in sauce for the meat.
To balance the plate, serve something bright and green on the side. A crisp arugula salad with a lemon vinaigrette or some steamed green beans with a squeeze of lemon juice will cut through the density of the cream and cheese. This contrast makes the meal feel complete rather than overly heavy.
Expert Tips for Professional Presentation
For the most beautiful presentation, use a shallow but wide ceramic baking dish. This increases the surface area, which means more of those crispy, golden-brown cheese bits for everyone. Before serving, sprinkle a few fresh thyme leaves over the top to give it a pop of color and a fresh aroma.
When you plate the potatoes, try to lift them out in square sections using a flat spatula. This preserves the beautiful layers you worked so hard to create. If you’ve let it rest properly, the sauce should stay exactly where it belongs—clinging to the potatoes in a thick, glossy coat.
Frequently Asked Questions
Can I use 2% milk instead of whole milk?
It is not recommended. Lower-fat milks have a much higher water content and fewer proteins and fats to stabilize the sauce. Using 2% or skim milk significantly increases the risk of the sauce curdling or becoming watery during the long baking process. For the silkiest results, stick to the combination of whole milk and heavy cream.
Do I have to peel the potatoes?
While you can leave the skins on for a more rustic look, peeling is preferred for traditional scalloped potatoes. The skins of Yukon Golds are thin, but they can interfere with the “melt-in-your-mouth” texture of the layers. If you do choose to leave them on, make sure to scrub them very well to remove any grit.
Why did my cheese turn oily on top?
This usually happens if you use pre-shredded cheese or if the oven temperature is too high. Pre-shredded cheese contains additives that prevent it from melting into the sauce, often causing the fat to separate. Additionally, if the cheese is exposed to high heat for too long, the protein structure collapses and releases the oil. Always grate your own cheese and follow the two-phase temperature guide.
Can I add extra vegetables like sliced onions?
Yes, but with a caveat. Raw onions release a lot of moisture as they cook, which can thin out your sauce. If you want to add onions, it is best to sauté them in a little butter until they are soft and most of their moisture has evaporated before layering them with the potatoes. This ensures your sauce stays thick and creamy.
How do I know exactly when the potatoes are done?
The best way to check is the “knife-tender” test. Insert a paring knife or a toothpick into the center of the dish. It should slide through the layers with absolutely no resistance, like cutting through room-temperature butter. If you feel any “crunch” or resistance, the potatoes need more time under the foil.
Creamy Scalloped Potatoes
Course: Side DishCuisine: AmericanDifficulty: easy8
servings20
minutes1
hour15
minutes95
Minutes345
kcalAmerican
Ingredients
3 pounds Yukon Gold potatoes, peeled and sliced 1/8 inch thick
4 tablespoons unsalted butter
3 cloves garlic, minced
1/4 cup all-purpose flour
2 cups whole milk
1 cup heavy cream
1.5 teaspoons salt
1/2 teaspoon black pepper
1/2 teaspoon onion powder
1 tablespoon fresh thyme leaves
2 cups shredded Gruyere or sharp white cheddar cheese (divided)
Directions
- Preheat your oven to 350 degrees F. Grease a deep 9×13 inch baking dish or a large ceramic casserole dish.
- Melt butter in a large saucepan over medium heat. Add minced garlic and cook for 1 minute until fragrant but not browned.
- Whisk in the flour and cook for 2 minutes, stirring constantly. This creates a blond roux that stabilizes the dairy and prevents curdling during the long bake.
- Slowly pour in the milk and heavy cream in a thin stream while whisking vigorously. This gradual addition is the key to a stable emulsion. Continue to cook and whisk until the sauce thickens enough to heavily coat the back of a spoon.
- Remove from heat. Stir in the salt, pepper, onion powder, and half of the fresh thyme.
- Layer one-third of the sliced potatoes into the prepared dish. Pour one-third of the cream sauce over the top and sprinkle with 1/2 cup of the cheese. Repeat layers twice more. For the final layer, ensure the potatoes are slightly submerged in the sauce, then top with the remaining cheese and thyme.
- Cover the dish tightly with aluminum foil. This traps steam to ensure the potatoes cook through without the dairy evaporating or scorching. Bake for 45 minutes.
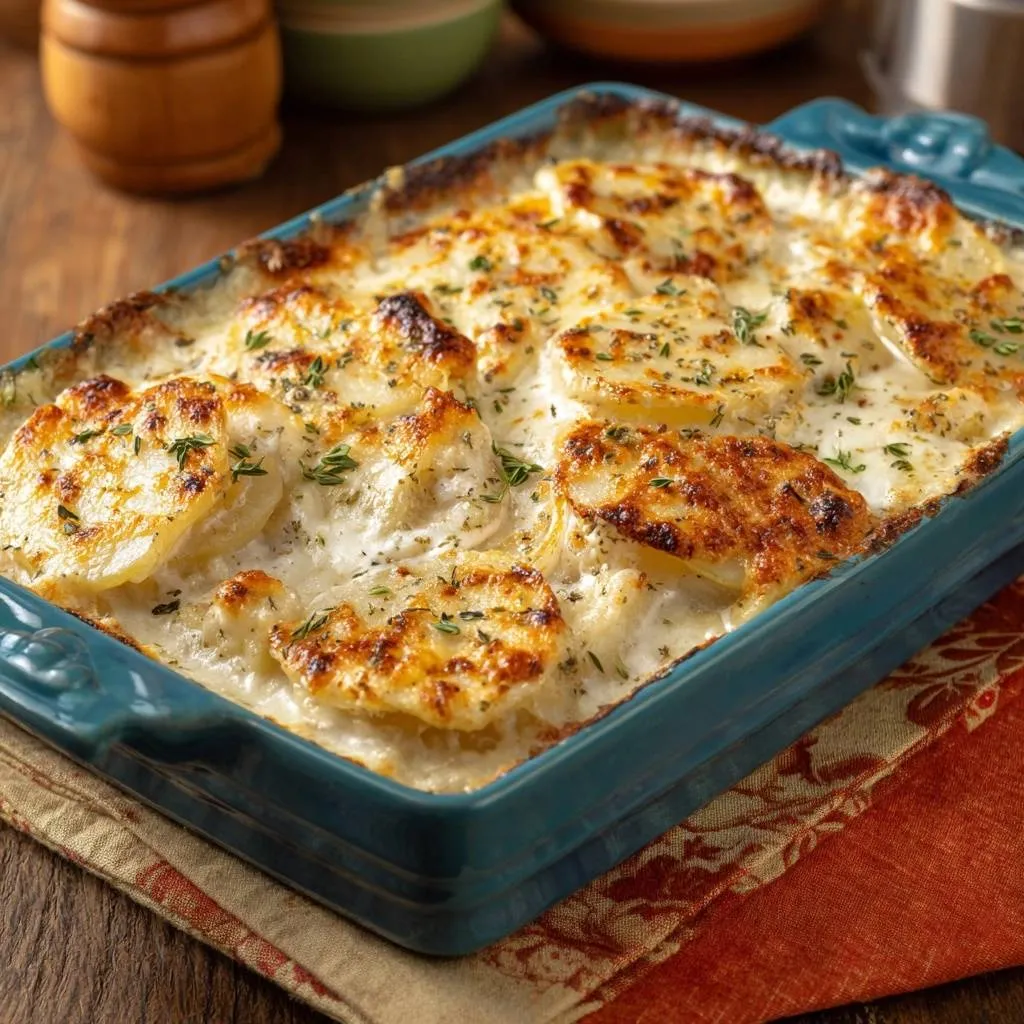
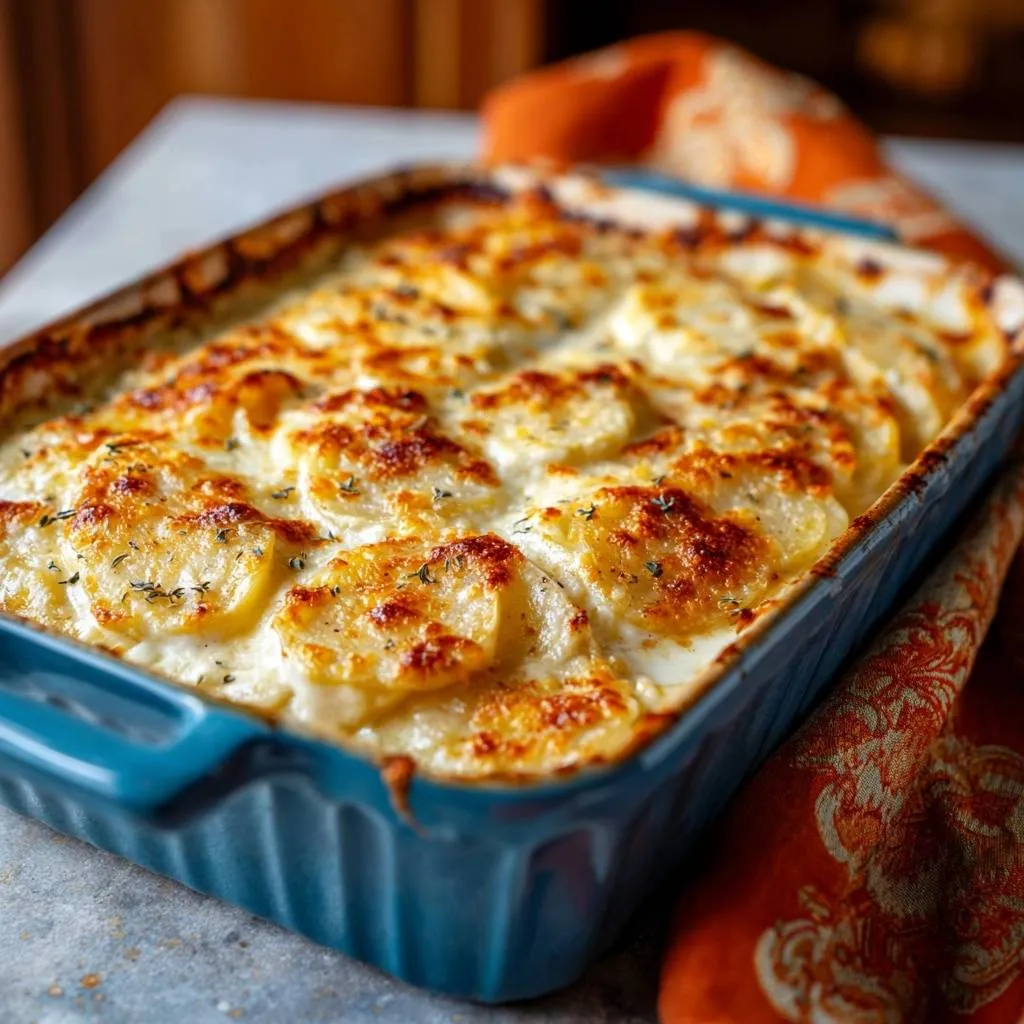
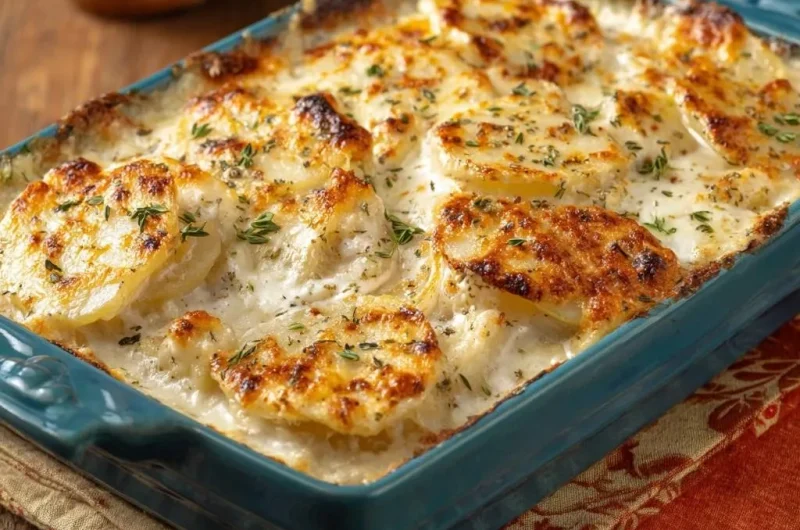
- Remove the foil. Increase the oven temperature to 400 degrees F. Bake for another 25 to 30 minutes until the sauce is bubbling vigorously and the top potatoes have developed the deep golden-brown, charred edges shown in the image.
- Let the dish rest for 15 minutes before serving. This final rest is mandatory; it allows the starch to set and the sauce to thicken into a velvety glaze that won’t pool at the bottom of the plate.
Notes
- The 15-minute rest after baking is mandatory to allow the starch to set and the sauce to thicken into a velvety glaze.