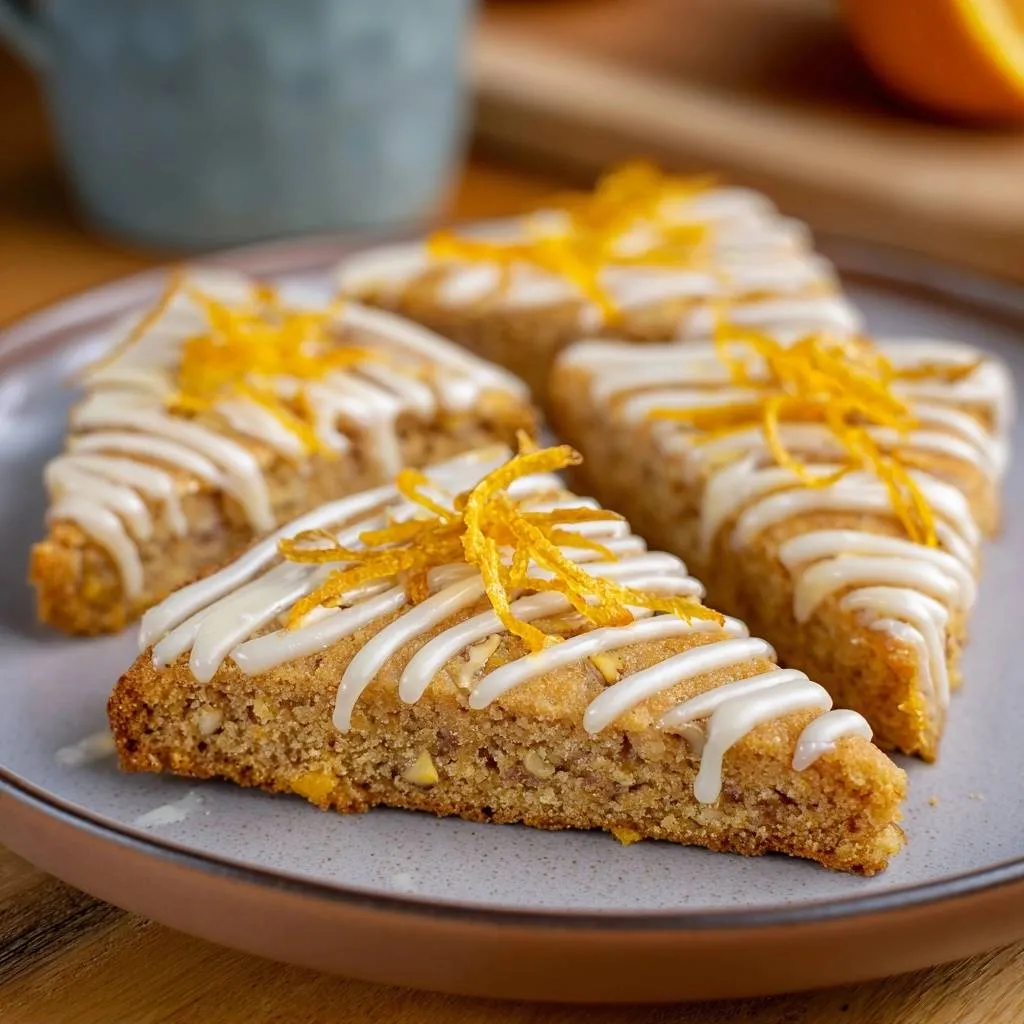
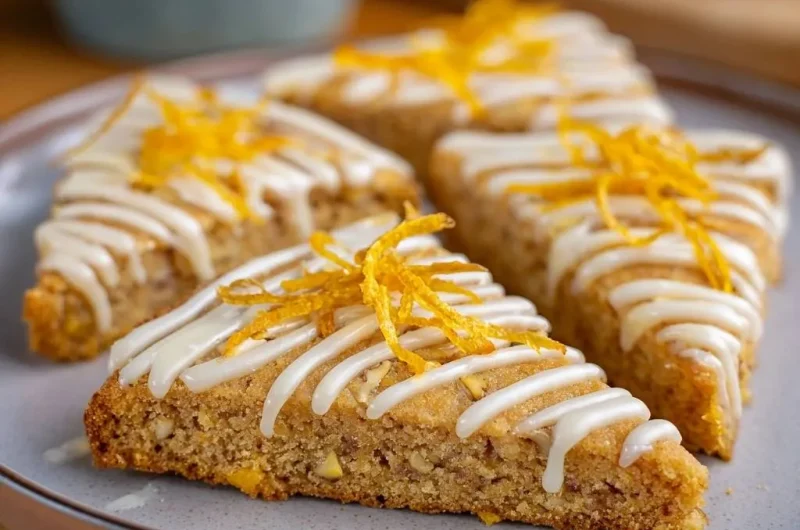
Nothing ruins a morning faster than biting into a scone that feels like a damp sponge. Most homemade versions suffer from the dreaded “soggy bottom,” where the moisture from the citrus and the weight of the glaze turn a delicate pastry into a heavy mess. These Glazed Orange Walnut Scones break that cycle by focusing on a high-contrast texture—a shatteringly crisp exterior that gives way to a tender, buttery center filled with toasted, earthy nuts and bright citrus zing.
The secret to this bakery-style success lies in a specific moisture-locking technique and a high-heat blast. By controlling how the liquids interact with the flour and using a preheated surface, you ensure the scone sets instantly. This creates a structural barrier that keeps the crumb light and airy while the outside stays golden and firm, even after you drizzle on that vibrant orange glaze.
If you want to guarantee that perfect flaky lift, here is the professional secret: keep your butter and heavy cream ice-cold until the very second they hit the bowl. When those cold bits of fat hit the hot oven, they burst into steam, creating hundreds of tiny layers. If the butter softens even slightly during the mixing process, your scones will turn out flat and greasy rather than tall and proud.
The Science of Flaky Scone Texture
Creating a scone that is both sturdy and delicate requires a basic understanding of baking chemistry. When you work cold, unsalted butter into your dry ingredients, you aren’t looking for a smooth paste. Instead, you want to leave pea-sized chunks of fat distributed throughout the flour. These solid bits of butter are the engines of leavening; as the scone bakes, the water in the butter evaporates, pushing the dough upward and creating those coveted flaky pockets.
The choice of flour also plays a massive role in the final mouthfeel. All-purpose flour provides just enough protein to give the scone structure without making it chewy like bread. However, the moment you add liquid to that flour, gluten begins to develop. If you over-work the dough or knead it too aggressively, the gluten strands become tight and elastic. This results in a tough, rubbery scone that lacks the “short” and crumbly texture that defines a classic pastry.
To keep the crumb tender, use a light touch. You want to stir the heavy cream and egg into the flour just until the mixture looks shaggy and barely holds together. It might look like a mess at first, but that minimal handling ensures the protein stays relaxed. This leads to a scone that practically melts in your mouth while still providing a satisfying crunch from the walnuts.

Why Temperature Control is Non-Negotiable
Thermal shock is your best friend when it comes to achieving a dramatic rise. If your ingredients are room temperature, the butter will simply bleed into the flour, resulting in a heavy, dense disk. By using heavy cream and eggs straight from the refrigerator, you maintain the integrity of the fat. This temperature differential between the cold dough and the 400-degree oven causes an immediate reaction that sets the outer crust before the middle has a chance to slump or spread.
Essential Components for Glazed Orange Walnut Scones
Quality ingredients are the foundation of this recipe, especially when it comes to the citrus. Always reach for fresh oranges rather than bottled extracts or juices. The essential oils found in the zest provide a deep, floral aroma that an extract simply cannot replicate. When you zest the orange, be careful to only take the bright orange outer layer; the white pith underneath is incredibly bitter and can ruin the delicate balance of the dough.
The fat content in this recipe is equally vital. We use heavy cream because its high fat-to-water ratio provides a richness that milk or half-and-half lacks. This fat coats the flour particles, further inhibiting gluten development and contributing to that “short” crumb. Additionally, using unsalted butter allows you to control the seasoning perfectly. Different brands of salted butter vary wildly in salt content, which can easily overwhelm the subtle sweetness of the walnuts and orange.
Sugar does more than just sweeten the dough; it aids in browning. The granulated sugar in the mix undergoes caramelization in the high heat of the oven, contributing to that crisp, golden-brown exterior. When combined with the crunch of the walnuts, you get a complex flavor profile that isn’t just “sweet,” but rather toasted, bright, and buttery all at once.
Selecting and Toasting the Walnuts
For the best flavor, look for walnut halves that are pale and plump, as dark or shriveled nuts can taste rancid. Before you fold them into your dough, take five minutes to dry-toast them in a skillet over medium heat. You’ll know they are ready when they smell fragrant and look slightly oily. Toasting expresses the natural oils within the nut, intensifying the earthy flavor so it doesn’t get lost against the bold orange zest.
The Preheated Sheet Method: Solving Soggy Bottoms
The most common mistake in scone baking is placing cold dough onto a cold baking sheet. This causes the bottom of the scone to heat up slowly, allowing the butter to leak out and the moisture to settle, which creates a gummy, pale base. To fix this, place your empty baking sheet in the oven while it preheats to 400 degrees. This is the “Skyscraper” secret to a professional finish.
When you drop your cold scone wedges onto that screaming-hot pan, the heat sears the bottom of the dough instantly. It functions exactly like searing a steak in a hot cast-iron skillet. This immediate “oven spring” creates a crisp, golden-brown barrier that prevents any moisture from migrating downward. The result is a scone that is structurally sound and perfectly toasted on the bottom, providing a beautiful textural contrast to the soft, glazed top.
Step-by-Step: Mixing and Shaping the Dough
Start by whisking your dry ingredients thoroughly to ensure the baking powder is evenly distributed. When you cut in the butter, look for a texture that resembles coarse cornmeal mixed with larger, pea-sized lumps. Once you pour in the cream and egg mixture, use a fork to toss the ingredients together. You are looking for a “shaggy dough”—a state where there are still a few dry streaks of flour, but the mass holds together when squeezed.
Turn the dough out onto a floured surface and pat it into an 8-inch circle. It is tempting to use a rolling pin, but your hands are much better for this. A rolling pin can compress the air pockets you’ve worked so hard to create. Gently pat the dough to a 1-inch thickness, ensuring the edges are straight and the height is uniform so every wedge bakes at the same rate.
Precision Cutting for Even Baking
When it is time to cut your wedges, use a very sharp knife or a bench scraper. Do not use a dull blade or a sawing motion, as this “smears” the edges of the dough, effectively sealing the layers shut. A clean, straight-down chop leaves the sides of the scone open, allowing them to expand and rise freely. Cut the circle into eight equal triangles to ensure they all finish baking at the exact same time.
Achieving a Professional Opaque Orange Glaze
A great glaze should be thick, white, and bold, not a thin, translucent syrup that disappears into the bread. By whisking powdered sugar with a combination of fresh orange juice and heavy cream, you create a stable emulsion. The cream adds fat, which helps the glaze set with a beautiful sheen and prevents it from becoming brittle or cracking when you bite into it.
The consistency should be thick enough that when you lift the whisk, the glaze falls in a slow, steady ribbon that holds its shape for a few seconds on the surface. If it is too runny, add a tablespoon more of powdered sugar. If it is too stiff to drizzle, add a few drops of orange juice. This balance ensures the glaze sits proudly on top of the scone, delivering a concentrated burst of citrus in every mouthful.
The Cooling Mandate: Why Patience Prevents Mush
It is incredibly tempting to glaze a scone the moment it comes out of the oven, but you must wait. As scones cool on a wire rack, they are still releasing internal steam. If you apply the glaze while they are warm, that steam gets trapped under the icing, which softens the crust and turns the whole thing mushy by the next morning. Let them cool completely to allow the exterior to fully crisp up before adding your finishing touches.
Troubleshooting Common Scone Failures
If your scones spread into flat puddles, your butter was likely too warm before it hit the oven. Next time, try chilling the shaped wedges in the freezer for 10 minutes before baking. If the scones feel dry or sandy, you may have measured your flour by scooping the cup directly into the bag, which packs it down. Always spoon the flour into the measuring cup and level it off with a knife for accuracy.
A lack of rise usually points to expired baking powder. Since scones rely heavily on chemical leavening, your powder needs to be fresh. You can test it by dropping a teaspoon into hot water; if it doesn’t bubble vigorously, it’s time to buy a new tin. Finally, if the edges are dark but the middle is raw, your oven might be running hot. Use an oven thermometer to ensure you are hitting that true 400-degree mark.
Make-Ahead Strategies and Storage Logistics
Scones are best served the day they are made, but you can prepare for a busy morning by freezing the unbaked wedges. Place the raw triangles on a tray in the freezer until solid, then transfer them to a zip-top bag. You can bake them straight from frozen—just add 2 to 3 minutes to the total baking time. This ensures you get that “just-baked” freshness without the morning prep work.
For leftovers, avoid airtight plastic containers, which trap moisture and soften the crust. Instead, store glazed scones in a cardboard bakery box or a container with the lid slightly ajar. This allows for minimal airflow, keeping the glaze set and the bottom crisp. If they do soften, a quick 5-minute stint in a 300-degree oven can help revive the exterior, though you should do this before glazing if possible.
Expert Tips for Citrus and Nut Pairings
While orange and walnut are a classic duo, you can easily elevate this recipe with a few sophisticated tweaks. Try swapping the walnuts for toasted pecans for a sweeter, more buttery profile. If you want to lean into the floral notes of the orange, add half a teaspoon of ground cardamom to the flour mixture. The spice complements the citrus beautifully and adds a professional, “gourmet” touch to the flavor profile.
For a high-tea experience, serve these scones with a dollop of thick clotted cream or a smear of orange marmalade. They pair exceptionally well with Earl Grey tea, as the bergamot in the tea mirrors the citrus in the glaze. If you want an even more intense orange flavor, rub the fresh zest into the granulated sugar with your fingertips before mixing the dough. This releases the oils directly into the sugar, scenting the entire scone from the inside out.
Frequently Asked Questions
Can I use milk instead of heavy cream in the dough?
You can use whole milk in a pinch, but the scones will not be as rich or flaky. Heavy cream has a much higher fat content, which is what creates that “short,” tender crumb. If you use milk, the dough will be wetter and more prone to gluten development, resulting in a texture that is closer to a biscuit than a traditional scone. If you must substitute, try adding an extra tablespoon of melted butter to the milk to boost the fat levels.
How do I get more orange flavor without making the dough too wet?
The best way to amplify flavor without changing the moisture content is to use more zest. You can also rub the orange zest into the sugar before you start mixing. The abrasive nature of the sugar crystals bruises the zest, releasing all the fragrant oils. This distributes the orange flavor evenly throughout the entire scone without adding a single drop of extra liquid, which keeps your dough easy to handle and prevents it from becoming sticky.
Why did my walnuts turn the dough slightly purple or gray?
This is a common chemical reaction! The skins of walnuts contain tannins, which can react with the alkaline baking powder in the dough. While it looks a bit strange, it is completely safe to eat and does not affect the flavor. To minimize this, make sure you are using fresh walnuts and try to avoid over-mixing the dough, which can crush the nuts and spread the tannins further into the flour mixture.
Can I use a food processor to cut in the butter?
Yes, you can use a food processor, but you must be extremely careful. Use short, one-second pulses just until the butter is the size of peas. It is very easy to over-process the dough in a machine, which turns the butter into a paste and ruins the flakiness. If you are new to scone making, using a pastry cutter or two forks is often safer because it gives you much more control over the final texture of the fat.
Can I substitute the walnuts for another nut or seed?
Absolutely. Pecans are the most natural substitute for walnuts as they have a similar fat content and crunch. If you have a nut allergy, you can replace the walnuts with toasted sunflower seeds or simply leave them out entirely. If you omit the nuts, you don’t need to adjust the liquid levels, but you might want to add an extra tablespoon of orange zest to ensure the flavor remains bold and exciting.
Glazed Orange Walnut Scones
Course: BreakfastCuisine: AmericanDifficulty: easy8
scones15
minutes20
minutes35
MinutesAmerican
Ingredients
2 cups all-purpose flour
1/3 cup granulated sugar
1 tablespoon baking powder
1/2 teaspoon salt
1/2 cup cold unsalted butter, cubed
1/2 cup finely chopped walnuts
2 tablespoons orange zest (plus extra for garnish)
1/2 cup heavy cream (cold)
1 large egg
1 cup powdered sugar
1 tablespoon fresh orange juice
1 tablespoon heavy cream (for the glaze)
Directions
- Preheat your oven to 400 degrees F. To solve the soggy bottom problem, place your baking sheet in the oven while it preheats. This hot surface sears the bottom of the dough instantly, creating a crisp, golden barrier.
- In a large bowl, whisk together flour, sugar, baking powder, and salt. Use a pastry cutter or two forks to work the cold butter into the flour until it resembles coarse crumbs with some pea-sized bits remaining. Stir in the chopped walnuts and orange zest.
- In a small bowl, whisk the 1/2 cup heavy cream and egg together. Pour this into the dry ingredients and stir with a fork just until a shaggy dough forms. Do not overmix, or the scones will be tough.
- Turn the dough onto a lightly floured surface and gently pat into an 8-inch circle, about 1 inch thick. Use a sharp knife to cut the circle into 8 equal wedges.
- Carefully remove the hot baking sheet from the oven and line it quickly with parchment paper. Place the cold wedges onto the hot sheet, leaving 2 inches of space between them.
- Bake for 18 to 20 minutes until the tops are golden brown and the edges are firm.
- While the scones bake, prepare the thick, opaque glaze: Whisk the powdered sugar, 1 tablespoon orange juice, and 1 tablespoon heavy cream until very smooth. It should be thick enough to hold its shape when drizzled.
- The secret to a perfect finish: Let the scones cool completely on a wire rack before glazing. If you glaze them while warm, the icing melts into the crumb and causes sogginess.
- Once completely cool, use a spoon or piping bag to drizzle the glaze in a zig-zag pattern across the scones. Immediately top with fresh orange zest strips so they adhere to the wet glaze for a professional, vibrant look.
Notes
- To prevent sogginess, ensure the baking sheet is preheated in the oven and wait until scones are completely cool before applying the glaze. Use cold butter and cold cream for the best texture.