Imagine pulling a golden, aromatic wheel of cheese from the oven, only to find the center has burst through the side, leaving a greasy puddle on your baking sheet. It’s a common kitchen heartbreak that ruins the centerpiece of your appetizer board. When done right, Honey Thyme Baked Brie offers a luxurious contrast between the earthy, woodsy herbs and the floral sweetness of the honey.
The secret to a perfect bake isn’t just the timing; it’s the structural integrity of the rind. Most recipes suggest a shallow crosshatch, but that actually creates weak points where steam can force the cheese to explode. By using a specific “bowl” scoring technique, you control the expansion and keep the molten center exactly where it belongs.
I’ve found that starting with a cold wheel of cheese is the absolute game-changer for this dish. A chilled rind is much easier to slice with precision, allowing you to remove the top layer without mangling the delicate cream inside. This small step ensures your cheese stays beautiful and contained until the very first scoop.
The Anatomy of a Perfect Brie Wheel
Choosing the right cheese is the foundation of a successful bake. You’ll typically find double-cream and triple-cream varieties at the grocery store. Double-cream Brie has a butterfat content of about 60%, making it sturdy enough to hold its shape while still becoming incredibly gooey.
Triple-cream versions are even richer, often exceeding 75% butterfat, which means they melt much faster and more aggressively. For this specific Honey Thyme Baked Brie, a standard double-cream wheel provides the best structural “wall.” It offers a reliable melt that won’t turn into a liquid soup the moment heat hits it.
Always keep your Brie in the refrigerator until the very second you are ready to prep it. If the cheese sits on the counter and softens, the rind becomes tacky and difficult to score. A firm, cold wheel allows your knife to glide through the white mold cleanly, ensuring the “bowl” you create has sharp, sturdy edges.

Selecting High-Quality Honey and Fresh Thyme
Since this recipe has so few ingredients, the quality of your honey makes a massive difference. A light clover honey offers a mild sweetness that lets the cheese shine, while a wildflower honey brings a more complex, floral depth. If you want something bolder, a dark buckwheat honey adds a molasses-like richness that pairs beautifully with the earthy rind.
Fresh thyme is non-negotiable here because dried thyme often tastes dusty or gritty when sprinkled over soft cheese. Fresh sprigs release essential oils as they warm in the oven, perfuming the entire wheel. These oils cut through the heavy fat of the Brie, providing a bright, herbaceous lift that keeps the dish from feeling too heavy.
Essential Components for Honey Thyme Baked Brie
You only need a handful of items to make this happen, but each plays a vital role. The olive oil might seem optional, but it’s actually a functional tool. Brushing the exposed cheese and the side walls with a thin layer of oil keeps the rind supple and prevents a dry, leathery skin from forming during the bake.
Parchment paper is your best friend for this recipe. Even with the best technique, cheese can be unpredictable. A parchment-lined sheet ensures that if a small leak occurs, you won’t be scrubbing burnt proteins off your pans for an hour. It also makes it much easier to slide the finished wheel onto a serving platter.
If you have a small ceramic baking dish that is just slightly wider than the cheese, use it. A snug fit provides physical reinforcement for the side walls of the Brie. When the cheese has nowhere to expand horizontally, it stays tall and impressive, making for a much better presentation when you set it on the table.
The Science of Heat and Cheese Expansion
Brie “blows out” because of internal steam pressure. As the fats and moisture inside the rind heat up, they expand and look for the path of least resistance. The white rind, made of Penicillium candidum, acts like a pressurized vessel. If there isn’t a clear exit point at the top, the pressure will eventually find a weak spot in the side wall.
By removing the top layer of the rind, you create a built-in chimney. This allows the steam to escape freely while the cheese expands upward into the open space. This “bowl” method effectively turns the rind into a natural ramekin that holds the molten cheese in place while it liquefies.
Understanding this transformation helps you monitor the bake. You aren’t just melting the cheese; you are gently softening the protein structure. If you see the sides of the wheel starting to bow outward significantly, it’s a sign that the internal pressure is reaching a breaking point, and it’s time to pull it out.
Why 350°F is the Ideal Temperature
High heat is the enemy of a perfect Brie. If you crank the oven to 400°F, the outside of the rind will brown and harden before the center has a chance to melt. This creates a rubbery exterior and a core that might still be cold and firm.
A moderate 350°F allows for a gentle, even heat transfer. At this temperature, the center reaches a molten state at the exact same rate the rind softens. This synchronization is what gives you that uniform, dip-ready consistency from the edge all the way to the middle.
Step-by-Step: Preparing the Rind “Bowl”
Start by placing your cold Brie on the parchment paper. Hold the knife vertically and gently pierce the top rind about a quarter-inch from the edge. Carefully cut a circle all the way around the perimeter, making sure you don’t cut too deep into the cream.
Once you’ve completed the circle, use the tip of the knife to lift the edge of the top rind. It should peel away in one or two large pieces, revealing the pale, smooth cheese underneath. This 1/4-inch border is your safety wall; it must remain intact to prevent the cheese from spilling over the sides.
This reservoir is now perfectly prepped to hold your toppings. By removing the top, you’ve created a space where the honey and thyme can actually mingle with the cheese during the bake. Instead of just sitting on top of a hard rind, the flavors sink into the molten center.
Executing the Bake: Timing and Visual Cues
Slide the cheese into the center of the oven and set your timer for 12 minutes. Around the 10-minute mark, you’ll start to smell the thyme and the nutty aroma of the warming cheese. Look for the center of the Brie to look slightly puffed and shiny.
Give the baking sheet a very gentle shake. The center of the cheese should jiggle like firm gelatin. If it still looks stiff and matte, it needs another three minutes. You want the edges of the white rind to look slightly toasted but not dark brown or slumped.
The olive oil you brushed on earlier should be shimmering. This barrier prevents the cheese from drying out under the oven’s dry heat. Once the center looks completely molten and the sides are just beginning to show a hint of a bulge, remove the tray immediately.
The Critical Resting Period
It is incredibly tempting to dive into the cheese the second it leaves the oven, but you must wait. Just like a steak, Honey Thyme Baked Brie needs a few minutes to rest. During this 3 to 5-minute window, the proteins begin to stabilize and thicken slightly.
If you cut into the cheese immediately, the center will be too watery and will run all over the plate. Resting allows the cheese to reach a perfect, velvety viscosity. It becomes thick enough to cling to a cracker but soft enough to stretch into those beautiful, long strings of cheese.
While the cheese rests, the residual heat will continue to soften any remaining firm bits in the center. This is also the perfect time to drizzle your honey. The warmth of the cheese will thin the honey just enough so it flows into every crevice without disappearing completely.
Flavor Variations and Ingredient Swaps
Once you master the basic technique, you can start playing with the flavor profile. If you like a bit of heat, swap the standard honey for a spicy hot honey. The chili flakes provide a sharp contrast to the creamy, fatty Brie that is absolutely addictive.
You can also experiment with different herbs. Rosemary offers a more resinous, piney flavor that works well in the winter months. For a bit of crunch, try topping the cheese with crushed walnuts or toasted Marcona almonds after the honey drizzle. The texture of the nuts against the soft cheese is fantastic.
If you want a more savory lean, skip the honey and use a dollop of fig jam or caramelized onions. The “bowl” technique works for almost any topping you can imagine. Just remember to add delicate items like fresh herbs or nuts toward the end so they don’t burn.
Optimal Pairings for Warm Brie
While standard crackers are fine, a dish this elegant deserves better. Sourdough crostini provide a sturdy, tangy base that can handle the weight of the molten cheese. The crunch of the toasted bread is the perfect foil for the silky texture of the Brie.
Fruit is another essential pairing. Slices of crisp green apples or Bosc pears offer a bright acidity that cuts right through the richness of the cheese. The tartness cleanses your palate between bites, making every scoop feel as fresh as the first one.
For a more rustic vibe, try serving the cheese with fruit-and-nut crisps. These crackers often contain dried cranberries or apricots, which echo the sweetness of the honey. The combination of the warm cheese, sweet honey, and chewy dried fruit creates a complex, satisfying bite.
Troubleshooting Common Brie Issues
If your cheese comes out too runny, it likely means it was overbaked or didn’t rest long enough. You can usually “save” a runny Brie by letting it sit at room temperature for an extra ten minutes until it firms up. It will still taste delicious, even if the presentation is a bit messy.
If the honey is sliding right off the top, you might have drizzled it while the cheese was still too hot and domed. Wait for the center to settle slightly after the rest period. If the thyme starts to look burnt or black, you can simply brush it off and replace it with fresh sprigs before serving.
For a wheel that has already started to bulge or leak in the oven, don’t panic. Use a spoon to gently push the cheese back toward the center and remove it from the heat immediately. Once it cools slightly, the leak will seal itself as the cheese solidifies.
Preventing a Rubbery Texture
A rubbery or “squeaky” texture is almost always the result of overcooking the proteins. When Brie is exposed to high heat for too long, the moisture evaporates, and the protein strands tighten up. This turns a creamy delight into something that feels more like a cheese curd.
To avoid this, always lean toward the shorter end of the baking time. Remember that the cheese will continue to melt for a few minutes after it leaves the oven. If the center feels soft to the touch, it’s done. Don’t wait for it to become completely liquid in the oven.
Expert Tips for Hosting and Presentation
Presentation is everything when serving a warm appetizer. I prefer using a small ceramic dish or a slate board. If you use wood, make sure to keep the cheese on the parchment paper so the oils don’t soak into the board and leave a permanent stain.
Garnish the plate with extra thyme sprigs and maybe a few fresh berries to make it look professional. To keep the cheese warm during a party, you can place the ceramic dish on a warming tray. However, Brie is best enjoyed within the first 20 minutes of leaving the oven.
If you are hosting a larger group, consider baking two smaller wheels rather than one giant one. This allows you to bring out a fresh, hot wheel halfway through the party. It ensures that every guest gets to experience the cheese at its peak molten consistency.
Managing Leftovers and Reheating
If you actually have leftovers, wrap the cooled Brie tightly in plastic wrap. It will stay good in the fridge for about three days. To reheat, place it back in a 350°F oven for about 5 to 7 minutes. Avoid the microwave, as it tends to make the cheese rubbery and oily.
Leftover Honey Thyme Baked Brie is also incredible when used as a spread. Smear it onto a gourmet grilled cheese sandwich with some sliced turkey, or whisk it into a simple cream sauce for pasta. The honey and thyme flavors add a sophisticated touch to even the simplest leftover meals.
How do I know if the Brie has gone bad before I bake it?
Check the rind first. It should be a clean, snowy white. If you see grey, green, or black mold, or if the cheese has a strong ammonia smell that doesn’t dissipate after sitting out for a few minutes, it’s past its prime. A slight mushroomy scent is normal, but it shouldn’t smell like cleaning supplies.
Can I use a wedge of Brie instead of a whole wheel?
You can, but the “bowl” technique won’t work. Without the circular rind to act as a wall, a wedge will lose its shape almost immediately in the oven. If you must use a wedge, bake it in a very small, tight-fitting ramekin to keep the cheese from spreading into a flat puddle.
What is the best way to store leftover baked Brie?
Place the cooled cheese in an airtight container and keep it in the refrigerator for up to three days. Do not freeze it, as the freezing and thawing process breaks down the delicate emulsion of fats and proteins, resulting in a grainy, mealy texture that won’t melt smoothly again.
Why did my cheese turn out oily?
This usually happens if the cheese was overbaked or if you used a lower-quality Brie with a high moisture content. When the protein structure breaks down too much, it can no longer hold the fat, causing the butterfat to separate and pool on top. Stick to the 12-15 minute window to prevent this.
Can I substitute the honey with something else?
Absolutely. Maple syrup is a great alternative, though it is thinner, so use a bit less. Agave nectar also works well. If you want a savory version, a balsamic glaze or even a dollop of apricot preserves provides a similar contrast to the salty cheese and earthy thyme.
Is the white rind actually edible?
Yes, the rind is completely edible and is a key part of the Brie experience. It has an earthy, mushroom-like flavor that balances the rich creaminess of the interior. In this recipe, we only remove the top to create a vessel, but you should definitely eat the side and bottom rind along with the melted cheese.

Honey Thyme Baked Brie
Course: AppetizerCuisine: French-AmericanDifficulty: easy6
servings5
minutes15
minutes20
Minutes210
kcalFrench-American
Ingredients
1 (8 to 12 ounce) wheel of high-quality Brie cheese (cold from the fridge)
3 tablespoons honey
6-8 sprigs fresh thyme
1 teaspoon olive oil
Toasted baguette slices or crackers for serving
Directions
- Preheat your oven to 350°F (175°C). Place the Brie wheel on a small parchment-lined baking sheet or in a ceramic baking dish that is only slightly larger than the cheese itself.
- To prevent the cheese from bursting out the sides, use a sharp knife to score the top rind. Instead of a shallow crosshatch, carefully cut and remove the very top layer of the white rind, leaving a 1/4-inch border around the edge. This creates a “bowl” that allows the cheese to expand upward rather than pushing through the side walls.
- Lightly brush the exposed cheese and the remaining side rind with olive oil. This prevents the cheese from forming a skin and keeps the rind supple.
- Press half of the fresh thyme leaves directly into the surface of the exposed cheese.
- Bake for 12 to 15 minutes. The cheese is ready when the center is completely molten and the edges of the rind are just beginning to golden. If the sides start to bulge significantly, remove it immediately.
- Remove from the oven and let it sit for 3 to 5 minutes. This resting period is crucial; it allows the proteins to stabilize so the cheese remains thick and gooey rather than watery.
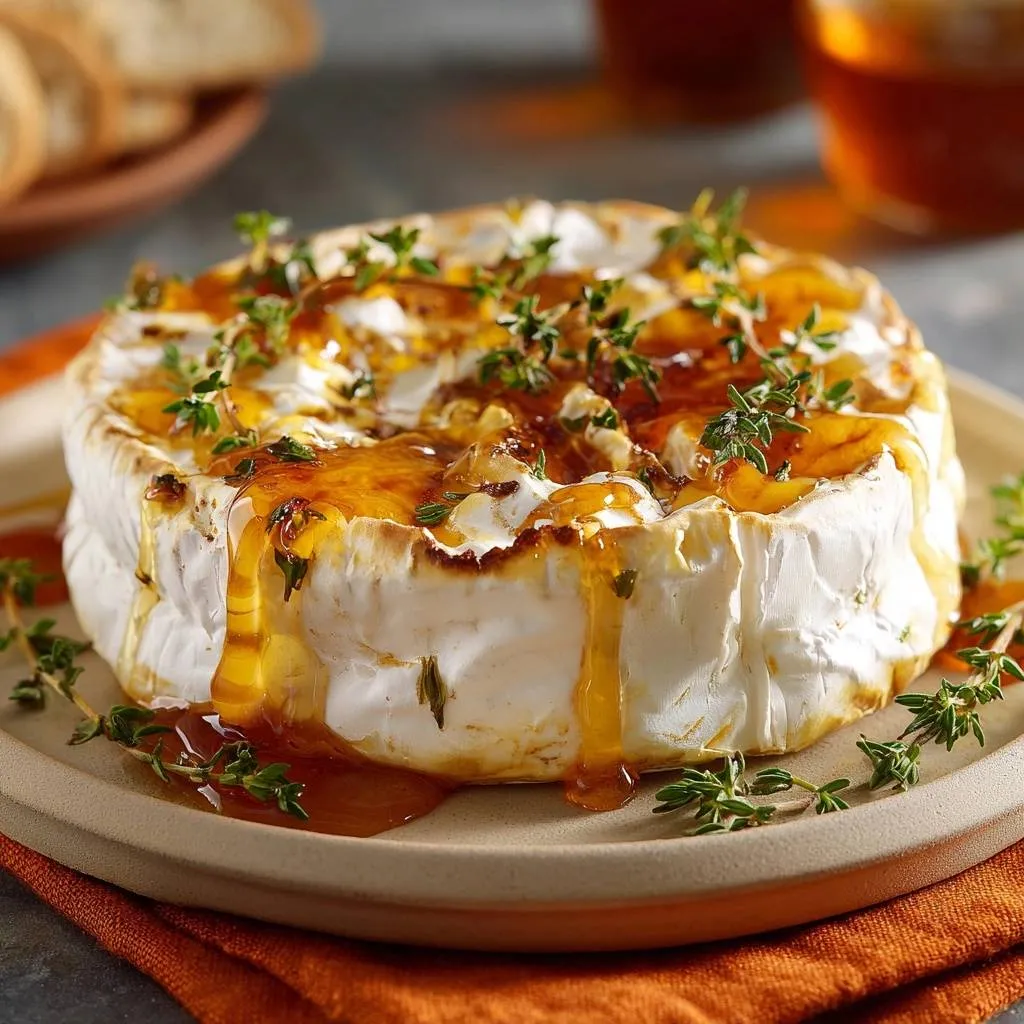
- Drizzle the honey generously over the top, allowing it to pool in the center and drip slightly down the sides as seen in the image. Scatter the remaining fresh thyme sprigs over the top and around the base of the plate for garnish.
- Serve immediately with toasted baguette slices.
Notes
- Removing the top layer of the rind creates a bowl that prevents the cheese from bursting out the sides. Let the cheese rest for 3-5 minutes after baking to ensure the perfect dipping consistency.