Most home cooks struggle with the same frustrating problem when making stir-fries: the chicken turns out dry, rubbery, and bland. You want that succulent, tender bite you get at your favorite Thai spot, but instead, the meat toughens up the second it hits the pan. This Spicy Red Curry Chicken and Green Beans recipe solves that forever by using a professional technique that locks in moisture while delivering an explosion of heat and umami.
This dish follows the Prik Khing style of Thai curry, which is a game-changer for anyone who finds coconut milk-based curries a bit too heavy. Instead of simmering the meat in a soup-like broth, we fry the red curry paste directly in oil. This concentrates the aromatics, creating a thick, intense glaze that clings to every inch of the chicken and beans. It’s a bold, punchy meal that you can get on the table in under 40 minutes.
The secret to the restaurant-quality texture here is a simple process called “velveting.” By tossing your chicken in a small amount of cornstarch before it hits the heat, you create a microscopic shield that protects the protein fibers. I’ve found that this single step is the difference between a mediocre dinner and a dish that people will swear you ordered from a high-end bistro. Let’s get into the science of why this works so well.
The Science of Velveting for Tender Chicken
Velveting is a cornerstone of professional wok cooking, and it’s surprisingly easy to do at home. When you coat raw chicken cubes in cornstarch, the starch acts as a physical barrier between the intense heat of the pan and the delicate muscle fibers. Without this coating, the heat causes the proteins to contract violently, squeezing out their natural juices and leaving you with a “woody” or rubbery texture.
As the chicken sears, the cornstarch gelatinizes, creating a silky exterior that feels incredibly smooth on the tongue. This isn’t just about moisture; it’s about surface area. That thin, starchy layer becomes the perfect “glue” for our spicy red curry sauce. Instead of the sauce sliding off the meat and pooling at the bottom of the plate, it grips the chicken, ensuring every bite is fully seasoned.
While traditional marinating relies on acid or salt to break down fibers over time, velveting works instantly. It is the superior choice for high-heat cooking because it allows you to achieve a beautiful golden-brown crust without overcooking the interior. You get the best of both worlds: the smoky flavor of a hard sear and the buttery tenderness of a slow-poached protein.
Choosing the Right Cut: Breast vs. Thigh
Many chefs prefer chicken thighs for their higher fat content and natural resilience to heat. However, this recipe specifically utilizes chicken breast for a lean, clean bite that allows the complex spices of the red curry paste to shine. Because we are using the velveting technique, the breast remains just as succulent and juicy as a thigh would.
To ensure maximum tenderness, always slice your chicken against the grain. Look for the tiny white lines in the muscle and cut perpendicular to them. This shortens the fibers, making the meat much easier to chew. When combined with the cornstarch barrier, this cutting method guarantees a melt-in-your-mouth experience every time.
Essential Components for Spicy Red Curry Chicken
The soul of this dish lies in the quality of your red curry paste. Since we aren’t using coconut milk to mellow things out, the paste provides all the flavor. Look for brands that list shrimp paste, lemongrass, galangal, and dried red chilies as the primary ingredients. A high-quality paste should smell bright and pungent, not dusty or muted.
Balance is the key to Thai cuisine, and we achieve that here with a duo of brown sugar and fish sauce. The brown sugar doesn’t make the dish “sweet” in a dessert sense; rather, it rounds out the sharp edges of the chilies. Meanwhile, the fish sauce provides a deep, fermented umami funk that salt alone cannot replicate. If you’ve never used it, don’t let the smell from the bottle scare you—it transforms into a savory masterpiece once it hits the hot pan.
Fresh Green Beans: Selection and Prep
Fresh green beans are non-negotiable for this recipe. Frozen or canned beans hold too much moisture and will turn into a mushy mess when they hit the spicy oil. You want that satisfying “snap” when you bite into them. To check for freshness at the store, bend a bean in half; it should break cleanly with a distinct popping sound.
Trim the ends and cut the beans into 2-inch segments. This specific length is important because it provides enough surface area to grab the thick curry glaze while still being easy to manage with a fork or naan bread. Keeping them uniform in size also ensures they all blister at the same rate, preventing some from being raw while others are overcooked.
Step-by-Step: Searing and Emulsifying the Sauce
Start by heating your oil until it is shimmering and just starting to wisps of smoke. Add the velvet chicken in a single layer. You aren’t trying to cook it all the way through yet; you just want a hard, golden-brown sear on the outside. If you see the chicken turning opaque and white but not browning, your pan isn’t hot enough. Pull the chicken out while the center is still slightly pink to keep it from drying out later.
After removing the chicken, it’s time to fry the paste. This is the most critical part of the process. Add the paste to the remaining oil and stir constantly over medium-high heat. You are looking for the “oil splitting” phenomenon. This happens when the moisture evaporates and the oil turns a vibrant, translucent red. This signals that the fat-soluble flavors in the chilies and aromatics have been fully activated.
Once the paste is fragrant and darkened, stir in your brown sugar and fish sauce. If the mixture looks too thick or starts to stick, add a tiny splash of chicken broth. You want to create a glossy, lacquer-like emulsion. This isn’t a watery sauce; it should look like a rich, concentrated gravy that is ready to coat your vegetables and meat.
Achieving the Glossy Prik Khing Glaze
Toss the fresh green beans into the spicy paste. You want to sauté them until they begin to “blister,” which means you’ll see tiny dark spots and a slight wrinkling of the skin. This high-heat contact develops a smoky sweetness in the beans that contrasts perfectly with the spicy sauce. They should stay bright green and retain a firm crunch.
Finally, return the chicken and any juices that collected on the plate back to the pan. Toss everything together for about two minutes. This allows the chicken to finish cooking gently in the residual heat of the sauce. By the time you’re done, the chicken should be coated in a thick, red glaze that looks like it was painted on. The final result is visually stunning and incredibly flavorful.
Avoiding Common Stir-Fry Mistakes
The biggest mistake people make is crowding the pan. If you dump all the chicken in at once, the temperature of the skillet drops, and the meat starts to steam in its own juices. This leads to that grey, rubbery texture we’re trying to avoid. If you have a small pan, sear the chicken in two batches to keep the heat high.
Another pitfall is burning the curry paste. Because the paste contains dried chilies and aromatics, it can go from fragrant to bitter in a matter of seconds. If the paste starts to smell acrid or looks black rather than deep red, you’ve gone too far. Keep the paste moving constantly and have your liquid ingredients ready to go to cool the pan down if needed.
Lastly, don’t overcook your greens. Green beans should be “al dente.” If they lose their vibrant color and turn a dull olive drab, they have been on the heat too long. The goal is a blistered exterior with a fresh, snappy interior. Remember that the beans will continue to soften slightly from the carryover heat once you take them off the stove.
Flavor Variations and Protein Swaps
While chicken is the classic choice, this red curry base is incredibly versatile. You can easily swap the chicken for jumbo shrimp or even cubes of extra-firm tofu. If using tofu, make sure to press it well to remove excess water so it can still benefit from the cornstarch velveting and get a crispy exterior.
If you are a true heat seeker, you can increase the spice level by adding two or three smashed Thai bird’s eye chilies during the paste-frying stage. This infuses the oil with extra capsaicin. On the other hand, if the red curry paste you bought is a bit too intense, adding an extra teaspoon of brown sugar or a squeeze of lime juice at the end can help mellow the fire.
For an extra aromatic lift, try adding very thinly sliced kaffir lime leaves during the final toss. They add a citrusy, floral note that cuts through the richness of the fried paste. You can also throw in a handful of Thai basil at the very end for a peppery, anise-like finish that complements the red curry beautifully.
What to Serve with Spicy Red Curry Chicken
While jasmine rice is the traditional accompaniment, I highly recommend serving this specific dish with warm, charred naan bread. The thick, concentrated Prik Khing sauce is perfect for scooping. Brush the naan with a little oil or butter and toast it in a dry pan until it has some dark, smoky spots. The soft, chewy bread is the perfect vessel for the spicy chicken and snappy beans.
Because this curry is so intense and savory, a neutral, starchy side is essential to balance the palate. If you want something lighter than naan, a cold cucumber relish made with vinegar, sugar, and shallots provides a refreshing contrast to the heat. The acidity of the relish cuts through the oil-based sauce, making every bite feel fresh.
If you prefer rice, stick to a long-grain variety like jasmine. Its subtle floral aroma pairs naturally with the lemongrass in the curry paste. Avoid flavored rices or heavy pilafs, as they will compete with the complex flavors of the red curry. The goal is to have a side dish that acts as a blank canvas for the spicy, umami-rich chicken.
Make Ahead and Storage Instructions
This is one of those rare dishes that actually tastes better the next day. As the chicken sits in the sauce, the spices from the red curry paste penetrate deeper into the meat. If you are meal prepping, you can store the finished dish in an airtight container in the refrigerator for up to three days. The flavors will mellow and meld, creating a more complex profile.
When it comes to reheating, avoid the microwave if possible. Microwaving often turns the chicken rubbery and makes the green beans limp. Instead, toss everything back into a hot skillet with a tiny splash of water or broth. Stir-fry it quickly over high heat for 2-3 minutes until everything is hot and the sauce has loosened up and become glossy again.
I do not recommend freezing this dish. Green beans have a high water content, and the freezing and thawing process destroys their cellular structure, leaving them mushy and watery. Additionally, the cornstarch coating on the chicken can become grainy after being frozen. This dish is best enjoyed fresh or within a few days of cooking.
Expert Troubleshooting and Technical Tips
Why is my curry paste bitter?
Bitterness usually occurs when the dried chilies or garlic in the curry paste burn. This happens if the heat is too high or if the paste isn’t stirred frequently enough during the frying stage. If you notice the paste darkening too quickly or smelling scorched, immediately add a tablespoon of chicken broth or water to lower the pan’s temperature and deglaze the surface.
Can I use frozen green beans?
It is best to avoid frozen green beans because they lack the necessary “snap” and will release too much water into the sauce, preventing the paste from sticking to the chicken. However, if you must use them, thaw them completely and pat them very dry with paper towels before adding them to the pan. You will lose the blistered texture, but the flavor will still be acceptable.
How do I make this spicier without more paste?
If you want more heat without changing the saltiness or consistency of the sauce, add dried red chili flakes or fresh sliced Thai chilies to the oil at the same time you add the curry paste. This allows the capsaicin to dissolve into the fat, distributing the heat evenly throughout the entire dish. You can also finish the dish with a drizzle of chili oil.
Is there a substitute for fish sauce?
You can substitute fish sauce with an equal amount of high-quality soy sauce or liquid aminos if you have an allergy or preference. However, keep in mind that you will lose the specific “fermented funk” and salty depth that defines authentic Thai red curry. To mimic that complexity, you might add a tiny pinch of extra salt and a squeeze of lime juice to the soy sauce.
Why did my chicken release so much water in the pan?
This usually happens if the pan wasn’t hot enough or if you crowded the chicken. When the pan temperature drops, the meat begins to poach in its own juices rather than searing. To prevent this, ensure your oil is shimmering-hot before adding the chicken and cook in batches if necessary. The cornstarch velveting should also help hold those juices inside the meat.
Spicy Red Curry Chicken and Green Beans
Course: Main CourseCuisine: Thai InspiredDifficulty: easy4
servings15
minutes20
minutes35
Minutes410
kcalThai Inspired
Ingredients
1.5 lbs chicken breast, cut into 1-inch cubes
1 tablespoon cornstarch (for velveting)
1/2 lb fresh green beans, trimmed
4 tablespoons red curry paste
3 tablespoons vegetable oil (divided)
1 tablespoon fish sauce (or soy sauce)
1 tablespoon brown sugar
1/4 cup chicken broth or water (optional, for consistency)
1/2 cup roasted peanuts
Fresh naan bread, toasted with butter or oil, for serving
Directions
- Velvet the Chicken: In a bowl, toss the chicken cubes with the cornstarch until evenly coated. This creates a protective barrier that prevents the protein from becoming rubbery.
- The High-Heat Sear: Heat 2 tablespoons of oil in a large skillet or wok over high heat until shimmering. Add the chicken in a single layer. Sear for 2-3 minutes until a golden-brown crust forms on the outside, but the center remains slightly undercooked. Remove chicken from the pan and set aside.
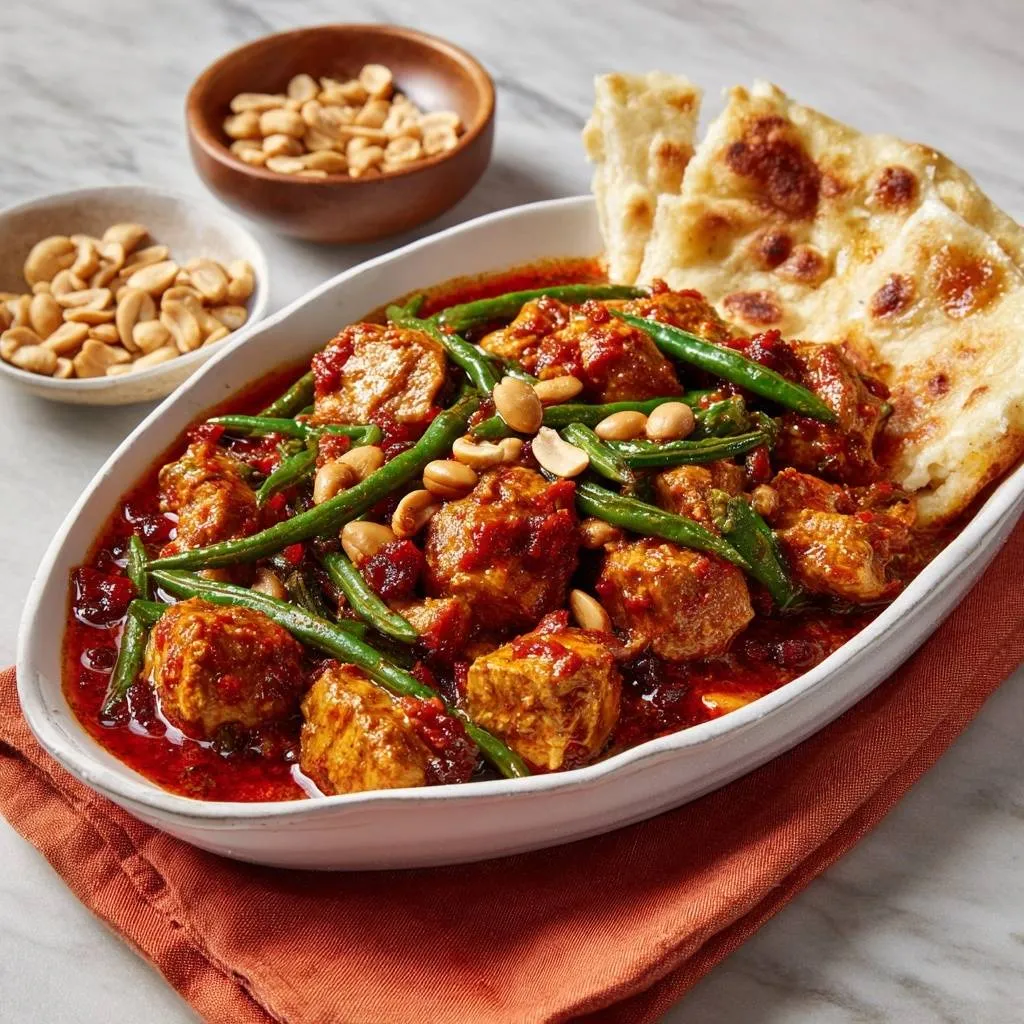
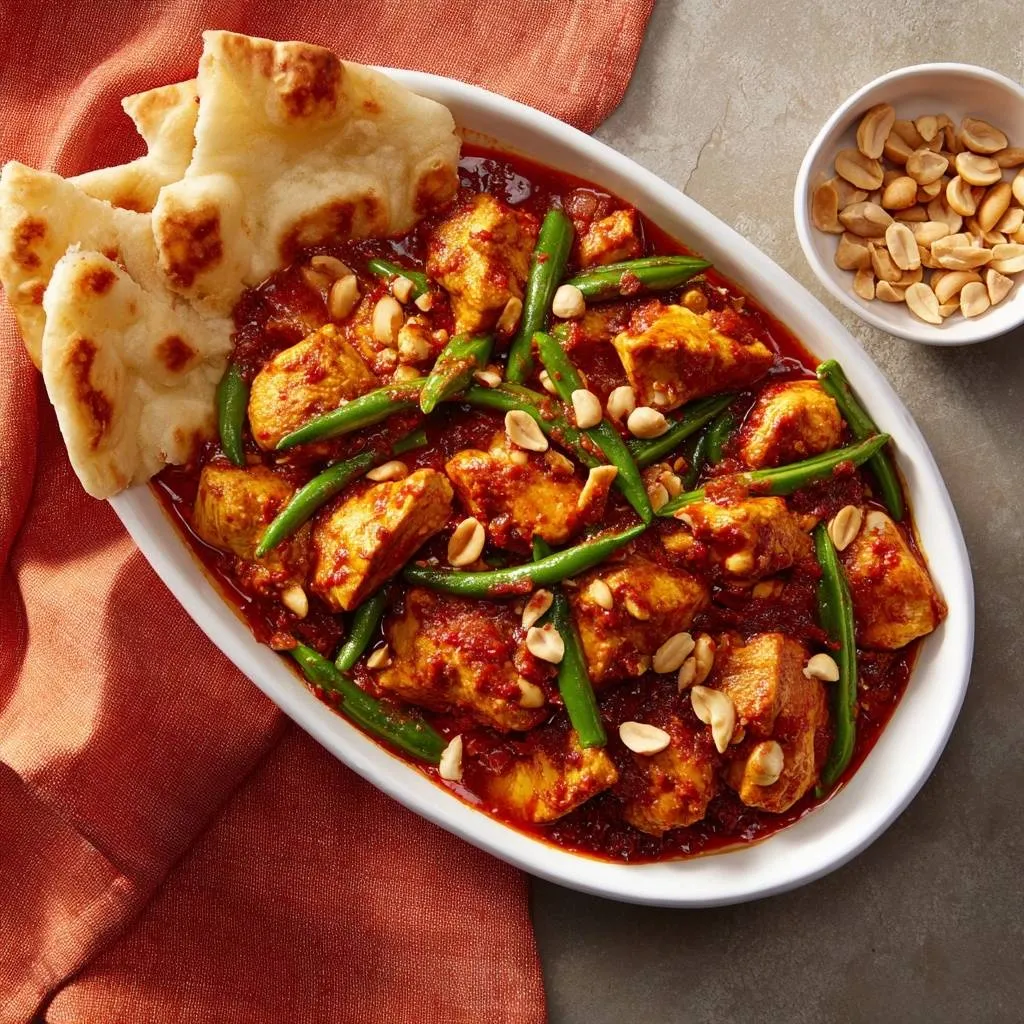
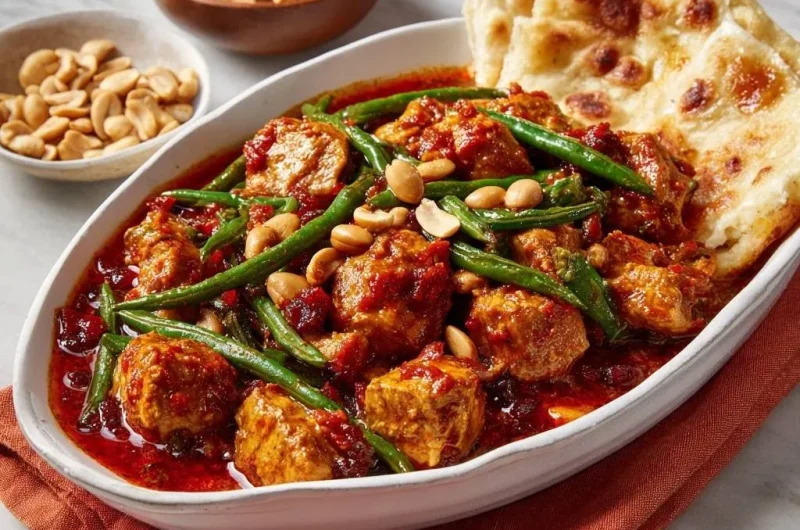
- Fry the Paste: Wipe the pan if necessary, then add the remaining 1 tablespoon of oil. Add the red curry paste and fry over medium-high heat for 1-2 minutes, stirring constantly. The paste should darken and the oil should begin to separate and turn red-this is essential for the deep color and flavor shown in the image.
- Build the Sauce: Stir in the brown sugar and fish sauce. If the paste is too thick or sticking, add a splash of chicken broth or water to create a glossy, rich sauce. (Note: This visual style uses a concentrated curry base rather than a diluted coconut milk broth).
- Blister the Beans: Add the fresh green beans to the pan. Toss well to coat in the spicy oil and paste. Sauté for 3-4 minutes until the beans are blistered but still have a snap.
- The Gentle Finish: Return the seared chicken and any accumulated juices to the pan. Toss everything together for 2 minutes until the chicken is just cooked through and coated in the thick, red glaze.
- Garnish and Serve: Top the dish generously with roasted peanuts. Serve immediately with warm, charred naan bread to scoop up the intense curry sauce.
Notes
- The secret to the texture is the cornstarch coating and high-heat sear. This recipe uses a concentrated oil-based curry rather than coconut milk for a deeper, more intense flavor profile.