There is nothing quite as disappointing as pulling a beautiful tray of pasta out of the oven only to find a puddle of green-tinted water lurking at the bottom. Most home cooks struggle with stuffed shells because the spinach and cheese release too much moisture during the baking process, turning a gourmet meal into a soggy disaster. You want a filling that stays fluffy and rich, held together by a perfectly al dente pasta shell that has just enough bite.
The secret to achieving that restaurant-quality texture lies in two specific professional techniques: the Triple-Drain Method and the Par-Bake Technique. By controlling the water content of your greens and undercooking your pasta before it hits the oven, you create a dish with incredible structural integrity. This approach ensures every shell stands tall, nestled in a thick, vibrant sauce rather than swimming in a watery mess.
I’ve found that the real “aha!” moment for most cooks is realizing that the pasta shouldn’t be fully cooked in the boiling water. If you boil the shells until they’re soft, they’ll inevitably turn to mush during the thirty minutes they spend soaking up marinara in the oven. Pulling them three minutes early is the insurance policy your dinner needs for that perfect, chewy finish.
The Science of Moisture Control in Pasta Fillings
When you heat spinach and ricotta together, you’re essentially creating a small steam chamber inside each pasta shell. Spinach is over 90% water, and its cellular structure collapses the moment it hits heat, dumping all that liquid into your cheese. If that moisture has nowhere to go, it thins out your ricotta and breaks the emulsion of your sauce.
Ricotta cheese is also hygroscopic, meaning it tends to absorb and hold onto moisture until the heat of the oven forces it out. When you combine wet spinach with ricotta, the proteins in the cheese can’t properly bond, leading to a grainy, weeping filling. A watery sauce isn’t just a texture problem; it actually dilutes the salt, garlic, and herbs, making the entire dish taste bland and unseasoned.
Why Frozen Spinach Requires Extreme Dehydration
Frozen spinach is actually a better choice for stuffing than fresh, but it comes with a catch. The freezing process creates ice crystals that puncture the cell walls of the leaves, essentially turning the spinach into a “water bomb” once it thaws. If you just give it a quick squeeze in a colander, you’re leaving behind nearly half a cup of hidden liquid.
To get it truly ready for your Spinach and Ricotta Stuffed Shells, you must use the kitchen towel wring technique. Place the thawed spinach in the center of a clean, lint-free towel, gather the corners, and twist with all your might. You’ll be shocked at how much green liquid pours out, leaving you with a dense, dry ball of greens that will actually hold its flavor.
The Role of the Egg as a Structural Binder
The egg in this recipe isn’t there for flavor; it’s the “glue” that holds the architecture of the filling together. As the shells bake at 375°F, the proteins in the egg begin to coagulate, creating a delicate web that traps the fats from the ricotta and mozzarella. This prevents the cheese from melting into a flat puddle.
Without the egg, the filling would likely slide right out of the shell the moment you try to serve it. By using a lightly beaten egg, you ensure the filling stays plump and upright. This allows the shells to maintain their iconic shape on the plate, looking just as good as they taste.
Essential Components for Spinach and Ricotta Stuffed Shells
Success starts with the quality of your ingredients, especially when the list is this short and focused. Since the pasta is the vessel for all that creamy goodness, you want to look for a brand of jumbo shells that feels heavy and thick. Thinner, cheaper pasta tends to tear more easily during the stuffing process, which can be frustrating when you’re halfway through assembly.
Always check the box for broken pieces before you leave the grocery store. It’s a good idea to boil a few extra shells just in case one or two split in the pot. Having a few “spares” ensures you have enough perfect vessels to fill your 9×13 baking dish completely.
Selecting the Right Jumbo Shells
Jumbo shells provide the perfect surface area for browning, which is where a lot of the flavor lives. When you’re shopping, look for shells with deep ridges on the outside. These ridges aren’t just for decoration; they help the marinara sauce cling to the pasta, ensuring you get a bit of sauce in every single bite.
Different brands have slightly different thicknesses, so keep a close eye on them as they boil. You want them flexible enough to stuff without snapping, but firm enough that they don’t feel “floppy.” A quick rinse in cold water after draining is vital to wash away excess starch and stop the cooking immediately.
Ricotta Quality: Whole Milk vs. Part-Skim
I strongly recommend using whole milk ricotta for this dish. Part-skim ricotta often contains more stabilizers and gums, which can result in a grainy, almost sandy texture once it’s baked at high heat. Whole milk ricotta has a higher fat content, which translates to a silky, luxurious mouthfeel that stands up to the acidity of the tomato sauce.
If you notice your ricotta has a lot of liquid on top when you open the container, give it a quick strain through a fine-mesh sieve for ten minutes. Starting with the thickest cheese possible is the first step in avoiding that dreaded soggy bottom. The richer the cheese, the more satisfying the final dish will be.
The Cheese Blend: Mozzarella and Parmesan Ratios
Mozzarella provides the gooey, stretchy pull we all love, but it’s relatively mild in flavor. That’s why the addition of grated parmesan is non-negotiable. Parmesan adds a salty, umami punch that cuts through the richness of the ricotta and highlights the earthy notes of the spinach.
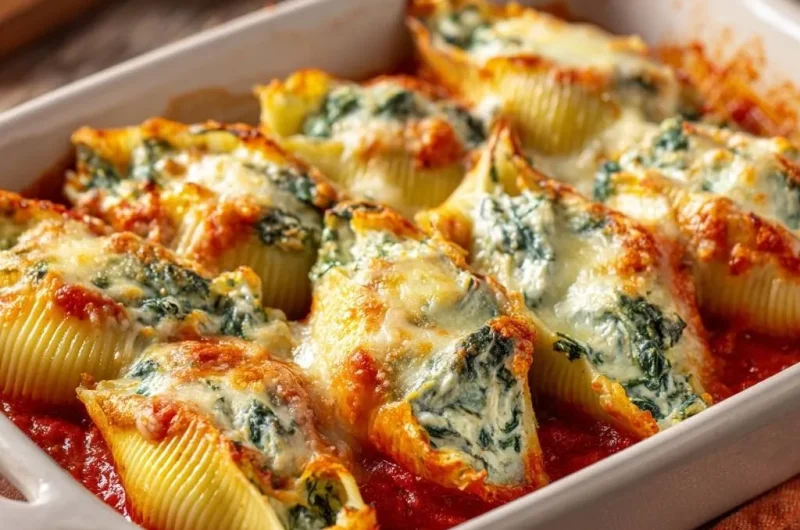
Dividing your mozzarella is a key tactical move. Mixing half into the ricotta provides internal structure and “cheesiness” throughout the filling. Saving the other half for the top creates that classic golden crust that protects the filling from drying out while adding a beautiful toasted flavor.
Step-by-Step: Preparing the Pasta and Filling
Preparation is where the magic happens. You want to move with intention, ensuring each component is handled correctly before they are combined. Start by getting your water to a rolling boil and salting it heavily; this is your only chance to season the pasta itself. Once the shells go in, stir them gently for the first minute to prevent them from sticking to the bottom or each other.
While the pasta boils, focus on your filling. This is a great time to gather your spices and beat your egg. Having everything measured out before you start mixing ensures you don’t forget the garlic powder or salt in the heat of the moment. A well-organized workspace makes the assembly process much faster and more enjoyable.
The 3-Minute Under-Boil Technique
The concept of carryover cooking is vital here. If the box instructions say 12 minutes for al dente, you should be pulling those shells out at the 9-minute mark. They will feel slightly too firm to eat at this stage, and that is exactly what you want. They will continue to soften as they absorb the moisture from the marinara sauce in the oven.
If you cook them all the way through on the stove, they will lose their structural integrity in the oven. They’ll flatten out and become mushy, making it impossible to get those distinct, beautiful individual portions. Think of the boiling water as just a “softening” phase and the oven as the actual cooking phase.
Executing the Triple-Drain Spinach Method
To truly master the “Anti-Soggy” promise, you need to be aggressive with your spinach. After thawing, drain it in a colander, then squeeze it by hand, and finally, use the towel method. When you think you’ve gotten all the water out, squeeze it one more time. The spinach should look like a dry, dark green puck.
Once it’s dry, break it apart with your fingers as you add it to the ricotta. This ensures you don’t end up with one giant clump of spinach in a single shell. Distributing the greens evenly throughout the cheese mixture ensures every bite has the perfect balance of creaminess and vegetable earthy flavor.
Mixing the Filling for Maximum Aeration
When combining your ingredients, use a large rubber spatula and a folding motion. You want to mix until everything is just combined. Over-mixing ricotta can cause it to become too smooth and lose the characteristic “curd” that gives stuffed shells their hearty texture.
The goal is a filling that is thick enough to hold its shape on a spoon. If it feels too runny, you likely didn’t drain the spinach enough. If it feels too stiff, don’t worry; the egg will loosen up and become creamy once it hits the heat of the oven. A little bit of texture in the filling makes the dish feel much more rustic and homemade.
Assembly: Engineering the Perfect Bake
Assembling the dish is where you can really show off your attention to detail. Start by spreading a thin, even layer of marinara on the bottom of your dish. This acts as a non-stick barrier and ensures the bottoms of the shells get cooked through. Don’t use too much sauce at the base, or the shells will slide around as you try to nestle them in.
When you place the shells in the dish, pack them in snugly. They should be touching each other, which helps them stay upright and prevents the filling from spilling out. A tight fit also means you can fit more shells into the dish, making for a more impressive presentation when you bring it to the table.
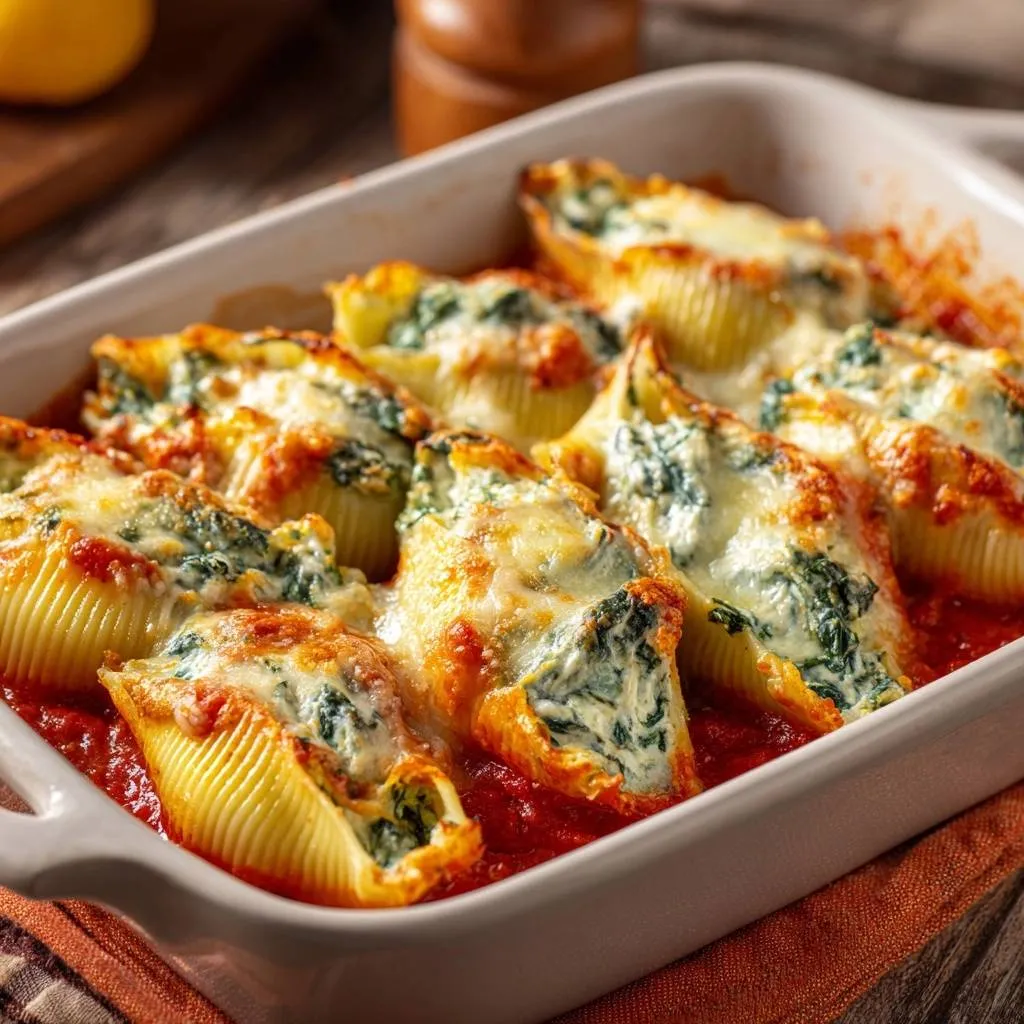
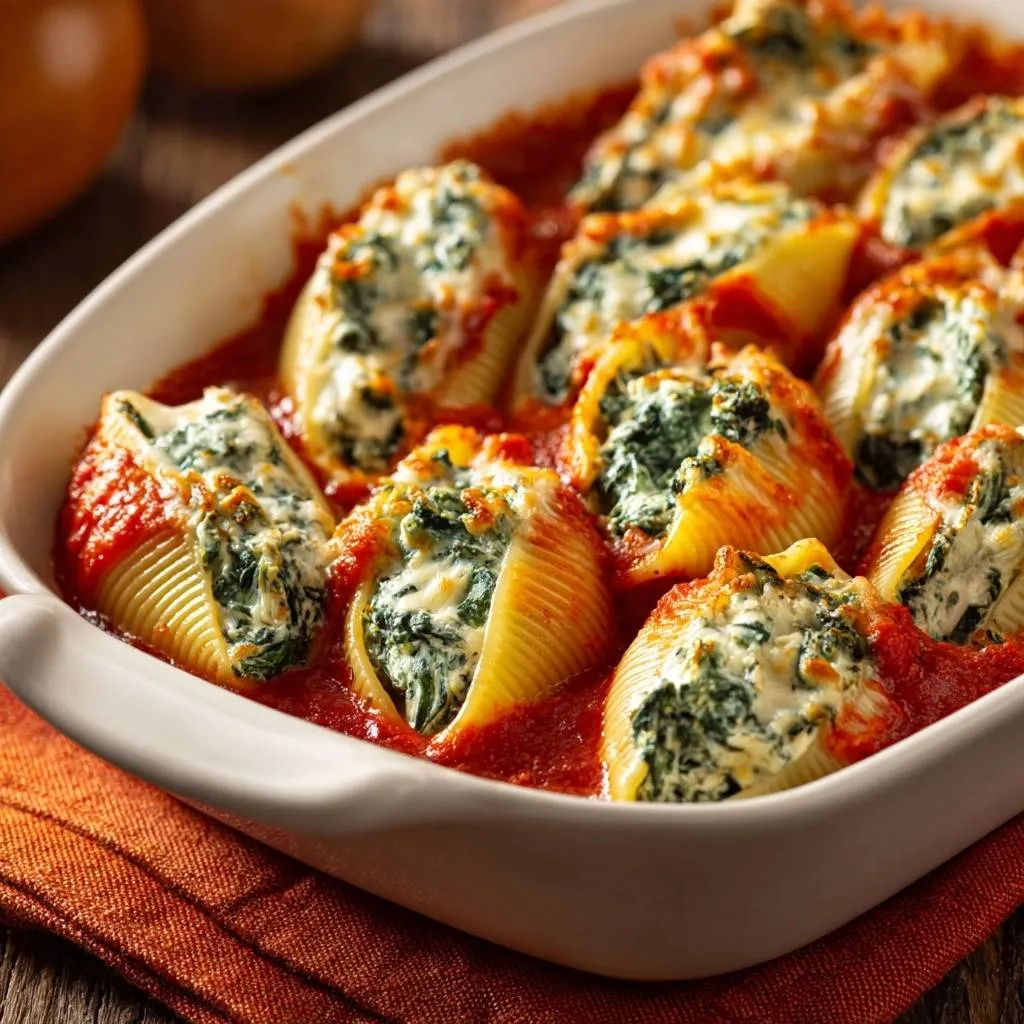
Sauce Placement and the “Exposed Top” Method
Most people make the mistake of drowning their shells in sauce. This steams the pasta and makes the tops gummy. Instead, spoon your remaining sauce carefully around the base of the shells. You want the sauce to come about halfway up the sides of the pasta, leaving the top of the ricotta filling exposed.
This method allows the edges of the pasta shells to get slightly crispy in the dry heat of the oven. It creates a wonderful textural contrast between the tender, sauce-soaked bottom and the toasted, firm top. It also allows the cheese you sprinkle on top to brown directly against the filling, creating a delicious crust.
Stuffing Techniques for Uniformity
For the cleanest results, you can use a small cookie scoop or even a piping bag with the tip cut off to fill the shells. If you’re using a spoon, use one hand to gently pry the shell open and the other to tuck the filling inside. Aim for about two tablespoons of filling per shell, or until they look generously plump.
Don’t overstuff them to the point of bursting, as the filling will expand slightly as the egg cooks. If you have extra filling at the end, go back and add a little “hat” of ricotta to any shells that look a bit thin. Consistency in size ensures that every shell cooks at the same rate, so no one ends up with a cold center.
Oven Management and the Maillard Reaction
Baking at 375°F is the sweet spot for this dish. It’s hot enough to bubble the sauce and cook the egg binder quickly, but not so hot that the cheese burns before the center is warm. Always bake these shells uncovered. Covering the dish with foil traps steam, which is the enemy of a firm, toasted pasta shell.
The Maillard reaction is the chemical process that gives browned food its distinctive flavor. By leaving the shells uncovered, you’re allowing the sugars in the tomato sauce and the proteins in the cheese to caramelize. This creates a depth of flavor that you simply can’t get from a steamed, covered casserole.
In the final two minutes of baking, keep a very close eye on the oven. Switching to the broiler can take your cheese from “melted” to “perfectly charred” in seconds. You’re looking for those beautiful deep golden-brown spots on the mozzarella. Once you see them, pull the dish out immediately to prevent the pasta edges from scorching.
Troubleshooting Common Stuffed Shell Issues
Even with the best intentions, things can go wrong in the kitchen. If you find that your shells are tearing as you try to stuff them, don’t panic. You can still use them! Simply lay the torn shell in the dish and “patch” the tear by overlapping the pasta edges before adding the filling. Once the cheese melts over the top, no one will ever know.
Another common issue is a sauce that tastes a bit too sharp or acidic. This often happens with canned marinara. If you taste your sauce and it puckers your mouth, stir in a tiny pinch of sugar or a teaspoon of butter before you put it in the baking dish. The fat or sugar will balance the acidity and make the whole dish taste more mellow and balanced.
How to Fix a Broken or Overcooked Shell
If you accidentally overcook your shells on the stove and they feel too mushy to handle, the best fix is to chill them. Run them under very cold water and let them sit in a colander for five minutes. The cold temperature will help the starch firm back up, making them easier to stuff without falling apart.
If you have a few shells that are completely shredded, chop them up and mix them right into the ricotta filling. It adds a bit of extra body to the cheese mixture and ensures nothing goes to waste. Then, just fill the remaining whole shells a little more generously to fill up the space in your baking dish.
What to Do if Your Sauce is Too Acidic
The acidity of your sauce can make or break the dish. If you’re using a store-bought brand that feels a bit thin or sour, you can “beef it up” by adding a tablespoon of tomato paste. This thickens the sauce and adds a concentrated sweetness that mimics a sauce that has been simmering for hours.
Adding a handful of fresh basil leaves to the sauce before layering it can also help. The aromatic oils in the basil provide a fresh, sweet counterpoint to the cooked tomatoes. Remember, the sauce is the foundation of the dish, so taking thirty seconds to taste and adjust it is always worth the effort.
Make-Ahead Strategies and Freezing Guide
Stuffed shells are a dream for meal prepping. You can assemble the entire dish a day in advance, cover it tightly with plastic wrap, and keep it in the fridge. When you’re ready to eat, just take it out of the fridge 30 minutes before baking to take the chill off, then bake as directed. You might need to add 5-10 minutes to the cook time if the dish is still cold.
For freezing, it’s best to freeze the shells *before* baking. Arrange the stuffed shells on a baking sheet and freeze them individually for an hour. Once they are firm, transfer them to a freezer bag. This prevents them from sticking together. When you’re ready for dinner, place the frozen shells directly into a sauced dish and bake at 375°F for about 45-50 minutes.
I don’t recommend freezing the shells after they’ve been baked with the sauce. The pasta tends to absorb too much liquid during the thawing process, which can lead to that mushy texture we worked so hard to avoid. Stick to freezing the stuffed shells solo for the best results and the freshest taste.
Pairing Suggestions for a Balanced Italian Table
Since this dish is quite rich and cheesy, you want sides that offer a bit of crunch and acidity. A simple arugula salad with a lemon vinaigrette is a perfect partner. The peppery bite of the arugula and the sharp citrus dressing cut right through the heavy ricotta, refreshing your palate between bites of pasta.
You also can’t go wrong with some high-quality garlic bread. Use a crusty Italian loaf and plenty of fresh garlic and butter. The bread is perfect for mopping up any extra marinara sauce left on the plate. If you want more vegetables, roasted broccoli with a sprinkle of red pepper flakes adds a nice charred flavor and a bit of heat that complements the mild cheese filling.
Frequently Asked Questions
Can I use fresh spinach instead of frozen?
Yes, you can use fresh spinach, but you’ll need a lot of it. One 10-ounce package of frozen spinach is roughly equivalent to one pound of fresh leaves. You must sauté the fresh spinach first until it is completely wilted, then let it cool and wring it out just as you would with the frozen version. If you don’t cook it first, the volume will be too high to mix into the cheese, and it will release too much water in the oven.
Why did my ricotta turn out grainy?
Grainy ricotta is usually the result of using part-skim cheese or overcooking the dish. Part-skim ricotta has less fat and more protein, which can clump together and feel sandy when heated. To avoid this, always use whole milk ricotta and make sure you don’t leave the shells in the oven much longer than 30 minutes. If the cheese gets too hot for too long, the proteins tighten up and push out the moisture, creating that grainy texture.
Can I use a different pasta shape?
While jumbo shells are the classic choice, this filling works beautifully in manicotti tubes as well. The flavor profile remains the same, though the assembly is a bit different. If you can’t find shells or manicotti, you can even use this mixture to make a “lazy” lasagna by layering it with noodles and sauce. However, you’ll miss out on those crispy pasta edges that make the shells so special.
How long do leftovers stay fresh in the refrigerator?
Leftover stuffed shells will stay fresh in an airtight container for up to 3 to 4 days. When reheating, I recommend using the oven or a toaster oven rather than the microwave. Reheating at 350°F for about 15 minutes helps maintain the texture of the pasta and keeps the cheese from becoming rubbery. If the shells look a little dry, add a tiny splash of water or extra sauce to the dish before popping them in the oven.
Spinach and Ricotta Stuffed Shells
Course: Main CourseCuisine: Italian-AmericanDifficulty: easy6
servings20
minutes30
minutes50
Minutes385
kcalItalian-American
Ingredients
1 box jumbo pasta shells (12 ounces)
15 ounces whole milk ricotta cheese
10 ounces frozen chopped spinach, thawed
2 cups shredded mozzarella cheese, divided
1/2 cup grated parmesan cheese
1 large egg, lightly beaten
1 teaspoon garlic powder
1/2 teaspoon dried oregano
1/2 teaspoon salt
1/4 teaspoon black pepper
24 ounces marinara sauce
Directions
- Preheat your oven to 375 degrees F. Boil a large pot of salted water.
- Cook the jumbo shells for exactly 3 minutes less than the package directions for al dente. This prevents them from becoming mushy when they absorb the sauce in the oven. Drain and rinse with cold water to stop the cooking process.
- To solve the watery sauce problem, place your thawed spinach in a clean kitchen towel and wring it out with maximum force until no more liquid escapes. This is the most critical step for a firm, flavorful filling.
- In a medium bowl, combine the bone-dry spinach, ricotta, 1 cup of mozzarella, parmesan, egg, garlic powder, oregano, salt, and pepper. Mix until well combined.
- Spread 2 cups of marinara sauce across the bottom of a 9×13 inch baking dish.
- Stuff each par-cooked shell generously with the ricotta mixture. Place them in the dish, nestled into the sauce.
- To match the visual presentation in the image, do not cover the shells with sauce. Instead, spoon the remaining sauce only around the base of the shells, leaving the tops of the filling exposed. Sprinkle the remaining 1 cup of mozzarella cheese directly onto the exposed ricotta filling of each shell.
- Bake uncovered for 25-30 minutes. Baking uncovered is essential to achieve the golden-brown, slightly crispy edges on the pasta and the toasted cheese crust shown in the image.
- For the final 2 minutes, you may turn on the broiler to achieve the specific deep golden-brown spots on the cheese.
- Let the dish rest for 5 minutes before serving to allow the filling to set perfectly.
Notes
- The most critical step is wringing the spinach in a kitchen towel until bone-dry to prevent a watery sauce. Bake uncovered to achieve crispy edges and a toasted cheese topping.