Most home cooks struggle with the dreaded “watery curry” syndrome, where a thin, pale liquid pools at the bottom of the plate while the ingredients sit sadly on top. You want a sauce that feels like velvet, a rich and heavy emulsion that clings to every single chickpea. Achieving that restaurant-style body isn’t about adding flour or heavy thickeners; it’s about mastering the physics of the ingredients already in your pan.
This Creamy Spiced Chickpea Curry solves the texture crisis by using a specific starch-bind technique that creates a thick, luscious gravy in just 35 minutes. When you bite into this, you’ll notice a deep, savory complexity that usually takes hours to develop. It’s the perfect high-protein, meat-free dinner for those nights when you’re craving something substantial but don’t want to spend all evening at the stove.
The secret to this recipe’s success lies in the “crush.” By intentionally breaking down a small portion of the legumes, you release natural starches that act as a bridge between the fats in the coconut milk and the acidity of the tomatoes. This creates a stable, thick sauce that won’t break or separate, even if you reheat it the next day. I’ve found that using a cast-iron skillet helps maintain the steady, even heat necessary for this transformation to happen perfectly.
The Anatomy of a Thick Curry Base
Building a legendary curry starts with choosing ingredients that provide structural integrity. Full-fat coconut milk is absolutely non-negotiable here because the “lite” versions lack the medium-chain triglycerides needed to create a creamy mouthfeel. Without that fat content, your sauce will lack the necessary weight to carry the heavy spices.
Tomato paste acts as your secondary thickening agent and a major color booster. It provides a concentrated hit of umami and sugars that, when caramelized, turn the sauce a vibrant, deep orange. While you can use dried chickpeas that have been soaked and boiled, canned chickpeas are actually a secret weapon for thickness. The canning process softens them just enough so they release their starches more readily when you apply pressure with your spoon.
Essential Spices and Aromatics
The flavor profile relies on a trio of mild curry powder, smoked paprika, and turmeric. The curry powder provides the earthy foundation, while the smoked paprika adds a subtle “charred” depth that mimics a tandoor oven. Turmeric brings that iconic golden hue and a slight peppery bite that cuts through the richness of the coconut milk.
Fresh ginger and garlic are the “high notes” that brighten the dish, preventing the heavy spices from feeling muddy. When you toss these into the hot oil, a chemical reaction called “blooming” occurs. This process dissolves the fat-soluble flavor compounds in the spices, ensuring the heat and aroma are distributed evenly throughout the entire fat base of the curry rather than just sitting on top.
The Science of the Starch-Crush Technique
Sauces often separate because the water and fat molecules refuse to bond. In a typical vegetable curry, the water from the tomatoes and the fat from the oil or coconut milk want to stay apart. To fix this, we look to the chickpeas themselves. By mashing about half a cup of the beans directly into the simmering liquid, you release amylose and amylopectin.
These starch molecules act as natural emulsifiers, physically getting in the way of water and fat molecules so they stay mixed together. This method is far superior to using a cornstarch slurry or a flour roux. A roux can sometimes mask the vibrant spices with a “pasty” flavor, whereas the chickpea starch is flavor-neutral and maintains the integrity of the dish. You’ll see the sauce transform from a thin soup into a glossy, spoon-coating gravy almost instantly.
Step-by-Step: Building the Flavor Foundation
The first 10 minutes are the most critical for the final flavor. When you add your finely diced yellow onions to the hot oil, you’re looking for the Maillard reaction. This isn’t just about softening the onion; it’s about breaking down the sulfur compounds and turning them into sweetness. You want them to be deeply translucent with just a hint of gold at the edges.
If you rush this step, you’ll end up with crunchy bits of onion that feel out of place in a creamy sauce. Take your time and let the moisture evaporate. You’ll know you’re ready for the next step when the onions smell sweet and look almost jammy. This soft base ensures that the onions eventually melt into the sauce, becoming part of the texture rather than a separate ingredient.
Toasting Spices and Deglazing the Skillet
Once the onions are ready, stir in the garlic, ginger, and tomato paste. You only have a 2-minute window here. You’re looking for the tomato paste to shift from a bright red to a dark, brick-red color. This indicates the sugars have caramelized and the raw metallic taste of the paste has vanished. It will smell intensely savory and slightly sweet.
Next, add your dry spices for exactly one minute. Watch them closely; they can burn quickly, which makes the curry bitter. As soon as the aroma hits your nose, pour in the crushed tomatoes and coconut milk. Use your wooden spoon to scrape the bottom of the skillet. This is called deglazing, and it lifts all those browned bits—the fond—off the pan and incorporates that concentrated flavor back into your sauce.
Simmering for Maximum Sauce Reduction
Patience during the 12 to 15-minute simmer is what separates a good curry from a great one. You must leave the skillet uncovered. This allows the excess water from the tomatoes to evaporate, concentrating the flavors and thickening the consistency. If you cover the pan, the steam will drop back into the sauce, keeping it thin and watery.
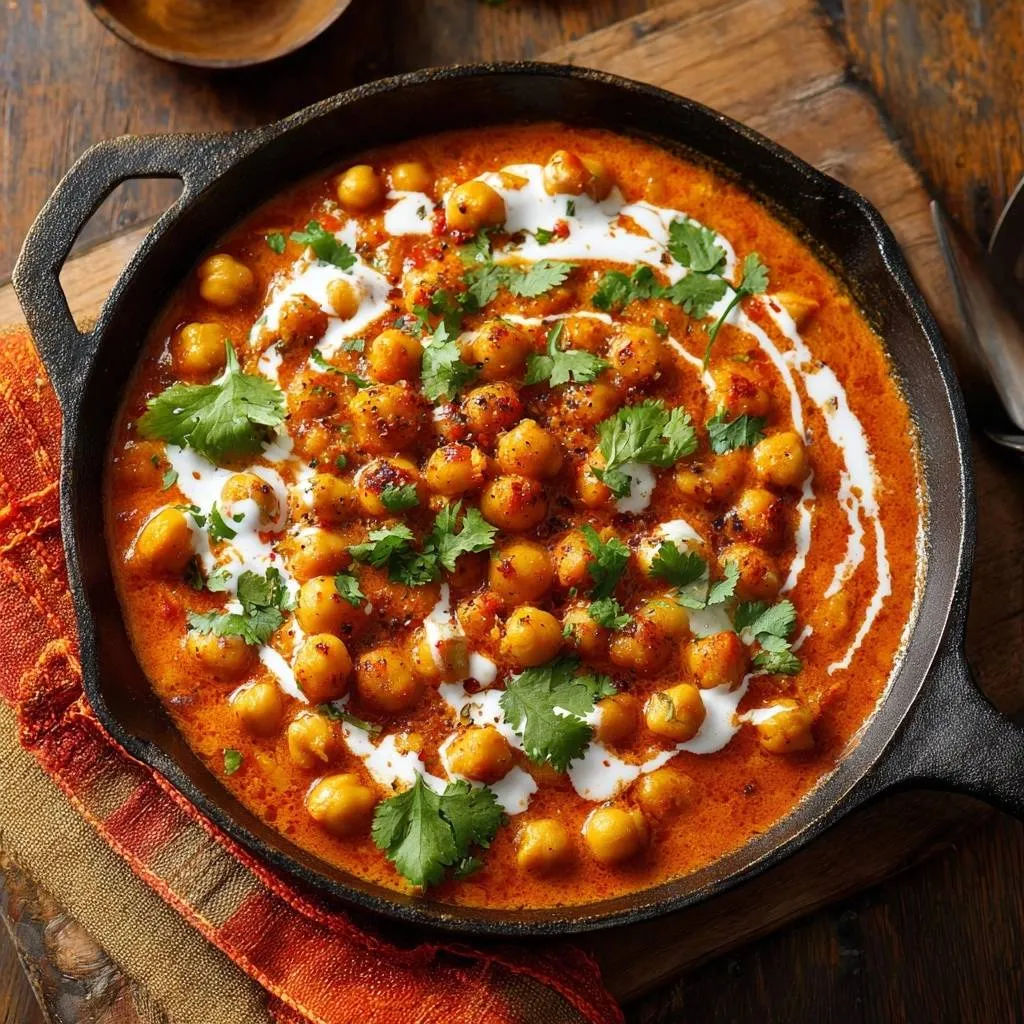
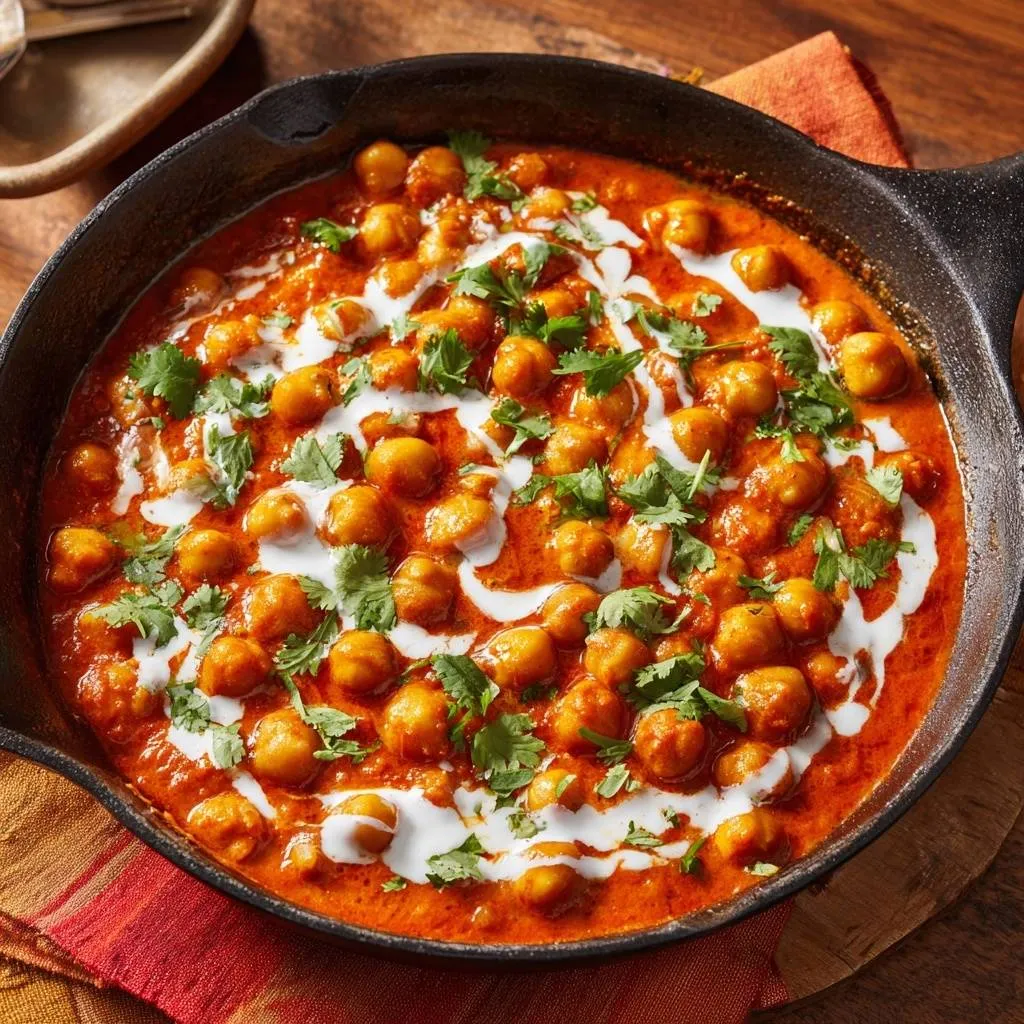
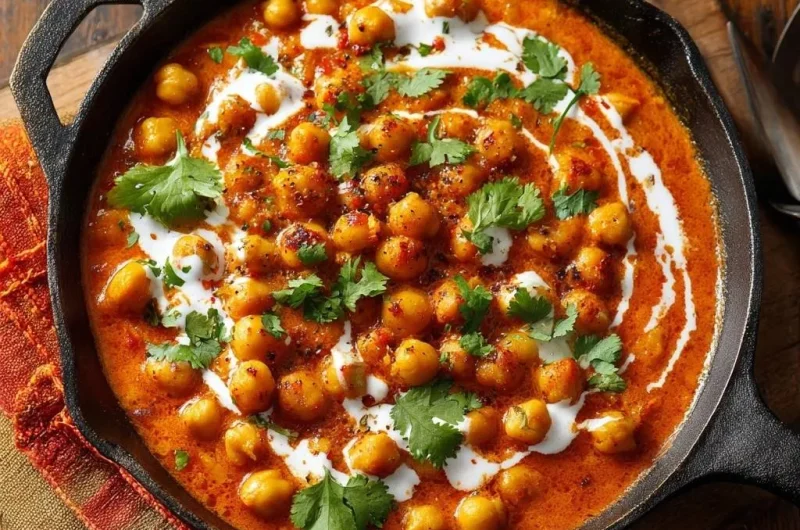
To check if it’s ready, use the “spoon-coating” test. Dip a metal spoon into the curry and pull it out. Run your finger through the sauce on the back of the spoon. If the line stays clean and the sauce doesn’t run back into the gap, you’ve reached the perfect viscosity. The chickpeas should look like they are nestled in a thick, bubbling blanket of sauce.
The Finishing Swirl: Emulsion and Garnish
The final touch is a drizzle of heavy cream or thick coconut cream. This isn’t just for looks; it adds a final layer of fat that rounds out the sharp edges of the spices. Always do this off the heat. If the sauce is boiling when you add the cream, the proteins can denature and cause the sauce to curdle or look grainy.
For a professional look, start in the center of the skillet and move your spoon in a tight circular motion outward. This creates a beautiful contrast against the deep orange sauce. Garnish generously with fresh cilantro. The bright, citrusy flavor of the leaves provides a necessary “pop” against the warm, earthy spices, making the whole dish feel fresh and vibrant.
Troubleshooting Your Chickpea Curry
If your sauce becomes too thick during the simmer, don’t panic. Simply stir in a splash of vegetable broth or water, one tablespoon at a time, until you reach your desired consistency. This allows you to thin the sauce without diluting the flavor profile you worked so hard to build. If the spices taste “raw” or dusty, it usually means they weren’t toasted long enough; you can sometimes fix this by simmering for an extra five minutes with a tiny bit more oil.
Sometimes the tomatoes can be overly acidic, making the curry taste sharp. If this happens, stir in a tiny pinch of sugar or an extra tablespoon of cream to balance the pH. Lastly, if the flavors feel flat, it’s almost always a salt issue. Add salt in small increments, tasting after each addition. Salt is the volume knob for spices; it turns up the flavor of the cumin, coriander, and turmeric.
Flavor Variations and Ingredient Swaps
This Creamy Spiced Chickpea Curry is a fantastic canvas for customization. If you want to add some greens, stir in two handfuls of baby spinach during the last two minutes of simmering. The heat of the sauce will wilt the leaves perfectly without overcooking them. You can also swap one can of chickpeas for roasted cauliflower florets to add a nutty, charred texture to the mix.
For those who prefer a different bean, cannellini or Great Northern beans work beautifully because their thin skins and creamy interiors mimic the texture of the chickpeas. If you want to increase the heat, don’t just add more curry powder. Instead, finely mince a fresh bird’s eye chili and sauté it with the onions, or add a teaspoon of red chili flakes during the spice-toasting phase for a slow, lingering burn.
Optimal Pairings for a Complete Meal
To soak up that incredible sauce, serve this curry over a bed of long-grain Basmati rice. Basmati is superior to Jasmine rice in this context because its grains stay separate and fluffy, providing a textural contrast to the creamy sauce. If you’re feeling indulgent, warm some garlic naan or roti in a dry pan until it’s soft and pliable, perfect for scooping up the mashed chickpeas.
If you find the spices a bit intense, a side of cucumber raita is the perfect companion. Simply mix plain yogurt with grated cucumber, a squeeze of lemon, and a pinch of salt. The cooling effect of the yogurt provides a refreshing counterpoint to the warm, aromatic spices of the curry. A simple squeeze of fresh lime juice over the entire plate right before eating can also help cut through the richness.
Make-Ahead Strategy and Storage Tips
Curry is one of those rare dishes that actually tastes better the next day. As it sits in the fridge, the spices continue to meld and the flavors penetrate deeper into the chickpeas. If you’re meal prepping, let the curry cool completely at room temperature for about 30 minutes before transferring it to an airtight container. This prevents condensation from forming inside the lid, which would water down your sauce.
You can store this in the refrigerator for up to four days. It also freezes remarkably well for up to three months. When you’re ready to eat, thaw it overnight in the fridge. Reheat it slowly in a saucepan over medium-low heat on the stove. You might need to add a tablespoon of water to loosen the emulsion, as the starches will continue to thicken the sauce as it cools.
Expert Tips for Restaurant-Quality Results
Using a heavy-bottomed skillet, like cast iron, is a game-changer because it prevents hot spots that can burn the delicate coconut milk. Always rinse your canned chickpeas thoroughly under cold water. This removes the “aquafaba” liquid, which can sometimes have a metallic or overly salty taste that interferes with your spice blend. It also helps the chickpeas absorb the flavors of the sauce more effectively.
Don’t throw away your cilantro stems! Finely chop the tender upper stems and sauté them along with the garlic and ginger. They hold an incredible amount of concentrated flavor that survives the cooking process better than the leaves. Save the leaves for the very end to maintain their bright color and fresh aroma. Finally, always use fresh ginger rather than the powdered version; the zingy, spicy bite of fresh ginger is irreplaceable in a high-quality curry.
Frequently Asked Questions
Can I use dried chickpeas instead of canned?
Yes, you certainly can. You will need to soak about one cup of dried chickpeas overnight in plenty of water. The next day, drain them and boil them in fresh water for about 60 to 90 minutes until they are tender but not falling apart. Once cooked, you can proceed with the recipe as written. Note that home-cooked chickpeas are often firmer than canned, so you might need to mash a few extra to get the same level of thickness in your sauce.
Is this recipe naturally vegan?
This recipe is very easy to keep vegan. Simply ensure you use vegetable oil instead of ghee for the initial sauté. For the finishing swirl, use the thick cream from the top of a chilled can of coconut milk instead of heavy dairy cream. These swaps won’t compromise the flavor or the creamy texture of the final dish at all.
How do I make this curry spicier?
The base recipe is relatively mild to suit most palates. To kick up the heat, you can add one or two finely diced serrano or bird’s eye chilies when you sauté the onions. Alternatively, increase the amount of red chili flakes or add a half-teaspoon of cayenne pepper during the spice-toasting step. Remember that the fat in the coconut milk will mellow the heat, so you can be a bit bolder than usual.
What is the best substitute for tomato paste?
If you’re out of tomato paste, the best substitute is tomato sauce or tomato purée. However, because these are much thinner, you’ll need to use about three tablespoons and simmer them longer to reduce the liquid. You won’t get quite the same deep “brick red” color or the same level of thickness, but it will still provide the necessary acidity to balance the coconut milk.
Why is my sauce still watery after simmering?
If your sauce hasn’t thickened, it’s likely because not enough steam escaped or you didn’t mash enough chickpeas. Try mashing another quarter-cup of the chickpeas directly into the pan and turning the heat up slightly to a vigorous simmer for another three to five minutes. Make sure the pan remains uncovered. The reduction of liquid is essential for the starches to do their job.
Creamy Spiced Chickpea Curry
Course: Main CourseCuisine: Indian-InspiredDifficulty: easy4
servings10
minutes25
minutes35
Minutes420
kcalIndian-Inspired
Ingredients
2 cans (15 oz each) chickpeas, drained and rinsed
2 tablespoons vegetable oil or ghee
1 large yellow onion, finely diced
3 cloves garlic, minced
1 tablespoon fresh ginger, grated
1 tablespoon tomato paste (for deep color and body)
1 can (14 oz) crushed tomatoes
1 can (14 oz) full-fat coconut milk
2 tablespoons mild curry powder
1 teaspoon smoked paprika
1/2 teaspoon turmeric
1/2 teaspoon salt, plus more to taste
1/2 teaspoon cracked black pepper
1/4 cup fresh cilantro, roughly chopped
3 tablespoons heavy cream or thick coconut cream (for finishing swirl)
Red chili flakes (optional, for garnish)
Directions
- Heat the oil in a large cast-iron skillet over medium heat. Add the onion and sauté for 8 to 10 minutes. Do not rush this; the onions should be deeply translucent and starting to caramelize at the edges to provide the base for the orange-red sauce.
- Stir in the garlic, ginger, and tomato paste. Cook for 2 minutes, stirring constantly, until the tomato paste turns a deep brick red.
- Add the curry powder, smoked paprika, and turmeric. Toast the spices for 1 minute until fragrant to unlock the essential oils.
- Pour in the crushed tomatoes and full-fat coconut milk. Stir well to deglaze the bottom of the skillet.
- Add the chickpeas to the skillet. To ensure a thick, never-watery sauce, use the back of a wooden spoon or a potato masher to crush about 1/2 cup of the chickpeas directly into the sauce. Stir these mashed chickpeas in to release their starches, which will naturally thicken the liquid.
- Simmer the mixture over medium-low heat, uncovered, for 12 to 15 minutes. This reduction time is critical for the sauce to reach the thick, spoon-coating consistency shown in the image.
- Season with salt and cracked black pepper. Remove from heat.
- Using a spoon, drizzle the heavy cream in a tight circular motion starting from the center. Garnish generously with fresh cilantro and a pinch of red chili flakes or extra black pepper before serving directly from the skillet.
Notes
- For the best texture, use full-fat coconut milk and do not skip the step of crushing a portion of the chickpeas. Simmering uncovered is essential for the sauce reduction.