There is nothing quite as disappointing as a vegetable lasagna that looks beautiful on the surface but collapses into a watery puddle the moment you slide your spatula underneath. We’ve all been there, staring at a plate where the noodles are swimming in a gray, mushroom-scented soup. A perfect Mushroom and Spinach Lasagna should be a structural masterpiece, standing tall with distinct layers of creamy ricotta, earthy greens, and savory fungi.
The secret to achieving that restaurant-quality slice lies in managing moisture before the assembly even begins. When you bite into this dish, you should experience the meaty texture of seared cremini mushrooms and the bright, concentrated flavor of spinach, all held together by a velvety cheese binder. It’s about creating a balance between the richness of the mozzarella and the toasted, nutty crunch of walnuts that dance through every bite.
I’ve found that the real trick to the “Anti-Soggy” method is all about the initial sear. Most people toss their vegetables into a lukewarm pan and hope for the best, but that just steams them in their own juices. By using high heat and a “no-stir” rule for the first few minutes, you lock in the flavor and evaporate the water that would otherwise ruin your dinner. This ensures your lasagna stays firm, flavorful, and perfectly stackable.
The Science of Moisture in Vegetable Lasagna
Mushrooms are essentially biological sponges, consisting of nearly 90% water. When they hit the heat, their cellular structure breaks down, releasing all that internal liquid. If this happens inside your oven, that water has nowhere to go but into your noodles and sauce. By searing them at high temperatures beforehand, you force that moisture out early, concentrating the umami flavors and giving the mushrooms a firm, meaty bite.
Spinach presents a similar challenge but on a different scale. Those delicate leaves collapse the second they feel heat, shedding water rapidly as their cell walls rupture. Without a proper “wilt and drain” phase, a single bag of spinach can release enough liquid to turn a thick marinara into a thin broth. You have to be aggressive with your drainage to keep the integrity of the dish intact.
Even the cheese can contribute to a “weeping” lasagna. Ricotta is a high-moisture cheese that tends to separate when heated, releasing whey. Adding a large egg to the mixture acts as a stabilizer. The egg proteins create a lattice that traps the moisture and fats, ensuring the ricotta layer sets into a fluffy, custard-like consistency rather than a grainy mess. It’s the glue that holds your vegetable layers in place.
Essential Components for Mushroom and Spinach Lasagna
Quality ingredients make a massive difference when you aren’t using meat to provide bulk. I always reach for Cremini mushrooms, often sold as “Baby Bellas,” because they have a much deeper, more savory profile than standard white button mushrooms. They hold their shape better during the long bake and provide that essential “chew” that makes a vegetarian lasagna feel substantial.
The walnuts might seem like an unusual addition, but they are the secret weapon here. Their natural tannins and healthy fats provide a sophisticated bitterness that cuts through the acidity of the marinara sauce. When they roast in the oven, they take on a smoky quality that mimics the complexity of a traditional meat sauce. Always use fresh, high-quality mozzarella; low-moisture part-skim is actually better here than fresh buffalo mozzarella, as it melts smoothly without releasing extra water.
Selecting the Right Mushroom Varieties
While Creminis are the workhorse of this recipe, you can experiment with textures by mixing in other varieties. Shiitakes add a buttery, almost smoky depth, while Oyster mushrooms provide a delicate, velvety mouthfeel. If you want a truly luxurious lasagna, a blend of all three creates a complex flavor profile that will have guests guessing what’s inside. Just remember that thinner mushrooms cook faster, so adjust your searing time accordingly.
The Role of Toasted Walnuts in Vegetarian Layers
Walnuts do more than just add crunch; they provide the “fatty” mouthfeel that is often missing in vegetable-heavy dishes. As the lasagna bakes, the oils from the walnuts seep into the surrounding cheese and sauce, carrying the herbal notes of the oregano throughout the dish. They act as little flavor bombs that break up the softness of the noodles and spinach, making every forkful more interesting.
Pre-Assembly: The High-Heat Searing Technique
To achieve the perfect sear, you need to embrace the Maillard reaction. This is the chemical process that browns the surface of food, creating those complex, savory flavors we crave. Start by getting your olive oil shimmering in a large skillet over medium-high heat. When you add the mushrooms, spread them out so they aren’t overlapping. If you crowd the pan, the temperature drops, and the mushrooms will boil instead of brown.
The hardest part is the “no-stir” rule. Leave them alone for at least three minutes. You’ll hear them sizzling and popping as the water evaporates. Once you see a deep golden-brown crust on the bottom, then you can toss them with the garlic. This step transforms the mushrooms from bland fillers into the star of the show, ensuring they contribute flavor rather than just moisture to the final bake.
Wilt and Drain: Managing Spinach Volume
Spinach is a master of deception; a massive pile of fresh leaves will shrink down to almost nothing in seconds. Once your mushrooms are browned, toss in the baby spinach and stir just until it turns bright green and collapses. Don’t overcook it in the pan, as it will continue to cook in the oven. The real work happens in the colander.
Transfer the mixture immediately and use the back of a heavy wooden spoon to press the vegetables against the mesh. You’ll be surprised at how much green liquid comes out. Keep pressing until no more drops fall. This step is the single most important thing you can do to prevent a soggy bottom. That extracted liquid is exactly what usually ruins a lasagna, so get it all out now.
The Ricotta Binder: Why the Egg is Non-Negotiable
Think of the egg as the structural engineer of your lasagna. Without it, the ricotta remains loose and fluid. When the egg cooks, its proteins coagulate, turning the cheese into a solid layer that can support the weight of the noodles above it. It also helps the dried oregano and black pepper stay evenly distributed, so you get a consistent burst of seasoning in every bite.
Step-by-Step: Building the Perfect Structural Stack
Building a lasagna is like laying a foundation for a house. Start with a very thin layer of marinara on the bottom of your dish. This prevents the bottom noodles from sticking and ensures they hydrate properly from both sides. When you lay down your first three noodles, use the “shingle” method, slightly overlapping them so there are no gaps where the cheese can leak through to the bottom.
Spread a third of your ricotta mixture over the noodles, followed by a layer of the squeezed mushroom and spinach mix. Sprinkle a handful of walnuts and a layer of mozzarella. Repeat this process twice more. As you build, use your hands to gently press down on each layer of noodles. This removes air pockets and helps the lasagna “bond” together, which is crucial for getting those clean, professional-looking squares later on.
For the final layer, place your last three noodles and cover them completely with the remaining marinara. Make sure the edges of the noodles are tucked in and coated with sauce, or they will become brittle and crunchy in the oven. Top with a generous layer of mozzarella and a dusting of parmesan for that salty, golden crust we all love.
Creating the Visual Top Layer
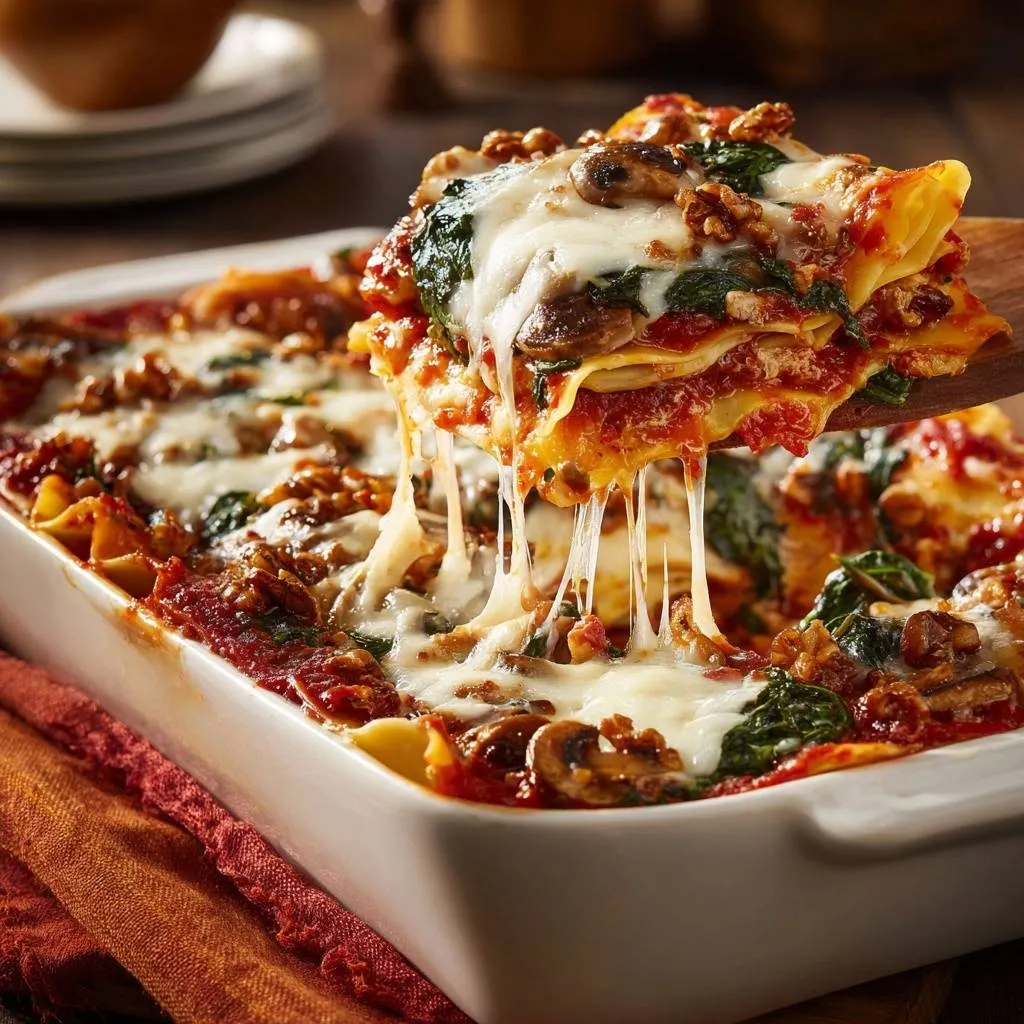
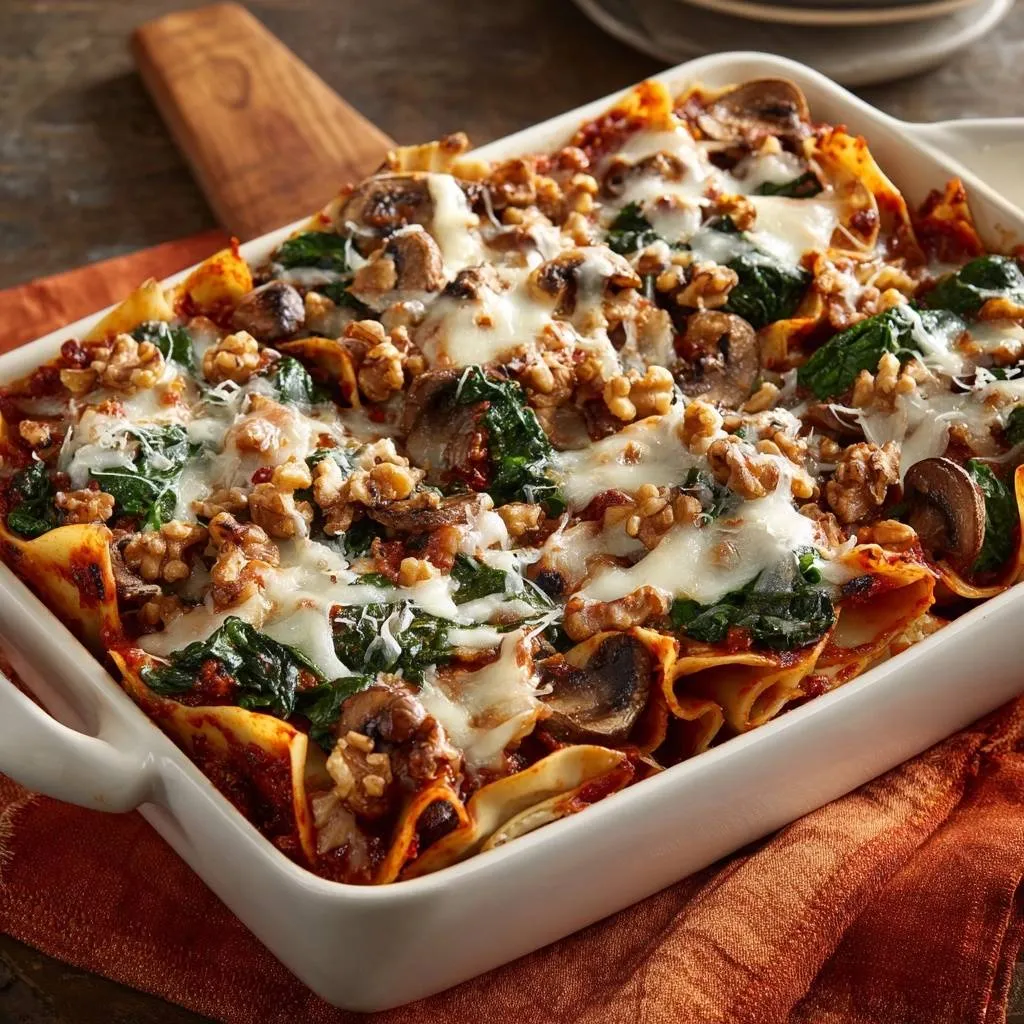
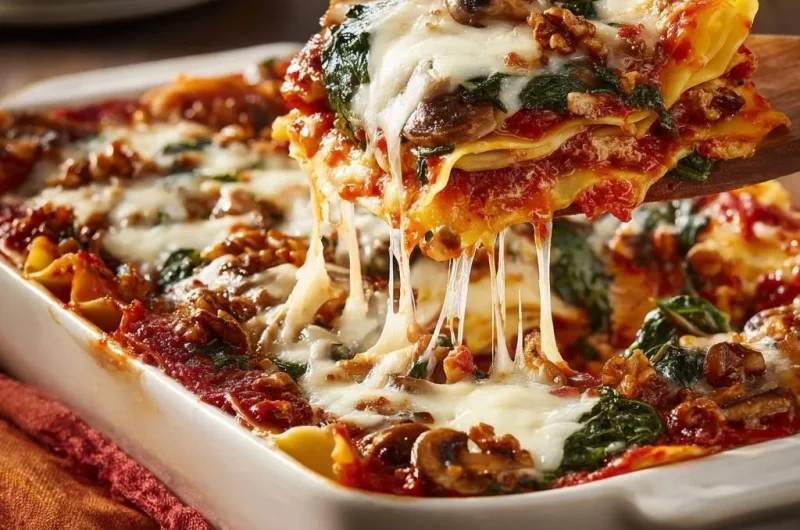
To make your lasagna look as good as it tastes, reserve a small handful of the sautéed mushrooms, spinach, and walnuts before you start layering. Scatter these over the top layer of cheese before it goes into the oven. While the interior ingredients stay moist and tender, these surface toppings will roast in the dry heat, becoming crispy and intensely flavorful. It gives the dish a rustic, artisanal look that screams “homemade.”
Temperature Control and Baking Timelines
Baking is a two-act play. For the first 25 minutes, cover the dish tightly with foil. This creates a steam chamber that ensures the par-boiled noodles finish cooking and the cheese melts into the vegetables without drying out. If you skip the foil, the top will burn before the middle is even warm. It’s all about gentle, even heat during this initial phase.
The second act is where the magic happens. Remove the foil for the final 15 to 20 minutes. This allows the excess moisture to vent and the top layer of cheese to brown and bubble. You’re looking for those beautiful charred spots on the mozzarella and a deep golden hue on the exposed walnuts. When the sauce is bubbling vigorously around the edges, you know it’s ready.
The Critical 15-Minute Rest Period
I know it’s tempting to dive in the second the timer beeps, but patience is a virtue here. When the lasagna comes out of the oven, it’s still technically “fluid.” The starches in the pasta and the proteins in the cheese need time to cool slightly and firm up. This is known as “setting.” If you cut it too early, the layers will slide apart, and you’ll end up with a messy pile on the plate.
During these 15 minutes, the internal temperature evens out, and the noodles soak up any remaining stray moisture from the sauce. This results in a much more cohesive texture. Think of it as the final stage of cooking. Once the time is up, you’ll be able to cut through the layers with ease, revealing the beautiful, distinct stripes of green, white, and red.
Troubleshooting Common Lasagna Failures
If your noodles end up too chewy, it usually means they didn’t have enough sauce to hydrate during the baking process. Next time, ensure every inch of the noodle is covered in marinara. If the top cheese is burning but the middle is still cold, your oven might be running hot. Try lowering the temperature by 25 degrees and extending the covered baking time to allow the heat to penetrate the center.
Sometimes the sauce can taste too acidic, especially with certain brands of canned marinara. You can fix this during the assembly by adding a tiny pinch of sugar to your ricotta mixture. The sweetness will balance the tomatoes without making the dish taste sugary. If you find the lasagna is still a bit loose, double-check that you are using a large egg in the ricotta; that binder is truly essential for structural integrity.
Make-Ahead Strategies and Freezing Protocols
Lasagna is the ultimate make-ahead meal. You can assemble the entire dish 24 hours in advance and keep it in the fridge. This actually allows the flavors to meld even more deeply. When you’re ready to eat, just add about 10 minutes to the covered baking time to account for the cold dish. It’s a perfect solution for busy weeknights or hosting dinner parties without the stress.
For long-term storage, this lasagna freezes beautifully. Wrap the unbaked dish tightly in plastic wrap, then a layer of heavy-duty foil to prevent freezer burn. It will stay fresh for up to three months. You can bake it directly from frozen; just keep it covered for the first 45 minutes at 375 degrees, then uncover for another 20 minutes. It’s like having a high-quality “TV dinner” ready to go whenever you need it.
Flavor Variations and Ingredient Swaps
If you have a nut allergy, you don’t have to miss out on the texture. Toasted sunflower seeds or even a layer of coarse sourdough breadcrumbs can provide that necessary crunch. For those who want more vegetables, roasted red peppers or chopped artichoke hearts make fantastic additions. Just be sure to pat them dry with paper towels first to maintain our “anti-soggy” standards.
You can also play with the cheese profile. Swapping half of the mozzarella for provolone adds a nice sharp bite, while a bit of fontina can make the layers even creamier. If you prefer a spicier kick, add a teaspoon of red pepper flakes to the marinara sauce. The base recipe is incredibly forgiving, so feel free to make it your own once you’ve mastered the moisture-control techniques.
Expert Tips for the Perfect Slice
To get those perfect, clean edges, use a very sharp serrated knife to saw through the top layer of cheese and noodles. Once you’ve broken the surface, switch to a wide, flat spatula or a bench scraper to lift the square out. A wide offset spatula is particularly helpful because it can get right under the bottom noodle layer without scraping the pan.
Always cut the entire lasagna into squares before you start lifting them out. This allows the steam to escape from the sides of each piece, further helping them to firm up. The first piece is always the hardest to remove, so don’t worry if it’s not perfect. By the time you get to the second and third slices, you’ll be pulling out picture-perfect portions that look like they belong in a magazine.
Frequently Asked Questions
Can I use frozen spinach instead of fresh?
Yes, you can definitely use frozen spinach, but you must be even more diligent about draining it. Thaw the spinach completely in the refrigerator or microwave first. Once thawed, place it in a clean kitchen towel or a fine-mesh strainer and squeeze it with all your might. Frozen spinach holds significantly more water than fresh, so if you don’t squeeze it until it’s bone-dry, your lasagna will be watery. The texture will be slightly softer than fresh spinach, but the flavor remains excellent.
What is the best substitute for walnuts?
If you don’t like walnuts or have an allergy, pine nuts are a classic Italian choice that offers a buttery, soft crunch. Toasted pumpkin seeds (pepitas) are another great option for a nut-free version, providing a nice earthy flavor. If you want to skip seeds and nuts entirely, try using toasted panko breadcrumbs mixed with a little olive oil between the layers to maintain that contrast in texture.
How do I prevent the noodles from sticking together?
When par-boiling your noodles, use a very large pot with plenty of salted water so they have room to move. Adding a tablespoon of olive oil to the boiling water can help, but the real trick is what you do after they drain. Lay the cooked noodles out flat on sheets of parchment paper or a clean baking sheet rather than stacking them in a bowl. This prevents them from fusing together into a single block of pasta while you prepare the other ingredients.
Why is my lasagna sauce pooling at the edges?
This usually happens for two reasons: either the vegetables weren’t drained well enough, or the lasagna didn’t rest long enough after baking. If you followed the “press and drain” method for the spinach and mushrooms, then the culprit is likely the resting time. As the lasagna sits for 15 minutes, the noodles actually act like a sponge, pulling in those stray juices from the sauce. If you cut it immediately, those juices have nowhere to go but the bottom of the pan.
Can I make this recipe vegan?
You can make a delicious vegan version by substituting the ricotta with a cashew-based ricotta and using a flax egg (1 tablespoon ground flaxseed meal mixed with 3 tablespoons water) as the binder. Use a high-quality vegan mozzarella alternative for the melting layers. Keep in mind that vegan cheeses often have different melting points and may not brown the same way as dairy cheese, so keep a close eye on it during the uncovered portion of the baking time.
Mushroom and Spinach Lasagna
Course: Main CourseCuisine: Italian-AmericanDifficulty: easy8
servings20
minutes45
minutes65
Minutes385
kcalItalian-American
Ingredients
1 box lasagna noodles, par-boiled
1 pound cremini mushrooms, sliced
10 ounces fresh baby spinach
24 ounces marinara sauce
15 ounces ricotta cheese
1 large egg (to bind the ricotta)
3 cups shredded mozzarella cheese
1/2 cup grated parmesan cheese
1 cup chopped walnuts (divided)
2 tablespoons olive oil
3 cloves garlic, minced
1 teaspoon dried oregano
Salt and black pepper to taste
Directions
- Preheat your oven to 375 degrees F.
- The secret to the anti-soggy bottom starts here: Heat olive oil in a large skillet over medium-high heat. Add the mushrooms in a single layer and do not stir them for 3 minutes. This allows the moisture to evaporate and the mushrooms to brown. Once browned, add the garlic and spinach.
- Sauté the spinach only until wilted, then immediately transfer the entire mushroom and spinach mixture to a colander. Press down firmly with a wooden spoon to squeeze out every drop of excess liquid. This step is mandatory to prevent a watery lasagna.
- In a small bowl, mix the ricotta cheese with the egg, oregano, salt, and pepper. The egg ensures the cheese layer sets firmly and doesn’t weep moisture.
- Spread a thin layer of marinara sauce on the bottom of a 9×13 inch baking dish.
- Layer three noodles over the sauce. Spread a third of the ricotta mixture, followed by a layer of the drained mushroom and spinach mixture, a sprinkle of walnuts, and a generous handful of mozzarella.
- Repeat the layers two more times. For the final top layer, place the last noodles, cover with the remaining marinara, and top with the remaining mozzarella and parmesan.
- Visual Accuracy Step: To match the image, reserve a handful of the sautéed mushrooms, spinach, and walnuts. Scatter these directly on top of the cheese before baking so they are visible and roasted on the surface.
- Cover with foil and bake for 25 minutes. Remove the foil and bake for another 15 to 20 minutes until the cheese is bubbly and the exposed walnuts and mushrooms on top are golden brown.
- Let the lasagna rest for at least 15 minutes before slicing. This allows the layers to set so you get a clean, perfect square every time.
Notes
- The mandatory step of pressing the vegetables in a colander is the key to preventing a watery lasagna. Resting the dish for 15 minutes is essential for clean slices.