Imagine biting into a shard of golden, buttery pastry that shatters instantly, followed by the richness of a jammy egg yolk and the salty punch of cured beef. Most people shy away from making a Savory Breakfast Puff Pastry Tart because they fear the dreaded “soggy bottom”—that limp, doughy center that collapses under the weight of the toppings. It’s a common frustration that turns a sophisticated brunch into a messy disappointment.
The secret to a professional-grade tart isn’t a fancy oven; it’s all about moisture management and structural engineering. By using a specific par-baking and docking technique, you create a foundation that stays crisp even when loaded with pesto and fresh eggs. This recipe ensures your pastry maintains its integrity from the first slice to the last bite.
I’ve found that the real trick lies in the “spoon compression” method. If your pastry center rises too much during the first bake, you simply use the back of a spoon to gently deflate it, creating a perfect, reinforced well for your ingredients. This creates a dense, crispy floor that acts as a barrier against moisture, ensuring every mouthful has that signature crunch.
The Architecture of a Crisp Savory Breakfast Puff Pastry Tart
Puff pastry is a marvel of culinary lamination, consisting of hundreds of thin layers of dough separated by even thinner layers of fat. When the heat hits the oven, the water in the dough and fat turns to steam, forcing the layers apart to create that iconic lift. However, this delicate structure is easily compromised by weight and wetness.
If you place raw eggs and oily pesto directly onto raw dough, the moisture seeps into the layers before they have a chance to puff. This results in a heavy, gummy mess rather than a light, airy tart. Therefore, we must treat the pastry as a structural base that needs to be “set” before it can support the luxurious toppings we have planned.
By par-baking the crust, you allow the steam to do its job first. This creates a rigid, toasted framework that can withstand the liquid nature of egg whites. Think of it as building a house; you wouldn’t put the roof on before the frame is dry and sturdy. The same logic applies to your breakfast tart.
Why Temperature Control Dictates Pastry Success
The golden rule of puff pastry is “Cold Dough, Hot Oven.” If your pastry gets too warm while you’re prepping, the butter melts into the flour, destroying those distinct layers. You want the butter to stay solid until the very second it hits the 400°F heat, which triggers the rapid steam release needed for maximum height.
I always recommend keeping your pastry in the fridge until the exact moment you are ready to score and dock it. If you feel the dough getting tacky or soft, pop it back in the freezer for five minutes. A cold baking sheet also helps; it prevents the bottom of the pastry from warming up too quickly while you’re adding your toppings.
Essential Components for the Perfect Morning Tart
Quality is everything when the ingredient list is this short. Look for an all-butter puff pastry rather than one made with vegetable oils; the flavor and “shatter” factor are significantly better. Your pastry should be thawed enough to unfold without cracking, but it must still feel cold to the touch.
The eggs are the star of the show here, so use the freshest ones you can find. Fresh eggs have stronger proteins, meaning the whites will stay gathered together rather than running all over your pastry. This helps maintain the “nest” look and keeps the moisture concentrated in one spot.
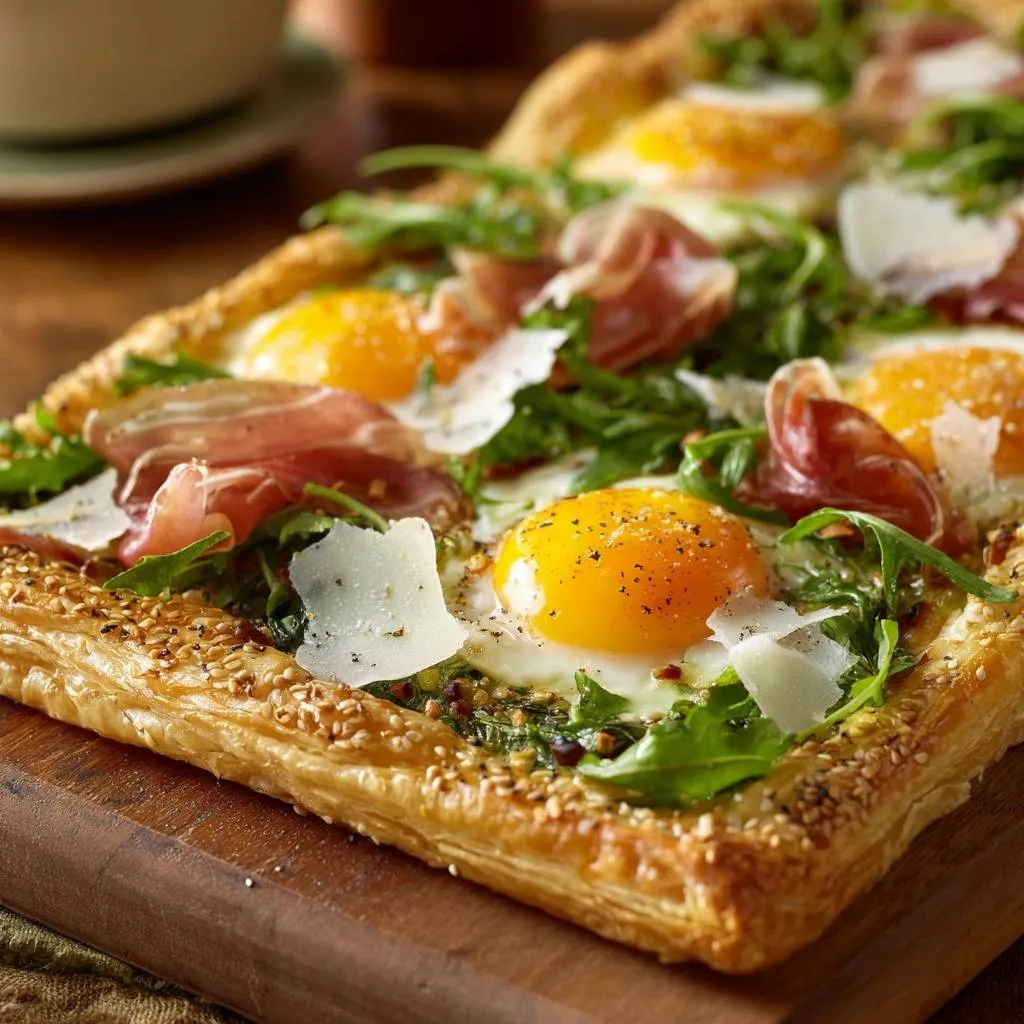
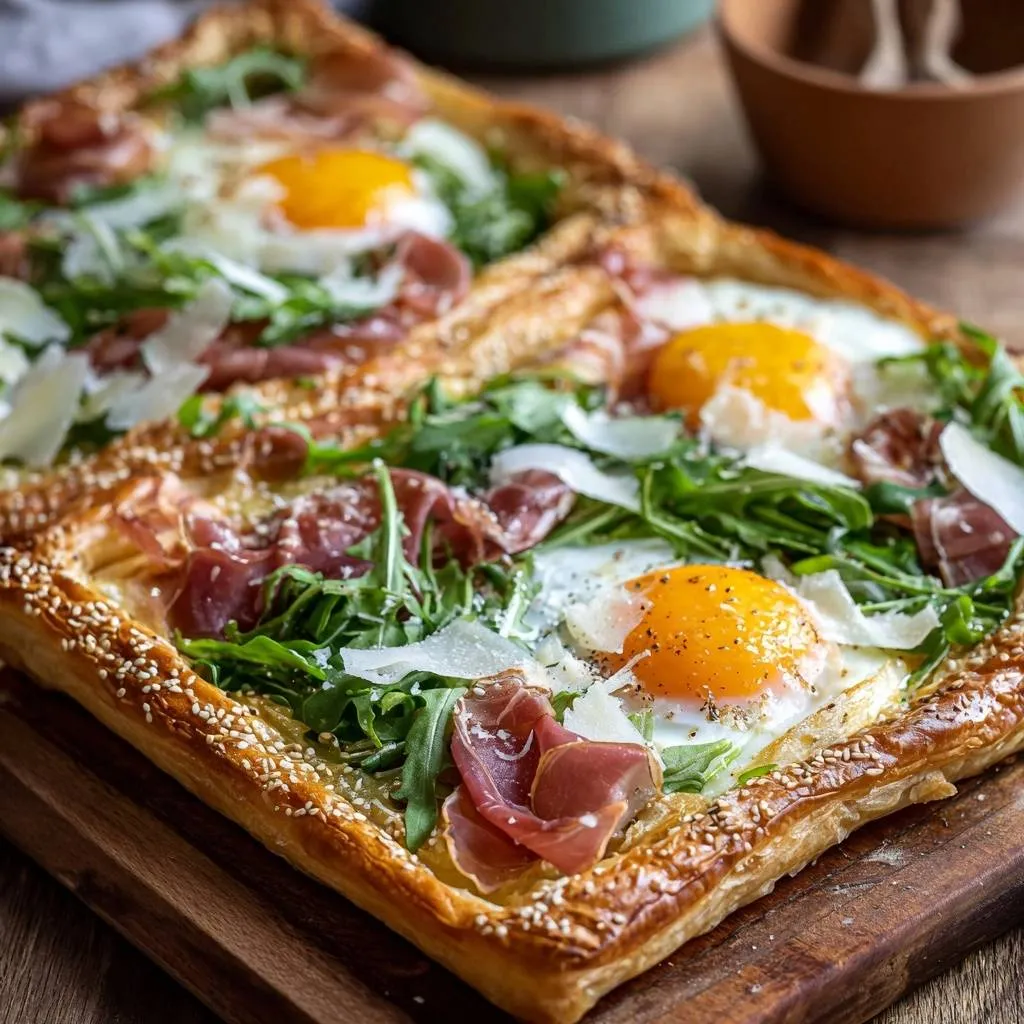
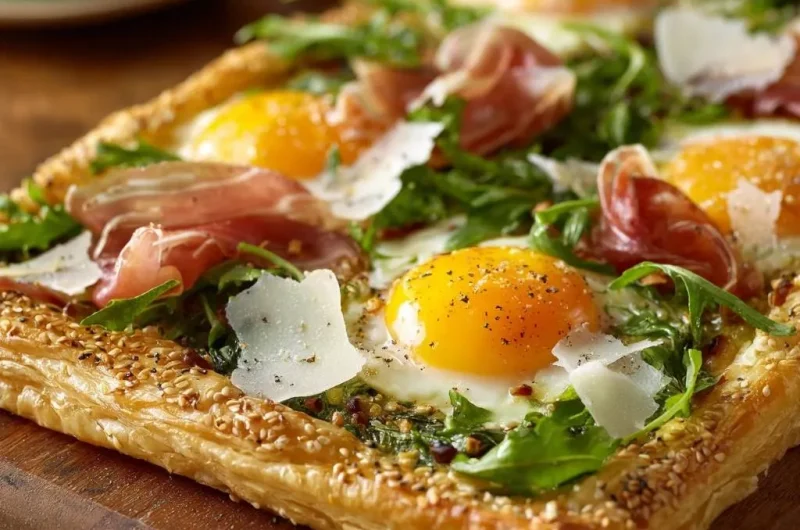
Finally, don’t skip the sesame seeds for the border. Beyond the visual appeal, they provide a nutty, toasted flavor that complements the richness of the butter. They also add an extra layer of crunch that contrasts beautifully with the soft, jammy eggs in the center.
Selecting the Right Proteins and Greens
Since we are avoiding pork, high-quality beef bresaola or thin-cut beef bacon are the perfect substitutes. These provide that essential salty, umami-rich element that balances the creamy yolk. If you use beef bacon, I suggest crisping it up slightly in a pan before adding it to the tart to ensure it isn’t chewy.
For the greens, baby arugula is the undisputed champion. Its peppery bite cuts through the fat of the pastry and the pesto. Unlike spinach, which can release a lot of water when heated, arugula wilts gently without making the tart soggy. It adds a fresh, vibrant finish that makes the dish feel light.
The Role of Pesto and Hard Cheeses
Pesto serves two purposes: it provides a massive hit of garlic and basil flavor, and the oil acts as a secondary moisture barrier. By spreading a thin layer of pesto over the par-baked crust, you’re essentially “waterproofing” the pastry before the eggs are added. However, use it sparingly—a little goes a long way.
When it comes to cheese, shaved Parmesan is superior to shredded mozzarella. Mozzarella releases moisture and can become oily, whereas Parmesan adds a sharp, salty kick and a beautiful texture without the extra liquid. The shaved ribbons also look much more elegant on a brunch spread.
Step-by-Step: Preparing the Pastry Foundation
Start by laying your cold pastry on a sheet of parchment paper. Take a sharp paring knife and score a one-inch border all the way around the edge. You aren’t trying to cut through the dough; you’re just creating a “perforation” that tells the edges to rise while the center stays flat.
You’ll know you’ve done it right if you see a clear, shallow line. This border will eventually puff up into a beautiful, golden frame that holds all your ingredients inside. It’s a simple step, but it’s what gives the tart its professional, bakery-style appearance.
Docking and Par-Baking for Structural Integrity
Docking is the process of pricking the dough with a fork, and it is the most important step for a crisp tart. Use your fork to poke holes all over the center area inside your scored border. These holes allow steam to escape from the middle section, preventing it from “doming” or rising too high.
Slide the tart into the oven for about 10 to 12 minutes. You’re looking for the edges to be high and pale gold, while the center should look dry and set. If the center has puffed up despite the docking, don’t panic. Just use the back of a spoon to gently press it back down while it’s hot.
The Sesame Seed Border Technique
Before that first bake, brush the one-inch border with a beaten egg. This egg wash acts as a glue for your sesame seeds and ensures the crust develops a deep, mahogany-gold color. Without it, the pastry can look dull and pale even when it’s fully cooked.
Sprinkle the seeds generously. As the pastry puffs, the seeds will spread out, creating a gorgeous textured crust. The aroma of toasted sesame seeds filling your kitchen is a clear sign that you’re on the right track to a world-class breakfast.
Assembling the Toppings Without Compromising Texture
Once the pastry is par-baked, it’s time for assembly. Spread your pesto thinly over the center. Then, take half of your arugula and scatter it over the pesto. This might seem unusual, but the arugula acts as a “nest” for the eggs, preventing the whites from spreading too far and soaking into the crust.
This layering strategy is a game-changer. The bottom layer of arugula will wilt into the pesto, creating a flavorful bed, while the top layer (added after baking) provides that fresh, crisp contrast. It’s all about building layers of texture.
Precision Egg Placement and Seasoning
I highly recommend cracking each egg into a small ramekin or bowl before sliding it onto the tart. This allows you to check for shells and gives you much better control over where the egg lands. Space them out evenly so every person gets at least one perfect yolk in their slice.
Season the eggs immediately with salt, cracked black pepper, and red chili flakes. Seasoning the eggs directly ensures the flavor is baked right into the yolk. The chili flakes add a subtle heat that wakes up the palate without being overwhelming.
The Final Bake: Achieving the Perfect Set
Slide the tart back into the oven for another 8 to 10 minutes. This is the critical window. You want to watch for the egg whites to turn from translucent to a solid, opaque white. The yolks should still look shiny and slightly wobbly when you move the pan.
Keep in mind that carry-over cooking is real. The heat from the pastry and the other toppings will continue to cook the eggs for a minute or two after you pull the tart out. If you wait until the yolks look hard in the oven, they will be overcooked by the time you eat.
Post-Oven Finishing Touches
As soon as the tart comes out, drape your beef bresaola or crispy beef bacon artistically around the eggs. The residual heat will warm the meat just enough to release its fats and aromas without drying it out. This is also the time to add the rest of your fresh arugula.
Finish with the shaved Parmesan. The heat from the eggs will slightly soften the cheese, but it will mostly retain its shape and bite. The contrast between the hot, crispy pastry and the cool, fresh greens on top is what makes this dish truly addictive.
Troubleshooting Your Savory Breakfast Puff Pastry Tart
If your egg whites are taking forever to set but your pastry is getting too dark, your oven might have a hot spot. You can tent the edges of the pastry with a little foil to protect them while the eggs finish. Also, make sure your eggs aren’t ice-cold from the fridge; letting them sit out for 10 minutes can help them cook more evenly.
If you find the center is still a bit soft, it usually means the pesto was too oily or the eggs were too large for the space. Next time, try using a bit less pesto or increasing the par-baking time by two minutes. Cooking is all about adjusting to your specific environment and ingredients.
Preventing the “Oil Leak” from Pesto
Store-bought pesto often has a layer of oil on top. Before spreading it on your tart, give it a good stir, or better yet, spoon out the thicker solids from the bottom of the jar. If the pesto is very runny, you can even blot it slightly with a paper towel to ensure your pastry stays shatteringly crisp.
Flavor Variations and Ingredient Swaps
Once you master the base technique, the variations are endless. For a Mediterranean twist, swap the pesto for a thin layer of sun-dried tomato tapenade and top with crumbled feta instead of Parmesan. Just remember to keep the “wet” ingredients to a minimum to protect that crust.
A “Forest” version is also incredible. Sauté some mushrooms with thyme and garlic until they are completely dry, then use those as your base layer instead of arugula. The earthy mushrooms pair perfectly with the runny egg yolks and the buttery pastry. Just ensure the mushrooms are well-drained before they touch the dough.
Optimal Serving and Pairing Suggestions
This tart is best served immediately while the pastry is at its peak crunch. Use a long serrated knife to cut it into squares. A serrated blade saws through the delicate layers without crushing them, preserving that beautiful “lift” you worked so hard to achieve.
To drink, something with a bit of acidity works best to cut through the richness. A sparkling citrus spritzer with fresh grapefruit or a sharp, hot espresso provides the perfect balance. The goal is to refresh the palate between those decadent, buttery bites.
Make-Ahead Strategies for Brunch Hosting
You can actually do most of the prep work the night before. Score and dock your pastry, then keep it covered in the fridge on its baking sheet. You can even shave the cheese and prep your greens in advance. This way, you only have to worry about the baking on the morning of your event.
If you have leftovers, don’t use the microwave! It will turn the pastry into a rubbery mess. Instead, reheat slices in a 350°F oven or a toaster oven for about 5 minutes. This will revive the crunch of the pastry and warm the toppings without completely overcooking the egg yolks.
How should I store leftovers?
Store any leftover slices in an airtight container in the refrigerator for up to two days. To maintain the best texture, place a piece of parchment paper between slices if you are stacking them. When you’re ready to eat, reheat them in a hot oven or air fryer at 350°F for 5 minutes until the pastry is crisp again. Avoid the microwave, as it will make the puff pastry soggy and the eggs rubbery.
Why did my pastry stay flat instead of puffing up?
The most common reason for flat pastry is that the dough got too warm before it went into the oven. If the butter melts into the flour while you’re prepping, the layers won’t separate. Always ensure your pastry is “thawed but cold.” Another culprit could be an oven that isn’t hot enough; use an oven thermometer to verify you’ve actually reached 400°F before sliding the tart in.
Can I use a different type of cheese?
Yes, but stick to harder, aged cheeses for the best results. Pecorino Romano, aged Gruyère, or even a sharp white cheddar work beautifully. Avoid soft, high-moisture cheeses like fresh mozzarella or ricotta unless you drain them extremely well, as the excess water will ruin the crispness of the pastry base.
What can I use instead of pesto?
If you aren’t a fan of pesto, you can use a very thin layer of Dijon mustard, a spread of caramelized onions (make sure they are cooked down until jammy and dry), or even a light coating of herb-infused olive oil. The key is to use something flavorful that doesn’t add too much liquid to the center of the tart.
Can I freeze this tart?
You can freeze the puff pastry base after it has been scored and docked, but I do not recommend freezing the fully assembled tart. Cooked eggs do not freeze and thaw well; they tend to become watery and develop a spongy texture. For the best experience, bake the tart fresh on the day you plan to serve it.
How do I prevent the egg whites from running off the edge?
The “arugula nest” technique is your best friend here. By placing a small pile of greens where you intend to crack the egg, you create a natural barrier that holds the whites in place. Additionally, make sure your par-baked border has puffed up significantly, as this acts as a physical wall to keep everything contained in the center.
Savory Breakfast Puff Pastry Tart
Course: BreakfastCuisine: AmericanDifficulty: easy4
servings15
minutes20
minutes35
Minutes420
kcalAmerican
Ingredients
1 sheet frozen puff pastry, thawed but cold
4 to 6 large eggs (depending on pastry size)
4 slices prosciutto or thin-cut beef bacon
2 cups fresh arugula
1/4 cup shaved parmesan cheese
1/4 cup basil pesto
1/2 teaspoon red chili flakes
1 egg, beaten (for egg wash)
2 tablespoons sesame seeds
Salt and freshly cracked black pepper to taste
Directions
- Preheat your oven to 400°F (200°C) and line a large baking sheet with parchment paper.
- Lay the puff pastry on the parchment. Use a sharp knife to lightly score a 1-inch border around the edge, being careful not to cut all the way through.
- To solve the soggy bottom problem, use a fork to prick (dock) the entire center area inside the border repeatedly. This prevents the middle from puffing up and trapping moisture.
- Brush the 1-inch border with the egg wash and generously sprinkle with sesame seeds.
- Bake the empty pastry for 10-12 minutes until the edges are puffed and the base is just beginning to turn golden.
- Remove from the oven. If the center has risen, gently press it down with the back of a spoon to create a flat well.
- Spread a thin, even layer of pesto over the par-baked center. Scatter half of the arugula over the pesto (this creates a barrier for the eggs).
- Carefully crack the eggs onto the tart, spacing them evenly. Sprinkle the eggs with salt, black pepper, and red chili flakes.
- Return to the oven for 8 to 10 minutes, or until the egg whites are opaque and set, but the yolks remain runny.
- Remove from the oven. Immediately drape the prosciutto slices artistically around the warm eggs.
- Top with the remaining fresh arugula and the shaved parmesan cheese. The residual heat will slightly wilt the bottom layer of greens while keeping the top layer fresh and crisp. Serve immediately while the pastry is at its maximum crunch.
Notes
- To ensure the best texture, make sure the puff pastry is cold when it goes into the oven. If the center rises during the first bake, gently deflate it with a spoon before adding toppings.