Most home cooks have experienced the heartbreak of a beef stew that looks beautiful but tastes like chewing on a rubber band. You spend hours in the kitchen only to end up with meat that is stringy, dry, and stuck in your teeth. This happens because high heat causes muscle fibers to contract and squeeze out every drop of moisture, leaving you with a disappointing dinner.
The secret to a truly luxurious stew isn’t a fancy ingredient; it’s the patience to let physics do the work. By using a low-and-slow braising technique, we transform tough, inexpensive cuts of beef into succulent morsels that practically melt when they hit your tongue. When you pair that tender beef with the creamy, buttery texture of white beans, you create a meal that feels like a warm hug on a cold evening.
If you want to guarantee success, you must start with large three-inch slabs of beef rather than the tiny pre-cut cubes sold at the grocery store. Smaller pieces lose their moisture far too quickly during the long simmer. Keeping the beef in larger portions allows the interior to stay juicy while the exterior develops a deep, savory crust that flavors the entire pot.
The Science of Tenderness: Why Braising Works
Braising is a dual-method cooking process that uses both dry and moist heat to conquer tough connective tissue. The first step involves searing the meat at a high temperature to trigger the Maillard reaction. This chemical reaction between amino acids and reducing sugars creates that complex, savory “browned” flavor that defines a great stew.
However, the real transformation happens during the long, quiet simmer. Beef chuck is loaded with collagen, a tough protein that makes meat feel chewy. If you boil the liquid at 212°F, the muscle fibers tighten and become parched. But if you maintain a gentle simmer between 180°F and 190°F, that collagen slowly dissolves into gelatin.
This gelatin is the holy grail of slow cooking. It coats the individual muscle fibers, providing a rich, silky mouthfeel that mimics the texture of fat without being greasy. By using large slabs of meat, you provide more surface area for this breakdown to occur internally, ensuring the beef stays structurally sound but fork-tender.
Essential Components for a Rich Braising Base
Success starts at the butcher counter. You need a cut with plenty of fat and connective tissue, which is why beef chuck roast is the undisputed king of the stew pot. Leaner cuts like sirloin or round will simply dry out and turn into flavorless wood chips after three hours of cooking.
Cannellini beans are the perfect partner for beef because they maintain their shape while offering a velvety interior. They act as little sponges, soaking up the beefy juices while releasing just enough starch to give the broth a natural, hearty body. This eliminates the need for heavy thickeners that can dull the vibrant flavors of the aromatics.
For the liquid, I always reach for beef bone broth over standard stock. Bone broth is simmered longer with marrow and joints, meaning it is packed with natural gelatin. This adds a noticeable viscosity and “lip-smacking” quality to the finished sauce. When combined with the deep brick-red color of toasted tomato paste and the smoky punch of paprika, the base becomes incredibly complex.
Selecting the Right Cut of Beef
While chuck roast is my top pick, you could also use brisket or short ribs for this recipe. These cuts are all “working muscles” that require long cook times to soften. Avoid anything labeled “stew meat” if it looks lean, as these packages often contain scraps from various parts of the cow that cook at different rates.
Step-by-Step: Searing for Maximum Flavor Extraction
Before the meat ever touches the pan, you must pat it bone-dry with paper towels. If there is any moisture on the surface of the beef, it will create a pocket of steam. Steaming prevents the meat from reaching the high temperatures needed for browning, leaving you with gray, unappealing beef and a lack of depth in your sauce.
Once the meat is dry and seasoned, you must sear in batches. It is tempting to throw all three pounds into the pot at once, but this is a mistake. Crowding the pan causes the temperature of the oil to plummet, which leads to the meat releasing its juices and boiling in its own liquid. Give each slab plenty of “elbow room” so the heat can circulate and create a dark, caramelized crust.
As you sear, you will notice brown bits sticking to the bottom of the Dutch oven. This is called the “fond,” and it is pure culinary gold. These bits are concentrated droplets of caramelized protein and fat. They are the foundation of your stew’s flavor, so be careful not to let them burn or turn black, which would make the final dish taste bitter.
Deglazing and Building the Braising Liquid
Deglazing is the process of adding liquid to the hot pan to loosen the fond. If you choose to use red wine, the acidity will cut through the richness of the beef and brighten the overall flavor profile. As the liquid hits the hot surface, use a wooden spoon to scrape up every single brown bit until the bottom of the pot is clean.
If you prefer to skip the wine, use a cup of the bone broth with a small splash of balsamic vinegar to achieve a similar balance. This step ensures that all those toasted flavors are incorporated back into the braising liquid. Once the pan is deglazed, you can stir in your aromatics and tomato paste, allowing them to toast until the paste turns a deep, rusty red.
The Low-and-Slow Simmering Phase
During the first hour of simmering, the meat will actually feel tougher than when it started. Don’t panic! This is the phase where the muscle fibers are tightening up. By the second hour, the heat begins to win the battle against the collagen, and the meat starts to relax. This is when the magic happens.
By the third hour, you should reach the “fork-tender” window. You’ll know it’s ready when you can press a fork into the beef and it yields without any resistance. It is vital to keep the lid tightly closed during this time. A heavy lid creates a self-basting environment where moisture evaporates, hits the lid, and drips back down onto the meat, keeping it bathed in flavor.
Remember the golden rule: never let the stew reach a rolling boil. Boiling is violent and will physically tear the meat apart into dry shreds. You are looking for a “lazy” bubble—just one or two popping to the surface every few seconds. This gentle heat ensures the beef stays succulent and whole until you are ready to shred it.
Integrating White Beans for Texture and Body
We wait until the final 20 minutes to add the cannellini beans for a very specific reason. Since canned beans are already cooked, adding them too early would cause them to disintegrate into a mushy paste. By adding them at the end, they have just enough time to heat through and absorb the savory beef gravy.
As the beans simmer uncovered, they release a small amount of starch. This starch acts as a natural thickener, turning the thin braising liquid into a rich, glossy sauce that clings to the back of a spoon. This method provides a much cleaner flavor than using a flour-based roux, allowing the taste of the beef and herbs to shine through clearly.
Troubleshooting Common Braising Obstacles
If your meat is still tough after three hours, the solution is almost always more time. Every cow is different, and some cuts simply have more stubborn connective tissue. Put the lid back on and give it another 30 minutes; eventually, the collagen will surrender and melt.
If you find the stew is too watery, simply remove the lid and increase the heat slightly for the final 15 minutes. This allows the excess moisture to evaporate, concentrating the flavors and thickening the sauce. Conversely, if the surface looks a bit greasy, you can skim the fat off with a large spoon or drag a piece of bread across the top to soak up the excess oil.
Optimal Equipment: The Power of the Dutch Oven
A heavy-bottomed cast iron Dutch oven is the gold standard for braising. The thick walls distribute heat evenly, preventing hot spots that could burn the bottom of your stew. Furthermore, the heavy lid creates a tight seal that prevents the braising liquid from evaporating too quickly over the long cook time.
While you can use a slow cooker, you will miss out on the deep flavor of the sear unless you brown the meat in a separate skillet first. A pressure cooker is another option for those in a rush, but it doesn’t allow the sauce to reduce and thicken in the same way. For the best texture and flavor, the stovetop Dutch oven method remains undefeated.
Make-Ahead Strategies and Storage Logistics
This is one of those rare dishes that actually tastes better the next day. As the stew cools, the flavors continue to meld and the beef absorbs even more of the seasoned liquid. If you are making this for a dinner party, I highly recommend cooking it a day in advance and reheating it gently on the stove.
To store leftovers, let the stew cool to room temperature before transferring it to an airtight container. It will stay fresh in the refrigerator for up to four days. If you want to freeze it, do so in individual portions. Just be aware that the beans may become slightly softer upon thawing, so reheat them slowly on the stovetop rather than using a microwave to preserve the beef’s texture.
Complementary Side Dishes for Beef and Beans
Because this stew is so rich and savory, it benefits from side dishes that offer a bit of contrast. A bright gremolata made of parsley, lemon zest, and minced garlic sprinkled over the top adds a necessary hit of acidity. Alternatively, a side of pickled red onions can provide a sharp crunch that cuts through the heavy fats.
For starches, you can’t go wrong with a thick slice of toasted sourdough bread to mop up the gravy. If you want something more substantial, serve the stew over a bed of creamy polenta or mashed cauliflower. A simple arugula salad tossed in a lemon vinaigrette provides a peppery, fresh finish that cleanses the palate between bites.
Frequently Asked Questions
Can I use dried beans instead of canned?
Yes, but you cannot add them directly to the stew. Dried beans must be soaked overnight and simmered separately until they are almost tender before being added to the pot. If you add raw dried beans to the acidic stew liquid, they may never soften properly due to the salt and tomato paste.
What can I substitute for red wine?
If you prefer not to use wine, pomegranate juice is an excellent substitute because it offers a similar acidity and deep color. You can also use an extra cup of beef broth mixed with a tablespoon of balsamic vinegar or Worcestershire sauce to provide that necessary “tang” that balances the richness of the beef chuck.
Why did my beef turn out stringy?
Stringy beef is usually a sign of overcooking or cooking at too high a temperature. When the meat boils, the fibers dry out and separate into long, tough strands. To prevent this, ensure your liquid is at a very low simmer and check the meat for tenderness starting at the 2.5-hour mark.
Can I add other vegetables like potatoes?
Absolutely! If you want to add potatoes or parsnips, add them during the last 45 minutes of cooking. This gives them enough time to become tender without turning into mush. Cut them into large chunks so they hold their shape alongside the large slabs of beef and the creamy white beans.
Slow-Braised Beef and White Bean Stew
Course: Main CourseCuisine: AmericanDifficulty: easy6
servings20
minutes3
hours30
minutes180
Minutes495
kcalAmerican
Ingredients
3 pounds beef chuck roast, cut into large 3-inch slabs
2 cans (15 ounces each) cannellini beans, drained and rinsed
4 cups beef bone broth
1 cup dry red wine (optional, for depth)
3 tablespoons tomato paste
1 large yellow onion, diced
4 cloves garlic, minced
2 large carrots, sliced into thick rounds
2 tablespoons vegetable oil
1 tablespoon smoked paprika
1 teaspoon dried thyme
2 bay leaves
Salt and black pepper to taste
1/2 cup fresh parsley, roughly chopped for garnish
Directions
- Pat the beef slabs completely dry with paper towels. This is the first secret to flavor; moisture on the surface prevents the Maillard reaction. Season generously with salt and pepper.
- Heat oil in a large Dutch oven over medium-high heat. Sear the beef in batches, ensuring you do not crowd the pan. Brown each side deeply until a dark, caramelized crust forms. Remove beef and set aside.
- Lower the heat to medium. Add onions and carrots, cooking until the onions are translucent. Stir in the garlic and tomato paste, cooking for 2-3 minutes until the paste turns a deep brick red and smells toasted.
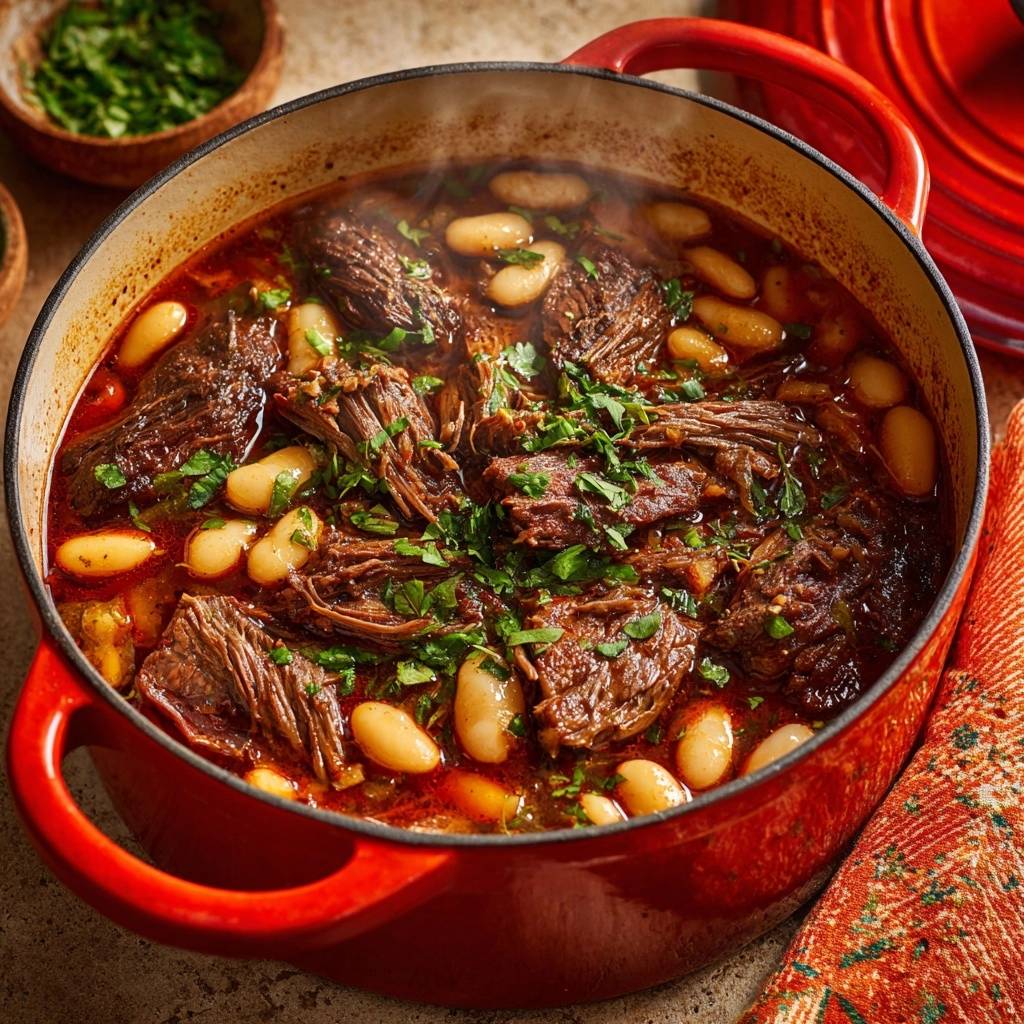
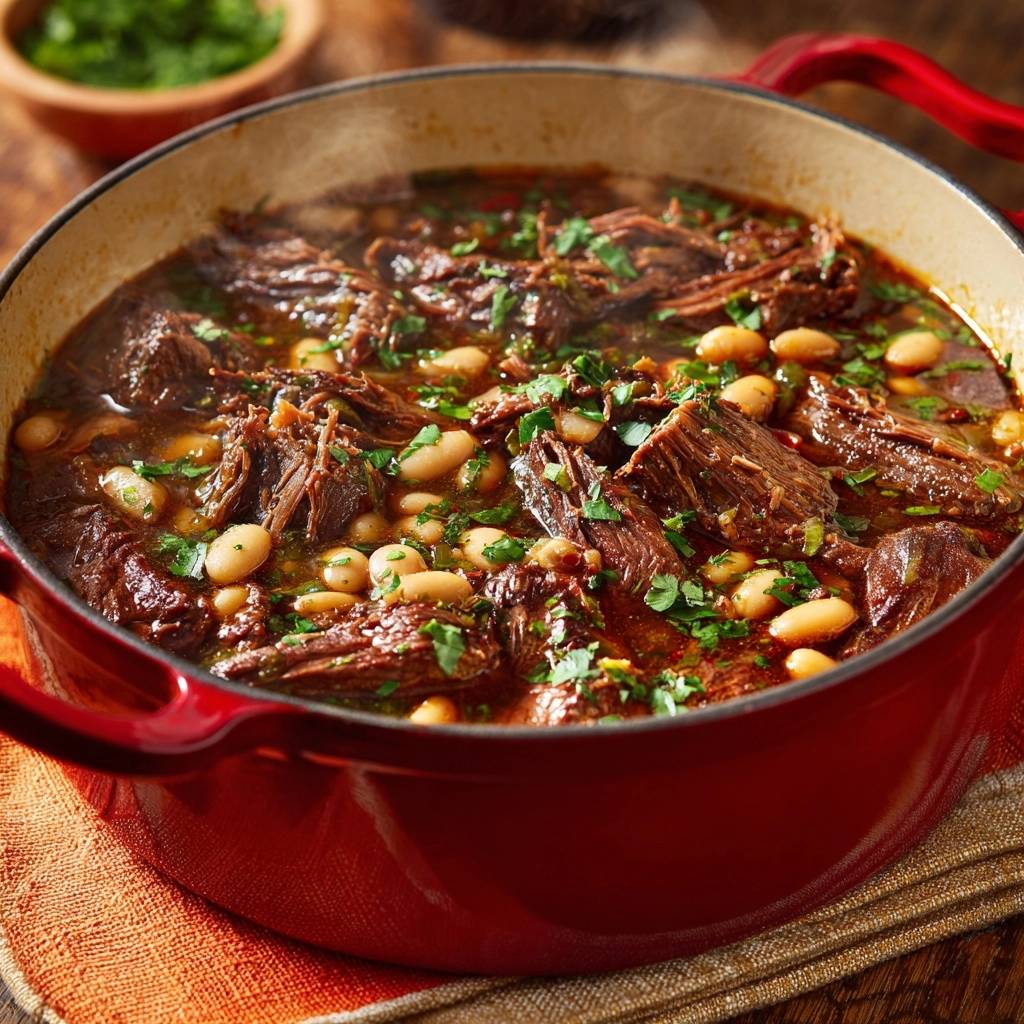
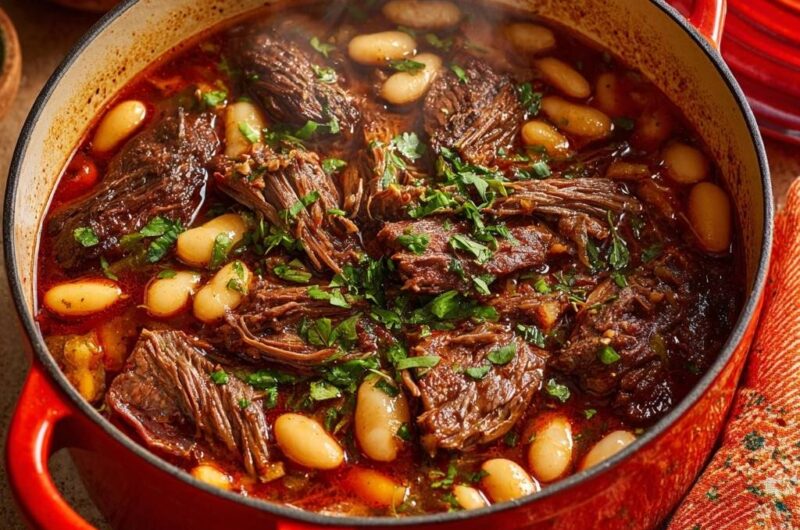
- Pour in the red wine (or 1 cup of broth) to deglaze the pan, scraping up every bit of the brown “fond” from the bottom. This is where the rich, dark color in the image comes from.
- Return the beef to the pot and add the remaining broth, paprika, thyme, and bay leaves. The liquid should partially submerge the meat but not drown it.
- To solve the tough meat problem, bring the liquid to a very gentle simmer, then immediately reduce heat to the lowest setting. Cover with a tight-fitting lid. Do not let it boil. Simmer very gently for 2.5 to 3 hours, or until the beef is tender enough to be easily pulled apart with a fork.
- Once the beef is tender, use two forks to slightly break the large slabs into the chunky, shredded pieces seen in the image.
- Gently stir in the white beans. Continue to simmer, uncovered, for another 20 minutes. This allows the sauce to reduce into a rich, glossy gravy and the beans to become creamy without falling apart.
- Taste and adjust seasoning with salt and pepper. Remove bay leaves. Garnish with a heavy handful of fresh parsley before serving directly from the pot.
Notes
- The secret to tender meat is avoiding a boil; keep the temperature at a very low simmer to break down connective tissue into collagen. Drying the meat before searing is essential for the Maillard reaction and deep flavor.