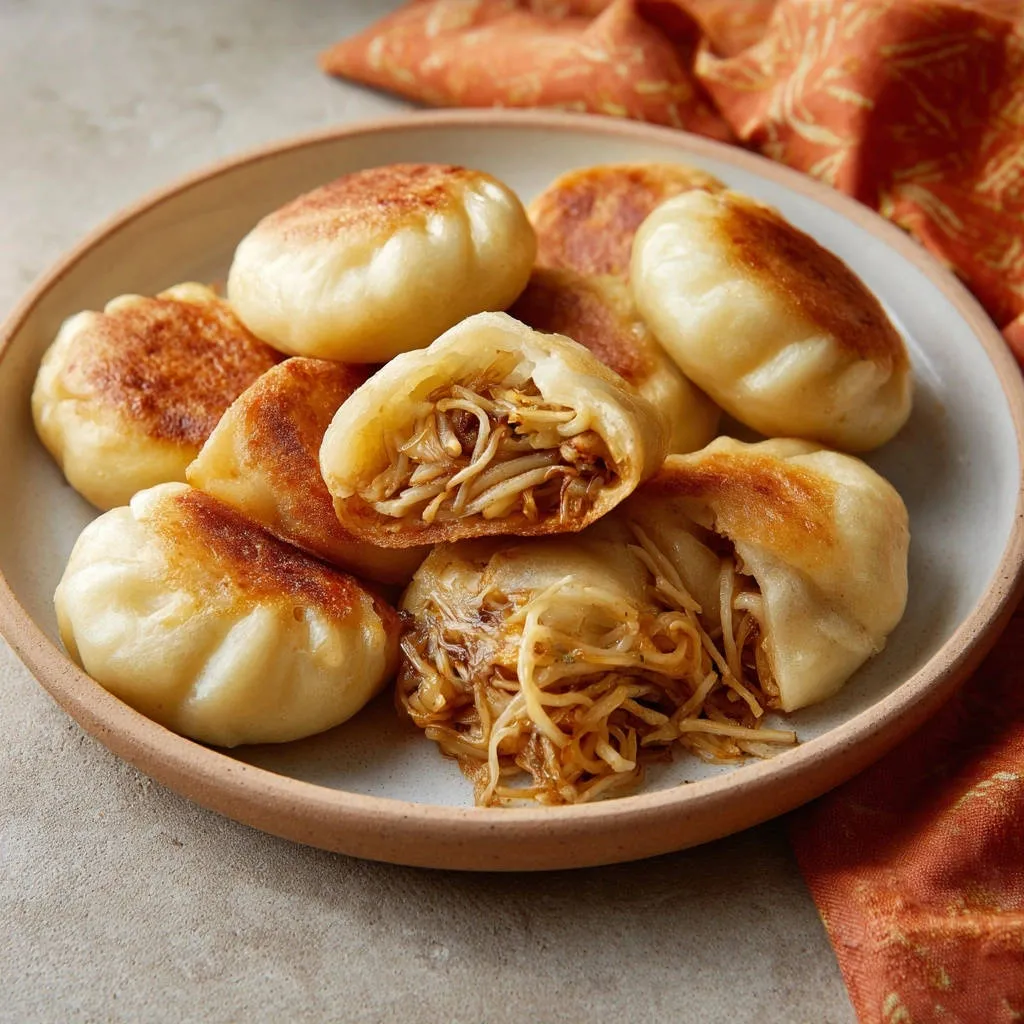
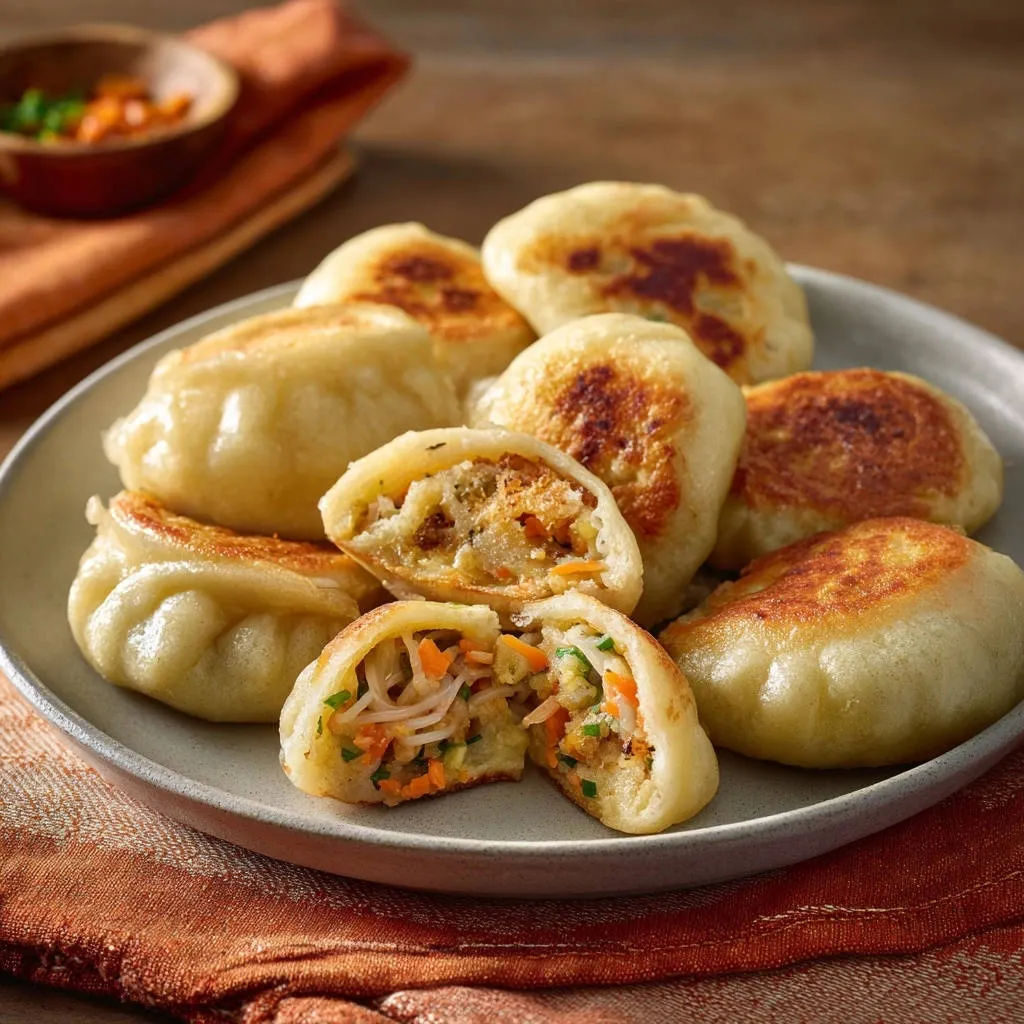
There’s nothing quite like a perfectly pan-fried bun, but achieving that ideal crispy bottom without a soggy center can feel like a culinary mystery. I’ve been there, chasing that elusive crunch until I refined a simple, foolproof technique. This recipe for Pan-Fried Noodle Buns delivers an irresistible golden-brown base alongside a soft, fluffy top, solving the common textural dilemma every single time.
Unlock the Secret: Why These Buns Are Truly Game-Changing
The “Never Soggy” Promise: Achieving Perfect Texture
The unique two-stage cooking method in this recipe is its greatest strength. It guarantees a perfectly golden, crispy base, while the steaming phase ensures the dough cooks through to a soft, fluffy texture. This eliminates any chance of a greasy or undercooked bun, delivering delightful contrast in every bite.
A Flavorful Twist: Why Noodle Filling Works So Well
Beyond the texture, the savory noodle filling sets these buns apart. Using ramen or vermicelli creates a comforting, substantial core that perfectly absorbs the aromatic soy-sesame sauce. It’s a satisfying and unexpected twist that makes each bun a mini meal.
Simple Ingredients, Extraordinary Results
Despite their impressive appearance and incredible flavor, these Pan-Fried Noodle Buns rely on easily accessible pantry staples. You won’t need any exotic ingredients, making this a practical recipe for any home cook looking to create something truly special.
Quick Prep, Impressive Table Presence
While the recipe involves a few steps, each is straightforward and efficient. These buns come together faster than you might expect, making them ideal for a weeknight family meal or a show-stopping appetizer for guests. Their unique shape and golden crust always impress.
Gather Your Essentials: Ingredients for Delicious Pan-Fried Noodle Buns
For the Fluffy Dough: Simple Pantry Staples
Your dough starts with all-purpose flour, forming the essential structure for your buns. Active dry yeast ensures a light, airy texture as it ferments, while granulated sugar helps activate the yeast and aids in browning the crust. Salt balances the flavors, and warm water is crucial for activating the yeast and hydrating the dough correctly.
Crafting the Savory Core: Your Noodle Filling
The heart of these buns is the noodle filling, built around instant ramen noodles (seasoning packets discarded) or thin rice vermicelli for a delicate, absorbent base. Shredded green cabbage adds a refreshing crunch and vibrant color. Rehydrated shiitake mushrooms, while optional, provide a wonderful earthy umami depth.
The Flavor Boosters: Essential Sauces & Aromatics
Soy sauce delivers a deep, savory foundation to the filling, complemented by the nutty fragrance of sesame oil. Freshly grated ginger and minced garlic infuse the noodles with a bright, aromatic punch. Finally, cornstarch whisked with a touch of water or vegetable broth creates a thick, glossy sauce that perfectly coats the filling, preventing a watery interior.
Your Kitchen Toolkit: Essential Gear for Success
Non-Stick Skillet: Your Crispy Base Secret Weapon
A high-quality non-stick skillet is absolutely non-negotiable for these buns. It allows you to achieve that signature golden, crispy bottom without sticking, ensuring easy release and a perfect crust every time.
Large Bowl & Work Surface: For Dough & Assembly
You’ll need a spacious large bowl for mixing and proofing the dough. A clean, lightly floured work surface is essential for kneading the dough and assembling your buns, providing ample space for shaping and filling.
Lid: For Steaming Perfection
A tight-fitting lid for your skillet is crucial for the steaming phase of cooking. It traps the steam effectively, allowing the dough to cook through and become wonderfully fluffy without over-browning the bottom.
Step-by-Step Perfection: Crafting Your Pan-Fried Noodle Buns
Preparing the Dough: Rise to the Occasion
- Mix and Knead Your Dough:
In a large bowl, whisk together the all-purpose flour, active dry yeast, granulated sugar, and salt. Gradually add the warm water, mixing until a shaggy dough forms. Turn the dough out onto a lightly floured surface and knead for 5-7 minutes until it becomes smooth and elastic. Proper kneading develops the gluten, creating a soft and chewy bun.
- First Rise:
Lightly oil the inside of a clean bowl, then place the kneaded dough inside. Cover the bowl tightly with plastic wrap or a clean kitchen towel. Let the dough rise in a warm, draft-free place for about 1 hour, or until it has visibly doubled in size. A successful first rise is fundamental for a light and airy texture.
Mastering the Filling: Savory Noodle Prep
- Cook and Chop Noodles:
Prepare your instant ramen noodles (discarding the seasoning packets) or thin rice vermicelli according to their package directions until they are al dente. Immediately drain them thoroughly to remove all excess water, then chop them into shorter, manageable pieces (about 1-2 inches). Well-drained noodles are key to preventing a watery filling.
- Sauté Vegetables:
In a large skillet or wok, heat 1 tablespoon of vegetable oil over medium-high heat. Add the shredded green cabbage, rehydrated mushrooms (if using), freshly grated ginger, and minced garlic. Stir-fry these ingredients for 2-3 minutes, just until the cabbage begins to soften slightly. This step builds the aromatic and textural foundation for your savory filling.
- Sauce and Combine:
In a small bowl, whisk together the soy sauce, sesame oil, water or vegetable broth, and cornstarch until smooth. Pour this mixture over the cooked noodles and sautéed vegetables in the skillet. Stir constantly until the sauce thickens and evenly coats all the filling components. Remove the filling from the heat and allow it to cool completely before proceeding to assembly; warm filling can affect the dough’s texture.
Assembling Your Buns: The Art of Enclosure
- Divide and Flatten Dough:
Once your dough has completed its first rise, gently punch it down to release the air. Divide the dough into 8-10 equal pieces. Roll each piece into a flat circle, approximately 4-5 inches in diameter, ensuring the center is slightly thicker than the edges. This slight thickness variation helps create a sturdy base for the filling.
- Fill and Seal:
Place about 2-3 tablespoons of the completely cooled noodle filling in the center of each dough circle. Carefully gather the edges of the dough upwards, completely enclosing the filling. Pinch the seams tightly at the top to seal the bun securely. Gently flatten the sealed bun into a neat disc shape. A tight seal is crucial to prevent the filling from escaping during cooking.
The Signature Method: Achieving That Golden Crisp
- Initial Fry for the Crispy Base:
Heat 1 tablespoon of vegetable oil in a large non-stick skillet over medium-high heat. The oil should be shimmering but not smoking. Carefully place the assembled Pan-Fried Noodle Buns into the hot oil, seam-side UP, ensuring there is ample space between each bun for even cooking. Cook for 2-3 minutes, undisturbed, until the bottoms are a beautiful golden brown and visibly crisp. Do not move them or peek too early; this undisturbed browning is the absolute secret to that incredible crispy base.
- Steam to Cook Through:
Once the bottoms are perfectly golden, carefully pour about 1/2 cup of water or vegetable broth into the skillet. Immediately cover the skillet tightly with a lid. Reduce the heat to medium-low and allow the buns to steam for 8-10 minutes, or until the dough is cooked through and the water has almost completely evaporated. The steam ensures the top and sides of the bun cook evenly without burning the already crispy bottom.
- Final Crisp-Up:
Remove the lid and increase the heat back to medium-high. Continue cooking for another 2-3 minutes, or until any remaining liquid has completely evaporated and the bottoms are extra crispy and deeply golden. You’ll hear the sizzling sound subside as the last of the water cooks off. This final step guarantees maximum crunch.
Serving Hot: The Grand Finale
- Serve Immediately:
For the ultimate taste and texture experience, serve your Pan-Fried Noodle Buns immediately while they are piping hot. The contrast between the crispy bottom and the soft, savory interior is best enjoyed fresh from the skillet.
Chef’s Notes: Elevating Your Noodle Bun Experience
Dough Handling & Proofing Secrets
Don’t Over-Flour: When kneading or rolling your dough, use only the minimum amount of extra flour necessary to prevent sticking. Excess flour can make the dough stiff and result in dry buns, losing that desirable fluffy texture.
Warm Place for Rising: Yeast loves warmth! Ensure you place your dough in a consistently warm, draft-free environment for its rise. A slightly warmed (then turned off) oven, or even a sunny spot in your kitchen, can significantly aid in proper proofing.
Flavor Boosters for Your Filling
Add a Protein: For a heartier and more substantial bun, consider incorporating a tablespoon or two of cooked, finely minced chicken or tofu into the cooled noodle filling. This adds an extra layer of flavor and protein.
Spice It Up: If you enjoy a bit of heat, a pinch of red pepper flakes or a small dash of sriracha added to the filling sauce before it thickens can introduce a delightful, subtle kick. Adjust to your personal preference.
Pan-Frying Mastery: Temperature and Timing
Oil Temperature is Key: Always ensure your vegetable oil is shimmering, but not actively smoking, before you introduce the buns. Oil that’s too cold will lead to greasy buns, while oil that’s too hot can burn the exterior before the interior crisps properly.
Resist the Urge to Peek: During that crucial initial fry, it’s vital to trust the process and avoid lifting or moving the buns. This uninterrupted contact with the hot oil is what develops that perfectly golden, ultra-crispy crust.
Tight-Fitting Lid: A lid that forms a snug seal with your skillet during the steaming phase is paramount. It efficiently traps all the steam, allowing the dough to cook thoroughly and achieve its signature fluffiness without drying out.
Common Pitfalls & Quick Fixes for Pan-Fried Noodle Buns
My Buns Aren’t Crispy on the Bottom!
This common issue typically stems from insufficient initial pan-frying or inconsistent heat. Ensure your skillet is thoroughly preheated and the oil is shimmering before adding the buns. Crucially, resist the urge to move or peek at the buns during the first 2-3 minutes of browning. Also, make sure all water fully evaporates during the final crisp-up stage to prevent steaming the crust soggy.
Dough Too Sticky/Stiff
Dough consistency can be sensitive to humidity and flour brands. If your dough is excessively sticky after kneading, add flour one tablespoon at a time until it’s pliable but still soft. Conversely, if it feels too stiff or dry, add warm water a teaspoon at a time until it reaches the desired elastic texture. Trust your instincts and adjust as needed.
Filling is Too Wet
A wet filling is a prime culprit for soggy buns. Ensure your cooked noodles are exceptionally well-drained and chopped. The cornstarch in the sauce is designed to thicken it; if it’s still too loose, you can gently stir-fry the filling for an additional minute on higher heat to evaporate any residual moisture before cooling completely. A dry filling is a happy filling.
Enjoying Your Buns: Serving, Storing, & Making Ahead
Creative Serving Suggestions
Serve your Pan-Fried Noodle Buns hot, accompanied by your favorite dipping sauces. Classic choices include chili garlic sauce, a simple soy-ginger blend, or a vibrant sweet chili sauce, like our perfect sweet chili sauce. They make an excellent appetizer or a satisfying light main course. Consider pairing them with a refreshing stir-fried baby bok choy or a crisp Asian-inspired salad for a complete meal.
Storing Leftovers & Reheating Tips
Should you have any delectable Pan-Fried Noodle Buns leftover, store them in an airtight container in the refrigerator for up to 3 days. To best restore their coveted crispness, reheat them in a dry non-stick skillet over medium heat for a few minutes per side. Alternatively, an air fryer or a preheated oven also works wonderfully to bring back that golden crunch.
Make-Ahead Strategies
You can streamline your cooking process by preparing the savory noodle filling up to a day in advance and storing it tightly covered in the refrigerator. For the dough, after its initial rise, you can punch it down, place it in an oiled bowl, cover tightly, and slow-rise it in the refrigerator overnight. Just remember to bring the chilled dough back to room temperature before dividing and assembling your buns.
Your Pan-Fried Noodle Buns Questions Answered
Can I use different noodles for the filling?
Yes, absolutely! While instant ramen (without the seasoning packet) or thin rice vermicelli are highly recommended for their texture and quick cooking, you can certainly experiment. Other thin, quick-cooking noodles like glass noodles or even finely chopped somen noodles could work. The most important factor is ensuring they are thoroughly drained and chopped into short, manageable pieces to fit well within the bun.
What if I don’t have fresh ginger?
Fresh ginger provides an unparalleled bright and zesty flavor that truly elevates the filling. However, if fresh ginger is unavailable, you can substitute it with 1/2 teaspoon of ground ginger powder for every 1 teaspoon of grated fresh ginger. Be aware that the flavor profile will be slightly different, but it will still contribute warmth to the dish.
Are these Pan-Fried Noodle Buns freezer-friendly?
Yes, they are! Once your Pan-Fried Noodle Buns are fully cooked and have cooled completely, you can arrange them in a single layer on a baking sheet and freeze until solid. Once frozen, transfer them to a freezer-safe bag or container, where they will keep well for up to 2-3 months. To reheat, simply warm them from frozen in a preheated oven or air fryer until they are hot throughout and their signature crispy texture is restored.
Can I make these gluten-free?
Adapting these Pan-Fried Noodle Buns to be gluten-free is certainly possible with a few adjustments. You’ll need to use a gluten-free all-purpose flour blend specifically designed for yeast baking for the dough, as these blends contain the necessary binders. Additionally, ensure your soy sauce is gluten-free (tamari is an excellent choice). For the filling, using 100% rice vermicelli or other certified gluten-free noodles is essential. Keep in mind that gluten-free dough may have a slightly different handling and final texture.
Ready to Create Your Own Noodle Bun Masterpiece?
Armed with this detailed guide, you’re now ready to conquer the kitchen and create a batch of Pan-Fried Noodle Buns that boast that coveted crispy bottom and fluffy interior. This recipe isn’t just about making food; it’s about mastering a technique that will elevate your culinary skills and impress everyone who tastes these delightful bites.
So, gather your ingredients, follow the non-soggy secret method, and prepare to enjoy the irresistible crunch and savory goodness. Don’t forget to share your creations and tell us your favorite serving ideas in the comments below! Happy cooking!

Pan-Fried Noodle Buns
Course: Main CourseCuisine: Asian cuisineDifficulty: easy8
buns1
hour15
minutes60
minutesAsian cuisine
Ingredients
For the Buns:
2 cups all-purpose flour
1 teaspoon active dry yeast
1 teaspoon granulated sugar
1/2 teaspoon salt
3/4 cup warm water (105-115 degrees F)
2 tablespoons vegetable oil (for cooking)
For the Filling:
2 blocks instant ramen noodles (discard seasoning packets), or 4 oz thin rice vermicelli
1 cup shredded green cabbage
1/4 cup finely diced rehydrated shiitake mushrooms (optional)
2 tablespoons soy sauce
1 tablespoon sesame oil
1 teaspoon grated fresh ginger
1 clove garlic, minced
1 tablespoon water or vegetable broth
1 teaspoon cornstarch
Directions
- Prepare the dough: In a large bowl, whisk together flour, yeast, sugar, and salt. Gradually add warm water, mixing until a shaggy dough forms. Turn out onto a lightly floured surface and knead for 5-7 minutes until smooth and elastic. Place the dough in a lightly oiled bowl, cover, and let rise in a warm place for 1 hour, or until doubled in size.
- Prepare the filling: Cook ramen noodles (or rice vermicelli) according to package directions until al dente. Drain well and chop into shorter pieces (about 1-2 inches). In a large skillet or wok, heat 1 tablespoon of vegetable oil over medium-high heat. Add shredded cabbage, rehydrated mushrooms (if using), ginger, and garlic. Stir-fry for 2-3 minutes until cabbage softens slightly.
- Add the noodles to the skillet. In a small bowl, whisk together soy sauce, sesame oil, water or broth, and cornstarch. Pour over the noodles and vegetables, stirring constantly until the sauce thickens and coats the filling. Remove from heat and let cool completely.
- Assemble the buns: Once the dough has risen, punch it down gently and divide into 8-10 equal pieces. Roll each piece into a flat circle, about 4-5 inches in diameter, slightly thicker in the center than the edges. Place about 2-3 tablespoons of cooled filling in the center of each circle. Gather the edges of the dough to enclose the filling, pinching tightly to seal at the top. Gently flatten the sealed bun into a disc shape.
- The Non-Soggy Secret Method: Heat 1 tablespoon of vegetable oil in a large non-stick skillet over medium-high heat. Ensure the oil is shimmering but not smoking. Carefully place the assembled buns seam-side UP into the hot oil, ensuring there’s space between them.
- Cook for 2-3 minutes, undisturbed, until the bottoms are a beautiful golden brown and crisp. Do not move them or peek too early! This initial undisturbed browning is crucial for the crispy base.
- Once golden brown on the bottom, carefully pour about 1/2 cup of water (or vegetable broth) into the skillet. Immediately cover the skillet tightly with a lid. Reduce the heat to medium-low and steam the buns for 8-10 minutes, or until the dough is cooked through and the water has almost completely evaporated.
- For the final crisp: Remove the lid and increase the heat back to medium-high. Continue cooking for another 2-3 minutes, or until any remaining liquid has evaporated and the bottoms are extra crispy and golden. The sizzling sound will subside as the water cooks off.
- Serve immediately while hot!
Notes
- Serve immediately while hot!