
Ah, the classic cheesecake. That creamy, dreamy, utterly satisfying dessert that graces so many special occasions (or just makes an ordinary Tuesday feel special!). But if you’ve ever baked one, you know the heartbreak: you pull that beautiful creation from the oven, anticipate a perfect, smooth surface, and… gasp… a giant crack appears right down the middle as it cools. It feels like all your careful measuring and patient waiting was for nothing!
Well, my friends, I’m here to tell you that cracked cheesecake can be a thing of the past. After years of trial and error, I’ve perfected a method for a truly perfect cheesecake. This recipe focuses on the crucial techniques that ensure a velvety smooth top every single time, paired with classic flavors and indulgent toppings. Get ready to bake with confidence!
Why This No-Crack Perfect Cheesecake Recipe is a Keeper
Beyond the obvious benefit of a flawless surface, this perfect cheesecake recipe delivers on flavor and texture. Here’s why it’s destined to become your go-to:
- Silky Smooth Texture: The combination of ingredients and the baking method creates a filling that is incredibly rich and smooth, melting in your mouth with every bite.
- Reliably Crack-Free: We’re employing tried-and-true techniques – specifically, the water bath and slow cooling – that drastically reduce the chances of that dreaded crack appearing. It’s truly foolproof if you follow the steps!
- Classic Flavor Profile: This recipe provides that quintessential tangy-sweet cheesecake taste that everyone loves.
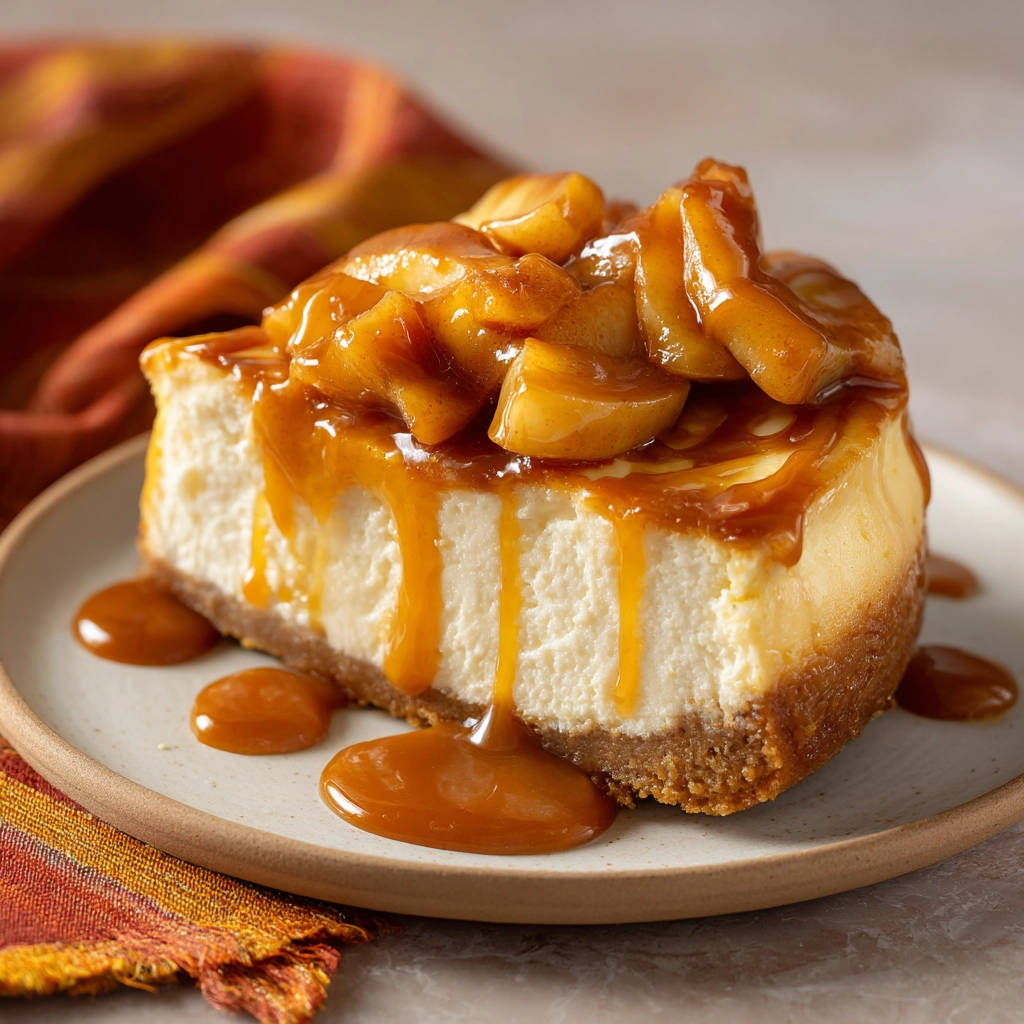
- Delicious Topping Options: While phenomenal on its own, the included recipes for warm cinnamon apples and luscious caramel sauce elevate this dessert to something truly spectacular, perfect for fall gatherings or any time you crave cozy flavors.
- Made with Love: As with any homemade dessert, there’s a special satisfaction in creating something so delicious from scratch.
Gathering Your Ingredients for Perfect Cheesecake
Success starts with good ingredients, and for a perfect cheesecake, quality and preparation matter. Let’s break down what you’ll need for each component – the sturdy crust, the luxurious filling, the comforting apple topping, and the decadent caramel sauce.
For the classic graham cracker crust, we’ll combine finely ground graham cracker crumbs with granulated sugar for a touch of sweetness and melted unsalted butter to bind it all together. Using unsalted butter gives you control over the saltiness, ensuring a pure buttery flavor that complements the creamy filling.
The heart of our perfect cheesecake is, of course, the filling. We’ll need three packages of full-fat cream cheese. Make sure it’s fully softened to room temperature – this is absolutely critical for a smooth, lump-free batter. We’ll sweeten it with granulated sugar and include a tablespoon of all-purpose flour, which acts as a stabilizer and helps prevent cracks. Pure vanilla extract brings warmth and classic dessert flavor. Large eggs, also at room temperature, provide structure and richness. Adding them at room temperature helps them incorporate smoothly into the batter. Finally, a touch of sour cream or heavy cream adds incredible richness, tenderness, and helps achieve that signature creamy texture.
For the warm apple topping, you’ll want three medium apples. Choose varieties that hold their shape well when cooked, like Honeycrisp, Gala, or Granny Smith (if you prefer a tarter contrast). We’ll sauté them in unsalted butter with brown sugar, which imparts a lovely caramel note, and ground cinnamon for that cozy spice. A little water or apple cider helps create a slightly thickened sauce as the apples cook down.
And finally, the luscious caramel sauce. This requires granulated sugar and water to start the caramelization process. Heavy cream and unsalted butter are stirred in off the heat to create a smooth, rich sauce, finished with a touch of vanilla extract.
Ingredients Needed:
- For the Crust:
- 1 and 1/2 cups graham cracker crumbs
- 1/4 cup granulated sugar
- 1/2 cup melted unsalted butter
- For the Filling:
- 3 packages (8 ounces each) cream cheese, softened
- 1 and 1/4 cups granulated sugar
- 1 tablespoon all-purpose flour
- 1 teaspoon vanilla extract
- 4 large eggs, at room temperature
- 1/2 cup sour cream or heavy cream
- For the Apple Topping:
- 3 medium apples, peeled, cored, and sliced
- 2 tablespoons unsalted butter
- 1/4 cup brown sugar
- 1 teaspoon ground cinnamon
- 2 tablespoons water or apple cider
- For the Caramel Sauce:
- 1 cup granulated sugar
- 1/4 cup water
- 1/2 cup heavy cream
- 2 tablespoons unsalted butter
- 1/2 teaspoon vanilla extract
Crafting Your Perfect Cheesecake: Step-by-Step Guide
Making a truly perfect cheesecake might seem intimidating, but by breaking it down into manageable steps and understanding the purpose behind each one, you’ll achieve stunning results. Pay close attention to the temperatures and mixing techniques – they are key to preventing cracks!
- Prepare Your Workspace: Begin by preheating your oven to 350 degrees F (175 degrees C). This ensures a consistent temperature from the moment the cheesecake goes in. Take your 9-inch springform pan and lightly grease the bottom and sides. Springform pans are ideal for cheesecakes as the ring can be easily removed without disturbing the delicate dessert.
- Build the Foundation: The Crust: In a medium bowl, combine the graham cracker crumbs, granulated sugar, and melted butter. Stir them together until the mixture resembles wet sand. This combination creates a flavorful and stable base for our creamy filling. Transfer the mixture to the prepared springform pan and use the bottom of a glass or a flat measuring cup to press it firmly and evenly onto the bottom. A compact crust is essential so it doesn’t crumble when sliced. Bake this crust for just 8 to 10 minutes – this slight bake helps set it and adds another layer of flavor. While it bakes, gather your supplies for the water bath technique.
- Prepare the Water Bath Superhero: While the crust cools slightly, prepare your springform pan for its water bath. This is one of the MOST crucial steps for preventing cracks. The water bath provides gentle, even heat and creates a humid environment in the oven, which helps the cheesecake bake slowly and evenly, preventing the edges from setting too quickly and pulling away from the center. Wrap the outside of your springform pan securely with several layers of heavy-duty aluminum foil. Make sure it covers the bottom and extends well up the sides, creating a watertight barrier. Any small gap can lead to a leaky crust and a soggy cheesecake, so be thorough!
- Mixing the Velvety Filling (Carefully!): In a large bowl, use an electric mixer to beat the softened cream cheese with the sugar and flour until the mixture is completely smooth and wonderfully creamy. Make sure there are no lumps of cream cheese left! Mix in the vanilla extract. Now comes the delicate part: add the large, room-temperature eggs one at a time, beating on LOW speed just until each egg is combined before adding the next. Do not overmix! Overmixing at this stage incorporates too much air into the batter, and as the cheesecake bakes and cools, this air expands and contracts, which is a major cause of cracks. Finally, gently stir in the sour cream or heavy cream until it’s just incorporated. Again, resist the urge to beat vigorously.
- Assemble the Layers: Carefully pour the smooth cheesecake filling over the cooled, pre-baked crust in your foil-wrapped springform pan. Use a spatula to gently spread the top evenly. Avoid tapping the pan on the counter, as this can bring hidden air bubbles to the surface, potentially causing issues later.
- Into the Water Bath They Go: Place the foil-wrapped springform pan inside a larger roasting pan. This outer pan will hold the hot water. Carefully pour hot (not boiling, but hot tap water is fine) water into the larger roasting pan until it comes about halfway up the sides of the springform pan. This creates your essential water bath. Be careful not to splash any water into the cheesecake filling.
- Baking Low and Slow: Carefully transfer the roasting pan with the cheesecake and water bath into your preheated oven. Bake for 60 to 75 minutes. The cheesecake is ready when the edges appear set and slightly puffed, but the center is still slightly jiggly when you gently shake the pan. It should resemble firm jello in the center. Don’t wait until the center is completely firm – it will continue to cook as it cools.
- The Crucial Slow Cool-Down: This is the second secret weapon against cracks. Turn off the oven, but leave the cheesecake inside. Prop the oven door open slightly (a wooden spoon works well). Let the cheesecake cool slowly inside the cooling oven for about 1 hour. This gradual decrease in temperature prevents the rapid contraction that can cause cracks. Resist the urge to peek or remove it early!
- Finishing the Chill: After the hour in the oven, carefully remove the roasting pan from the oven and lift the springform pan out of the water bath. Remove the foil wrapping from the springform pan (be careful, there might be some condensation). Let the cheesecake cool completely on a wire rack at room temperature. Once it’s reached room temperature, transfer it to the refrigerator to chill for at least 4 hours, or preferably overnight. This chilling time is vital for the cheesecake to fully set and develop its firm, creamy texture. Only remove the springform pan ring just before you’re ready to serve, once it’s fully chilled.
- Whipping Up the Warm Apple Topping: While the cheesecake chills, you can prepare the toppings. To make the apple topping, melt the unsalted butter in a skillet over medium heat. Add the sliced apples, brown sugar, and ground cinnamon. Cook, stirring occasionally, until the apples are tender and slightly caramelized, which should take about 10 to 15 minutes. Add the water or apple cider and simmer for a few more minutes until the sauce thickens slightly. Keep warm or reheat gently before serving.
- Creating the Silky Caramel Sauce: For the caramel sauce, combine the granulated sugar and water in a small heavy-bottomed saucepan over medium heat. Stir initially until the sugar dissolves, then stop stirring. Allow the sugar syrup to bubble and cook undisturbed until it turns a rich amber color. This typically takes about 8 to 10 minutes. Watch it carefully, as caramel can burn quickly! As soon as it reaches the desired color, carefully remove the pan from the heat. Stand back and slowly pour in the heavy cream, then add the butter and vanilla extract. The mixture will bubble up vigorously – this is normal! Whisk gently until the sauce is smooth and all the butter is incorporated. Be patient, it will come together.
- Serving Your Masterpiece: Once the cheesecake is fully chilled and set, run a knife around the edge before releasing the springform ring. Slice the chilled cheesecake with a sharp knife, wiping the knife clean between slices for the cleanest cuts. Top each slice generously with the warm apple topping and drizzle with the luscious caramel sauce. Simply divine!
Tips for Perfect Cheesecake Every Time
Baking a flawless cheesecake is achievable, especially with these extra tips:
- Room Temperature is Your Friend: Ensure your cream cheese, eggs, and any dairy (like sour cream or heavy cream) are at room temperature. This allows them to cream together smoothly without lumps and helps prevent overmixing.
- Don’t Overmix: Seriously, I can’t stress this enough! Beat just until combined, especially after adding the eggs. Excess air leads to cracked tops.
- Use the Water Bath: This is your best defense against cracking and also contributes to a wonderfully creamy texture. Make sure your foil wrap is secure!
- Cool Down Gradually: The slow cooling period in the turned-off oven is just as important as the water bath. Resist the urge to take it out early.
- Chill Time is Mandatory: The cheesecake needs ample time in the refrigerator to set properly. Don’t rush this step. Overnight is best.
- Clean Slices: Use a sharp knife dipped in hot water and wiped dry between each slice for clean, professional-looking portions.
- Vary Your Toppings: While apple and caramel are fantastic, feel free to experiment! Fresh berries, chocolate ganache, or a simple fruit coulis are wonderful alternatives.
What to Serve With Your Perfect Cheesecake
A truly perfect cheesecake is a showstopper all on its own, but pairing it with the right accompaniments can make the experience even more delightful. The warm apple topping and rich caramel sauce included in this recipe are a match made in heaven, adding layers of flavor and texture.
Beyond the provided toppings, a scoop of high-quality vanilla bean ice cream alongside a slice adds a lovely temperature contrast. A simple dollop of fresh whipped cream is always a classic and elegant choice. For something a little different, consider a berry coulis made from fresh or frozen mixed berries simmered with a little sugar and lemon juice, then strained. It adds a bright, tangy counterpoint to the richness of the cheesecake.
If you’re hosting a dessert spread, this cheesecake pairs wonderfully with other treats. Imagine serving it alongside Simple Sugar Cookie Bars or Chewy Chocolate Caramel Cookie Bars for a variety of textures and flavors. And for the ultimate indulgence, why not feature it with Mini Cheesecakes featuring different flavors? The possibilities are endless!
Your Perfect Cheesecake Questions Answered (FAQ)
Even with a reliable recipe and method, sometimes questions pop up. Here are some answers to common cheesecake queries:
Why did my cheesecake still crack?
Cracking is usually caused by sudden temperature changes or overmixing. Ensure all ingredients are at room temperature, mix just until combined, use the water bath, and allow the cheesecake to cool slowly in the oven with the door propped open. Sometimes minor cracks can still happen, but these steps significantly reduce the risk of major ones.
Can I use a different type of crust?
Absolutely! While graham cracker is classic, you can use crushed shortbread cookies, chocolate cookies, or even gingersnaps for a different flavor profile. Just follow the same ratio of 1 ½ cups crumbs to ¼ cup sugar and ½ cup melted butter.
Is the water bath really necessary?
For a smooth, crack-free top and a perfectly creamy texture, yes, the water bath is highly recommended. It creates a humid, even baking environment that helps the cheesecake cook gently from the edges to the center. Skipping it can lead to a dry, cracked top and potentially a less creamy result.
How long does cheesecake last?
Properly stored in the refrigerator, cheesecake will last for about 3-5 days. Keep it covered loosely with plastic wrap or in an airtight container.
Can I freeze cheesecake?
Yes! Cheesecake freezes beautifully. Cool it completely, then wrap the entire cheesecake (or individual slices) tightly in plastic wrap, followed by a layer of aluminum foil. It can be frozen for 1-2 months. Thaw it slowly in the refrigerator overnight.
I don’t have a springform pan. Can I use a different pan?
A standard cake pan can be used, but removing the cheesecake will be tricky. You’d need to grease and flour it very well, or line it with parchment paper, leaving overhangs to lift it out. The water bath method is also more challenging with a standard pan, as water can leak over the top edge more easily. A springform pan is definitely the best tool for the job.
Can I make the apple topping or caramel sauce ahead of time?
Yes, both toppings can be made a day or two in advance. Store them covered in the refrigerator. Gently reheat the apple topping and caramel sauce on the stovetop or in the microwave before serving.
Enjoy Your Homemade Perfect Cheesecake!
There’s nothing quite like the feeling of slicing into a perfectly smooth, creamy cheesecake that you made yourself. This recipe, with its focus on simple yet effective techniques, is designed to give you that feeling every single time. The combination of the rich, tangy cheesecake with warm cinnamon apples and buttery caramel is simply divine. It’s the perfect dessert for celebrations, holidays, or just because you deserve something wonderful.
Give this perfect cheesecake recipe a try and wave goodbye to cracks! We’d love to hear how it turns out. Leave a comment below and let us know what you think, or share your own favorite cheesecake tips!
Perfect Cheesecake

Ingredients
- For the Crust:
- 1 and 1/2 cups graham cracker crumbs
- 1/4 cup granulated sugar
- 1/2 cup melted unsalted butter
- For the Filling:
- 3 packages (8 ounces each) cream cheese softened
- 1 and 1/4 cups granulated sugar
- 1 tablespoon all purpose flour
- 1 teaspoon vanilla extract
- 4 large eggs at room temperature
- 1/2 cup sour cream or heavy cream
- For the Apple Topping:
- 3 medium apples peeled cored and sliced
- 2 tablespoons unsalted butter
- 1/4 cup brown sugar
- 1 teaspoon ground cinnamon
- 2 tablespoons water or apple cider
- For the Caramel Sauce:
- 1 cup granulated sugar
- 1/4 cup water
- 1/2 cup heavy cream
- 2 tablespoons unsalted butter
- 1/2 teaspoon vanilla extract
Directions
- Preheat oven to 350 degrees F (175 degrees C). Grease a 9 inch springform pan.
- For the crust combine graham cracker crumbs sugar and melted butter in a bowl. Press firmly onto the bottom of the prepared springform pan. Bake for 8 to 10 minutes then let cool.
- While the crust cools prepare the springform pan for a water bath. Wrap the outside of the springform pan securely with several layers of heavy-duty aluminum foil making sure to cover the bottom and sides completely to prevent water from leaking in.
- For the filling beat the softened cream cheese with sugar and flour until smooth and creamy. Mix in the vanilla extract. Add the eggs one at a time beating on low speed just until combined after each addition. Do not overmix. Gently stir in the sour cream or heavy cream until just incorporated. Overmixing adds air which can cause cracks.
- Pour the filling over the cooled crust in the foil-wrapped springform pan.
- Place the foil-wrapped springform pan inside a larger roasting pan. Carefully pour hot water into the larger pan until it comes about halfway up the sides of the springform pan. This water bath is the key to preventing cracks as it provides even moisture and gentle heat.
- Bake for 60 to 75 minutes or until the edges are set but the center is still slightly jiggly.
- Turn off the oven but leave the cheesecake inside with the oven door propped open slightly for about 1 hour. This allows the cheesecake to cool slowly preventing sudden temperature changes that cause cracks.
- Carefully remove the cheesecake from the water bath and the roasting pan. Remove the foil wrapping. Let cool completely on a wire rack then refrigerate for at least 4 hours or preferably overnight before removing the pan ring.
- For the apple topping melt butter in a skillet over medium heat. Add apple slices brown sugar and cinnamon. Cook stirring occasionally until apples are tender and caramelized about 10 to 15 minutes. Add water or cider and simmer for a few minutes until slightly thickened.
- For the caramel sauce combine sugar and water in a saucepan over medium heat. Stir until sugar dissolves then stop stirring. Cook until the syrup turns a rich amber color about 8 to 10 minutes. Carefully remove from heat. Stir in the heavy cream butter and vanilla extract until smooth. Be cautious as the mixture will bubble up.
- To serve top chilled cheesecake slices with warm apple topping and drizzle generously with caramel sauce.